The Ultimate Low Slow Pulled Pork Oven Method for Perfect Bark and Flavour
- Why Low-and-Slow Cooking is the Key to Exceptional Pulled Pork
- The Oven Advantage: Ensuring Professional Bark and Flavour Indoors
- Sourcing the Foundation: Meat Selection and Preparation
- The Essential Arsenal: Rub Ingredients and Cooking Tools
- Phase One: Setting the Bark and Initial Temperature Blast
- Phase Two: The Long Haul to Melting Tenderness
- The Final Steps: Resting, Pulling, and Juiciness Retention
- Planning Your Feast: Servings, Storage, and Reheating
- Elevating the Meal: Creative Pairing and Flavour Variations
- Recipe FAQs
- 📝 Recipe Card
Why Low-and-Slow Cooking is the Key to Exceptional Pulled Pork
The hallmark of truly exceptional Pulled Pork is its meltingly tender texture, and this is entirely dependent upon the "low-and-slow" cooking method. Unlike fast roasting, which would leave tough cuts like the pork shoulder dry and fibrous, this method demands patience over speed.
The structure of the pork shoulder contains high levels of connective tissue, primarily collagen. To transform this tough tissue into succulent, moisture retaining gelatin, the meat must be held at a moderate temperature for an extended period often 8 to 12 hours.
This long cooking duration, typical of a well executed Slow cooked Pulled Pork Recipe , allows the internal fats to slowly render and baste the meat from the inside out, while the low heat ensures the muscle fibres remain relaxed.
This is why attempting to rush the pulled pork recipe is the greatest mistake; time is the critical ingredient.
The Oven Advantage: Ensuring Professional Bark and Flavour Indoors
While smoking provides unparalleled flavour, the modern oven paired with a heavy Dutch oven offers superior temperature control and consistency, making it an ideal choice for the home cook seeking reliable results.
By mastering the oven method, you can achieve the desired exterior crust (the "bark") without the need for specialised smoking equipment.
Understanding the Science of Collagen Breakdown
For a pork shoulder to become truly shreddable, the internal temperature must surpass the threshold required to fully dissolve the collagen. This process occurs reliably once the meat reaches an internal temperature range of 90° C to 95° C ( 195° F to 205° F).
Below this range, even if the meat appears cooked, the connective tissue remains intact, resulting in a chewy, resistant final product. The slow, gentle heat of the oven allows the meat to remain moist as it climbs toward this critical temperature, ensuring every fibre is gelatinized.
The Core Difference Between Roasting and Smoking
Traditional high heat roasting relies on surface browning and quick cooking, aiming for medium rare or medium doneness. Low-and-slow cooking, however, pushes the meat well past typical 'doneness' levels specifically to break down the tough structure, transforming the cut entirely.
On top of that,, the tightly sealed Dutch oven environment facilitates an internal braise using a mix of apple cider vinegar and stock. This slight acidity and steam introduction helps accelerate tenderisation during the final hours, differentiating it significantly from a dry roast.
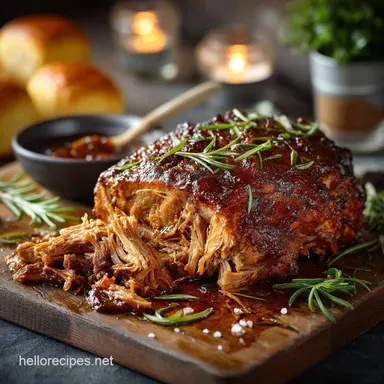
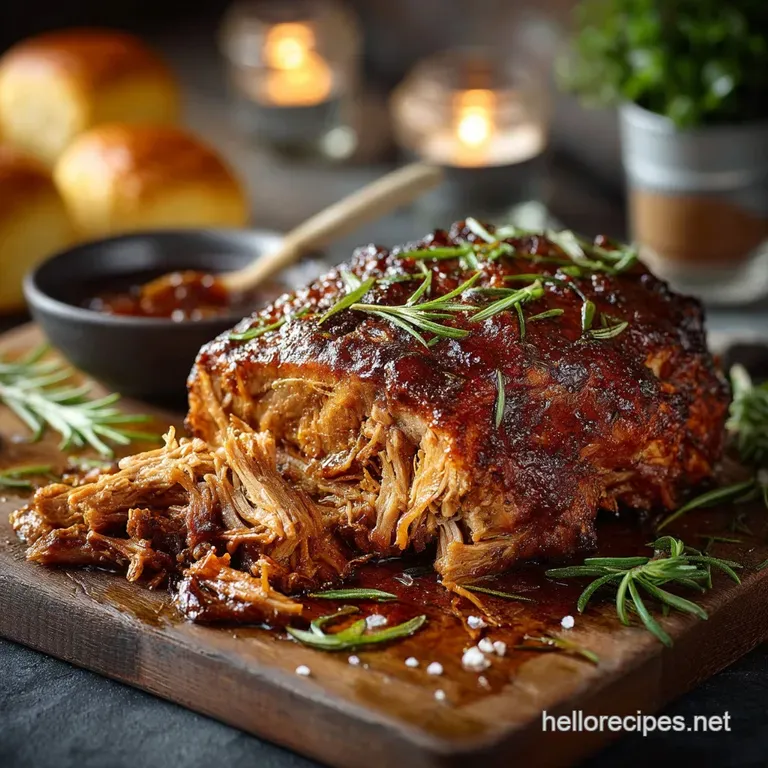
Defining the Perfect 'Bark': Texture, Spice, and Moisture
The 'bark' is the dark, flavourful, slightly crisp exterior crust that gives traditional BBQ its texture and depth. It is formed by the Maillard reaction the non-enzymatic browning of amino acids and sugars and requires direct, dry heat initially.
Our smoky herb rub, rich in brown sugar and smoked paprika, provides the necessary components. Setting the oven to 135° C ( 275° F) and keeping the lid off initially (or searing the fat cap) allows the rub to set firmly before the braising liquids introduce steam, ensuring the meat maintains a robust and flavourful crust that holds up when served in a pulled pork sandwich .
Sourcing the Foundation: Meat Selection and Preparation
Selecting the right cut is non-negotiable for achieving perfect Pulled Pork . The pork shoulder, often weighing around 2 kg (4.5 lbs), provides the necessary fat and connective tissue.
We strongly recommend choosing a bone-in cut, as the bone itself conducts heat and helps maintain moisture levels throughout the exceptionally long cook time. The two common options are the Boston Butt (from the upper shoulder), which is fattier and typically squarer, or the Picnic Roast (from the lower shoulder), which is leaner and sometimes includes the skin.
For maximum marbling and ease of shredding, the Boston Butt is generally preferred.
The Essential Arsenal: Rub Ingredients and Cooking Tools
The success of this pulled pork recipe hinges on the quality of your preparation and the tools you employ. Forget shortcuts the right dry rub and proper vessel are non-negotiable.
Pork Shoulder Showdown: Boston Butt vs. Picnic Roast
As noted, the Boston Butt offers superior marbling, which contributes significantly to the final succulence. Ensure the joint is thoroughly patted dry before applying the rub; moisture is the enemy of bark formation at this stage.
Crafting Your Signature Smoky Herb Rub Blend
Our specific blend moves beyond simple salt and pepper, creating a powerhouse of flavour. It relies on packing 1/4 cup of dark brown sugar for deep caramelisation, balanced by 2 tablespoons of smoky paprika, a generous measure of coarse salt and black pepper, and aromatics like garlic and onion powder.
A small amount of dried mustard powder and optional cayenne pepper adds complexity and heat. This careful blend is what prevents the dish from resembling a bland 2 Ingredient Pulled Pork preparation, elevating it to true BBQ status.
The Dutch Oven Difference: Selecting Your Roasting Vessel
For an oven based BBQ Pulled Pork Slow Cooker style result, a sturdy, 6 8 quart cast iron Dutch Oven is the ideal choice. Cast iron distributes heat evenly, preventing scorching, and the heavy, tight fitting lid keeps the moisture and steam locked in for the braise phase.
If a Dutch oven is unavailable, a deep baking dish covered tightly with multiple layers of heavy duty foil can suffice, but vigilance against moisture loss is necessary.
Pre-Cook Preparation: Scoring and Trimming the Fat Cap
Before applying the rub, locate the thickest part of the fat cap. Use a sharp knife to score this fat in a diamond pattern, spacing the cuts about 2 cm apart. Crucially, do not cut into the meat itself; only penetrate the fat layer.
This technique increases the surface area, allowing your rub to penetrate deeper, ensuring even seasoning, and facilitating the rendering process during the cook.
Related Recipes Worth Trying
- Ultimate Cuban Mojo Marinated Pork Recipe Slow Roasted Magic — Forget bland roasts This Cuban Mojo Marinated Pork recipe delivers unbelievably tender zesty meat using a traditional citrusgarlic marinade Perfect for a...
- Easy Brown Sugar Balsamic Pork Tenderloin Recipe Weeknight Win — This Brown Sugar Balsamic Pork Tenderloin recipe creates a sticky flavourful glaze that elevates any dinner A truly easy pork tenderloin dinner staple Get...
- The Ultimate Cuban Roasted Mojo Pork Recipe Lechón Asado — Forget dry roasts This Cuban Mojo Roast Pork recipe yields incredibly tender meat thanks to a long marinade and slow cooking Get the secret to that bright...
Phase One: Setting the Bark and Initial Temperature Blast
This phase is dedicated to building the foundation of flavour. Once the fat cap has been scored, combine all dry rub ingredients and generously massage the mixture into every surface of the pork shoulder, pressing firmly.
For maximum flavour penetration and bark adherence, place the fully rubbed pork, uncovered, on a baking tray in the refrigerator for at least one hour, or ideally overnight (up to 12 hours). Next, preheat the oven to 135° C ( 275° F).
If you opt for an initial sear, heat your Dutch oven over medium high heat and sear the fat cap side for 5– 7 minutes until deeply caramelised. This step adds complexity and guarantees bark, even in Easy Slow Cooker Pulled Pork adaptations.
Phase Two: The Long Haul to Melting Tenderness
After the initial preparation, place quartered onions in the base of the Dutch oven to act as a natural rack, keeping the pork slightly elevated. Set the seared pork, fat cap side up, on the onions.
Add the braising liquid 1/2 cup of apple cider vinegar and 1 cup of stock around the meat, ensuring the liquid does not wash the rub off the sides. Cover the Dutch oven tightly and place it in the preheated oven.
The cooking time will be between 8 and 10 hours, possibly up to 12 hours for a large bone-in cut. The key is to maintain a stable, low temperature, allowing the moisture and heat to work their magic slowly.
The Final Steps: Resting, Pulling, and Juiciness Retention
The final stage ensures the texture is perfect and the flavour is maximised.
Monitoring Internal Temperature for Effortless Shredding
Do not rely on the clock; trust your digital, instant read thermometer. Monitor the pulled pork temp closely. When the thickest part of the meat (avoiding the bone) reaches the target range of 90° C to 95° C ( 195° F to 205° F), perform the "probe test." The thermometer should slide in with almost no resistance, feeling like it’s piercing softened butter.
If you feel resistance, the collagen is not fully dissolved, and the meat requires more time.
Wrapping or Covering: When to Introduce Moisture
Because we are using a sealed Dutch oven, we are essentially controlling the moisture via the lid. This sealed environment achieves a similar effect to wrapping the meat tightly in foil (the "Texas Crutch"), helping to push through the notorious "stall" (when the temperature plateaus around 70° C).
If you are using a standard roasting tray, ensure it is wrapped absolutely airtight with foil once the liquid is added to prevent excessive moisture loss. If using a pulled pork crock pot , the lid remains sealed for the entire duration.
The Importance of a Long, Sealed Rest
Once the meat hits temperature, remove the Dutch oven from the oven. Leave the lid on and allow the pork to rest for a mandatory minimum of 45 minutes. This is perhaps the most critical step to guarantee juiciness.
During this rest, the internal temperature continues to cook slightly while the muscle fibres relax and reabsorb the rendered, gelatinized juices that have migrated to the surface. Skipping this step leads directly to dry Pulled Pork .
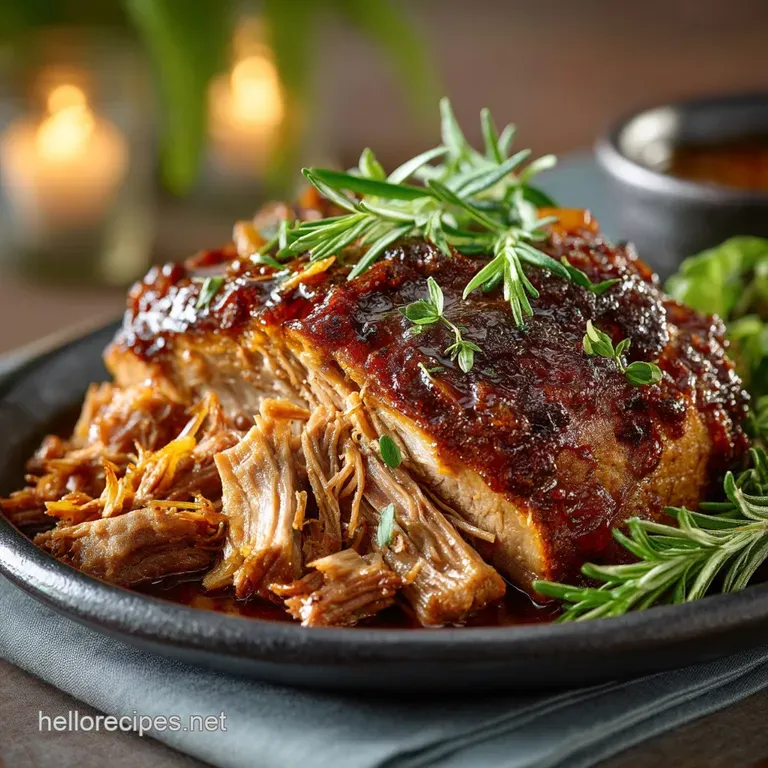
Expert Technique for Perfectly Shredded Pulled Pork
Transfer the rested pork to a large cutting board. The bone should lift out cleanly. Use shredding claws or two sturdy forks to pull the meat apart into beautiful strands. Skim the large quantities of rendered fat from the remaining cooking liquid (the jus) in the Dutch oven, and toss the shredded pork with about 1/2 cup (120 ml) of this highly concentrated liquid.
This step adds back natural flavour and moisture before the addition of any thick sauce, ensuring every strand is deeply seasoned. Finish by tossing with your favourite BBQ sauce just before serving.
Planning Your Feast: Servings, Storage, and Reheating
This Easy Pulled Pork Recipes method is perfect for feeding a crowd, but planning ahead is key to managing leftovers.
Calculating Portions: How Much Pulled Pork Per Person?
When calculating serving size, remember that the pork shoulder loses a significant amount of volume during the rendering and cooking process. Plan on approximately 150g to 200g (5 7 ounces) of cooked meat per adult serving.
Our 2 kg raw shoulder, once cooked and shredded, comfortably yields 10 to 12 hearty servings.
Freezing and Reheating Strategies for Next Day Quality
Pulled Pork freezes exceptionally well. For best results, package the shredded meat in vacuum sealed bags or airtight containers, ensuring you include a small amount of the cooking jus or the final BBQ sauce. This crucial moisture buffer prevents freezer burn and drying.
Thaw overnight in the refrigerator and reheat gently in a covered dish in a 150° C ( 300° F) oven, adding a splash of stock or vinegar if needed, until piping hot.
Beyond the Bun: Creative Ways to Serve Leftover Pulled Pork
While the classic pulled pork sandwich on a toasted brioche bun with tangy coleslaw is supreme, leftovers are incredibly versatile. Transform them into loaded nachos, mix them into creamy mac and cheese, use them as a filling for quick tacos or quesadillas, or create a smoky pulled pork hash for breakfast.
Elevating the Meal: Creative Pairing and Flavour Variations
The neutral base provided by a slow cooked pork shoulder allows for endless flavour customisation, making this the foundation of many Easy Pulled Pork Recipes .
Switching Styles: From Traditional BBQ to Carolina Vinegar
Our standard Pulled Pork recipe leans toward a sweet and smoky profile (often associated with Kansas City style). For a dramatic regional shift, try the clean, sharp profile of North Carolina BBQ. Simply omit the addition of a thick BBQ sauce.
Instead, prepare a thin finishing sauce using equal parts apple cider vinegar and water, seasoned aggressively with salt, pepper, and cayenne. Toss the freshly shredded pork thoroughly in this tangy mixture; the vinegar cuts through the richness of the meat, creating a vibrant contrast perfect for a classic pulled pork sandwich .
Recipe FAQs
What’s the best cut for classic Pulled Pork, and should I go bone-in or boneless?
You’re looking for Pork Shoulder, which is typically sold as Boston Butt or Picnic Roast. The Boston Butt is generally preferred as it has a higher fat content, which keeps the meat incredibly moist during the long cooking process.
Go bone-in every time if you can manage it; the bone adds moisture, insulation, and a richness of flavour that truly is the dog's bollocks.
My pork has stopped cooking! What is 'the stall' and how do I fix it?
Don't panic, mate, 'the stall' is a completely normal part of low-and-slow cooking, usually hitting around 70°C (160°F) when evaporative cooling slows the temperature rise.
To push through it, you can slightly increase your oven temperature, or try the ‘Texas Crutch’: wrap the pork tightly in two layers of heavy duty foil. This traps the moisture and heat, ensuring the internal temperature climbs smoothly toward the finish line of 90°C+.
I want a really great "bark" that dark, flavourful crust. Any clever tricks to achieve it in the oven?
Getting that perfect, dark 'bark' is what separates the novices from the pros! Ensure you let your dry rub rest on the meat, uncovered, in the fridge overnight to fully dry out the surface. Cook the pork fat-side up, and crucially, remove the Dutch oven lid for the final 60 to 90 minutes of cooking.
This allows the surface moisture to evaporate and the spices to caramelise beautifully, giving you that authentic, dark crust.
I've made loads of it! How long will this brilliant pulled pork keep, and what’s the best way to reheat it?
Cooked pulled pork is ace for feeding a crowd and excellent for meal prep. Store it in an airtight container in the fridge for 3 to 4 days. For longer keeping, freeze it in small, usable portions with a little splash of the reserved cooking liquid (jus) added it will keep perfectly for up to 3 months.
To reheat, thaw overnight, and gently warm it covered in the oven or in a pan with a tablespoon of stock, preventing it from drying out.
This recipe sounds delicious, but can I cut down on the fat or make a less sweet BBQ sauce option?
Absolutely, the beauty of this dish is its versatility. To reduce the overall fat content, thoroughly skim the solidified fat layer off the cooking juices before tossing it with the shredded meat, and discard any large, hard fat chunks before serving.
If you want a less sweet finish, skip the commercial BBQ sauce entirely and opt for the sharp, vinegary North Carolina style dressing instead it offers a brilliant, tart counterpoint to the rich, slow cooked pork.
Oven Pulled Pork Recipe With Perfect Smoky Bark