The Perfect Crumb Classic British Scones the Foundation Recipe
- Why This Classic Scone Recipe Redefines Afternoon Tea Excellence
- The Quest for the Fluffy Interior: Understanding Scone Science
- The Essential Components for Unforgettable Scones
- Tool Checklist: What You Need Before You Begin Your Scone Recipe
- Step-by-Step: Crafting the Perfect Scone Dough
- Achieving Maximum Rise: Shaping, Cutting, and Baking Techniques
- Troubleshooting Common Scone Setbacks
- Recipe FAQs
- 📝 Recipe Card
Why This Classic Scone Recipe Redefines Afternoon Tea Excellence
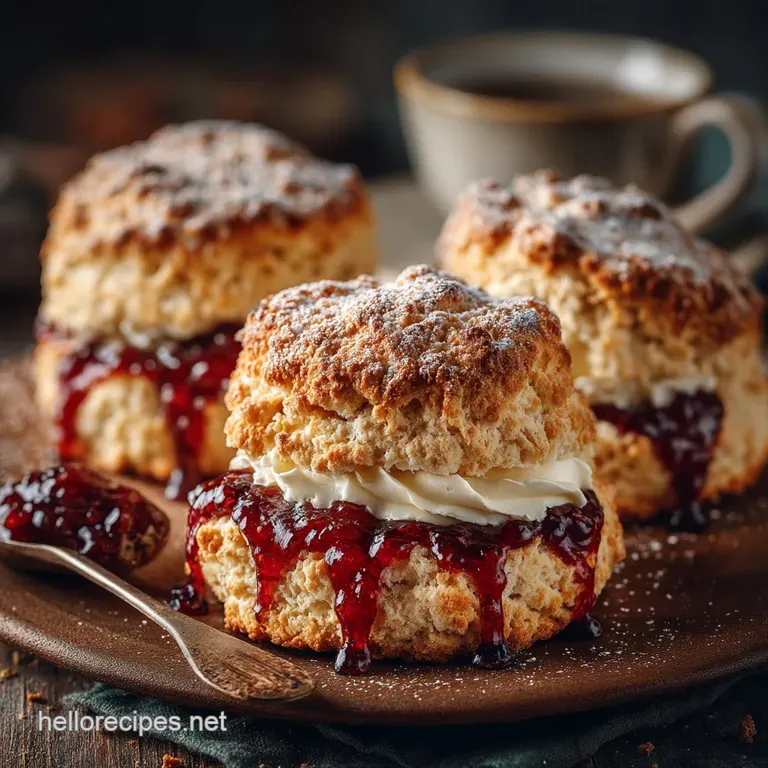
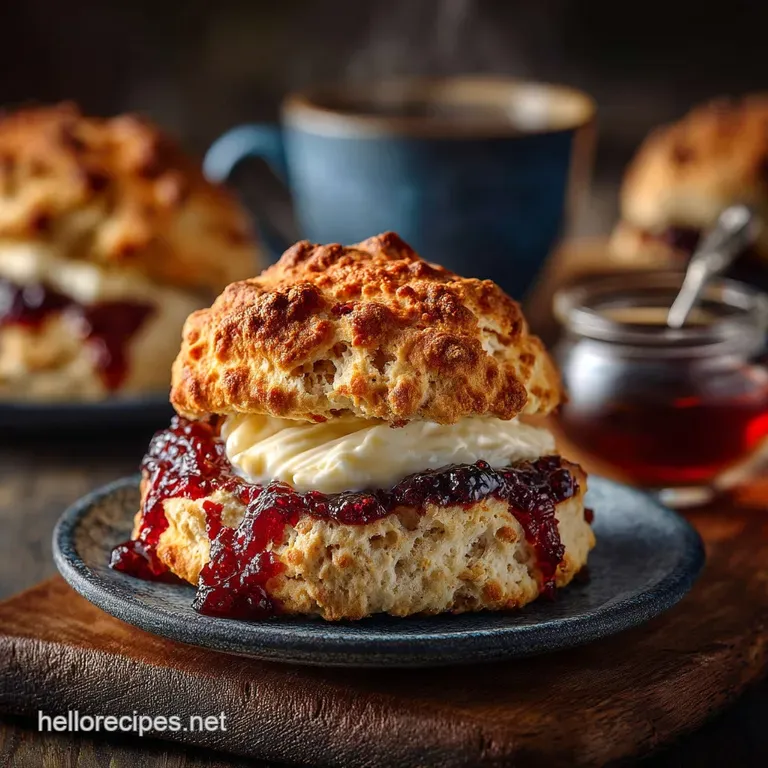
There is a profound difference between a shop bought, dry, and disappointing baked good and a truly magnificent, freshly baked scone. The latter is the centerpiece of any civilized afternoon tea, possessing a delicate crust that yields instantly to a fluffy, tender interior.
Achieving this textural masterpiece is often seen as the mark of a seasoned baker, but I am here to assure you that mastering the art of the Scone Recipe is well within everyone’s grasp.
Forget everything you thought you knew about dense baking; this foundational recipe strips away the complexity, focusing instead on fundamental, scientific principles to deliver Light and Crumbly Scones every single time.
This isn't just a recipe; it’s an education in textural perfection, setting the standard for what a proper Breakfast Scones offering should be.
The Quest for the Fluffy Interior: Understanding Scone Science
The secret to achieving that ethereal lift and tender crumb lies not in complex additions, but in the careful management of three key factors: temperature, fat integration, and minimal manipulation. When butter melts slowly in the oven, it releases steam, creating pockets of air that expand dramatically.
If the butter is warm or overly mixed, it incorporates too smoothly into the flour, resulting in a dense, heavy bake that stubbornly resists fluffiness. Our goal is to keep everything as cold as possible until the moment it enters the heat.
Elevating the Humble Bake: Our Signature Approach
While many recipes call for using cream straight from the fridge, our signature approach ensures that every component from the flour to the liquid is thoroughly chilled. This meticulous temperature control is the cornerstone of this Best Scone Recipe .
We are aiming for texture first and foremost. When you follow these steps, you’ll find that the final product has a slight, satisfying crack when you break it open, revealing that beautifully soft, layered interior that is just begging for clotted cream.
Dispelling Myths: What Makes a Truly Authentic British Scone?
A common misconception, especially outside of the UK, is that scones should be sweet enough to rival a cupcake. Authentic British scones are intentionally quite plain, allowing the accompanying preserves and cream to provide the sweetness. They rely heavily on good quality raising agents and cold fats.
We use a generous amount of baking powder (a full tablespoon for two cups of flour) to guarantee a phenomenal rise, ensuring they are perfect for splitting and lavishly topping.
A Quick Glimpse at the Final Product
The resulting bake from this process yields about eight perfectly proportioned rounds. They bake quickly in just 12 to 15 minutes at a high temperature of 425° F ( 220° C) developing a gorgeously golden crust while remaining pale and soft on the sides where they gently kissed their neighbours in the oven tray.
This foundational recipe is so reliable, it serves as the perfect platform for exciting variations like Scone Recipe Blueberry or richer options like Scone Recipe Chocolate Chip .
The Essential Components for Unforgettable Scones
To create truly memorable Scone Recipe Easy results, you must be selective about your core ingredients. For this recipe, we rely on a simple, classic lineup: all-purpose flour for structure, fine sugar for a touch of balance, fresh baking powder for lift, fine salt to enhance the flavour of the butter, very cold unsalted butter, and the chosen liquid dairy.
The beauty of this simple structure means you can easily pivot to variations like a Scone Recipe Buttermilk rendition if you prefer a slight tang.
Related Recipes Worth Trying
- Ultimate Cuban Mojo Marinated Pork Recipe Slow Roasted Magic — Forget bland roasts This Cuban Mojo Marinated Pork recipe delivers unbelievably tender zesty meat using a traditional citrusgarlic marinade Perfect for a...
- Foolproof New York Cheesecake Cupcakes Recipe — Get that dense tangy New York cheesecake flavour in perfect cupcake form This cheesecake cupcakes recipe uses a water bath for a guaranteed smooth finish
- The Best Homemade Tomato Soup Recipe from Scratch Roasting Tomatoes — Forget the can This fresh tomato soup recipe uses roasted vegetables for deep smoky flavour Perfect paired with your favourite grilled cheese Get the recipe
Tool Checklist: What You Need Before You Begin Your Scone Recipe
Before we start mixing, ensure your equipment is ready. You’ll need a large mixing bowl, a whisk for the dry ingredients, and crucially, a pastry blender or two sturdy knives these are essential for cutting the fat into the flour without melting it with your hands.
A 2.5 inch round cutter is the standard size for traditional afternoon tea scones. Don't forget parchment paper to line your baking sheet, which guarantees easy cleanup and prevents sticking, and a small pastry brush for the final egg wash.
Mastering the Ratio: Flour, Fat, and Liquid Breakdown
The magic number here is the ratio of fat to flour. We use a standard ratio designed to ensure you have enough fat pockets to create steam, yet not so much that the dough becomes greasy. For 250g of flour, the 85g of cold butter strikes that perfect balance.
If you use too little fat, you miss the tenderness; too much, and the scones spread rather than rise vertically.
The Crucial Role of Cold Butter (And Why Temperature Matters)
I cannot stress this enough: the butter must be very cold, cut into small, roughly pea-sized cubes. This is the single most important variable in achieving the desired texture. When these cold pieces hit the oven’s heat, they liquefy rapidly, releasing steam that pushes the layers of dough apart, creating those desirable, light fissures.
Warm butter simply blends into the flour, coating the starch grains and inhibiting the lift.
Selecting Your Dairy: Buttermilk vs. Whole Milk Considerations
For our base Scone Recipe , we recommend very cold whole milk. It provides enough richness without overwhelming the bake. However, if you substitute this with Scone Recipe Buttermilk , the slight acidity reacts beautifully with the baking powder, often leading to an even higher rise and a subtly tangier flavour profile that pairs wonderfully with fruit additions like in Raspberry Scones .
Step-by-step: Crafting the Perfect Scone Dough
Our process begins with whisking the dry ingredients flour, sugar, baking powder, and salt in a large bowl until they are uniformly dispersed. This aeration step is crucial as it helps distribute the leavening agent evenly. Next comes the critical integration of the cold butter.
Achieving Maximum Rise: Shaping, Cutting, and Baking Techniques
The handling of the dough after the liquid is added dictates the final texture. Gentle hands are your best tool here. We want to combine the dough just until it stops looking shaggy; any further mixing develops gluten, which equals toughness.
The Gentle Hand: Cutting the Fat Into the Dry Mix
Using a pastry blender or your fingertips (working swiftly so as not to transfer warmth), cut the cold butter into the dry mix. Stop when the mixture resembles coarse breadcrumbs, ensuring there are still some visible, small, almond sized pieces of butter remaining. These are your steam pockets waiting to happen.
Minimizing Handling: Bringing the Dough Together Swiftly
Create a well in the centre of your dry ingredients and pour in most of your cold milk, reserving a tablespoon just in case. Use a fork to draw the ingredients together. Once a shaggy mass forms, turn it out onto a lightly floured surface.
Pat it gently, or perform only 3 to 4 light kneads just enough to bring it into a cohesive, soft disc. Overworking is the enemy of the light scone.
The Secret to Vertical Lift: Proper Dough Thickness and Washing
Pat or roll the dough gently to about 3/4 inch thickness thicker scones rise taller. Dip your floured cutter straight down and pull straight up; do not twist the cutter, as this seals the edges and stops the upward expansion. For a gorgeous finish, brush the tops lightly with a beaten egg wash.
This will give you that desirable, slightly shiny, golden crown.
Baking Timeline: Monitoring for That Golden Crust
Place the cut rounds on a parchment lined tray. If you prefer softer sides, place them close enough so they touch; for crispier edges, space them slightly apart. Slide them into the hot oven ( 425° F/ 220° C).
They bake quickly, usually in 12 to 15 minutes. Watch for them to puff up impressively and achieve that rich golden hue on top, signaling they are done.
Troubleshooting Common Scone Setbacks
Even with the best intentions, sometimes things go slightly awry. Knowing how to pivot is key to maintaining your baking confidence.
When Your Scones Turn Out Dense: Quick Fixes
If your scones are dense, the primary culprit is almost always overmixing or warm butter. If they are merely slightly heavy, try incorporating a more acidic liquid next time, such as using full Scone Recipe Buttermilk instead of regular milk.
If they spread out instead of rising up, your cutter was twisted during shaping, or your baking powder is old and inactive.
Storing and Reheating for Day-Two Delight
Scones are objectively best eaten the day they are made, warm from the oven. However, they store well in an airtight container at room temperature for up to two days. To revive them, wrap them loosely in foil and warm them in a 300° F ( 150° C) oven for about 8 minutes.
This steams them slightly, bringing back tenderness.
Cream Tea Etiquette: Jam First or Cream First?
Ah, the great debate! This is purely regional, but it’s a fun discussion point when serving Raspberry Scones or plain ones. In Devon, the cream goes on first, followed by jam. In Cornwall, it is jam first, topped with cream.
There is no objectively correct answer only personal preference and regional loyalty!
Flavor Twists: Incorporating Citrus Zest or Dried Fruit
This base is incredibly versatile. For a bright twist, adding the zest of one lemon to the dry ingredients transforms the flavour profile beautifully. If you’re aiming for a comforting flavour, folding in dried fruit like sultanas or raisins works perfectly.
For a richer treat, consider the indulgent Scone Recipe Chocolate Chip variation, replacing fruit entirely with good quality semi sweet morsels folded in during the final stage of mixing.
Recipe FAQs
Why are my scones coming out hard and flat instead of light and fluffy?
That’s the bane of every baker’s existence! The main culprit is usually warm butter or overworking the dough. Ensure your butter is ice cold and you only work it into the flour until it resembles coarse crumbs. Remember, treat your dough gently minimal handling is the key to that gorgeous rise.
What is the secret trick for getting scones to rise tall when I use this Scone Recipe?
It comes down to two things: coldness and cutting technique. Keep your ingredients super cold, and when you use your cutter, press straight down vertically don't twist the cutter!
Twisting seals the edges of the dough, which stops the heat from getting in and stops them from achieving that glorious 'lift' we're after.
Can I make the dough ahead of time? How should I store leftovers?
You can prepare the dough and chill it for up to 24 hours before baking, which can actually improve the texture! Just make sure it's wrapped well. Leftover baked scones are best eaten the same day, but if you must store them, keep them in an airtight container at room temperature for up to two days; reheat briefly in the oven to revive their texture.
Do I have to use buttermilk, or can I stick to regular milk for this Scone Recipe?
You can absolutely stick to the regular whole milk listed in the recipe for a classic result. However, if you have buttermilk on hand, it’s a brilliant substitution; the acidity reacts beautifully with the baking powder, often resulting in an even softer, slightly tangier crumb.
What's the proper way to serve these scones jam first or cream first?
Ah, the great traditional debate! In Devon, they do cream first, then jam (putting the foundations down first). In Cornwall, they famously do jam first, then a dollop of clotted cream on top.
There’s no official rule, so long as you enjoy them warm with a proper cuppa, you’re halfway to being a baking legend!
My kitchen is warm; should I chill the dough before I cut them out?
If your kitchen feels like the middle of July, definitely pop the flour and-butter mix into the fridge for about 15 minutes after cutting the butter in. This brief chill ensures the butter stays firm, which is crucial for that flaky texture when they hit the hot oven never skip the cold step!
Classic Crumb Scone Recipe

