The Perfect Piccadilly Scones Light Fluffy and Buttery

- Achieving Pinnacle Fluffiness: Introducing Your New Favourite Scones
- Why These Classic British Scones Redefine Tea Time
- Assembling the Essential Elements for Supreme Scones
- Stocking Your Pantry: Required Implements and Components
- The Step-by-Step Alchemy of Crafting Flawless Baked Goods
- Guiding Your Hands Through The Making Process
- Elevating Your Experience: Serving Suggestions and Storage Secrets
- Recipe FAQs
- 📝 Recipe Card
Achieving Pinnacle Fluffiness: Introducing Your New Favourite Scones
Welcome to the world of truly excellent baking, where we tackle a classic that often intimidates home cooks but shouldn't the humble, yet magnificent, scone. If your past attempts have resulted in dense discs or crumbly failures, prepare to have your perspective shifted.
Today, we are diving deep into the Basic Scone Recipe that transforms simple flour and butter into light-as-air treasures worthy of any tiered serving tray.
These are the Homemade Scones that will finally conquer the mystery surrounding achieving that perfect, soaring height and tender interior crumb. We are aiming squarely for the Best Scone Recipe on your culinary bookshelf.
Why These Classic British Scones Redefine Tea Time
There is a significant culinary distinction that must be addressed right away: the difference between Scones vs Biscuits . While American biscuits share a similar foundational technique (cutting fat into flour), British Scones Recipe variations typically involve a small amount of sugar and are historically intended to be slightly sweeter and often richer, designed specifically to accompany cream and jam.
These classic British versions are the backbone of every proper Afternoon Tea Scones service, demanding respect for their delicate structure.
The Secret to a Non-Negotiable Light Texture
The magic behind an exceptional scone isn't in a complicated ingredient list; it lies entirely in temperature control and minimal interference. Achieving that lift, that spectacular vertical rise, relies on creating tiny pockets of cold fat within the flour matrix.
When these cold pieces hit the hot oven, the trapped water instantly turns to steam, forcing the dough upwards before the gluten has a chance to set firmly. Keeping your butter near freezing and using ice-cold liquid are the primary non-negotiables in this process.
Setting the Stage for Afternoon Tea Perfection
To truly honour this bake, you need to approach it with the mindset of Traditional Scone Preparation . This isn't a quick mix-and-bake situation; it requires a brief chill period to ensure the ingredients are perfectly tempered before they enter the heat.
We are producing Light Scones Recipe standard, meaning every action, from cutting the butter to pressing the dough, must be executed with swiftness and gentle hands to preserve those precious air pockets.
Meet the Recipe: Nan’s Guiding Philosophy
The philosophy behind this recipe, affectionately inherited, is one of precision regarding coldness and brevity in handling. We aim for a tender crumb that yields delightfully when split open, ready to absorb the richness of clotted cream.
This recipe yields 8 generous servings, balancing rich buttery flavour with just enough sweetness to complement the required toppings. It’s an Easy Scone Preparation once you commit to the cold factor.
Assembling the Essential Elements for Supreme Scones
Before the mixing begins, a quick inventory is essential. Remember, every component plays a role in the final texture and rise. We rely on time tested ratios to ensure success, making this approachable even for those new to scratch baking.
Related Recipes Worth Trying
- The Best Homemade Scones Recipe Light Fluffy Easy — Tired of dry baked goods This easy homemade scones recipe guarantees tall tender tea scones perfect for jam and cream Get the foolproof technique now
- Savory Breakfast Cheddar Chive Scones Recipe — Fancy a scrumptious savoury breakfast These cheddar chive scones are easy cheesy and perfect for brunch Inspired by Mary Berry a true bakers delight Get the...
- Best Things to Bake Proper British Scones Recipe — Craving easy things to bake Make proper British Scones with clotted cream and jam This simple recipe is perfect for afternoon tea Get the tips
Stocking Your Pantry: Required Implements and Components
To begin, gather the core elements for this classic bake: 2 cups (250g) of levelled all-purpose flour, 2 tablespoons (25g) of granulated sugar for a subtle sweetness, 1 tablespoon (12g) of fresh baking powder freshness is key for maximum lift and ½ teaspoon (3g) of fine sea salt to balance the
Flavour profile.
The Cold Hard Facts: Keeping Ingredients Chilled
The critical component is the fat. You require ½ cup (113g) of cold, unsalted butter, cubed and straight from the refrigerator. This must remain cold until the moment it meets the flour.
Complementing this, you’ll need ¾ cup (180ml) of cold buttermilk; this acidity aids in a gentle, tender reaction with the baking powder, but whole milk with a teaspoon of lemon juice added will suffice in a pinch. Finally, for the wash, have one large egg beaten with 1 tablespoon of milk or cream ready.
Precision Measurements for the Best Rise
Baking is chemistry, and accurate measurement ensures we nail that perfect texture. When measuring the flour, avoid scooping directly from the bag, as this compacts it, resulting in denser scones. Instead, spoon the flour lightly into the measuring cup and level it off.
The careful ratio of dry ingredients to fat ensures the structure can support the steam lift without collapsing.
What Essential Kitchen Tools Make This Possible?
You will need a large mixing bowl to accommodate the 'rubbing in' process, and either a pastry blender or two knives to cut the butter effectively. Crucially, secure a 2 inch round cookie or biscuit cutter. This tool must be sharp and used with purpose.
A baking sheet lined with parchment paper is mandatory for easy cleanup and even heat distribution. For the final touch, a pastry brush ensures an even, golden egg wash.
The step-by-step Alchemy of Crafting Flawless Baked Goods
The process moves quickly once you start combining ingredients, so have everything measured and within reach. This entire process moves from dry components to shaped dough in under 20 minutes, followed by a vital chill period.
Guiding Your Hands Through The Making Process
We begin by combining the dry elements in the large bowl flour, sugar, baking powder, and salt whisking them thoroughly so the leavening agent is distributed evenly. This prevents any single scone from failing to rise due to a lack of baking powder.
The Critical Rubbing-In Technique
Next comes the butter. Add the cold, cubed butter to the dry mix. Your goal is to work the butter into the flour using your fingertips or a pastry blender until the mixture resembles coarse breadcrumbs, with some pieces no larger than small peas.
Speed is paramount here; you are aiming to coat the fat particles in flour while minimizing the transfer of body heat from your hands. These cold chunks are your guaranteed steam vents!
Handling the Dough: Minimizing Work for Maximum Lift
Create a well in the centre of your mixture and pour in all the cold buttermilk at once. Use a fork not your hands yet to gently pull the dry ingredients into the liquid until a shaggy, barely cohesive dough forms. Turn this mixture out onto a lightly floured surface.
Now, the final, gentle kneading: press the dough together lightly and fold it over on itself two or three times. This folding action creates the delicate layers characteristic of a high-quality scone. Resist the urge to knead it like bread; we want minimal gluten development.
From Cutter to Oven: Ensuring Ideal Baking Conditions
Pat the dough out evenly to about ¾-inch thickness. Take your sharp cutter and press it straight down through the dough. Do not twist the cutter ; twisting seals the edges and prevents the scone from achieving its magnificent height.
Place the rounds onto your lined baking sheet, leaving a slight space between them. For optimal performance, slide the cut scones into the freezer for 10 minutes while your oven preheats fully to 425° F ( 220° C).
Before baking, lightly brush the tops only avoiding the sides with your egg/milk wash for a glossy finish.
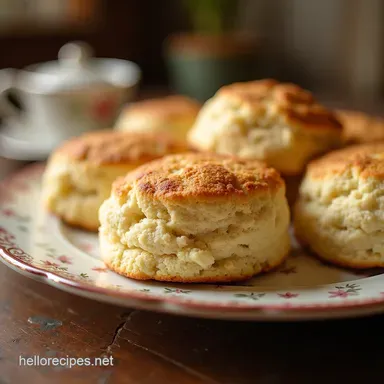
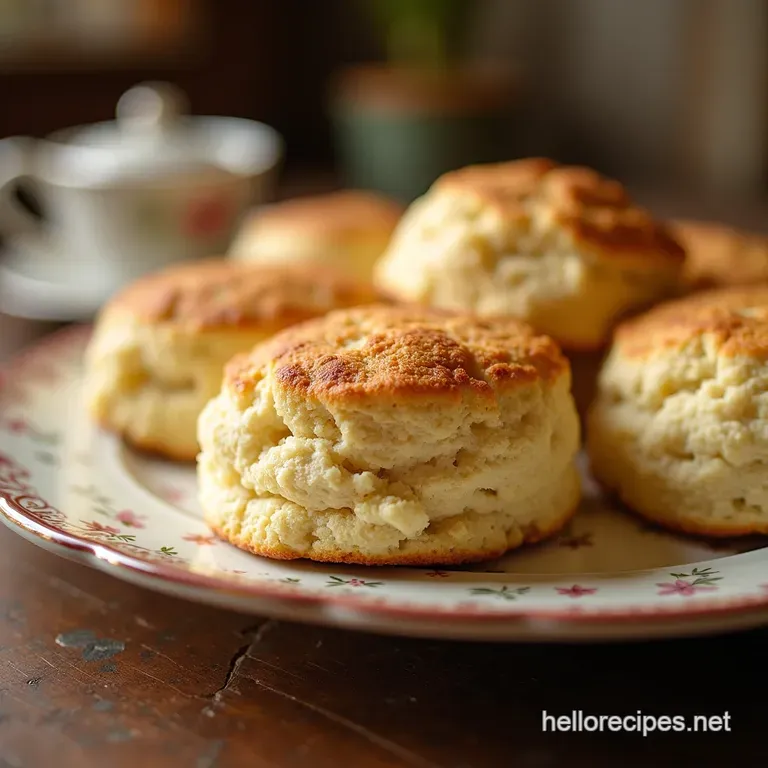
Identifying Peak Doneness for Golden Brown Beauty
Bake for a brief 12 to 15 minutes. You are looking for a significant puff and a rich, golden brown hue across the top surface. They should sound hollow when tapped lightly on the bottom. As soon as they achieve this perfect colour, transfer them immediately to a wire rack to cool slightly.
Elevating Your Experience: Serving Suggestions and Storage Secrets
A perfect scone deserves a perfect presentation. These are best enjoyed warm, ideally within an hour of leaving the oven.
The Proper Accoutrements: Cream, Jam, and Conversation
The consumption ritual is almost as important as the bake itself. Serving requires clotted cream the dense, rich, slightly cooked cream that is tradition and high-quality strawberry preserve.
Whether you put the jam on first or the cream first is a delightful debate for your Afternoon Tea Scones gathering, but either way, the combination is heavenly. Serve alongside a robust brew of English Breakfast Tea to cut through the richness.
Storing Leftovers So They Taste Fresh Tomorrow
If you are fortunate enough to have leftovers, store them at room temperature in an airtight container for up to two days. To revive them and recapture some of that just baked fluffiness, reheat them briefly in a warm oven (about 300° F or 150° C) for about 5 minutes before slicing.
Creative Ways to Adapt These Baked Wonders
While the plain classic is supreme, these Scones vs Biscuits foundation allows for easy adaptation. For savoury lovers, omit the sugar, reduce the salt slightly, and fold in 1 cup of sharp grated cheddar cheese during the butter cutting stage; these are fantastic served warm with butter.
For a touch of sweetness, you can incorporate dried currants or sultanas into the dry mix before adding the butter.
Troubleshooting and Tailoring This Quintessential Recipe
Even with the best technique, baking sometimes presents challenges. The most common issue leading to flat scones is using warm butter, which melts into the flour rather than steaming up during baking.
If your dough felt sticky or warm at any stage, a mandatory 15-minute chill in the refrigerator will rescue the texture. Another frequent culprit for lack of lift is twisting the cutter; always push straight down and lift cleanly. If they brown too quickly, lower the oven temperature slightly for the last few minutes.
Adherence to the cold ingredients rule is the single most effective strategy for achieving the light, airy results these Homemade Scones promise.
Recipe FAQs
Why are my scones coming out flat instead of fluffy?
This is the most common pitfall! The secret to a high rise in these Scones is keeping everything especially the butter and buttermilk absolutely freezing cold.
Also, ensure you are pushing your cutter straight down and lifting it out without twisting; twisting seals the edges and stops them from expanding upwards.
Can I make the dough ahead of time, or should I freeze them before baking?
You absolutely should chill the dough! After cutting the rounds, placing them back in the freezer for 10 minutes before baking is highly recommended; this solidifies the butter one last time, guaranteeing maximum lift in the oven.
You can also freeze unbaked scones for up to a month; just bake them from frozen, adding an extra 3-5 minutes to the cooking time.
What’s the big deal about not twisting the biscuit cutter?
It’s crucial for achieving those lovely, flaky layers that separate nicely. When you twist the cutter, you are essentially sealing the dough around the edges like crimping a pie crust. This barrier prevents the steam from pushing the layers apart vertically, resulting in a shorter, denser scone.
My scones are a bit dry; how can I store them to keep them fresh?
Scones are best eaten the day they are made, perhaps slightly warm! If you have leftovers, wrap them tightly in foil or plastic wrap and store them at room temperature for up to two days.
To revive them the next day, just give them a quick blast in a moderate oven (about 300°F or 150°C) for five minutes to warm the butter back up.
Can I substitute buttermilk, or is it essential for these scones?
While buttermilk gives a fantastic tang and tenderness due to its acidity reacting with the baking powder, you can substitute it. Use standard whole milk mixed with one teaspoon of fresh lemon juice or white vinegar per ¾ cup of milk; let it sit for five minutes to curdle slightly before using it as your buttermilk substitute.
What’s the absolute best way to serve these scones?
For a truly authentic experience, split the warm scone horizontally and top it with a generous dollop of proper clotted cream first, followed by a spoonful of good quality strawberry jam the proper Devon/Cornwall debate aside! Don't forget a strong, steaming mug of tea to wash it all down; you can't beat it.
Light Fluffy Scones Recipe