The Crumblyyettender Perfection Classic British Tea Scones
- Unlocking the Secret to Truly Tall, Fluffy Homemade Scones
- The 'Cold Hand' Arsenal: Essential Components for Flaky Success
- Precision Measurements for Unbeatable Texture in Your Homemade Scones
- The Gentle Art of Rubbing In: Building the Foundation
- From Dough to Golden Perfection: Baking the Ultimate Batch
- Troubleshooting and Expert Adjustments for Your Next Bake
- Recipe FAQs
- 📝 Recipe Card
Unlocking the Secret to Truly Tall, Fluffy Homemade Scones
There is a certain magic that happens when flour, fat, and liquid combine under the right conditions to create a British classic. Forget everything you think you know about dry, sad little biscuits; the Best Scone Recipe is about achieving architectural height coupled with an interior texture that is ethereally soft and crumbly.
This is the foundational knowledge for crafting Homemade Scones that will transport you straight to a classic tearoom, regardless of where you are baking. We are aiming for lightness, and that requires a disciplined approach to temperature and touch.
The Essential Afternoon Tea Staple Explained
The scone, at its heart, is a quick bread, relying on chemical leavening (baking powder) rather than yeast for its lift. This makes the Homemade Scones Recipe Easy to master, provided you respect the dough. In the hierarchy of afternoon tea accompaniments, the scone reigns supreme.
It must be substantial enough to hold its toppings but delicate enough to yield easily to the pressure of a gentle knife. Mastering this balance is why we meticulously review every step, ensuring your batch yields approximately 8 perfect rounds every time.
A Pledge Against Dryness: Our Fluff Guarantee
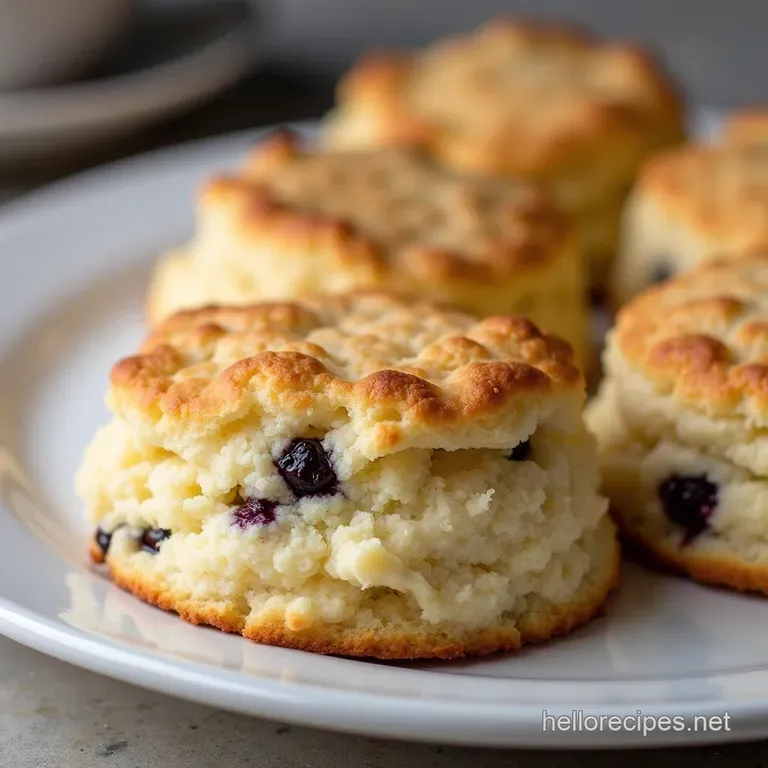
Dryness is the nemesis of a good scone. The primary culprit is usually overworked dough or melted butter. Our pledge for fluffiness hinges on two critical elements: using ample, active baking powder (4 teaspoons for this recipe) and ensuring the butter stays frigid until the moment it enters the oven.
This immediate heat shock creates steam pockets within the dough layers, forcing them upward. We prioritize an almost shaggy, barely combined dough texture to guarantee those lovely, light air pockets remain intact, delivering on the promise of an easy bake.
Beyond Plain: A Nod to Subtle Savory Twists (Thinking Gorgonzola and Herbs)
While the classic version benefits from a gentle sweetness (2 tablespoons of sugar in this blueprint), the versatility of the scone base allows for wonderful savory deviations. Once you have mastered the base technique, experimenting with Savory Scones becomes a delight.
Imagine folding in sharp, aged Cheddar, finely chopped chives, or even the pungent notes of crumbled Gorgonzola and black pepper into the dry mix before incorporating the butter. These savoury alternatives pair beautifully with soup or as a light luncheon item, offering a delightful change from the traditional jam scenario.
The 'Cold Hand' Arsenal: Essential Components for Flaky Success
Baking science dictates that when fat melts prematurely, it coats the flour particles, preventing the proper formation of gluten structure and inhibiting the rise. Therefore, our arsenal is built around cold, quality ingredients.
For the Homemade Scones Ingredients , you will need 2 cups of all-purpose flour, 4 teaspoons of baking powder, 1/2 teaspoon of salt, 2 tablespoons of sugar, and crucially, 6 tablespoons of unsalted butter. This butter must be chilled and cubed, ready to be incorporated quickly.
The final essential cold component is the liquid: 3/4 cup of ice-cold milk. Keeping these elements separated and frigid until the final moments is the key to flaky layers.
Precision Measurements for Unbeatable Texture in Your Homemade Scones

While simplicity is advertised, precision ensures consistency. The ratio of fat to flour is calibrated here to ensure the final product achieves that perfect "crumbly yet-tender" mouthfeel we are striving for.
Why Unsalted Butter Must Be Frozen Solid
Using unsalted butter allows us complete control over the final salt content. However, the temperature is more important than the type. The butter should be firm, ideally frozen for about 15 minutes before you begin, then cut into small cubes.
These small, cold pieces maximize the surface area that can be "cut in" quickly, trapping air and ensuring that when the dough hits the oven, the butter resists melting immediately, thus creating steam to push the layers apart.
Flour Selection: Balancing Strength and Tenderness
Standard all-purpose flour is ideal here. It provides enough structure to support the rise from the baking powder without being overly dense, which can happen with high protein bread flour.
Ensure you measure your flour correctly level scoops, not packed, which can add up to 25% too much flour and lead to dry results.
The Magic Ratio of Cream to Milk (And Which to Use)
For these traditional tea scones, whole or 2% milk works perfectly when chilled. While heavy cream adds richness, using straight milk keeps the texture lighter and more authentically British.
The 3/4 cup measurement is precise; too much liquid activates the gluten too early, resulting in tough dough, while too little prevents everything from binding together properly.
Related Recipes Worth Trying
- The Back Garden Boss Authentic Homemade BBQ Sauce Recipe — Ditch the bottle Whip up this easy tangy BBQ sauce that sings with smoke and balance Perfect for ribs or pulled pork Get the recipe
- Classic Honey Butter Dinner Rolls Recipe Fluffy Homemade Bread — Whip up truly fluffy dinner rolls that vanish faster than the last scone at the fête This easy homemade rolls recipe delivers a golden crust Find out how now
- The Best Homemade Pizza Sauce Recipe Simple Quick — Ditch the jar Learn how to make the best homemade pizza sauce from scratch in under an hour This simple recipe creates a vibrant nonwatery base every time
The Gentle Art of Rubbing In: Building the Foundation
Once your dry ingredients are whisked together in a large bowl, the next crucial step is incorporating the cold butter. This process, often called "rubbing in," requires speed and a light touch. You can use two knives, a pastry blender, or, traditionally, your fingertips.
The goal is to work the butter into the flour until the mixture resembles coarse breadcrumbs, crucially still containing some small, pea-sized lumps of butter. These visible lumps are the insurance policy for your flaky layers, so stop rubbing the moment you reach this stage.
From Dough to Golden Perfection: Baking the Ultimate Batch
With the foundation set, we move to assembly and baking. Preheat your oven high— 425° F ( 220° C) is necessary to trigger that immediate, powerful rise.
Cutting the Fat: Achieving Pea-Sized Crumb Distribution
As mentioned above, the resulting texture after incorporating the butter should show those desirable pea-sized pieces scattered throughout the flour. If the mixture is too fine, you’ll get a dense product; if it’s too coarse, the dough might fall apart before baking.
This intermediate stage is where the structure is determined.
The Non-Negotiable Rule of Minimal Handling
When you introduce the ice-cold milk, use a spatula or knife to gently fold the liquid into the dry mixture. Only mix until a shaggy mass forms it should look messy and uncooperative. As soon as you can bring it together with your hands, stop.
Over mixing develops gluten, turning your light scone into something chewy and resembling tough bread. This is perhaps the most important factor in ensuring your Homemade Scones Easy to love.
Achieving the Perfect Rise: The Cutter and The Twist Technique
Turn the barely mixed dough onto a lightly floured surface. Pat or gently roll it out to about 3/4 inch thickness. Now, choose your cutter a straight edged 2 inch cutter is superior to a sloped one. Do not twist the cutter. Press straight down firmly and lift straight up.
Twisting seals the edges of the dough, which inhibits the vertical rise, meaning you miss out on those beautifully tall sides.
Baking Temperature Calibration for Deep Golden Crowns
Place the cut rounds onto a parchment lined baking sheet. For that deep golden hue that signals a perfectly baked scone, brush the tops lightly with milk or a quick egg wash. Bake at 425° F ( 220° C) for 12 to 15 minutes.
You are looking for them to have risen significantly and achieved a rich golden brown color across the top.
Troubleshooting and Expert Adjustments for Your Next Bake
Even with careful adherence, sometimes a bake doesn't go quite as planned. If your scones spread out sideways rather than rising vertically, it almost always signals that the dough was overworked or the butter was too warm when added.
Conversely, if they are crumbly straight out of the oven, you likely needed a splash more liquid. Remember that achieving the perfect Homemade Scones Chocolate Chip variation or plain version depends heavily on environment a hot kitchen requires faster action.
Handling Sticky Dough: Quick Fixes for Over Mixed Batches
If you find the dough has become sticky, indicating too much handling or liquid, resist the urge to add a massive amount of extra flour. Instead, quickly wrap the dough in plastic wrap and chill it in the refrigerator for 15 minutes.
This temporarily relaxes the gluten and firms up any residual butter, making it easier to handle for cutting.
Storage Wisdom: Keeping Scones Fresh for Days
Scones are undeniably best on the day they are baked. However, to store them, place cooled scones in an airtight container at room temperature for up to two days. To refresh them, simply wrap them loosely in foil and warm them in a 300° F ( 150° C) oven for 5– 7 minutes.
Creative Flavor Injections: Incorporating Dried Fruits and Nuts
To move beyond the standard, consider adding flavor directly into the dough. For a twist on the Homemade Scones and Strawberry Jam Recipe , try folding in finely chopped crystallized ginger or dried cranberries along with the dry ingredients.
For nutty depth, toasted pecans or walnuts work beautifully, adding texture without compromising the structure.
Pairing Ponderings: Tea Varieties that Complement These Baked Goods
The perfect beverage elevates the experience. These beautifully tender scones demand a robust tea. English Breakfast or Earl Grey provides the necessary tannic backbone to cut through the richness of the butter and cream.
For a lighter afternoon experience, a delicate Darjeeling offers a floral counterpoint that won't overpower the subtle sweetness of the scone itself.
Recipe FAQs
Why are my Homemade Scones coming out flat instead of rising tall?
This is usually down to two culprits: warm butter or twisting the cutter. Make absolutely certain your butter is rock solid and work quickly when mixing; warm butter melts and ruins the layers before they hit the oven.
Also, when cutting the rounds, press the cutter straight down and lift it; twisting seals the edges, stopping them from achieving that lovely vertical rise.
Can I make the dough for these scones ahead of time?
While you can mix the dry ingredients and cut in the butter the day before, it’s best to hold off on adding the liquid until you are ready to bake. If you want to prep further, mix the dough, cut the rounds, and place them on the tray, then cover and chill them in the fridge for up to an hour before baking.
Baking them cold ensures they rise beautifully!
What is the secret to getting that perfectly tender crumb, not dry and hard?
The magic lies in minimal handling, truly. Treat the dough like it’s a delicate houseguest be gentle! As soon as the flour and liquid just come together into a shaggy mass, stop mixing. Overworking the dough develops gluten, making the scone tough, much like an over kneaded loaf of bread.
Can I use self raising flour instead of plain flour with baking powder?
You certainly can, but you'll need to adjust the leavening agents. If you use self raising flour, simply omit the baking powder listed in the recipe. Self raising flour already contains a raising agent, so doubling up will make your scones rise rapidly and then potentially fall flat or taste a bit metallic.
How should I store leftover scones to keep them from going stale?
Scones are definitely best eaten on the day they are baked, fresh from the oven is unbeatable! If you have leftovers, store them in an airtight container at room temperature for up to two days.
To revive them, simply dampen them very lightly with water and warm them through in a moderate oven (about 325°F/160°C) for about 5-7 minutes.
What's the difference between an egg wash and just brushing with milk on top?
Brushing the tops with plain milk yields a lovely, slightly softer, matte golden brown crust, which is very traditional. Using an egg wash (one egg mixed with a splash of milk or water) creates a shinier, deeper, and more professional looking golden finish, as the egg proteins brown beautifully in the heat.
Classic British Tea Scones