Cheeseburger Sliders with Hawaiian Rolls the Ultimate Easy Sheet Pan Recipe
- The Secret to Stress and Free Entertaining: Ultimate Sheet and Pan Cheeseburger Sliders
- Essential Gear and Premium Components for Perfect Sliders
- Mastering the Assembly: Step and by-Step Guide to Baking Your Sliders
- Troubleshooting, Storage, and Flavor Variations for Your Cheeseburger Sliders
- Recipe FAQs
- 📝 Recipe Card
The Secret to Stress and Free Entertaining: Ultimate Sheet and Pan Cheeseburger Sliders
Look, if you’re anything like me, you love entertaining. You love the idea of it, anyway. But the reality is often panicked chopping and trying to keep appetizers warm while simultaneously greeting guests. We’ve all been there. This cheeseburger sliders recipe is my secret weapon against panic.
It’s the definition of a fuss and free, slam and dunk meal. They look impressive. They are husband approved meals, honestly. And they take about 40 minutes, start to finish.
This is my go and to when I need a cheap supper ideas budget win, or just an easy dinner recipe for two beginner cooks could master. It’s absolutely brilliant.
Why We Skip Shaping Individual Mini Patties
Shaping 12 tiny, uniform patties is a fool’s errand. I tried it once. It was a disaster. The patties shrank unevenly, and half of them fell apart, ending up as crumbled beef. When we make cheeseburger sliders with hawaiian rolls, we are aiming for maximum flavour, minimum effort.
Efficiency is the name of the game here.
The sheet and pan approach is superior because it uses the rolls as a structural guide. You press the meat into one single, large slab, bake it, drain the grease, and then build the sandwich right on top.
This method means the meat steams slightly under the buns during the final bake, keeping the beef incredibly juicy and ensuring that every single slider has an even meat and to-bun ratio. Trust me. That’s how real home cooks get supper ideas easy picky eaters will actually devour.
Defining the Slider: Size vs. Technique
Quick pause. Are these technically "sliders" or just "mini burgers?" Who cares, honestly? For me, a true slider isn't just small. It's about the method and the intention. Traditional sliders are often steamed over onions on a flat top.
We’re doing a baked version in the oven, but the spirit is the same: the bun should slightly soak up the meat juices and butter glaze. We’re aiming for structural integrity and that iconic melt, not the tiny grilled disks you might get at a fast and food joint. The whole point is ease of preparation.
Essential Gear and Premium Components for Perfect Sliders

You don’t need much for this, which is why it’s such a winner. But quality matters, particularly in two areas: the beef and the cheese.
The Core Shopping List: Ground Beef, Rolls, and Cheese Selection
You can’t cheat the system here. Specifically, the fat content of your beef is crucial for moisture.
- Ground Beef: You absolutely need 80/20 ground beef. Don't go leaner, or you lose all the flavour and juiciness during the par and bake. It’s worth the extra few cents.
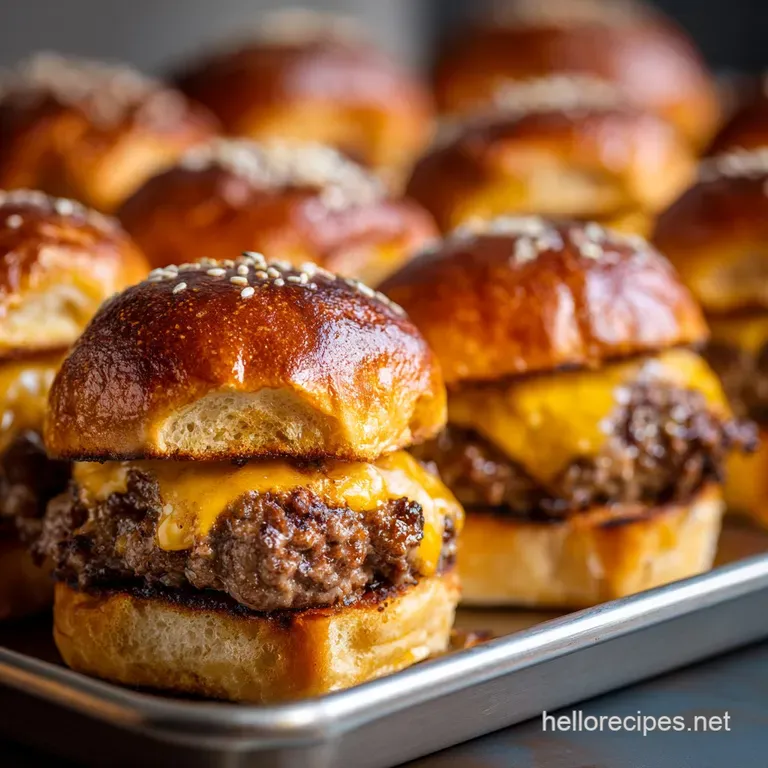
- The Rolls: Sweet Hawaiian Rolls are traditional for a reason. They stand up beautifully to the steam and fat, and the sweetness pairs perfectly with the savoury beef. Brioche works, too.
- The Cheese: Honestly, don't even bother with low and fat or expensive aged cheese here. We need that perfect, seamless, molten melt. Processed cheese slices (like American or a good cheddar blend) are your best friend. They melt into a delicious, creamy blanket without breaking or going oily.
Beyond the Basics: Must and Have Tools for the Slider Bake
Right, equipment check. A standard 9x13 inch casserole dish is the stage for our masterpiece, but the real MVP here is the parchment paper.
Cut the parchment long enough to create little handles that stick up over the edges of the dish. This allows you to lift the entire slab out intact after baking, making slicing painless. The second crucial tool is a sharp serrated knife (a bread knife works wonders).
If you try to slice those soft brioche rolls with a chef's knife, you will flatten them into dense pancakes. Disaster averted.
Related Recipes Worth Trying
- No Faff Proper PubStyle Cheeseburger Sliders Hawaiian Rolls — Knock up a proper feast These quick Cheeseburger Sliders are perfect party food baked in a baking dish with a rich beef filling and buttery garlic glaze No...
- The Ultimate Baked Ham and Cheese Sliders Recipe — Need easy ham and cheese sliders These baked sliders on Hawaiian rolls feature a sticky savoury butter glaze thats utterly addictive Get the foolproof recipe
- How to Bake Mini Bagel Breakfast Sliders: The Ultimate Family Treat! — Craving a delicious start to your day? Try my Bake Mini Bagel Breakfast Sliders filled with fluffy eggs and cheesy goodness. Perfect for families or brunch!
Mastering the Assembly: Step and by-Step Guide to Baking Your Sliders
Let’s crack on with the instructions. This is simpler than making cookies, I promise.
Prepping the Base: Seasoning and Forming the Single Sheet and Pan Beef Layer
Get that oven cranking to 350°F (175°C). Line your 9x13 dish.
Grab your 80/20, your finely diced onions, and the Worcestershire sauce that’s the umami secret weapon. Now, this is crucial: use your hands, but mix gently . We aren't making bread dough here; overmixing toughens the meat. Press that whole mound into your lined dish.
Make sure it’s nice and even, about 3/4 inch thick.
Bake the patty alone for 10– 12 minutes. This sets the shape beautifully.
CRUCIAL STEP ALERT: Once that meat is semi and cooked, take it out and tilt the pan. Use the parchment overhang or a paper towel to soak up or pour off all that rendered fat. If you skip this, your bottom buns will be swimming, and no one wants a soggy bottom on their cheeseburger sliders.
The Ultimate Meltdown: Stacking the Cheese and Brioche Rolls
While the patty is warm, use your serrated knife to slice the rolls horizontally . Keep them connected! Spread your mayo (or secret sauce, I use a little mustard and ketchup blend sometimes) thinly on the bottom half.
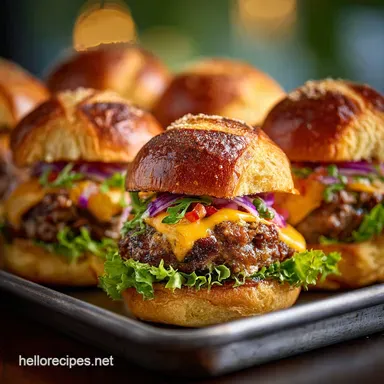
Now, place that bottom slab directly on top of the drained beef patty. Cover it edge and to-edge with cheese. Overlap them slightly to ensure total coverage. The pickles go on next if you're using them. They add that necessary, sour crunch. Finally, cap it off with the top bun slab.
Creating the Signature Golden Glaze and Finishing Bake
We need that signature shine and garlicky kick. Melt your butter, stir in garlic powder (not fresh garlic it burns too easily), dried parsley for colour, and sesame seeds. Brush that mixture generously all over the tops of the rolls. Don’t be shy about it.
Cover the dish loosely with foil. This acts like a little sauna, guaranteeing the cheese melts perfectly before the buns have a chance to dry out or burn. Bake for another 8– 10 minutes. Peek in.
If the cheese is melted and bubbling, remove the foil for the last 2 minutes just to get those tops golden brown and slightly crisp.
Let them rest in the pan for 5 minutes. This allows the juices to settle and prevents the filling from spilling out when you slice them. Use the parchment handles to lift the entire creation out, then slice along the original roll seams. Serve immediately.
Troubleshooting, Storage, and Flavor Variations for Your Cheeseburger Sliders
Quick Fixes: Avoiding Soggy Bottoms on Baked Sliders
We already talked about draining the grease, which is 90% of the battle. But what if you’re using very thin rolls, or want to prep them early? You need a moisture barrier.
- Toast the Bottoms: Before layering any sauce or meat, briefly toast the bottom slab of rolls under the broiler for 60 seconds. A tiny bit of crunch creates a physical barrier to moisture.
- Use Fat as a Barrier: Use a thicker sauce (like mayonnaise or mustard) instead of something watery (like ketchup) on the bottom bun. Fat naturally repels moisture, keeping the bread dry.
Perfect Pairings: What to Serve Alongside Your Mini Cheeseburgers
These easy cheeseburger sliders are rich, savoury, and highly comforting. Since they are so filling, I recommend sides that offer contrast either salt or acid.
| Slider Component | Recommended Pairing | Why it works |
|---|---|---|
| Fat/Umami (Beef) | Bright, Vinegar and Based Coleslaw | The acidity cuts through the richness beautifully. |
| Sweetness (Rolls) | Salty French Fries or Onion Rings | Adds necessary crunch and a classic pub grub feel. |
For a healthier angle, a simple green salad tossed in a sharp vinaigrette is excellent.
Meal Prep and Safety: Expert Guide to Storing Leftover Sliders
Leftovers? Is that even a thing with these? If you do somehow end up with extra, let them cool completely before storing them in an airtight container in the fridge. They keep well for about three days.
To reheat, the microwave is fine if you're desperate, but a low oven (300°F / 150°C) wrapped tightly in foil for 10– 12 minutes brings them back to life much better. This prevents the rolls from hardening.
Just a safety note: never store them with fresh toppings like lettuce or tomato (they turn instantly gross and watery). Keep those fresh for serving!

Recipe FAQs
Crikey, how do I stop the bottom of my Cheeseburger Sliders getting all soggy?
The crucial bit is draining the grease don’t be a mug, pour off that excess fat after the initial 10-minute bake! Additionally, spreading a thin layer of sauce (like the recommended mayo) on the bottom bun acts as a protective moisture barrier.
Can I prep these the day before the big match, or do I have to make them fresh?
You can definitely do the heavy lifting beforehand: season the beef patty and slice the buns a day ahead, keeping them separate and chilled. However, assemble and bake them just before serving, as the fresh melt of the cheese is pure magic.
I usually use leaner mince; will using 90/10 beef ruin the texture?
Leaner beef (90/10) can result in a drier patty because it lacks the internal fat needed for juiciness. If using lean mince, ensure you add an extra tablespoon of Worcestershire sauce and lightly brush the cooked patty with oil before assembling.
Is the garlic butter glaze strictly necessary? Can I skip that step?
The glaze is optional but highly recommended, as it adds that classic pub-grub aroma and ensures a beautifully golden, slightly crispy top crust. If you skip it, your sliders will still taste great, but they might lack the signature rich finish.
What's the best way to reheat leftover sliders without them turning rubbery?
Don't be tempted by the microwave! The best technique is wrapping the whole batch loosely in foil and reheating them in the oven at 300°F (150°C) for about 10 15 minutes until piping hot; the foil traps moisture and prevents them from drying out.
Easy Sheet Pan Cheeseburger Sliders
Ingredients:
Instructions:
Nutrition Facts:
| Calories | 475 kcal |
|---|---|
| Fat | 27.5 g |
| Fiber | 1.5 g |
