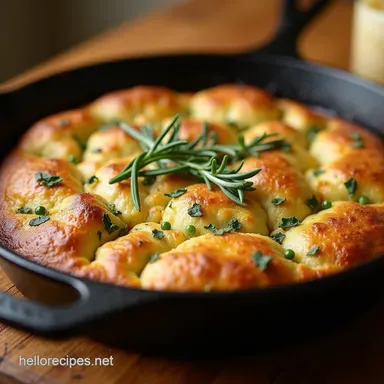
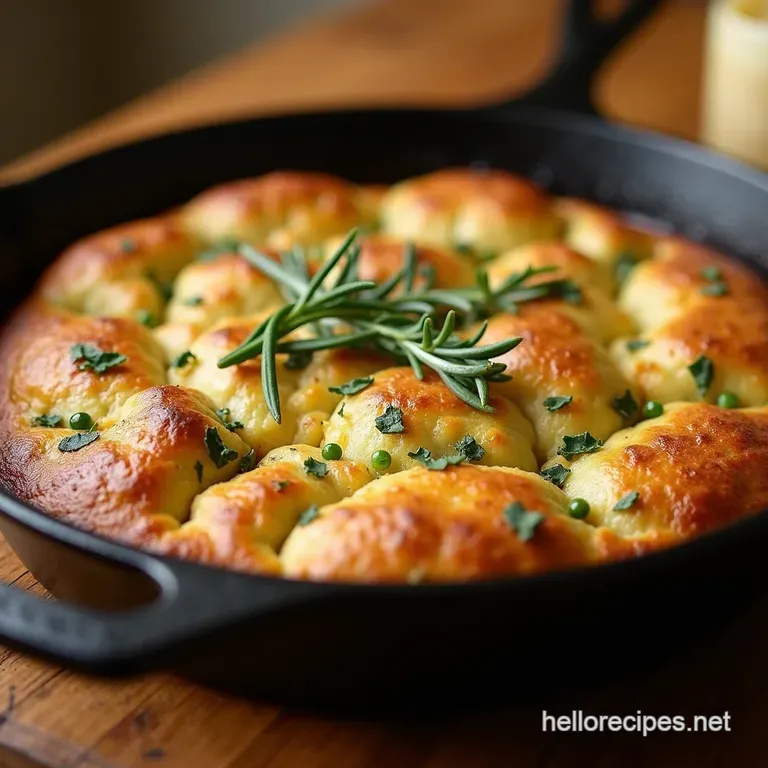
The Cast Iron Crowdpleaser Rustic Garlic and Rosemary Skillet Bread

- Why This Skillet Bread Redefines Weeknight Baking
- The Tuscan Aroma That Fills Your Kitchen
- Assembling Your Aromatic Arsenal for the Bread
- Essential Tools for This Garlic and Rosemary Skillet Bread Recipe
- The Step-by-Step Journey to Golden Crust Glory
- Baking Precision: Achieving the Ultimate Skillet Finish
- Elevating Your Garlic and Rosemary Skillet Bread Experience
- Storing and Reheating Leftovers Like a Pro
- Recipe FAQs
- 📝 Recipe Card
Why This Skillet Bread Redefines Weeknight Baking
When you envision baking bread, you might picture long proving times, complex kneading techniques, and an early start to your day. However, that image dissolves completely when you discover the magic of Garlic and Rosemary Skillet Bread .
This recipe is designed for the modern home cook who craves that incredible aroma and texture of fresh baked bread without the commitment. Forget fussy yeast management; this is a quick mix, rustic bake, akin to a sophisticated soda bread, that delivers an unbelievably aromatic, deeply savoury loaf with a gorgeous, crisp crust.
Ready from pantry to oven in under thirty minutes, this Cast Iron Rosemary Bread proves that incredible flavour doesn't require hours of waiting. It’s proper comfort food, perfect for mopping up the last drops of a hearty stew or simply devouring warm with salted butter.
The Tuscan Aroma That Fills Your Kitchen
The defining characteristic of this loaf is its intense, earthy perfume derived from freshly chopped rosemary and mellow, sweet garlic. This Rosemary Garlic Bread Skillet transports your kitchen straight to the Italian countryside.
It’s a deceptively simple Skillet Bread Recipe because its complexity comes entirely from high-quality, fragrant additions rather than intricate construction.
We achieve this depth by gently warming the aromatics in the skillet before introducing the dough, ensuring every bite is infused with that signature Mediterranean profile.
Simplifying Rustic Baking: The No-Knead Magic
The beauty of this bread lies in its simplicity. We rely on chemical leaveners baking powder and soda rather than yeast. This means there is absolutely no kneading required, and crucially, no lengthy proofing time.
When making this Rustic Garlic Rosemary Skillet Bread Recipe , you are aiming for a cohesive, shaggy dough, not a smooth, elastic ball. The goal is minimal handling to keep the gluten relaxed, resulting in a wonderfully tender interior crumb that contrasts perfectly with the crust formed in the hot iron.
From Prep to Perfection: Time Commitment Breakdown
For those keeping a close eye on the clock, you’ll be thrilled. Active preparation for this loaf takes a brisk 15 minutes. If you choose to elevate the flavour by roasting a head of garlic beforehand which I highly recommend for sweetness allow an extra 30– 35 minutes for that roasting time, though this can be done completely ahead of schedule.
Once mixed, the bread bakes for a swift 25– 30 minutes. In under an hour total, you can serve 6 to 8 people a slice of pure, golden brown heaven.
Why the Cast Iron Skillet is Your Secret Weapon
The vessel matters immensely for this particular bake. A heavy duty, oven safe cast iron skillet is non-negotiable here. The thermal mass of cast iron is unmatched; it holds and radiates consistent, intense heat from the bottom up.
This intense contact heat is what guarantees that signature, crackly, golden brown bottom crust, elevating this from a simple quick bread to a truly spectacular Garlic Bread Skillet Recipe . It mimics the intense hearth heat that makes traditional rustic loaves so appealing.
Assembling Your Aromatic Arsenal for the Bread
To achieve the signature flavour of this Rosemary Bread In Cast Iron Skillet , we focus on two key elements: the dry structure and the fat infusion. For the structure, you’ll need 2 cups of all-purpose flour, paired with 1 tablespoon of baking powder and 1 teaspoon of fine sea salt for that essential lift and seasoning.
The flavour core hinges on three large sprigs of fresh rosemary, finely chopped, and one whole head of garlic. While raw garlic is punchy, roasting the garlic first allows its natural sugars to caramelise, yielding a sweet, spreadable pulp that blends seamlessly into the dough and the melted butter base.
We also bring in 1 cup of cold buttermilk to react powerfully with the leavening agents for a superior rise.
Essential Tools for This Garlic and Rosemary Skillet Bread Recipe
While this bread is simple, having the right basic gear ensures a flawless outcome. The star, as mentioned, is your 10 inch cast iron skillet, ensuring even heat distribution for the perfect Roasted Garlic Rosemary Skillet Bread .
Beyond that, you need a large mixing bowl and a spatula for gentle folding. A sharp knife and cutting board are required for preparing the herbs and slicing the final product.
Choosing the Right Flour and Leavening Agents
For the ideal texture in this quick bread style loaf, spoon and level your 2 cups of all-purpose flour. Do not pack it into the measuring cup, as this adds too much weight and results in a dense final product.
The leavening relies solely on 1 tablespoon of baking powder, which must be fresh to guarantee a good rise during the short bake time.
Perfecting the Herb & Garlic Infusion Mix
This step is crucial for a deeply flavoured loaf. After roasting the garlic (if choosing that route) and extracting the soft cloves, melt 4 tablespoons of unsalted butter with 1 tablespoon of olive oil in the skillet over low heat. Add the roasted garlic flesh and the finely chopped rosemary.
Sauté this mixture for just two minutes until the kitchen fills with that beautiful aroma. This process tempers the raw edge off the garlic and blooms the flavour oils in the rosemary before the mixture is slightly cooled and incorporated.
Measuring Precise Ratios: Achieving the Ideal Dough Consistency
The ratio of liquid (buttermilk) to dry ingredients is critical for quick breads. Using 1 cup of cold buttermilk ensures a tender crumb. When mixing the wet into the dry, remember the golden rule: stop mixing as soon as the flour streaks disappear. You are looking for a very shaggy, slightly sticky dough.
If you mix too vigorously, the gluten develops too much, leading to a tough, chewy loaf instead of a tender interior.
Related Recipes Worth Trying
- The Ultimate Moist Banana Bread Recipe Easy Foolproof — Forget dry loaves This easy Banana Bread Recipe guarantees a buttery moist crumb and that perfect crackly top Perfect for teatime Find out how
- The Ultimate Sticky Honey Garlic Chicken Thighs Recipe — Make unbelievably juicy sticky Honey Garlic Chicken Thighs faster than takeout This oven recipe delivers the perfect sweet and savoury glaze Get the full...
- Chewy Ginger Molasses Sandwich Cookies with Buttercream — Bake truly chewy Ginger Molasses Sandwich Cookies filled with dreamy vanilla buttercream A proper treat for afternoon tea Full recipe here
The step-by-step Journey to Golden Crust Glory
How To Make Skillet Bread begins with preparing the flavour base. First, if roasting your garlic, get that into a 400° F ( 200° C) oven until soft.
While that’s happening, combine your 2 cups of flour, 1 tablespoon of baking powder, 1 teaspoon of salt, and 1/2 teaspoon of black pepper in your mixing bowl. Next, return to your skillet, melt the butter and olive oil, and gently sauté the flesh of the roasted garlic and chopped rosemary for two minutes, then remove the skillet from the heat to cool slightly.
Pour the cold buttermilk into the dry ingredients and fold gently until just combined no more than 30 seconds of mixing. Fold in the optional 1/2 cup of grated sharp Cheddar cheese along with the aromatic butter mixture from the skillet.
Scrape this entire shaggy mass into your prepared skillet, gently patting it into a rough circle filling the pan base. Allow the dough to rest on the counter for five minutes while your oven finishes preheating.
Baking Precision: Achieving the Ultimate Skillet Finish
Getting the bread into the right environment is the final key to unlocking that perfect exterior and interior texture.
Mixing the Dough: A Quick Combine, Not a Workout
As detailed above, the mixing phase should be exceptionally fast and gentle. Think of it as combining ingredients rather than developing structure. Overworking the dough is the fastest way to ruin the light, tender crumb that makes this Garlic and Rosemary Skillet Bread so irresistible.
Preheating Your Skillet for Maximum Crispness
Once your oven is set to 400° F ( 200° C), ensure the skillet containing the melted butter and garlic infusion is still warm but not scorching hot when you place the dough in it.
The moment that cool, wet dough hits the butter slicked, slightly warm iron, it begins to steam and sizzle gently, setting the base for that fantastic crispness immediately upon entering the oven.
Monitoring Doneness: Signs Your Bread is Ready to Serve
Bake the loaf for 25 to 30 minutes. You are looking for a deep, rich golden brown colour across the top surface. The most reliable test is internal temperature: the centre should register about 205– 210° F (96– 99° C) on an instant read thermometer, or alternatively, a skewer inserted into the centre should emerge clean, perhaps with a few moist crumbs attached, but no wet batter.
Elevating Your Garlic and Rosemary Skillet Bread Experience
Once the Cast Iron Rosemary Bread emerges, resist the urge to slice it immediately! Turn the loaf out onto a wire rack instantly to cool slightly. This prevents steam from getting trapped underneath, which would soften that beautiful, crisp bottom crust you worked so hard to achieve.
Serve warm it is at its absolute peak when it’s still radiating heat.
Storing and Reheating Leftovers Like a Pro
This bread tastes best the day it’s made, but leftovers store well. Keep cooled bread wrapped tightly in foil at room temperature for up to three days. To reheat, wrap the slice back in foil and bake in a 350° F ( 175° C) oven for about 10 minutes, or until warmed through and the crust is crisp again.
For a truly decadent second day experience, slice the bread open, slather the interior with garlic butter, and briefly grill it.
Savory Swaps: Alternative Herbs and Cheese Additions
If rosemary isn't your favourite, this bread welcomes experimentation. Try substituting the rosemary with finely chopped fresh thyme or marjoram for a different earthy note. For cheese, swap the sharp Cheddar for nutty Gruyère or a slightly smoky Gouda to add another layer of richness to your Rosemary Garlic Bread Skillet .
Pairing Suggestions: What Dips and Stews Work Best?
This loaf is designed to be a sturdy companion. It excels when served alongside hearty, liquid based dishes. Think deeply flavourful French Onion Soup, rich beef and ale stew, or a vibrant tomato based minestrone.
It is also fantastic served simply with a small dish of high-quality olive oil mixed with a touch of aged balsamic vinegar for dipping.
Troubleshooting Common Skillet Bread Setbacks
The most common pitfall is density. If your bread is heavy, you likely overmixed the dough, developing too much gluten. Next,, if the bottom burns before the top is done, your oven temperature might be slightly high, or you might not have allowed the skillet to cool down slightly after heating the aromatics.
Ensure you are using fresh baking powder, as expired leavening agents are the primary cause of flat, sad quick breads.
Recipe FAQs
Can I skip roasting the garlic for this Garlic and Rosemary Skillet Bread?
You certainly can, but you'll miss out on that lovely, mellow sweetness! If you’re pressed for time, you can stir raw minced garlic straight into the butter mixture, but it might taste a bit sharper or even slightly burnt by the time the bread is done. Roasting truly takes the edge off.
My dough seems really shaggy and sticky is this right, or have I messed up?
That's absolutely spot on, mate! Quick breads like this are designed to be mixed minimally; the dough should look rustic, sticky, and shaggy, not smooth like a yeast dough. Overmixing develops the gluten, which results in a tough, heavy loaf, so stop fussing with it as soon as the flour is just incorporated.
How do I store leftovers, and can I freeze this skillet bread?
Store any leftovers wrapped tightly in foil or in an airtight container at room temperature for up to two days just like a regular loaf. It freezes brilliantly too; wrap slices securely and freeze for up to three months.
To revive it, just pop it back in a warm oven for a few minutes until the crust crisps up again.
My bread didn't rise much; what did I do wrong?
Usually, a flat quick bread points to one of two things: either your baking powder has expired, or you overmixed the batter. Always check the 'use-by' date on your rising agents! Secondly, remember that cold buttermilk helps the chemical reaction, so ensure your buttermilk is straight from the fridge for the best 'puff'.
Can I bake this bread without a cast iron skillet?
While the cast iron skillet is brilliant because it gives you that superb, crisp bottom crust, you can certainly use an oven safe 8 or 9 inch metal baking pan or even a standard loaf tin if you must. Just be aware that the baking time might vary slightly, and you might need to grease the pan generously.
Is this bread too heavy to serve alongside a main meal, like a Sunday roast?
Not at all! Because it’s a quick bread made with baking powder rather than heavy yeast, it’s lighter than a traditional artisan loaf, though it’s still substantial enough to stand up to gravy and sauces.
It’s wonderfully buttery, making it excellent for soaking up all those lovely juices it’s better than a Yorkshire pudding, if you ask me!
Skillet Garlic Rosemary Bread