Nanas Secret Weapon Slowsmoked St Louis Ribs with Deep South Tangy Bbq Sauce
- Unlocking the Magic: Why This Ribs and BBQ Sauce Recipe Reigns Supreme
- The Philosophy Behind Truly Tender Pork Ribs
- Sourcing Excellence: Essential Components for Peak Flavor
- Assembling the Ultimate Homemade BBQ Sauce Base
- Phase One: Preparing and Seasoning the Meaty Canvas
- The Low-and-Slow Cooking Process: Achieving Fall-Apart Texture
- Crafting and Glazing with the Tangy Backyard BBQ Sauce
- Troubleshooting Common Pitfalls in Rib Cookery
- Beyond the Plate: Serving Suggestions and Storage Mastery
- Recipe FAQs
- 📝 Recipe Card
Unlocking the Magic: Why This Ribs and BBQ Sauce Recipe Reigns Supreme
There are certain culinary benchmarks that every home cook strives to master, and few command the respect and the hunger quite like a rack of perfectly cooked ribs. Forget the dry, sad strips of meat you sometimes encounter; we are here to talk about deeply flavoured, fall off-the-bone perfection.
This Ribs and BBQ Sauce Recipe is not just a set of instructions; it’s a culmination of years spent testing temperatures, rubs, and cooking methods, resulting in what I affectionately call Nana’s Secret Weapon.
The harmony achieved between the deeply seasoned pork and the complex, tangy homemade glaze is what elevates this dish from mere barbecue to an event. We aren't just cooking meat; we are crafting an experience rooted in low-and-slow tradition.
The Philosophy Behind Truly Tender Pork Ribs
The fundamental truth about exceptional ribs is that speed is the enemy of tenderness. Meat fibres are composed of muscle and connective tissue; to make them yielding and succulent, you must gently coax the collagen within that tissue to break down into gelatin.
This process requires time, low heat, and moisture the trifecta of perfect pork. Getting the Best BBQ Sauce for Pork Ribs is important, certainly, but even the greatest sauce can’t mask poorly cooked meat.
Our approach ensures the meat itself is the star, with the sauce acting as a crowning jewel of flavour.
Why We Opt for St. Louis Style Over Baby Backs
While Short Ribs and BBQ Sauce are fantastic for braising, for the classic barbecue plate, we lean toward St. Louis style spareribs. Baby backs are smaller, leaner, and cook quicker, but St.
Louis ribs offer a better, flatter surface area for applying the dry rub and feature a more substantial layer of intramuscular fat. This fat is crucial; as it renders during the long cook time, it bastes the meat from the inside out, resulting in an unparalleled richness that leaner cuts simply cannot achieve.
A Legacy Recipe: The Story Behind Nana's Technique
Nana always insisted that ribs shouldn't be just baked or just grilled; they needed the best of both worlds. Her technique involves two primary cooking stages: a very long, moist, low-temperature bake (essentially a gentle steam) followed by a final, high heat glaze.
This hybrid method is the reason our BBQ Ribs Crock Pot (or oven equivalent) manages to achieve meat so tender it barely needs a knife, yet finishes with a sticky, caramelized crust.
Setting Expectations: The Slow Cook Yield
Be forewarned: this is not a weeknight meal you rush through. The total commitment, including prep and rest, hovers around five to six hours for the 3-pound rack we use. While this sounds lengthy, the actual active preparation time is minimal.
Most of this time is hands off cooking, making it ideal for weekend projects. If you follow the steps for the Slow Cooker Ribs with BBQ Sauce , you can certainly minimize supervision, but for the very best results, the two-stage oven/grill method detailed here is superior.
Sourcing Excellence: Essential Components for Peak Flavor
The success of any Ribs and BBQ Sauce rests entirely on the quality and balance of its foundational elements: the rub and the sauce. We build flavor in layers. The rub, applied first, penetrates deep into the muscle tissue during the long cook, providing the savory, salty backbone.
The sauce, applied last, provides the sweet, tangy, and smoky finish that hits the palate immediately.
Assembling the Ultimate Homemade BBQ Sauce Base
Our Homemade BBQ Sauce for Ribs leans heavily on a classic Southern tang, moving away from overly sweet syrups. We start with a ketchup base, boosted significantly by apple cider vinegar, which cuts through the richness of the pork perfectly.
Dark molasses adds depth and colour, ensuring that when it caramelizes under heat, it achieves that beautiful mahogany sheen.
The Dry Rub Concoction: Balancing Sweet, Salty, and Heat
The magic of our dry rub lies in its ratio. We use slightly more brown sugar (1/2 cup) than usual to help promote bark formation, balanced by the robust saltiness of kosher salt and the earthy punch of smoked paprika.
Garlic and onion powders provide aromatic depth, while a whisper of cayenne ensures the flavour profile has a delightful, non-overpowering background warmth. This precise blend creates the ideal seasoning for achieving Sweet BBQ Ribs Recipe profiles without tasting cloying.
Essential Tools for Perfect Rib Rendering
While you can certainly manage with just a baking sheet, having the right equipment makes the journey smoother. A heavy duty roasting pan is essential for catching drippings during the initial bake.
Crucially, an accurate meat thermometer is your best friend for confirming the internal temperature during the finishing phase aiming for that 200– 205° F range (93– 96° C) is the sweet spot for yielding tenderness.
The Secret Ingredient That Elevates Our Ribs and BBQ Sauce
If you’re looking for a variation on standard recipes, our secret weapon in the sauce is a tablespoon of Dijon mustard. It’s not enough to make the sauce taste distinctly mustardy, but it acts as a powerful emulsifier and adds a subtle sharpness that brightens the entire flavour profile, making the final glaze exceptionally complex.
Related Recipes Worth Trying
- Rich Hearty Beef and Pearl Barley Soup Recipe — Forget watery broths This Beef Barley Soup recipe builds deep flavour through searing for a truly hearty comfort soup that sticks to your ribs Get the...
- FallOffTheBone Ribs with Homemade Sweet Tangy BBQ Sauce — Achieve proper pubquality pork ribs with our lowandslow oven method and incredible homemade BBQ sauce recipe Tender sticky and foolproof
- Best Creamy Chicken and Rice Casserole Recipe No Canned Soup — Forget bland weeknight dinners This easy chicken and rice casserole recipe skips the canned soup for a luxurious homemade sauce Pure comfort food bliss
Phase One: Preparing and Seasoning the Meaty Canvas
The first hands-on step is critical: preparation. Pat your rack of ribs absolutely dry moisture hinders rub adhesion. Then, you must tackle the membrane (silverskin) on the bone side. Using a butter knife, gently lift a corner until you can grip it with a paper towel, and pull firmly.
If you skip this step, the membrane will remain chewy and block the rub from reaching the meat. Once prepped, apply the mixed dry rub generously to all surfaces, pressing firmly so the spices adhere well.
Wrap the rubbed ribs tightly and allow them to rest in the refrigerator for at least two hours, though an overnight infusion yields far superior results.
The Low-and-Slow Cooking Process: Achieving Fall Apart Texture
The oven setup for the initial cook is the heart of this recipe. Preheat your oven to a low 275° F ( 135° C). Place the ribs bone side down in a roasting pan.
The crucial element here is the moisture: pour about a half cup of apple cider vinegar around the base of the rack. This creates a steamy microclimate inside the pan. Cover the entire pan extremely tightly with heavy duty foil.
This foil seal prevents moisture escape, essentially slow braising the meat until it’s fork tender a process that takes approximately 3 to 3. 5 hours.
Crafting and Glazing with the Tangy Backyard BBQ Sauce
While the ribs are undergoing their initial transformation, shift your focus to the sauce. Combine the ketchup, vinegars, molasses, sugars, and spices in a small saucepan. Simmer gently for about 15 minutes, stirring occasionally until the mixture thickens slightly and the sugars are fully dissolved.
This is your Tangy Backyard BBQ Sauce .
Applying the Binder and Applying the Rub Generously
Once the ribs are tender and have begun pulling back from the bone tips, remove them from the oven. Carefully discard the liquid accumulated in the bottom of the pan. It's time to introduce the sauce. Liberally brush one-third of your homemade sauce over the top surface of the ribs.
Mastering the Indirect Heat Method (Oven or Smoker)
This next stage is where we develop texture and colour. Increase your oven temperature to 375° F ( 190° C). If you prefer a more traditional smoke flavour, this is the time to transfer them to a grill set up for indirect heat.
Cook for another 15 to 20 minutes, basting with more sauce every five minutes. This application process builds up layers of flavour and caramelization.
The Crucial Rest Period Before Serving
Resist the temptation to slice immediately! After the final glazing stage, the meat needs time to redistribute its internal juices. Tent the finished ribs loosely with foil and let them rest for a solid 10 minutes. This short rest is vital for maximizing juiciness, even after the long cook time.
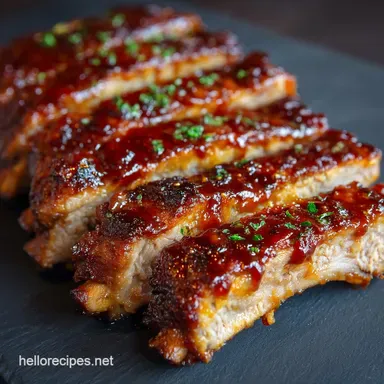
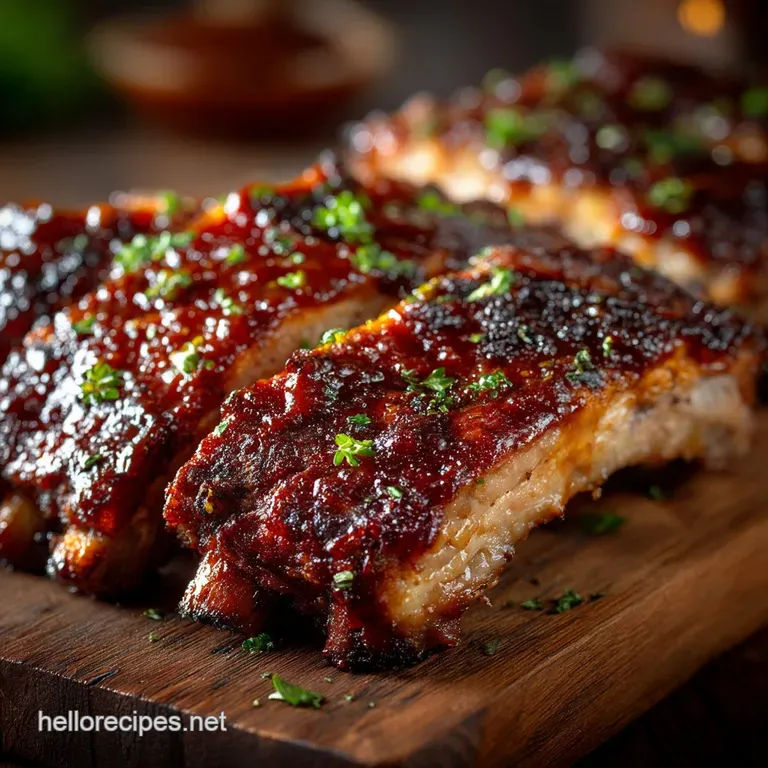
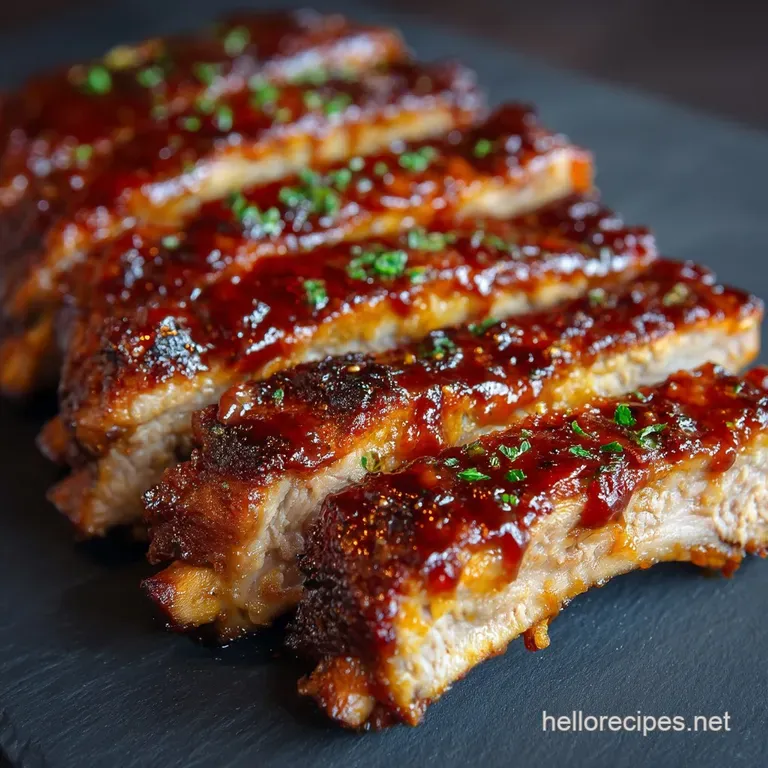
Finishing Touches: The Final Sear for Caramelization
The high heat of the final stage is designed specifically to caramelize the sugars in the sauce, creating that desirable, slightly sticky, dark red exterior often associated with the Grilled BBQ Ribs Recipe .
If your oven finish didn't achieve this level of char, a quick 2-minute blast under the broiler (watching carefully!) can give you that perfect, glossy finish.
Troubleshooting Common Pitfalls in Rib Cookery
The most common issue is texture: either the meat is dry, or it’s too tough. Dryness almost always results from cooking too hot or not wrapping the initial stage tightly enough. Toughness is usually solved by simply giving it more time; if they aren’t probing tender after 3.
5 hours in the oven, put them back in for another 30 minutes. If your BBQ Sauce burns during glazing, it means your heat was too high; reduce the temperature next time and add the glaze later in the process.
Beyond the Plate: Serving Suggestions and Storage Mastery
Once sliced between the bones, these ribs demand robust sides. A sharp, vinegary coleslaw is the perfect foil to the richness of the pork and the sweetness of the sauce.
Variations: Adjusting Spice Levels in Your Ribs and BBQ Sauce
Wanting more heat? For a genuinely spicy kick, feel free to double the cayenne in the dry rub, or introduce smoked chipotle powder for a deeper, smokier heat profile in both the rub and the sauce. This flexibility is what makes this foundational recipe so versatile for any fan of rich flavour.
Can I Speed This Up? (A Note on Pressure Cooking)
While you can use an BBQ Ribs Crock Pot method (often requiring about 6- 8 hours on low), the pressure cooker is a different beast entirely.
Pressure cooking achieves fork tender meat rapidly, but it bypasses the slow rendering of fat required for true barbecue texture, often resulting in meat that falls apart but lacks the structural integrity and deep connective tissue breakdown we are targeting.
Optimal make-ahead Strategies for Game Day Feasts
These are brilliant for preparing ahead. Complete the entire slow cooking phase (Steps 1 through 5). Cool the ribs completely, still wrapped in their foil, and refrigerate overnight. The next day, unwrap, reapply the final glaze (Step 7), and finish them on the grill or in the hot oven until sticky and hot throughout.
Nutritional Snapshot of This Hearty Classic
As a rich, slow cooked pork dish enhanced by a sugary glaze, this remains a hearty classic. Expect a significant caloric and fat contribution, balanced by high protein content. The sugar load is largely concentrated in the final glaze, so if you decide to use less sauce or opt for a lower sugar application, you can easily mitigate that aspect of the macro profile.
Recipe FAQs
How do I get the meat really tender should I just cook the Ribs and BBQ Sauce hotter and faster?
Oh, definitely not! That’s a rookie mistake that leaves you with chewy pork. The secret to "fall off-the-bone" tenderness is low and slow cooking, just like Nana taught us. We bake them low (275°F) for several hours, often using a foil wrap with a little liquid to create steam, which breaks down the connective tissue beautifully.
I’m new to this; what’s the deal with removing the membrane off the back of the ribs?
That thin, papery layer you see on the bone side is called the silverskin or membrane. If you leave it on, it seals the meat and stops your rub from penetrating, leaving a rubbery texture once cooked.
Use a butter knife to gently pry up a corner, grab it with a paper towel for grip, and peel it right off it should come away cleanly.
Can I make the BBQ Sauce ahead of time, and how should I store leftovers?
Absolutely, in fact, making the sauce a day ahead is ideal as the flavours have time to meld together nicely. Store any leftover homemade BBQ sauce in an airtight container in the fridge; it’s usually good for up to two weeks, much like a decent jar of HP sauce.
My sauce keeps burning on the grill during the final glaze; what am I doing wrong?
That's the sugar in the glaze doing what sugar does it caramelises quickly! Ensure you only start basting during the final 15 20 minutes of cooking after the meat is already tender. Keep the heat moderate to medium low during this stage, and turn the ribs frequently to prevent any black, bitter spots.
Can I use Baby Back Ribs instead of St. Louis cut for this recipe?
Yes, Baby Backs will certainly work, and they tend to be slightly leaner and smaller, meaning they might cook through a tad quicker than the St. Louis cut. Just keep a close eye on the internal temperature, aiming for that sweet spot of tenderness, and they’ll be grand.
How do I know when the ribs are perfectly cooked and ready to pull off the heat?
Forget just looking at the colour; you need to check the texture. The meat should have shrunk back from the bone tips by about a quarter of an inch. More reliably, use a probe or meat thermometer to check the thickest part you are looking for an internal temperature between 195°F and 203°F (90°C to 95°C) for perfect tenderness.
Nanas Tangy Ribs