Herb Butter Turkey: the Secret to Incredibly Moist Meat and Golden Skin
- Unlocking the Ultimate Roast: Why Herb Butter Rules the Roost
- The Secret Weapon for Succulent Turkey: Compound Butter Mastery
- Gathering Your Arsenal: Essential Ingredients for the Perfect Herb Butter Turkey
- From Prep to Platter: Mastering the Roast Turkey Workflow
- The Step and by-Step Guide to the Best Herb Butter Turkey
- Troubleshooting and Turkey Tactics: Expert Roasting Tips
- Beyond the Holiday: Storage and Leftover Innovation
- Recipe FAQs
- 📝 Recipe Card
Unlocking the Ultimate Roast: Why Herb Butter Rules the Roost
Listen, if you’re reading this, chances are you’ve had the dry turkey experience. We all have. The one where you spend four hours fussing, the breast meat comes out looking like sawdust, and you need half a litre of gravy just to choke it down. I know that pain.
I’ve been there, weeping slightly into my carving knife.
But here is the absolute truth, the secret weapon that changed my entire roasting game: The herb butter turkey method. It’s brilliant. It's the reason my turkey comes out juicy, aromatic, and sporting skin so shatteringly crisp you can hear the crunch from across the dining room.
Seriously, folks, forget the elaborate brining stations and the expensive gadgets. We're going straight for flavour and fat penetration, and that means loading up on the good stuff.
The beauty of this herb butter turkey recipe isn't just the flavour (though it’s spectacular). It’s the simplicity. Once the butter is under the skin, your job is basically done until it’s resting time. This is how you reclaim your holiday afternoon.
The Secret Weapon for Succulent Turkey: Compound Butter Mastery
The French nailed it centuries ago: fat is flavour, and when you blend softened butter with incredible aromatics, you create compound butter a flavour bomb ready to deploy. For our purposes, it’s not just flavour; it’s insulation and moisture delivery.
Think of that layer of seasoned fat as the bird’s personal spa treatment.
Basting vs. Butter: The Science of Moisture Retention
You see grandma basting every 20 minutes? Bless her heart, she’s actually making it harder on herself. Every time you open the oven door, the temperature plummets, slowing down the cooking process. And what are you basting with? Liquid.
That liquid immediately cools the skin, preventing it from crisping up. You end up with pale, soggy skin and an inefficient cook time.
This is why the herb butter turkey approach is superior. By working the butter under the skin (we'll get to that tricky part in a sec), the fat melts directly onto the breast meat, acting as an internal baste. It constantly lubricates the muscle fibers from the inside out.
The result? Flavour permeates the meat, and the skin still gets that critical direct heat exposure needed for crispness.
Flavor Fusion: Choosing the Perfect Herb Blend for Your Bird
When I started out, I used dried everything. Mistake! Dried herbs just don't have the volatile oils you need here. You need fresh, vibrant herbs to really carry the aromatics through the cooking process.
I stick to the classics for my definitive herb butter turkey rub because they’re robust enough to handle the high heat and pair perfectly with poultry. My holy trinity is sage, thyme, and rosemary.
| Herb Role | Recommended Mix | Why It Works |
|---|---|---|
| Foundation | Thyme and Sage | Deep, earthy, classic poultry pairings. |
| Aromatic Punch | Rosemary | Piney, bright, cuts through the fat. |
| Brightness | Lemon Zest & Garlic | Non and negotiable for cutting richness. |
If you feel like experimenting, go for it! Just make sure the herbs are finely chopped so they don’t tear the delicate skin.
The Herb Butter Turkey Difference: Crispy Skin, Effortless Flavor
When people ask me what makes this recipe different, I tell them it's the lack of stress. You put the time in upfront about 20 minutes of intense prep and then you trust the process.
You put the bird in, you walk away, and you come back hours later to a perfect, golden, aromatic centerpiece. This technique ensures that even the often and neglected herb butter turkey breast remains juicy and tender, which is usually the trickiest part.
Gathering Your Arsenal: Essential Ingredients for the Perfect Herb Butter Turkey
Let’s talk ingredients. Honestly, this isn’t the time to skimp. If you can get great quality butter, do it. If you can get fresh herbs, absolutely. The quality of your raw materials directly translates to the final flavour. It’s worth the extra few quid.
Butter Breakdown: The Critical Role of Softened Fat
You must use softened butter. I mean, truly room temperature. If you press your finger into it and it leaves a clean indentation without melting completely, you're golden. If it’s too hard, you risk tearing the turkey skin when you try to apply it, and a tear means a dry patch.
If it's too melty, it won't hold the herbs well. I usually leave my butter out for about two hours before I start the prep.
Freshness Matters: A Guide to Selecting Aromatic Herbs
Go heavy on the herbs. Seriously heavy. We are looking for vibrant green specs throughout that butter. Buy them the day before, or clip them from the garden. Fresh sage smells like Thanksgiving in a jar; there’s no replicating that with dried stuff. And don't forget the garlic and lemon zest.
That acidic brightness is critical to balancing the richness of the butter and the poultry.
Temperature and Trestles: Must and Have Kitchen Equipment
You need three things to succeed here:
- A sturdy roasting pan.
- A rack (V-rack is best, but any raised rack works). This keeps the bottom of the bird out of the liquid, allowing air circulation for crispiness.
- A meat thermometer. Forget the little plastic pop and up thing. It’s wildly inaccurate. Get an instant and read digital thermometer. This is the single most important purchase you will make for your roast dinner life.
Choosing the Right Bird: Size, Quality, and Prep
I usually opt for a free and range, heritage bird if possible. They just have better flavour and better fat coverage. When choosing size, remember you need about 500 grams (1 lb) per person, but account for leftovers!
The most important prep step (which I always tell my friends): Pat that bird down.
CRUCIAL NOTE: You must pat the turkey completely dry, inside and out. Use stacks of paper towels. Moisture is the enemy of crispy skin. Some folks even rub the skin with a tiny bit of baking powder and salt after drying to guarantee crispness.
Related Recipes Worth Trying
- Garlic Butter Bread Rolls: Properly Fluffy Homemade Dinner Buns — Garlic Butter Bread Rolls are the softest dinner rolls youll ever bake. Master this enriched dough recipe for fluffy garlic butter buns that are the...
- Thanksgiving Recipes Collection: Perfect Brown Butter Stuffing — Thanksgiving Recipes Collection features this Brown Butter Stuffing, the unsung hero of your Full Thanksgiving Dinner. Get the perfect moist inside,...
- Flourless Chocolate Peanut Butter Muffins Fudgy GlutenFree — Flourless Chocolate Peanut Butter Muffins are a gamechanger for gluten-free breakfast These naturally grain free muffins have a fudgy rich chocolate flavor...
- Grilled Corn Sweet Charred Cobs with Zesty Lime Chili Butter — This ultimate Grilled Corn recipe transforms simple sweetcorn into a smoky side dish with perfect charred kernels Our grilled corn on the cob is finished...
- Mediterranean Bowl LemonHerb Chicken Power Bowl Ready in 40 Min — This vibrant Mediterranean Bowl is a satisfying lunch featuring lemonherb chicken and zesty tahini dressing This quick mediterranean bowl recipe is perfect...
- Vegan Peanut Butter NoBake Cookies Easy 10Minute Recipe — Vegan Peanut Butter NoBake Cookies deliver classic flavor with only 10 minutes of active prep time Quick and easy these vegan chocolate peanut butter no...
From Prep to Platter: Mastering the Roast Turkey Workflow
The workflow for this herb butter turkey method is straightforward, but the timing of the steps is crucial.
First, you mix the butter. Second, you dry the bird (seriously, dry it). Third, the messy part: getting that butter under the skin. This feels slightly gross, but it's where the magic happens. You have to be delicate.
Find the membrane opening near the cavity and gently slide your fingers or a thin rubber spatula in, creating a pocket over the breast meat. Don't worry about ripping the skin further down; just focus on the breast. That's the part that needs the most help.
Once the bird is coated internally and externally, it gets a over high heat blast. Why? To jump and start the crisping process. Then we drop the temp down low and slow. This method guarantees we get that beautiful golden colour without drying out the interior.
The Step and by-Step Guide to the Best Herb Butter Turkey
We’re past the theory; let's crack on with the instructions. This is how you make the absolute best herb butter turkey .
Crafting the Compound Butter: Mixing and Mashing
In a medium bowl, combine the softened butter, the minced garlic, the sage, thyme, rosemary, lemon zest, salt, and pepper. Use a fork or a small spatula and mash it together thoroughly until everything is evenly distributed and the butter is slightly streaky with green herbs. Taste it!
It should taste intensely seasoned and absolutely delicious. If it tastes bland, add more salt.
The Sub and Skin Mission: Applying Butter for Maximum Effect
Place the dry turkey in the roasting pan. Starting at the neck cavity, work your fingers carefully between the skin and the breast meat, creating a large, loose pocket. Grab a dollop of that herb butter (about a tablespoon at a time) and push it deep into the pocket.
Use your hands on top of the skin to massage and spread the butter evenly over the breast meat. Repeat until the breast and the top of the thighs are coated under the skin.
Use the remaining butter to coat the exterior skin of the whole bird. Now, pour the stock and rough and chopped aromatics (onions, celery, carrots) into the bottom of the pan not over the bird. This liquid will steam the bottom and create the base for our gravy.
Achieving Golden Skin: The Initial over High heat Blast
Pop the turkey into your preheated 220°C (425°F) oven. Roast for 20 minutes, just until that skin turns a deep golden colour. Keep a close eye on it during this phase. If your oven runs hot, you might only need 15 minutes.
Once golden, immediately drop the temperature to 175°C (350°F). Don't open the door until the temperature has settled.
Internal Temperature Checks: Ensuring Food Safety and Perfection
Continue roasting at the lower temperature. Don't worry about opening the oven for a peek too often. If the breast starts getting aggressively dark before the thighs are done, loosely tent the breast with foil.
Start checking the internal temperature with your digital thermometer at the three and hour mark. Stick the probe into the thickest part of the breast and then the deepest part of the thigh, avoiding bone. You are looking for 74°C (165°F) in the breast and 80°C (175°F) in the thigh.
Since the thigh is fattier, it can handle a higher temperature and usually needs a little more time. When the breast hits 74°C (165°F), it's done!
The Crucial Rest: Locking in Juices Post and Roast
I cannot stress this enough: The turkey continues cooking once it leaves the oven, and it absolutely must rest. Pull it out, transfer it (rack and all) to a cutting board, tent it tightly with foil, and walk away. For a 5.5 kg bird, aim for a 45 minute rest, or even an hour.
If you carve immediately, all those beautiful juices that the herb butter turkey method worked so hard to create will flood your board instead of staying in the meat. That rest time is non and negotiable.
Troubleshooting and Turkey Tactics: Expert Roasting Tips
- The Foil Tactic: Is one side of the bird browning faster than the other? Rotate the pan halfway through the low and slow cook time. If the skin is getting too dark, use a double layer of foil to create a small tent over the area.
- The Dry Skin Insurance: If you didn’t brine (we’ll discuss brining in a second), adding a tiny sprinkle of fine kosher salt to the interior and exterior 12 hours before cooking can help draw moisture out of the skin, leading to a crisper surface.
- Don't Overstuff: If you must stuff the bird (I prefer to bake stuffing separately), only stuff the cavity loosely. A densely packed cavity acts like an insulator, meaning the centre won't reach a safe temperature without overcooking the surrounding breast meat.
- Lard for Lubrication: If you find the legs are looking pale, rub them with a little extra fat (the remaining herb butter or a splash of olive oil) about 30 minutes before the end of cooking.
Beyond the Holiday: Storage and Leftover Innovation
This herb butter turkey is so flavourful, you’ll find yourself looking for excuses to roast it all year. But inevitably, you’ll have leftovers.
Addressing Brining: Is it Necessary with This Method?
Many folks ask if they still need to brine if they use a liberal herb butter turkey injection recipe (which this basically is, just surface application). My answer is no, you don't need to.
Brining certainly helps with ultimate moisture retention and seasoning, but the sheer amount of fat and seasoning applied directly under the skin in this method is enough to produce an incredibly juicy bird. I skip the brine if I’m short on fridge space or time.
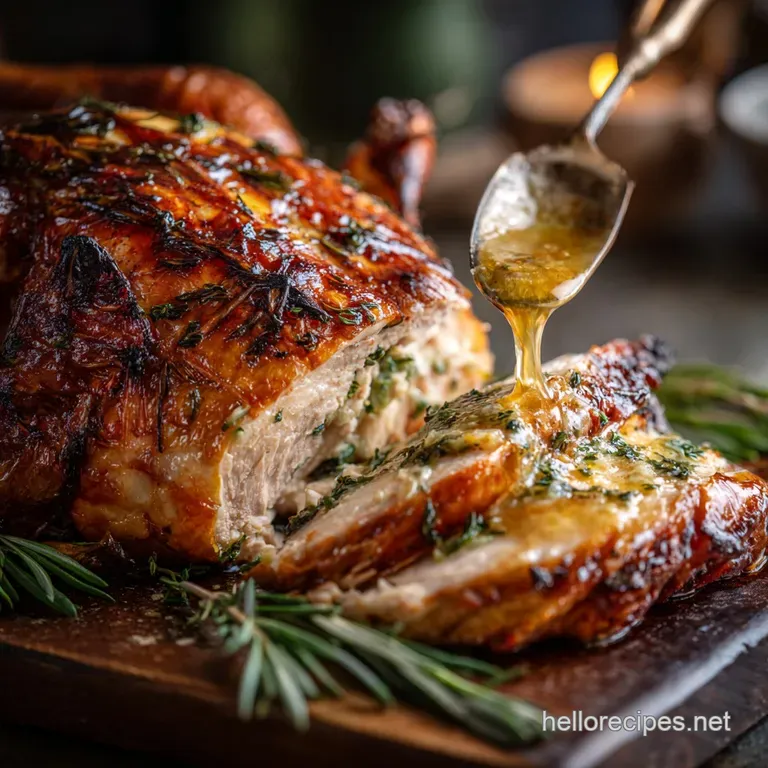
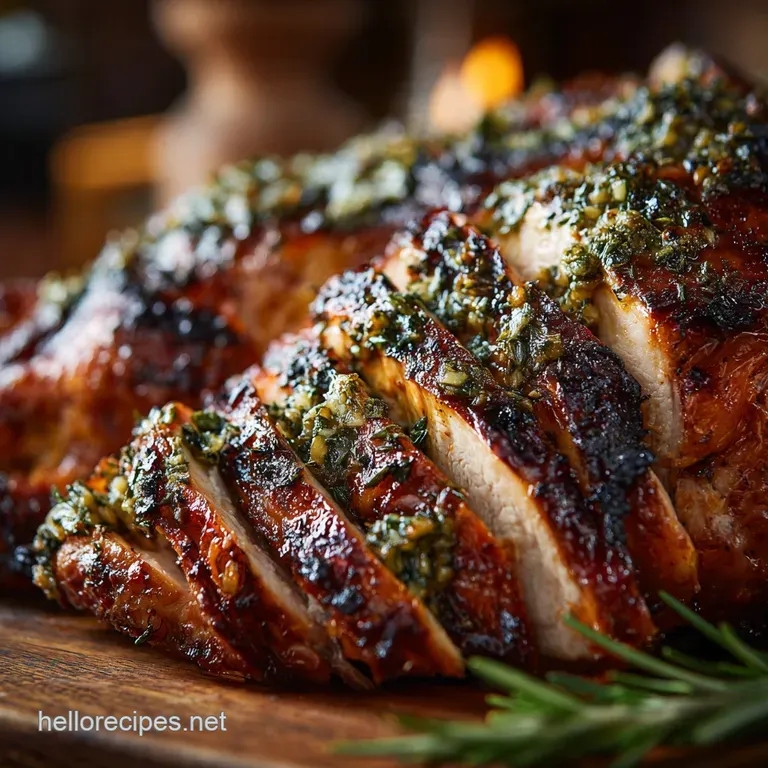
Carving Techniques: Presenting Your Herb Butter Turkey Like a Pro
Start with a really sharp knife (sharpen it before the guests arrive!). Slice the breast meat off the bone in large sections first, then slice those sections against the grain. Remove the legs and thighs by cutting through the joint.
If you slice it neatly, you can arrange it beautifully on a platter and then pour the pan juices over the top right before serving. It looks impressive, and the slicing keeps the meat juicy.
Flavor Swaps: Mediterranean and Spicy Butter Variations
Want to change things up next time? Try these herb butter turkey variations :
- Mediterranean: Swap sage and thyme for oregano, parsley, capers, and sun and dried tomatoes (chopped very finely). Add an extra squeeze of lemon juice.
- Spicy Smoke: Go heavy on smoked paprika, add a little cayenne, and use cilantro and garlic. This gives the skin a deep, gorgeous colour and a fiery kick.
Safety First: Storing Cooked Turkey and Preventing Dryness
The biggest enemy of a leftover turkey sandwich is dryness.
- When storing carved meat, place it in an airtight container and pour a couple of spoonfuls of gravy or pan juices over the slices before sealing. This keeps them moist for reheating.
- Cooked turkey should be cooled quickly (within two hours of roasting) and stored in the fridge for no more than three to four days.
What to Serve Alongside: Pairing Suggestions
This herb butter turkey is robust and garlicky, so you need sides that can stand up to it. I always go for a mash (potato or celeriac) that soaks up the juices beautifully. Green beans sautéed with almonds provide great texture.
And please, please, use the roasted vegetables and pan drippings from the roasting pan to make the gravy it's already infused with all that fantastic herb and garlic flavour. It will be the best gravy you’ve ever had. Trust me. You’ve got this. Go roast that perfect bird!

Recipe FAQs
How does this Herb Butter Turkey method stop the meat from getting dreadfully dry?
The butter under the skin melts and bastes the meat internally, delivering flavour and moisture directly into the muscle tissue as it cooks, unlike external basting.
My turkey skin is usually a bit pale how do I get that brilliant, golden brown crust?
The secret is aggressively drying the skin before applying the butter, starting the roast at a high temperature (425°F), and avoiding unnecessary basting that cools the skin.
Is there a foolproof way to know when the bird is safely cooked? I ditch the pop-up timer!
Absolutely. Use an instant read thermometer: the breast must hit 74°C (165°F) and the thigh 80°C (175°F). Then, allow it to rest for at least 45 minutes before carving.
Can I make the herb butter ahead of time, and how long are the leftovers good for?
Yes, make the compound butter up to a week prior and store it chilled. Leftover turkey is safe for 3 4 days in the fridge, perfect for Boxing Day sandwiches!
Can I swap out the fresh herbs for dried ones, or use a different type of fat for dietary reasons?
You can substitute dried herbs, but use half the quantity as they are much stronger. For dairy-free, use a high-quality plant based butter alternative, ensuring it is room temperature.
Herb Butter Turkey For Moist Meat

Ingredients:
Instructions:
Nutrition Facts:
| Calories | 600 calories |
|---|---|
| Fat | 30 g |
| Fiber | 1 g |
