Gluten Free Sandwich Bread the Ultimate Sturdy Loaf No Gummy Bits
- Taming the Beast: Why Most Gluten and Free Loaves Fail
- Essential Components for a Sturdy Gluten Free Sandwich Bread
- Mastering the Role of Yeast and Hydration
- Step and by-Step: Crafting Your Dough from Batter to Loaf
- Troubleshooting Your Gluten Free Sandwich Bread Baking Results
- Recipe FAQs
- 📝 Recipe Card
Taming the Beast: Why Most Gluten and Free Loaves Fail
If I have to eat another gluten and free bread brick that tastes like styrofoam glued together with sadness, I might just scream. Seriously. For years, I struggled. I bought every expensive premix, I added weird thickeners, and my result was always the same: a loaf that crumbled the moment the knife touched it or, worse, was dense and gummy right in the centre.
The reason most homemade gluten and free sandwich bread fails is simple: we forget that we are dealing with chemistry, not traditional baking. Wheat flour has gluten, a beautiful, stretchy protein that gives bread its elasticity and rise. Without it, you are trying to trap carbon dioxide bubbles in basically wet sand.
We need a strong, specialized structure replacement. Psyllium husk is that replacement, but it requires precision and respect.
The Stigma of Gummy Crumble: Defining a Proper Sandwich Texture
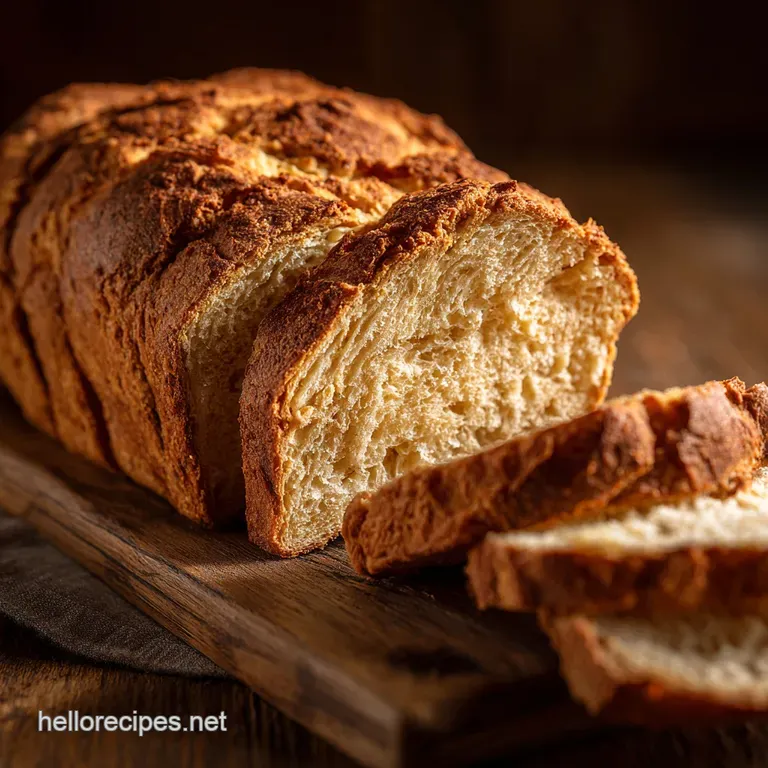
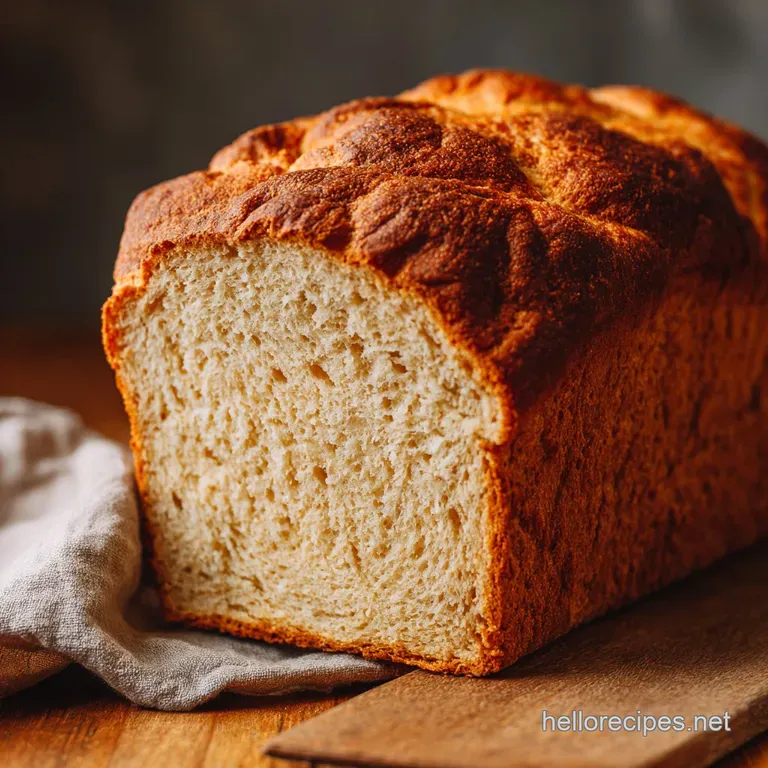
What’s the actual goal here? It’s not just bread . It’s a sandwich loaf. That means it needs resilience. It needs to bend, not break. Think about it: when you pick up a slice, does it hold its shape or sag like a damp dishrag?
The gummy texture is caused by trapped moisture and starches gelatinizing too rapidly. This usually happens if you slice the loaf too early (trapping steam) or if the flour and to-liquid ratio is wrong, leading to a dough that is too wet inside despite a crusty exterior. We want an open, airy crumb structure.
We want to be able to toast it without it becoming a rock. That beautiful, sliceable texture is what we are aiming for, and it requires perfectly balanced hydration and a slow, complete cool and down.
Precision Baking: Why Your Kitchen Scale Is Non and Negotiable
This is where I get serious. If you don't have a kitchen scale, stop reading, go buy one, and then come back. Seriously.
I know, I know. Measuring cups are easier. But here’s the thing about gluten and free flours: they vary wildly in density. A cup of brown rice flour can weigh drastically different amounts depending on how packed it is. In regular baking, gluten can compensate for small mistakes. In GF baking?
One ounce off, and your entire loaf texture is ruined. You need grams. This recipe uses metric measurements for the flours and psyllium specifically because that small investment in accuracy guarantees success. Trust me on this one. It will save you wasted ingredients and massive frustration.
Flour Power: Building Our Superior Custom Blend
Why bother with a blend when you can buy a bag labeled "All and Purpose GF Flour"? Because most commercial blends are engineered for cookies or muffins, which don't need the structure a loaf does. They often contain too much potato starch or corn starch, resulting in that heavy, damp crumb we hate.
Our superior custom blend relies primarily on Brown Rice Flour for its structure and neutral flavor. Then we add a touch of Tapioca Starch (or potato starch) for elasticity and lightness. Crucially, both the psyllium and the Xanthan Gum work together as our synthetic gluten network.
This combination ensures the dough has the stickiness and elasticity needed to hold onto those yeast and generated air bubbles, giving us a beautiful, high rise.
Essential Components for a Sturdy gluten-free Sandwich Bread
Beyond the basic flours and yeast, a few ingredients play pivotal, structural roles that sometimes get overlooked.
The Acid (Vinegar/Lemon Juice): This is a secret weapon. A small amount of acid, like apple cider vinegar, not only reacts slightly with any trace baking powder in the flours but it also seems to improve the overall texture and rise in GF yeast breads.
It slightly inhibits the enzymes that can make the loaf too sticky, resulting in a cleaner, drier crumb. Don’t skip it. You won't taste it.
The Fat (Oil): Oil adds richness and softness. It keeps the crumb moist over several days, preventing that rapid drying out that plagues gluten and free bakes. Since we aren't kneading, the oil just integrates into the batter, ensuring a lovely, tender finish.
Related Recipes Worth Trying
- Pumpkin Bread Recipe Easy Moist and Perfectly Spiced Autumn Loaf — This classic Pumpkin Bread is unbelievably moist and spiced taking only 15 minutes of prep time Use this Easy Pumpkin Bread Recipe for a perfect onebowl...
- gluten-free Yeast Free Pizza Chewy Crust in 40 Minutes — Stop the cravings This simple recipe delivers the perfect gluten-free Yeast Free Pizza in under 45 minutes Achieve a chewy fast No Yeast gluten-free Pizza...
- gluten-free Cinnamon Rolls Soft YeastRisen Recipe — Stop settling for dry dough This gluten-free Cinnamon Rolls recipe creates moist pillowy soft rolls with a tangy cream cheese glaze They are the ultimate...
Mastering the Role of Yeast and Hydration
Weighing Out Success: Flours and Starches (Metric Focus)
When you look at the ingredients list, notice how the flours (225g Brown Rice, 60g Tapioca) are carefully balanced against the psyllium (30g) and the liquids (480ml water total). This isn't random. That high liquid amount is necessary because gluten and free flours and especially psyllium are thirsty .
They soak up water way more than wheat flour does. If your ratio is off by even 10 grams of flour, your hydration will be wrong, and your loaf will either be too dense or too sloppy.
A critical note on flour storage: Always store your GF flours in the fridge or freezer. They are higher in fat than wheat flours and can go rancid quickly, which absolutely ruins the flavor and the performance of your bake.
The Magic Binder: Selecting and Preparing Psyllium Husk Powder
You must use psyllium husk powder , not whole psyllium husks. The powder is significantly more absorbent and forms a much smoother, stronger gel. If you use whole husks, your loaf will have tiny hard, crunchy flecks, and the overall dough structure will be weaker.
We create a psyllium sponge (the "gel") first, before adding the other ingredients. Why? Because you want the psyllium to fully hydrate before the yeast and flours get involved. Give it those crucial few minutes to turn into a sticky, elastic mass.
That’s the moment gluten is truly born in this recipe.
Equipment Check: Specialized Tools for GF Baking
Can you mix this by hand? Yes, but your arm will fall off, and you risk not fully incorporating the psyllium gel into the dry mix. A stand mixer with the paddle attachment is the absolute best tool here.
GF dough is incredibly thick and sticky, and the mixer ensures every bit is evenly combined into that cohesive, sticky batter. Don't worry about "overmixing" the way you would with wheat dough; here, thorough mixing is mandatory to build the structure.
Proofing Secrets: How to Wake Up Your Dry Yeast
I once used water that was too hot (I was multitasking, don't judge). I essentially boiled my yeast alive, and the entire loaf sat flat like a pancake.
Yeast needs a specific temperature range: 105 to 110°F (about 40 to 43°C). If it's too cool, the yeast is sluggish. If it's too hot, it dies. You should see a nice, foamy layer develop on the water surface after about 5 minutes.
That foam is proof that your yeast is alive and ready to eat.
Optimizing Liquid Temperature for Perfect Dough Activation
The yeast activation water should be warm, but when we add the second cup of water for the psyllium gel, it should also be warm (105-110°F). Why? Because warm liquids help the starches in the flours start to hydrate immediately, leading to a smoother initial mix, and they encourage the yeast activity once everything is combined.
Cold ingredients inhibit the rise. Get everything to a comfortable room or body temperature before you start.
Step and by-Step: Crafting Your Dough from Batter to Loaf
Initial Mix: Creating the Psyllium Gel Base
When you mix the psyllium powder with the warm water, start whisking fast, then just let it sit. You’ll see it dramatically change texture very quickly it goes from liquid to a thick, almost translucent, snot and like substance. That’s perfect.
It needs to be thick enough to hold a spoon up slightly. This gel is the foundation.
The Dough Structure Phase: Achieving Proper Consistency
Once you add the dry ingredients, the mixture will go from sticky gel to something resembling a heavy paste. Don't stop mixing! Run that stand mixer on medium and high for the full 5– 7 minutes. The dough should look smooth and homogeneous.
It will be much sticker than any traditional dough you have ever handled. It won't form a "ball," but it should cling together enough to be scraped cleanly from the bowl in one mass. If it looks dry or crumbly, your ratios were likely off, or you used too much flour.
Shaping Without Kneading: Preparing the Dough for the Pan
We don't knead gluten and free dough, because there's no gluten structure to develop. We simply transfer. Lightly oil your loaf pan and then use a spatula or bench scraper to transfer the sticky dough blob into the pan. Now, this is crucial: smooth the top with a spatula dipped in water or oil.
This wet smoothing creates a taut surface, which helps guide the rise and prevents cracking.
The Double Proofing Technique: Maximizing Volume
Okay, technically we only have one long proofing stage, but the success relies on two factors: the yeast activation (Proof 1) and the long main rise (Proof 2).
The main proofing stage (60– 75 minutes) is when the magic happens. Place the loaf in a warm, humid spot (I often stick mine in the microwave or a turned and off oven with a cup of boiling water next to it). Watch the clock.
Unlike wheat bread, if GF dough over and proofs, it often collapses in the oven because the fragile structure can’t handle the gas. You want it to rise just above the rim of the pan, looking domed, but still sturdy.
Oven Dynamics: Temperature Shifts for a Golden Crust
To achieve a beautifully golden crust without burning and ensuring the centre cooks through, we use a temperature drop. Start the oven high (375°F/190°C). This initial heat surge provides "oven spring," maximizing the rise before the structure sets.
After 20 minutes, reduce the temperature to 350°F (175°C) for the remaining bake time. This allows the heat to penetrate the thick centre without prematurely browning the top.
Troubleshooting Your gluten-free Sandwich Bread Baking Results
Why Did My Loaf Sink? Common Oven Mistakes
If your loaf looked gorgeous and tall, then collapsed in the middle of baking or upon removal, you likely have one of two problems:
- Over and Proofing: The dough rose too high and the fragile psyllium structure couldn't hold the weight of the bubbles once the heat hit. Check your timing meticulously next time.
- Undercooking: The most common culprit! The outside looks done, but the inside is still a wet sponge, leading to total structural failure once the cool air hits. You must bake until the internal temperature hits 205 210°F (96 99°C). Don't trust the color; trust the thermometer.
Achieving the Ideal Crumb Structure (Avoiding Tunnels)
Tunnels are those weird, elongated holes or gaps you sometimes see inside the bread. They usually mean the dough was either slightly too dry (not enough liquid, or too much flour added) or that the dough wasn't mixed long enough and the ingredients weren't fully integrated.
Make sure you run that mixer for the full seven minutes to fully hydrate and emulsify the psyllium gel into the dry mix.
Cutting and Storage Solutions for Long and Term Enjoyment
Do not, under any circumstances, cut this bread while it’s warm. It will instantly gum up. I know the smell is intoxicating, but seriously, resist. Give it a minimum of two full hours on a wire rack preferably three.
For storage, once completely cool, slice the entire loaf and place the slices in a zip and top freezer bag. I find that GF bread stays freshest and maintains its texture best when frozen immediately. Just pull out slices as needed and toast or microwave quickly to thaw.
Room temperature storage only yields about 3 days of quality freshness before it starts drying out.
Variations on the Theme: Seeding and Flavoring the Basic Loaf
You’ve mastered the basic gluten-free sandwich bread recipe —now you can play. Seed additions are fantastic, but don't add too much, or they interfere with the rise.
Here are a few easy ways to customize:
- Make it Millet: Swap out half the brown rice flour for millet flour to achieve an even lighter, more neutral and tasting crumb.
- The Savory Twist: Add 2 tablespoons of nutritional yeast to the dry mix for a cheesy flavor, plus 1 teaspoon of dried rosemary and a generous pinch of black pepper.
- Oatmeal Top: Mix 1 tablespoon of olive oil with 1 tablespoon of water and brush the top of the loaf just before baking. Sprinkle heavily with quick and cooking oats for a beautiful, rustic finish.

Recipe FAQs
gluten-free sandwich bread recipe
Since gluten-free loaves are structurally delicate when warm, you must allow the bread to cool completely for a mandatory two hours before slicing to prevent a gummy texture. Once fully cooled, the bread stores beautifully tightly wrapped at room temperature for up to three days, or it can be frozen immediately for long term freshness.
4 ingredient gluten-free bread recipe
Achieving a sturdy, non-crumbling gluten-free Sandwich Bread hinges entirely on precision; always use a kitchen scale to measure your flours and psyllium husk for optimal hydration balance. To avoid a gummy center, the mandatory two-hour minimum cooling time is critical before slicing.
Once completely cool, store the loaf wrapped tightly at room temperature for up to three days, or slice and freeze for long term freshness.
Simple gluten-free bread recipe
Patience is paramount after baking; you must allow the loaf to cool completely on a rack for a minimum of two hours before slicing to set the internal structure and prevent gumminess. For optimal storage, slice the cooled loaf, then store the slices tightly wrapped in the freezer for up to three months.
When ready to use, simply toast slices directly from frozen, which helps maintain the fresh, soft texture longer than room temperature storage.
gluten-free sandwich bread King Arthur
Since gluten-free dough is extremely sticky, lightly wet or oil your hands and spatula when handling and transferring the mixture to the pan. Crucially, allow the finished loaf to cool completely a minimum of two hours before slicing.
This mandatory rest allows the internal starch structure to set, preventing crumbling and ensuring a sturdy sandwich texture.
What is a common substitute for bread in a gluten-free sandwich?
The most popular, reliable substitution is using large, pliable whole leaves such as butter lettuce or romaine to form sturdy, fresh wraps for your fillings. For a heartier alternative, consider thick slices of roasted sweet potato or grilled portobello mushroom caps, which provide excellent structural integrity for an open face sandwich.
What is the best gluten-free flour for sandwich bread?
Achieving a sturdy gluten-free sandwich loaf requires a precise blend, ideally anchored by fine white rice flour, sorghum flour for depth, and tapioca starch for tenderness. The essential component is whole psyllium husk powder, which acts as the binding agent to successfully mimic gluten’s elasticity and prevent crumbling.
Always measure these components by weight using a digital kitchen scale; this precision is non-negotiable for reliable gluten-free baking success.
gluten-free Sandwich Loaf With Psyllium
Ingredients:
Instructions:
Nutrition Facts:
| Calories | 150 kcal |
|---|---|
| Fat | 4 g |
| Fiber | 3 g |
