Delightful Gluten-Free Hello Dolly Bars: a Sweet Layered Treat
- Indulge in the Delights of Nostalgia: Bake Delightful Gluten-Free Hello Dolly Bars
- Your Essential Ingredients Guide for Baking Bliss
- Professional Cooking Method: Baking Delightful Gluten-Free Hello Dolly Bars
- Pro Tips & Secrets for Baking Delightful Gluten-Free Hello Dolly Bars
- Perfect Presentation of Your Amazing Bars
- Storage & Make-Ahead Strategies
- Creative Variations for Everyone’s Taste Buds
- Complete Nutrition Guide
- Frequently Asked Questions
- 📝 Recipe Card
Indulge in the Delights of Nostalgia: Bake Delightful gluten-free Hello Dolly Bars
Oh my gosh, let me tell you about the time i stumbled into a little cafe in my hometown that grabbed my heart and taste buds with a single bite.
As i sank my teeth into a hello dolly bar you know, the layered dessert bursting with flavors i was sent straight back to those carefree summer days.
You ever have a food that feels like a big cozy hug? that was it for me! but what if i told you that we've given this classic treat a twist? that's right, today we’re diving into how to bake delightful gluten-free hello dolly bars .
Trust me, these bars are a game changer!
A Slice of History with Modern Relevance
The origins of hello dolly bars are a bit murky, but they’re often linked to the beloved musical "hello, dolly!" from the ‘60s.
They’ve managed to stick around because, honestly, who can resist that perfect blend of buttery crust, gooey chocolate, sweet coconut, and crunchy nuts? fast forward to today, and we see these bars popping up everywhere, from bake sales to brunch spreads.
They’re not just some retro relic; they’ve evolved into beloved gluten-free dessert recipes , bringing joy to those who need a gluten-free option.
So, how long does it take to whip these up? prep time is a breezy 15 minutes, and with just about 25 minutes in the oven, you could be munching on these delicious bars in just over an hour! and the best part?
They’re super easy think “easy glute free baking” for all your friends who think gluten-free is synonymous with bland.
With a yield of 16 bars, they’re perfect for gatherings. and you won't break the bank; most of the ingredients are pretty budget friendly!
All the Benefits Without the Guilt
Alright friends, here’s the good stuff. did you know that these gluten-free treats not only taste divine but are also perfect for sharing at parties or just enjoying on a cozy couch night?
We're talking about rich semi sweet chocolate desserts that are balanced out by the crunch of nuts and the chewy goodness of coconut.
Plus, with the use of sweetened condensed milk , you’re getting a nice hit of creaminess that brings it all together.
These bars are a versatile crowd pleaser, suitable for holiday baking, brunch get-togethers, or that impromptu weekday dessert when you need a little pick-me-up.
And don’t get me started on how customizable they are! swap out the nuts, add a pinch of sea salt, or even play around with gluten-free graham cracker crumbs if the classic version isn’t your thing.
Sweet Treating Made Simple
Now, if you’re like me, you might sometimes look at a recipe and think, “will i really pull this off?” but trust me, these bars are built for success.
With just a few simple steps, you’ll be on your way to serving up some serious rustic dessert recipes that look like they took hours to create.
They’re perfect for family friendly desserts , making everyone feel included, especially those gluten-free buddies who often miss out.
So, how about we dig into the ingredients for these delightful bars? You’re gonna need some basic baking essentials, and I promise, once you get your hands on this recipe, you'll be the cupcake magician at the next gathering! Ready to bring some delicious cheer? Let’s grab those ingredients!
Your Essential Ingredients Guide for Baking Bliss
Alright, folks, if you're diving into the world of baking, you gotta know your essential ingredients like the back of your hand. Seriously, it’s a game changer! Let’s break this down easy peasy.
Premium Core Components: What You Need
When it comes to baking, it’s not just about tossing flour into a bowl. you need the premium core components to create those gluten-free dessert recipes you’ll brag about later.
Here’s a quick rundown:
- Detailed Measurements: In the baking world, accuracy matters. For our Delightful gluten-free Hello Dolly Bars, grab 1 ½ cups of gluten-free graham cracker crumbs (that’s about 150g), and you’ll want ½ cup of unsalted butter, melted (or 115g for the precise folks). Oh, and don't forget that 1 ½ cups of sweetened condensed milk (which is around 360ml) for that rich layer.
- Quality Indicators: Always pick ingredients that scream freshness. For chocolate, look for shiny, smooth chips. With coconut, check for that soft, fluffy texture avoid anything that’s dried up. Fresh is best, baby!
- Storage Guidelines: Keep your stuff cool and sealed tight. Your chocolate chips deserve a nice, dark pantry spot, while coconut can chill in a zip-lock bag.
- Freshness Tips: Smell your ingredients; honestly, if they smell off, they probably are! Don’t risk it.
Signature Seasoning Blend: Making it Pop
Now, let’s jazz it up with a signature seasoning blend. don’t skip this it makes your dessert shine! when we talk about flavor enhancers like vanilla extract (1 teaspoon goes a long way), you’ll want to pour it in slowly and savor that moment.
Think about classic pairings like chocolate and nuts (hello, walnuts or pecans) for our hello dolly bars. they’re like the batman and robin of desserts.
Smart Substitutions: Be Resourceful
What happens when you’re missing an ingredient? panic? no way! think smart substitutions. need a gluten-free option for that graham cracker crust? crushed gluten-free digestives work wonders! can’t find sweetened condensed milk? try a homemade coconut version.
Seriously, it’s easy peasy and oh-so-delicious!
- Common Alternatives: Swap chocolate chips for butterscotch if you’re feeling adventurous.
- Dietary Modifications: Keep it vegan by using dairy-free chocolate.
- Emergency Replacements: If you run out of butter, use coconut oil. Game changer!
Kitchen Equipment Essentials: Tools of the Trade
You don’t need fancy gadgetry to whip up these glorious yes, I need more Hello Dolly Bars. Stick to the basics:
- Must Have Tools: A 9x9 inch (or 23x23 cm) baking pan is key! It’s your trusty partner here.
- Preparation Tips: A rubber spatula is worth its weight in gold for mixing.
- Storage Solutions: Airtight containers will keep your sweets fresh and prevent any sneaky snacking before guests arrive.
Cherry On Top: Final Touches!
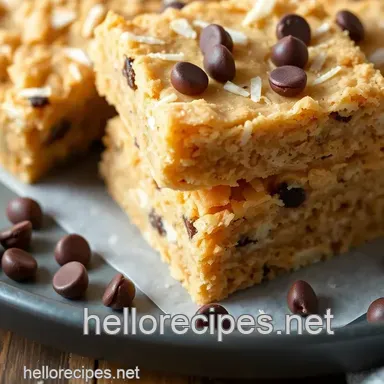
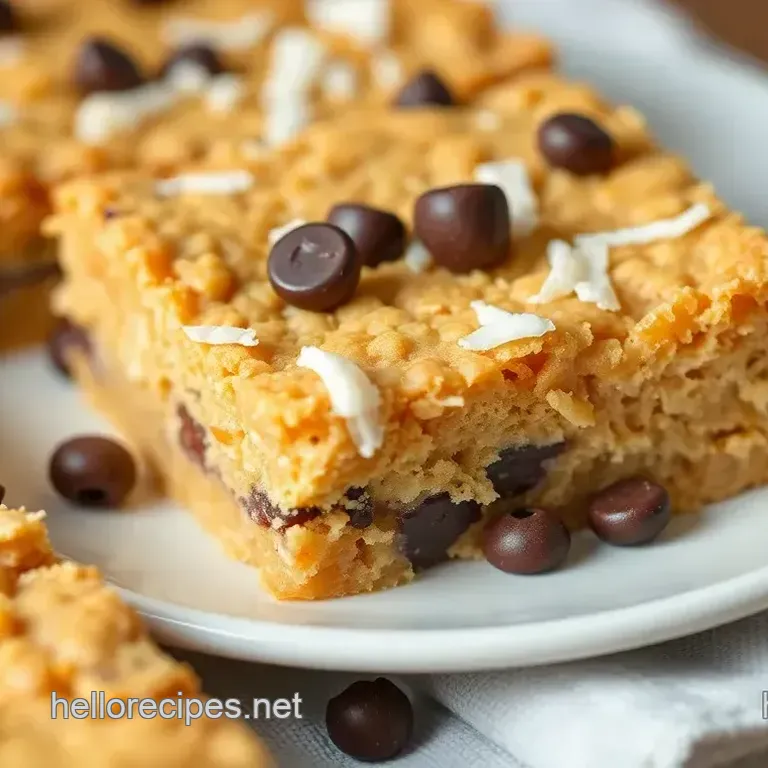
Now that you're armed with the lowdown on what to gather, it’s time to throw on your apron and bake those delightful gluten-free hello dolly bars! picture this: layers of buttery crust, rich chocolate, sweetened coconut, and a sprinkling of nuts.
Seriously, they’re a crowd pleaser. folks will be begging for the recipe!
Every layer you add is a chance for you to really get creative. feeling nutty? toss in almonds. wanna kick up the chocolate factor? go for some dark chocolate chunks instead of chips.
Baking shouldn’t feel like a chore; it’s about creating cozy, nostalgic memories over a plate of homemade sweet treats! look into in wholeheartedly, and you’ll have the perfect dessert for brunch or gatherings that’ll leave everyone begging for your secrets.
Let’s Get Cooking!
With all these essentials in your back pocket, you're ready to jump into the fun part making those layered dessert bars! let’s mix, layer, and bake our way into some deliciousness! remember, sweetened condensed milk recipes are your friends here.
Get started, and enjoy every bite. happy baking, everyone!
Professional Cooking Method: Baking Delightful gluten-free Hello Dolly Bars
Oh my gosh, there's nothing like curling up with a sweet treat, especially when it's a layered dessert like hello dolly bars ! and you know what? these bars are not just any bars; they’re gluten-free and packed with deliciousness that will knock your socks off.
Let’s get into the nitty gritty of cooking like a pro, so you can perfect your baking skills while whipping up these gluten-free hello dolly bars !
Essential Preparation Steps
Before you dive in, let's chat about mise en place . you might have heard this fancy term before. it just means getting all your ingredients ready before you start cooking.
For our bars, you need gluten-free graham cracker crumbs , butter , chocolate chips , coconut , and nuts gather them up first.
This will keep you organized when you’re in the thick of it.
Time management is like your best buddy while baking. set a timer trust me, it’ll save you from burnt edges! and organization is key; keep your workspace clean.
Tackling one part at a time reduces chaos. as for safety , don’t forget that oven can be hot. always use oven mitts, and when using a mixer, make sure you don’t stick your fingers anywhere near those beaters!
Step-by-step Process
Preheat the oven to 350° F ( 175° C) . This is super important nobody wants to guess when to put their bars in!
Prepare your pan by greasing it. If you line it with parchment paper, removing the bars later will be a breeze.
Create the crust : combine your 1 ½ cups of gluten-free graham cracker crumbs , ½ cup melted butter , and ¼ cup sugar in a bowl.
Mix until crumbly, then press it into the bottom of your pan.
Now, it’s time to layer it up! sprinkle 1 cup of chocolate chips over your crust, followed by 1 cup of shredded coconut and ½ cup of chopped nuts .
You might want to sneak a few chocolate chips while you’re at it!
Drizzle that sweetened condensed milk— 1 ½ cups of it over the top. Don’t skimp on that creamy goodness.
Bake your bars for 25 minutes . You’ll know they’re ready when the top is golden and the edges are set.
Cool them completely on a wire rack. Patience is key here, my friend.
Finally, cut those babies into bars and enjoy each delicious bite!
Expert Techniques
Now, every chef has a few tricks up their sleeve . if you’re using semi sweet chocolate , ensure you get the good stuff; it makes a difference! here’s a pro tip: keep an eye on your bars as they bake to avoid the dreaded overbake.
Once they get nice and golden, that’s when it’s go-time.
If you run into trouble, don’t sweat it! if your filling spills out of the sides, it’s okay! just scoop it back into the middle and bake on.
On the other hand, if they don’t seem cooked give them an additional 5 minutes and check again.
Success Strategies
Let’s clear up a few common mistakes . the most frequent one is underestimating the chilling time. trust me, if you cut these too early, you might have a crumbly mess.
Also, always check that the sweetened condensed milk is evenly drizzled for perfect bites!
For quality assurance , taste as you go! if you think the layer needs a bit more sweetness or crunch, adjust as needed.
These bars are meant to be customizable . want to go nut-free? swap the nuts with extra coconut or gluten-free oats for a fun twist!
And if you want to enjoy these again without the hassle, double the recipe and refrigerate one batch after it’s cooled.
They store nicely in an airtight container at room temp for up to a week!
Additional Information
Trust me, baking these bake delightful gluten-free hello dolly bars is worth every second. they’re perfect for gatherings, family friendly, and downright delicious for chocoholics too!
Whether you’re whipping them up for a party, a brunch, or just some cozy snacking, you’ll be sure to impress with this classic dessert that has a few twists.
So go on, bring some sweetness into your day, and bake away! happy baking!
Pro Tips & Secrets for Baking Delightful gluten-free Hello Dolly Bars

So, you've decided to bake delightful gluten-free hello dolly bars ? oh my gosh, you’re in for a treat! i mean, these things are seriously to die for.
And trust me, i’ve learned a thing or two along the way that’ll save you a headache or two. here are some of my personal insights to elevate your baking game!
Time saving techniques: if you’re short on time (who isn’t, right?), you can prep the crust and filling a day ahead.
Just store ‘em in the fridge until you’re ready to bake. boom! you’re already three quarters of the way to dessert!
Flavor enhancement tips: want to elevate those layers of flavor? consider adding a splash of almond extract to the condensed milk.
It creates a depth you didn’t know your bars were missing. trust me, the classic dessert bars can use a little twist sometimes!
Presentation advice: a little sprinkle of toasted coconut or a few extra chocolate chips on top before serving? yes, please! not only does it enhance the visual appeal, but it also entices those sweet tooth cravings.
And let’s face it, we eat with our eyes first, right?
Perfect Presentation of Your Amazing Bars
Let’s chat about making your Hello Dolly dessert variations stand out on the table. Plating these bad boys can really up the ante.
Plating Techniques: Instead of just slapping those bars on a plate, cut them into fun shapes or try a diagonal cut. This adds a touch of culinary flair.
Garnish Ideas: If you’ve got mint leaves or edible flowers hanging around, throw those on the plate. They add color and make those gluten-free treats for gatherings look fancy and festive!
Color Combinations: Pair your chocolate coconut dessert with some fresh strawberries or colorful sprinkles. It’s like a party for your taste buds and makes your dessert pop visually!
Storage & make-ahead Strategies
Now, let’s talk about getting the most out of those layered dessert bars once they’re baked!
Storage Guidelines: After cooling, keep your bars in an airtight container. They’ll stay fresh up to a week, but let’s be real, they probably won’t last that long!
Reheating Instructions: If you wanna go all out, heat a bar in the microwave for about 10-15 seconds before serving. The chocolate gets all melty, and it’s like a mini culinary hug!
Freshness duration: trust me, these bars are best enjoyed within the first few days. however, if you keep them sealed away from air and moisture, you could technically stretch their life a bit longer.
Creative Variations for Everyone’s Taste Buds
Feeling adventurous? Let’s mix things up a bit!
Flavor Adaptations: Try swapping the nuts for some pretzel pieces; the saltiness adds an incredible juxtaposition to the sweet. Or throw in some peanut butter chips for a creamy kick.
Dietary Modifications: For a vegan option, swap the sweetened condensed milk for a homemade coconut alternative. It's easy peasy, and nobody will miss the dairy.
Seasonal Twists: How about adding some pumpkin spice for a fall theme or peppermint for a winter vibe? These touches make a perfect dessert for brunch or holiday gatherings!
Complete Nutrition Guide
Before you dig in, let’s break down what you’ve whipped up here.
Detailed Breakdown: Each bar packs about 200 calories, making these a treat worth reaching for.
Health Benefits: You’re getting a good dose of fiber from the nuts and coconut, which makes these chocolate coconut dessert bars a bit more balanced, right?
Dietary Considerations: For folks with nut allergies, keep it nut-free; you can still enjoy that rich flavor without compromising.
Portion Guidance: Cut them smaller if you’re serving a big crowd. These crowd pleasing dessert options are so rich, you’ll get more bang for your buck with smaller portions!
So, there you have it! Whether you’re preparing a holiday feast or just need an easy recipe for home cooks, these Bake Delightful gluten-free Hello Dolly Bars are sure to impress! Enjoy every delicious bite, share with friends, and embrace the joy of baking! Happy baking, y'all!
Frequently Asked Questions
What are Hello Dolly Bars, and how do I bake delightful gluten-free Hello Dolly Bars?
Hello Dolly Bars are a layered dessert typically made with a base of graham cracker crumbs topped with chocolate, coconut, and nuts. To bake delightful gluten-free Hello Dolly Bars, simply substitute traditional graham crackers with gluten-free ones, following the recipe instructions for layering and baking.
This allows you to enjoy this nostalgic treat without gluten!
Can I make these bars in advance and how do I store them?
Yes, you can make the gluten-free Hello Dolly Bars in advance! Once cooled, store them in an airtight container at room temperature for up to a week. If you prefer longer storage, keep them in the fridge for up to two weeks or freeze them for up to three months.
What are some variations I can try for gluten-free Hello Dolly Bars?
There are several fun variations to try! You can make a nut-free version by skipping the nuts or using sunflowers seeds instead. A vegan twist can be achieved by using dairy-free chocolate chips and coconut cream instead of sweetened condensed milk.
For a flavor boost, consider adding a sprinkle of sea salt on top before baking!
Is there a way to make these bars healthier?
To make the gluten-free Hello Dolly Bars a bit healthier, consider reducing the amount of sugar in the crust or using a natural sweetener. You can also add in some ground flaxseed or chia seeds to the crust for added fiber and nutrients. Just be mindful of maintaining the texture and flavors!
What are some optional toppings or serving suggestions for the bars?
You can top the gluten-free Hello Dolly Bars with a drizzle of melted chocolate or a sprinkle of shredded coconut before serving for extra flair. They pair beautifully with a scoop of vanilla ice cream or a dollop of whipped cream to make for a decadent dessert.
Enjoy them with a cup of coffee or dessert wine for an elevated treat!
How can I ensure my Hello Dolly Bars don't turn out too dry?
To avoid dry Hello Dolly Bars, be sure not to overbake them; watch for a golden top and slightly set edges. Chilling the bars before cutting can also help maintain their moistness and improve the overall texture, allowing for cleaner cuts without crumbling.
Bake Delightful gluten free Hello Dolly Bars