Red Velvet Strawberry Cheesecake Delight Recipe
- Time: Active 25 mins, Passive 65 mins, Total 1 hours 30 mins
- Flavor/Texture Hook: Silky cheesecake filling against a shattering chocolate cookie crust
- Perfect for: High impact dinner parties or innovative holiday dessert spreads
- Crafting the Bold Contrast of Red Velvet Strawberry Cheesecake
- Understanding the Gastronomy of This Vibrant Red Dessert
- Measuring Your Success with Accurate Recipe Specifications
- Selecting Sustainable Components for Your Cheesecake Elements
- Essential Gastronomy Technology for Your Kitchen Arsenal
- Navigating the Innovative Steps from Batter to Berry
- Troubleshooting Your Red Velvet Strawberry Cheesecake Masterpiece
- Adaptation Strategies for Your Personal Flavor Profile
- Preservation Technology for Maintaining Cheesecake Freshness
- Designing the Aesthetic Presentation of Your Red Velvet
- Recipe FAQs
- 📝 Recipe Card
Crafting the Bold Contrast of Red Velvet Strawberry Cheesecake
I still remember the first time this batter hit the pan. The visual of that electric crimson liquid swirling against the pitch black chocolate cookie crumbs felt like I was painting rather than cooking.
When the oven door opened, the aroma wasn't just sweet; it had that specific, earthy cocoa tang that signals a true red velvet. It's a dish that demands attention before you even take a bite.
We’ve all seen standard cheesecakes, but this version is about the sensory play between the rich, fatty weight of the cheese and the sharp, acidic bite of the berries. It’s a bit of a kitchen experiment that turned into a household staple.
Trust me, once you see that red slice against a white plate, there’s no going back to plain vanilla.
You don't need to be a professional pastry chef to get this right, but you do need to respect the chemistry. We aren't just adding food coloring; we are managing moisture and protein structures to ensure the center stays creamy while the edges remain firm.
Let’s get into how we make this masterpiece happen without the usual kitchen stress.
Understanding the Gastronomy of This Vibrant Red Dessert
The Chemistry of the Crimson Hue: The distilled white vinegar reacts with the anthocyanins in the natural cocoa powder to stabilize the red pigment. This innovative interaction prevents the color from turning muddy or brown during the over high heat baking process.
Protein Denaturation Management: Using room temperature eggs ensures the lipids in the cream cheese and the proteins in the eggs emulsify into a uniform matrix. This technology prevents the cheesecake from "weeping" liquid or developing a grainy texture after it sets.
Starch Gelatinization in Glaze: The cornstarch in the strawberry topping acts as a thickening agent by absorbing the berry juices and swelling. This creates a glossy, translucent finish that stays suspended on top of the cake rather than soaking into the surface.
| Baking Format | Total Time | Final Texture | Best For |
|---|---|---|---|
| Standard Pan | 1 hours 30 mins | Dense and velvety | Formal dinner parties |
| Mini Portions | 55 mins | Firm and snappy | Large gatherings/Buffets |
| No Bake Style | 4 hours (chill) | Mousse like/Light | Warm summer days |
Similar to the technique used in our Silky Smooth New recipe, keeping the ingredients at a specific temperature is the primary secret to a smooth finish. If you rush the tempering process, the fats will clump, and you'll lose that signature mouthfeel.
Measuring Your Success with Accurate Recipe Specifications
To achieve the intended results, you need to be precise with your measurements. This isn't a "measure with your heart" kind of recipe; the ratio of fat to sugar determines if the cake stands tall or slumps on the plate.
We use the metric system here because a gram of sugar is always a gram, whereas a cup can vary wildly.
Precision Checkpoints
- Weight Check: Ensure you have exactly 900g of full fat brick cream cheese; using tubs or low-fat versions will cause the structure to fail.
- Thermal Target: The center of the cheesecake should reach 71°C (160°F) when a digital thermometer is inserted.
- Time Marker: Stop the bake at exactly 65 minutes, even if the center looks slightly wobbly like Jello.
Selecting Sustainable Components for Your Cheesecake Elements
- 2 cups (200g) Chocolate sandwich cookie crumbs: Use high-quality dark cocoa cookies. Why this? Provides the "shatter" texture and deep color contrast.
- 5 tbsp (70g) Unsalted butter, melted: Choose grass fed butter for a richer flavor profile.
- 1 tbsp (12g) Granulated sugar: Used to help the crust caramelize and bond.
- 1/4 tsp Sea salt: Essential for cutting through the heavy fats of the cheese.
- 32 oz (900g) Full fat brick cream cheese, softened: Never use the spreadable kind from a tub. Why this? The low moisture content ensures a stable, sliceable cake.
- 1 1/4 cups (250g) Granulated sugar: Provides sweetness and aids in the aeration of the cheese.
- 1/4 cup (30g) Unsweetened cocoa powder (natural): Must be "natural," not Dutch processed, to react with the vinegar.
- 4 Large eggs, room temperature: These act as the primary structural binder.
- 1/2 cup (120ml) Full fat sour cream: Adds a necessary tang and softens the protein structure.
- 1 tbsp (15ml) Distilled white vinegar: The catalyst for the red velvet color reaction.
- 1 tsp (5ml) Pure vanilla extract: Boosts the floral notes of the cocoa.
- 2 tbsp (30ml) Liquid red food coloring: Provides the iconic, saturated crimson appearance.
- 1 lb (450g) Fresh strawberries, hulled and sliced: Sourced seasonally for maximum sugar content.
- 1/3 cup (65g) Granulated sugar: For macerating the berries into a syrup.
- 1 tbsp (15ml) Fresh lemon juice: Brightens the glaze and prevents it from being cloying.
- 1 tsp (5g) Cornstarch: The innovative thickener for the fruit topping.
- 1 tbsp Water: Used to create a slurry for the cornstarch.
| Original Ingredient | Substitute | Why It Works |
|---|---|---|
| Distilled Vinegar | Lemon Juice | Provides acidity for the color, though flavor is slightly more citrusy. |
| Sour Cream | Greek Yogurt | Same acidity and fat content. Note: Resulting texture is slightly denser. |
| Red Food Color | Beet Powder | Natural alternative. Note: Resulting color is more earthy/burgundy than bright red. |
If you are looking for a way to use up extra berries, the topping technique here is very similar to what I use in my classic Strawberry Shortcake recipe. It focuses on drawing out the natural juices without overcooking the fruit into mush.
Essential Gastronomy Technology for Your Kitchen Arsenal

You don't need a lab, but a few specific tools will make this process significantly easier. First, a 23cm (9 inch) springform pan is non negotiable. Without the removable sides, you'll never get the cheesecake out in one piece, and trying to flip a red velvet cake is a recipe for a crimson disaster on your floor.
A digital scale is also a huge help. I’ve found that "2 cups of crumbs" can vary by 30 grams depending on how finely you crush them. In the world of baking technology, weight is the only true constant.
Also, have a large roasting pan ready for the water bath this is the most effective way to prevent surface cracks.
Chef's Tip: Freeze your butter for 10 minutes before melting it. It sounds counterintuitive, but it helps the butter retain a specific fat solid ratio that makes the crust crispier once it hits the oven.
Navigating the Innovative Steps from Batter to Berry
1. Building the Foundation
Combine 200g cookie crumbs, 70g melted butter, 12g sugar, and salt in a bowl. Press firmly into the bottom of your springform pan until the surface is flat and compacted. Bake for 10 minutes at 175°C to set the structure before adding the liquid filling.
2. Crafting the Red Velvet Emulsion
Beat the 900g cream cheese and 250g sugar until the mixture is silky and free of lumps. Note: Overbeating at this stage is fine, but slow down once the eggs are added.
3. Mixing the Cocoa
Whisk in the 30g cocoa powder, 120ml sour cream, 15ml vinegar, 5ml vanilla, and 30ml red food coloring. The batter should look vibrant, glossy, and deeply saturated.
4. Integrating the Proteins
Add the 4 eggs one at a time, mixing on the lowest speed. Stop as soon as the yellow streaks disappear to avoid incorporating excess air.
5. Preparing the Thermal Buffer
Wrap the outside of your pan in three layers of heavy duty foil. Place the pan in a larger roasting tray and fill the tray with 2cm of boiling water until the pan is safely insulated.
6. The Low and Slow Bake
Slide the tray into the oven and bake for 65 minutes. The edges should be set, but the center must jiggle slightly like a firm custard.
7. The Controlled Cool Down
Turn off the oven and crack the door open. Let the cake sit inside for 30 minutes until the temperature drops gradually. This prevents the surface from shattering.
8. The Strawberry Infusion
In a small saucepan, simmer 450g strawberries and 65g sugar for 5 minutes. Stir in the 5g cornstarch dissolved in 15ml water until the sauce turns clear and thick.
9. Final Assembly
Once the cheesecake is cold, pour the room temperature strawberry glaze over the top. Spread it to the edges until the red velvet is completely crowned with fruit.
Troubleshooting Your Red Velvet Strawberry Cheesecake Masterpiece
Why Your Cheesecake Surface Cracked
Cracks usually happen because of a sudden temperature shift or overbaking. When the surface dries out and the center continues to expand, the tension has nowhere to go but out, causing a split. Using a water bath creates a humid environment that keeps the top supple during the rise.
Preventing Lumpy Batter
If your cream cheese is even slightly cold, it will form tiny "beads" that refuse to incorporate. This ruins the velvety mouthfeel. If you forget to leave the cheese out, you can soften the blocks in the microwave for 10 seconds, but be careful not to melt them into oil.
| Problem | Root Cause | Solution |
|---|---|---|
| Grainy Texture | Eggs were too cold | Use room temp eggs; whisk batter over a warm water bath to emulsify. |
| Soggy Crust | Water bath leaked in | Use a "crockpot liner" or slow cooker bag inside the foil for a 100% seal. |
| Filling is Runny | Oven temp was too low | Check calibration; bake until the internal temp hits 71°C exactly. |
Common Mistakes Checklist
- ✓ Ensure the cream cheese is fully softened (at least 2 hours on the counter).
- ✓ Don't skip the vinegar; the color won't be as vibrant without that acidic reaction.
- ✓ Avoid opening the oven door during the first 45 minutes of baking.
- ✓ Never pour hot strawberry glaze on a cold cheesecake; it will melt the surface.
- ✓ Use a hot, wet knife for slicing to get those clean, professional edges.
Adaptation Strategies for Your Personal Flavor Profile
If you want a smaller version, you can adapt this into Red Velvet Strawberry Cheesecake Cupcakes. Simply line a muffin tin and reduce the bake time to 22 minutes. The ratio of crust to filling increases, which is perfect for people who love that chocolate crunch.
For a more modern "Red Velvet Strawberry Cheesecake Cake", you can bake thin layers of red velvet sponge and sandwich this cheesecake filling between them. It’s a bit of a structural challenge, but the results are visually stunning. If you are interested in smaller, more manageable versions, you might want to look at this Posh Nosh Foolproof recipe for inspiration on scaling down.
| Strategy | Adjustment | Effect |
|---|---|---|
| Half Batch | Use 450g cheese, 2 eggs, 15cm pan | Bakes faster (40 mins); same height. |
| No Dye | Increase cocoa to 45g | Result is "Chocolate Strawberry," dark brown color. |
| Extra Tang | Replace 1/4 of sugar with honey | Adds floral notes and moisture to the filling. |
Preservation Technology for Maintaining Cheesecake Freshness
Storage: This cake must stay refrigerated. It will keep its structural integrity for up to 5 days if covered tightly. The strawberry glaze may start to weep slightly after 48 hours, so if you're making it ahead of time, I suggest adding the fruit on the day you plan to serve it.
Freezing: You can freeze the cheesecake (without the strawberry topping) for up to 3 months. Wrap the entire chilled cake in plastic wrap, followed by a double layer of aluminum foil. To thaw, move it to the fridge 24 hours before you want to eat it.
Do not thaw on the counter, or the condensation will make the crust mushy.
Zero Waste: If you have leftover strawberry glaze, it’s a crime to throw it away. Whisk it into some balsamic vinegar for a fruity salad dressing, or swirl it into your morning yogurt. Any leftover crust crumbs can be saved in a jar and used as a "soil" topping for chocolate pudding or ice cream.
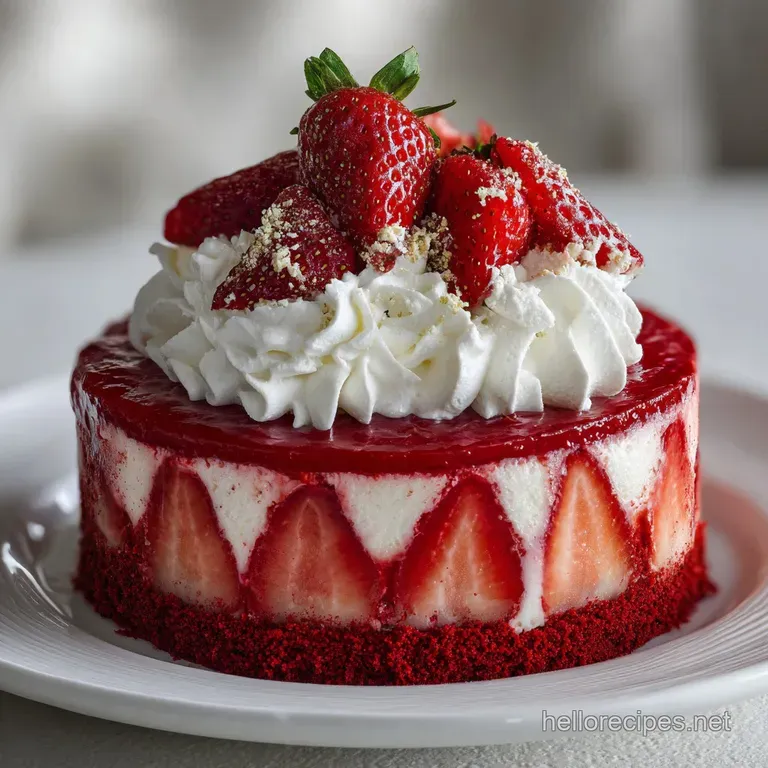
Designing the Aesthetic Presentation of Your Red Velvet
Presentation is where the "innovative" part of this recipe really shines. Because the filling is such a deep red, I love to serve this on stark white or slate gray plates. The contrast makes the color pop.
Instead of just dumping the strawberries on top, try arranging them in a concentric sunburst pattern starting from the outside edge.
"Searing the flavor" isn't a thing in baking, but "setting the stage" is. A light dusting of powdered sugar right before serving adds a professional touch, but wait until the last second so the moisture from the berries doesn't dissolve the sugar.
- Myth 1: You have to use a water bath. Truth: Technically, you can bake without one at a lower temperature, but the texture won't be as creamy, and you're 80% more likely to get cracks.
- Myth 2: Red velvet is just chocolate cake with dye. Truth: Real red velvet, like this recipe, uses vinegar and buttermilk (or sour cream) to create a specific tangy flavor profile that regular chocolate cake lacks.
- Myth 3: Cheesecake is hard to make. Truth: It's actually just a baked custard. If you can follow a clock and a thermometer, you can't fail.
Right then, let's get that oven preheated. You're about to make the best looking dessert your kitchen has ever seen. Trust me on the vinegar it sounds weird, but it's the secret to that iconic velvet finish. Let's crack on!

Recipe FAQs
What is the role of vinegar in the Red Velvet batter?
It stabilizes the red pigment. The acetic acid in the vinegar reacts chemically with the natural cocoa powder to enhance and set the crimson color, preventing it from turning muddy during baking.
How to ensure the cheesecake filling bakes without cracking?
Use a water bath and cool gradually. Wrap the pan tightly in foil, place it in a roasting pan with boiling water, and allow the cake to cool inside the turned off oven for at least 30 minutes.
Is it true that using low-fat cream cheese works for this recipe?
No, stick with full fat brick cream cheese. Lower fat versions contain more stabilizers and water, which will cause the final cheesecake structure to collapse or become overly soft.
How to prevent the strawberry topping from making the cake soggy?
Thicken the glaze completely before chilling. Use the cornstarch slurry to achieve a clear, firm gel structure that will sit atop the cheesecake without leaching excessive moisture.
What is the secret to achieving the perfect silky texture?
Ensure all dairy ingredients are at room temperature. If the cream cheese and eggs are cold, they will not emulsify smoothly, leading to a grainy final product, much like when you are trying to perfect the emulsion in a vinaigrette.
Can I skip the chocolate cookie crust and use graham crackers instead?
Yes, but expect a flavor shift. Graham crackers yield a lighter, sweeter base. For a crust with this much contrast, mastering the technique of working with high fat crumb bases, like in our Homemade Apple Pie recipe, will improve your binding results.
How long should the cheesecake chill before I can slice it cleanly?
Chill for a minimum of six hours, preferably overnight. Use a large knife dipped in hot water and wiped dry between every slice to achieve the clean, professional edges this cake deserves.
Red Velvet Strawberry Cheesecake

Ingredients:
Instructions:
Nutrition Facts:
| Calories | 554 kcal |
|---|---|
| Protein | 8.8 g |
| Fat | 37.9 g |
| Carbs | 46.8 g |
| Fiber | 1.3 g |
| Sugar | 30.2 g |
| Sodium | 233 mg |
