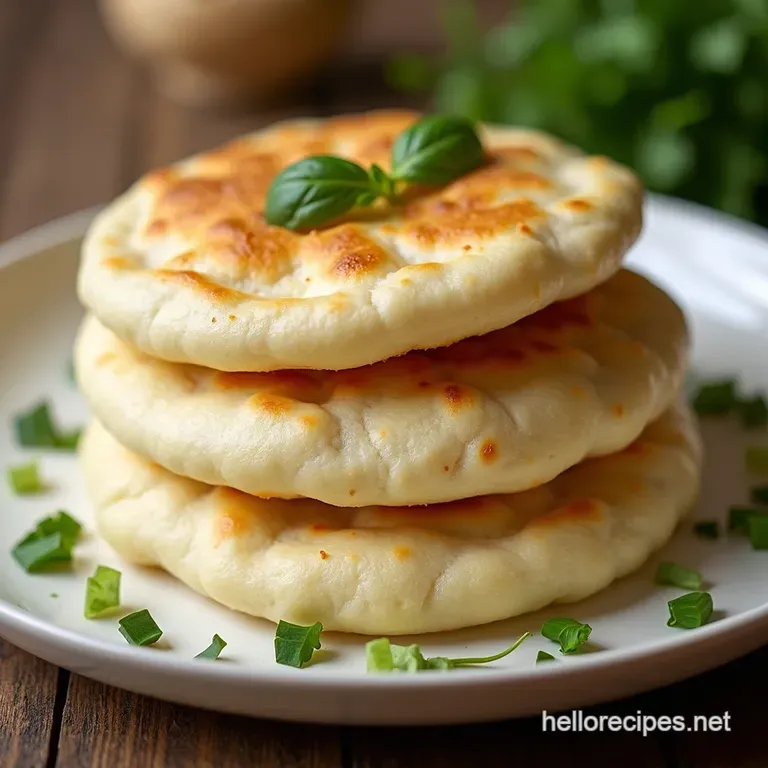
Pillowsoft Pockets Your Guide to Perfect Homemade Pita Bread
Recipe Introduction
Quick Hook
Ever craved a Soft & Fluffy Homemade Pita , like, really craved one? Honestly, supermarket pitas just don't cut it.
This recipe nails that perfect, slightly chewy texture with a pocket begging to be filled. It's a taste of the Mediterranean right in your kitchen!
Brief Overview
Homemade Pita Bread has been a staple for centuries. It’s super easy to make and a fantastic way to enjoy Mediterranean Flatbread at home.
We are talking about an easy recipe, with 20 minutes prep, around 7 minutes cooking time, and 1 to 2 hours to allow proving time, which is really not that hard, right? This recipe yields 8 pitas.
Main Benefits
These pitas are packed with flavour, plus they are way healthier than shop bought ones. Making Pita Bread Recipe from scratch means you control the ingredients.
They're perfect for a quick lunch or a simple dinner. This Easy Pita Bread Recipe is special because it's reliable, fun, and utterly delicious!
Ready to dive in? First, let's gather the ingredients!
Ingredients: Your Pita Arsenal
Right, so, here’s what you’ll need for the dough. 2 ¼ teaspoons of active dry yeast gotta get that rise happening.
Then grab 1 ¼ cups of warm water. Make sure it's between 105- 115° F! It’s essential for waking up the yeast.
A teaspoon of sugar, purely for feeding the yeast.
Next, get your hands on 3 ½ cups of all-purpose flour, plus extra for dusting. No one likes a sticky dough disaster! Add a teaspoon of salt.
Finally, two tablespoons of olive oil it adds a gorgeous flavour and keeps the Bread Soft .
Let's Get Baking: Easy Steps to Homemade Pita
First things first, wake up the yeast. In a bowl, mix the warm water, sugar, and yeast. Let it chill for 5- 10 minutes until it's all foamy.
This step is like saying "good morning" to your yeast and making sure it's alive and kicking.
Now for the fun part. Add the flour, salt, and olive oil to the yeast mixture. Mix it until it forms a shaggy dough.
Then, plop it onto a lightly floured surface and knead it for 5- 7 minutes. You want it smooth and elastic like a baby's bottom, almost.
Ingredients & Equipment for Soft & Fluffy Homemade Pita
Ready to make the most amazing Pita Bread Recipe ? Let's gather our bits and bobs. Don't worry, you probably have most of this already.
This Easy Pita Bread Recipe will quickly becomes a favorite.
Main Ingredients for Homemade Pita Bread
Let's talk dough, baby!
- Active Dry Yeast: 2 ¼ teaspoons (7g) . Make sure it's not ancient, yeah?
- Warm Water: 1 ¼ cups (300ml) , heated to 105- 115° F (40- 46° C) . This is super important!. Too hot and you'll kill the yeast. Too cold, and they won't wake up!
- Granulated Sugar: 1 teaspoon (4g) . Just a wee bit to get the yeast partying.
- All-Purpose Flour: 3 ½ cups (420g) , plus extra for dusting. Plain flour is your friend here.
- Salt: 1 teaspoon (6g) . Brings out all the flavours.
- Olive Oil: 2 tablespoons (30ml) . Adds richness and helps the Bread Soft .
Quality indicators? For the flour, make sure it’s fresh. Old flour can affect the texture and rise. As for the yeast, a good batch should foam up nicely in the warm water.
If it doesn't, bin it.
Seasoning Notes for the Fluffy Pita Bread Cooking
Okay, so this is where you can get a bit creative!
- Essential spice combos: A sprinkle of garlic powder to the flour, or even some dried oregano? That's a cracking way to add interest.
- Flavor enhancers: A tiny drizzle of honey in the dough? It'll give the pitas a subtle sweetness.
- Quick substitutions: No olive oil? Sunflower or rapeseed oil will do the trick.
Don’t be afraid to experiment a little here. That's how you find your perfect Authentic Pita Bread .
Equipment Needed for Pillow Soft Pockets
Right, no fancy stuff needed!
- Large mixing bowl. For making the dough.
- Measuring cups and spoons. Obviously.
- Clean kitchen towel. For covering the dough while it rises. This is crucial, trust me .
- Rolling pin. To roll out those Mediterranean Flatbread .
- Large skillet, cast iron pan, or pizza stone. For cooking. A pizza stone helps them puff up.
No pizza stone? Don't stress! A good frying pan will do just fine for your Pocket Bread Recipe . The key is a hot surface and a bit of patience.
This Homemade Bread Recipe is worth it, promise.
Honestly, the biggest challenge I had at first was getting the temperature of the water right. I killed a few batches of yeast before I got the hang of it.
Just use a thermometer! You can find them really cheap.
Pillow Soft Pockets: Your Guide to Perfect Homemade Pita Bread
Forget those sad, dry pitas you get at the shop, yeah? Honestly, making your own Soft & Fluffy Homemade Pita is way easier than you think.
Plus, the taste? Oh my gosh, miles better.
Prep Like a Pro: Mise en Place for Pita Perfection
First things first, let's get organised. Measure out 2 ¼ teaspoons (7g) of active dry yeast , 1 ¼ cups (300ml) of warm water (105- 115° F) vital for happy yeast and 1 teaspoon (4g) of sugar .
Then, get your 3 ½ cups (420g) of all-purpose flour , 1 teaspoon (6g) of salt , and 2 tablespoons (30ml) of olive oil ready.
I find it helps to have everything lined up, makes the whole process smoother, you know?
Let's Get Baking: The step-by-step Guide
Okay, time to make some magic! Here's how to get some Easy Pita Bread Recipe :
- Activate the Yeast: Pop the warm water, sugar, and yeast into a bowl. Give it 5- 10 mins. It should get foamy - that means it's alive and kicking.
- Make the Dough: Add the flour, salt, and olive oil to the yeast mixture. Mix it until it looks all shaggy.
- Knead It!: Turn it out onto a floured surface and knead for 5- 7 minutes. It should feel smooth and spring back when you poke it.
- First Rise: Plop the dough into an oiled bowl, cover it, and leave it in a warm place for 1- 2 hours , until it's doubled in size.
- Shape 'Em: Punch the dough down gently. Divide it into 8 equal bits and roll each into a ball.
- Second Rise: Give those balls a rest! Cover them for 15- 20 minutes , this makes them Bread Soft and much easier to roll out later.
- Roll 'Em Out: Roll each ball into a circle, about 6-8 inches wide and ¼ inch thick.
- Cook 'Em!: Heat a skillet over medium high heat. Cook each Mediterranean Flatbread for 2- 3 minutes per side, until they puff up and get golden spots.
Pro Tips for Fluffy Pita Bread Cooking
- Hot pan is vital! A screaming hot pan is key for that amazing pocket.
- If you don't have active dry yeast, use Pita Bread Recipe Instant Yeast but skip the proofing stage and toss it straight in with the flour.
- Don't have olive oil? Any neutral oil will do the trick.
Honestly, once you've mastered this Pita Bread Recipe , you'll never go back to shop bought again. Fill these Authentic Pita Bread beauties with falafel, kebabs, or just some simple salad and hummus.
Enjoy!
Recipe Notes: Tips for Pita Perfection
Okay, so you're ready to make some Soft & Fluffy Homemade Pita , fantastic! Let's dive into some extra tips and tricks to ensure pita bread success.
Honestly, it's easier than you think. I swear it's nearly fool proof.
Serving Suggestions: What to do with Your Pita Pockets
Once your authentic pita bread is cooked, it's time for the fun part: eating! For presentation, think about stacking them high on a platter.
Consider cutting some in half to show off the fluffy inside. Fill the cut pitas with colorful fillings.
Why not try serving your homemade flatbread alongside a big bowl of creamy hummus and crudités? A crisp Greek salad would also be a perfect match. I'm telling you!
Storage Tips: Keeping Your Pita Fresh
Alright, let's talk storage. I mean, Homemade Pita Bread is best fresh out of the oven, but life happens. If you have leftovers, wrap them tightly in plastic wrap or put them in an airtight container.
They'll keep at room temperature for about 3 days.
For longer storage, freezing is your friend! Just pop them in a freezer bag, squeezing out as much air as possible.
They can last for up to 2 months. To reheat, simply thaw them at room temperature. Then, pop them in a toaster or warm skillet for a minute or two.
Easy peasy!
Variations: Getting Creative with Your Dough
Feel free to mix things up! For a healthier twist, try substituting half of the all-purpose flour with whole wheat flour.
This gives a nutty flavor and extra fiber. Boom, a Homemade Bread Recipe upgrade.
If you are feeling fancy, add a tablespoon of dried herbs, such as rosemary or oregano, to the dough. It makes delicious Mediterranean flatbread.
Nutrition Basics: The Goodness Inside
Okay, let’s get real, this Pocket Bread Recipe is delicious. Each fluffy pita bread cooking serving has roughly 220 calories.
The real power of the pita is what you fill it with. So, load up on veggies, lean protein, and healthy fats!
This Pita Bread Recipe is also low in sugar and provides a decent amount of fiber. I love serving them with falafel. You know? The possibilities are endless!
Honestly, making Easy Pita Bread Recipe is super satisfying. Don’t be intimidated, just give it a go. With a little love, you'll be whipping up these Soft & Fluffy Homemade Pita like a pro in no time.
Get baking!

Frequently Asked Questions
Why didn't my pita puff up? I was hoping for that classic pocket!
Aha, the dreaded flat pita! The most common reason for this is that your pan wasn't hot enough. A screaming hot skillet (cast iron is your best mate here!) is crucial for creating the steam that makes the pita puff up. Also, make sure you haven't rolled them too thin; about 1/4 inch is ideal.
How do I make sure my Soft & Fluffy Homemade Pita stays soft after cooking? I'm tired of them going hard!
Nobody wants a rock hard pita! The secret to keeping them soft is to wrap them in a clean kitchen towel as they come off the pan. This traps the steam and keeps them pliable. Store them in an airtight container at room temperature for up to 3 days, or you can freeze them for longer storage.
Just remember to thaw them completely before using.
Can I make this pita dough ahead of time? My life is a bit of a 'Carry On' film, so convenience is key!
Absolutely! You can make the dough and let it rise in the fridge for a longer, slower fermentation this can even improve the flavour! Just punch it down after the first rise, cover it well, and refrigerate for up to 24 hours. Bring it back to room temperature before dividing and shaping.
Consider this a bit of a 'Mary Berry' pro tip!
I'm a bit of a health nut can I make these Soft & Fluffy Homemade Pita using whole wheat flour?
You certainly can! For a healthier twist, substitute up to half of the all-purpose flour with whole wheat flour. This will give them a nuttier flavour and a boost in fiber. Keep in mind that the texture might be slightly denser than with all-purpose flour, so you might need to add a tablespoon or two of extra water if the dough seems too dry.
What's the best way to reheat my Soft & Fluffy Homemade Pita? I need them ready for lunch time!
Reheating pita bread is a doddle! You can quickly warm them in a dry skillet over medium heat for a minute or two per side. Alternatively, a few seconds in the microwave (wrapped in a damp paper towel to prevent them from drying out) will do the trick. If frozen, thaw them completely before reheating for best results.
My yeast didn't foam, is my dough ruined?
Not necessarily! If your yeast didn't foam after proofing, it might just be a little slow. Give it a bit more time. If it still doesn't foam, your yeast may be past its prime. You can still try using the mixture, but the dough might take longer to rise, or not rise at all.
In that case, it's best to start again with fresh yeast - nobody wants a flatbread disaster!
Pillowsoft Pockets Your Guide To Perfect Homemad
Ingredients:
Instructions:
Nutrition Facts:
| Calories | 220 calories |
|---|---|
| Fat | 4g |
| Fiber | 2g |
