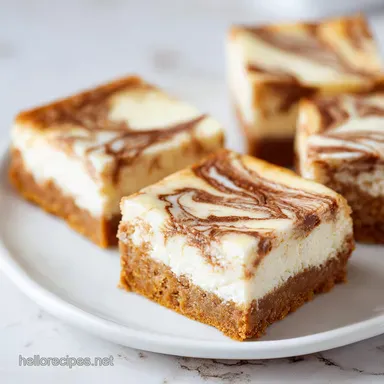
Mom's Cheesecake Cookie Bars: Silky and Buttery
- Time:10 minutes active + 2 hours 30 mins cooling/chilling = Total 2 hours 40 mins
- Flavor/Texture Hook: Buttery, chocolatey edges with a silky, cream cheese center
- Perfect for: Family reunions, holiday bake offs, or a rainy weekend treat
- Baking the best moms cheesecake cookie bars
- Secrets to the Perfect Texture
- Ingredient Deep Dive
- Essential Baking Tools
- Step-by-Step Baking Process
- Solving Common Baking Issues
- Troubleshooting Common Issues
- Creative Flavor Swaps
- Adjustment Guidelines
- Truths About Cheesecake Bars
- Storage and Reheating Tips
- Best Ways to Serve
- Recipe FAQs
- 📝 Recipe Card
Baking the best moms cheesecake cookie bars
The first thing that hits you isn't the sight of the bars, but the scent. It starts as a warm, toasted sugar aroma that drifts from the oven, smelling like a professional bakery just opened next door. Then, as the cheesecake layer sets, that sweet vanilla scent mixes with a sharp, tangy note of cream cheese.
It's the kind of smell that makes everyone in the house suddenly remember they're hungry for dessert.
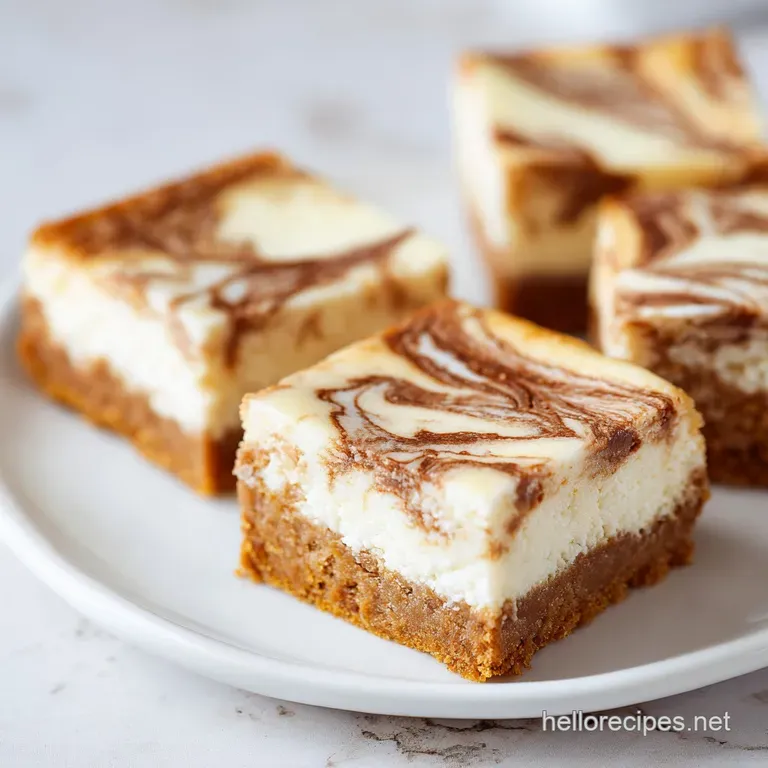
I remember the first time I tried making these for a family gathering. I was so nervous about the cheesecake layer cracking that I practically hovered over the oven door. But the magic happened during the cooling phase. Watching those golden brown edges set against the pale, creamy center is the most satisfying part.
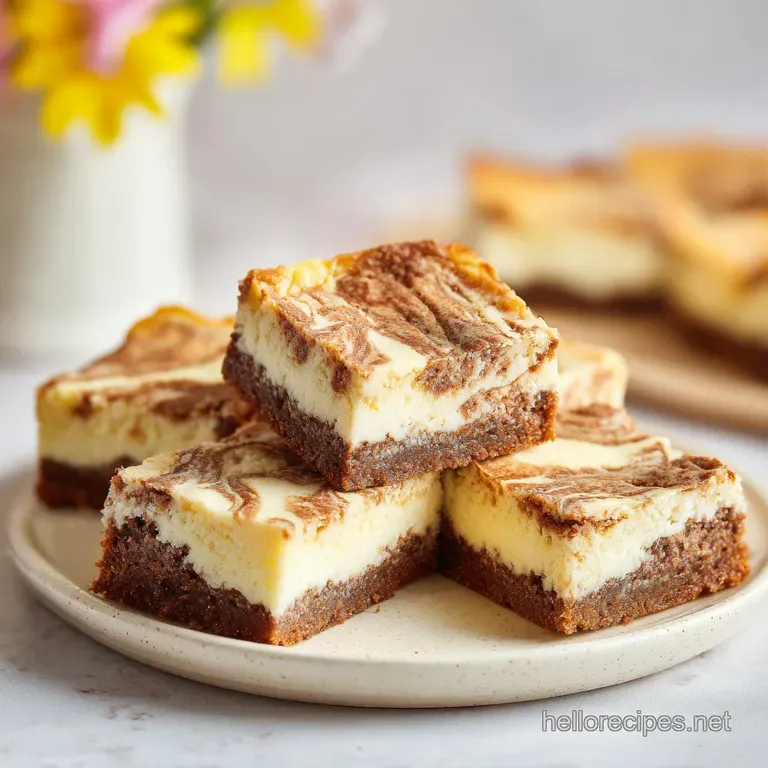
These moms cheesecake cookie bars aren't just a recipe, they're a memory of late night kitchen chats and the sound of a serrated knife slicing through a dense, buttery crust.
You can expect a treat that hits every note. You've got the shatter of the crisp outer edges, the chew of the chocolate chip cookie, and the smooth, melt in-your mouth feel of the cheesecake. It's a heavy hitter, but it's balanced. By the time you finish the first square, you'll already be eyeing the rest of the pan.
Secrets to the Perfect Texture
Getting the mouthfeel right is where most people trip up. It's not just about following the measurements, but about how the ingredients interact under heat.
- Sugar Synergy: Using both granulated and brown sugar ensures the base doesn't just taste sweet, it stays chewy. The molasses in the brown sugar holds onto moisture, preventing the bottom from becoming a hard biscuit.
- Fat Distribution: Softened butter, not melted, creates tiny air pockets when creamed with sugar. This keeps the cookie layer from becoming a dense slab of dough.
- Temperature Stability: Keeping the cream cheese at room temperature is non negotiable. Cold cheese creates lumps that no amount of whisking can fix once it's in the oven.
- The Chill Factor: The 2 hour refrigeration isn't a suggestion, it's a structural requirement. This allows the fats to solidify, giving you that clean, professional slice instead of a gooey mess.
Since I usually lean toward plant based options in my own kitchen, I've spent a lot of time thinking about how these textures differ from vegan alternatives. If you're used to the lighter feel of no bake protein bites, these will feel incredibly indulgent. The dairy provides a specific kind of richness that anchors the whole dish.
| Method | Time | Texture | Best For |
|---|---|---|---|
| Classic Bake | 30 minutes | Chewy base, set top | Traditional parties |
| Undercooked | 22 minutes | Gooey, soft center | Those who love "doughy" |
| Overbaked | 40 minutes | Crisp, firm, dry | Long term storage |
The classic method is the gold standard here. It ensures the cheesecake is stable enough to hold its shape but remains velvety on the tongue.
Ingredient Deep Dive
Before we crack an egg, let's look at why we're using these specific items. Each one plays a role in the architecture of the bar.
| Ingredient | Science Role | Pro Secret |
|---|---|---|
| All Purpose Flour | Provides the structural skeleton | Measure by weight to avoid a dry crust |
| Cream Cheese | Adds tang and creamy density | Full fat only; low-fat will weep water |
| Baking Soda | Creates the lift and browning | Fresh soda ensures the edges shatter |
| Brown Sugar | Adds moisture and chewiness | Pack it tight for a deeper caramel flavor |
I've found that using a high-quality flour, like those recommended by King Arthur Baking, makes a noticeable difference in the crumb. If the flour is too protein heavy, the base can become tough. All purpose is the sweet spot for moms cheesecake cookie bars.
Essential Baking Tools
You don't need a professional kitchen, but a few specific tools make this a breeze.
- 9x13 inch baking pan: The standard for these bars. A metal pan conducts heat faster for those crisp edges, while glass keeps the center softer.
- Parchment paper: Essential. Do not just grease the pan. You want to lift the entire block out for clean cutting.
- Electric hand mixer: You can do it by hand, but getting the cream cheese "devoid of lumps" is a workout you don't need.
- Serrated knife: A smooth blade will squish the layers. A saw tooth edge slices through the cheesecake without compressing the cookie.
- Rubber spatula: For folding in those chocolate chips without overworking the gluten.
Step-by-step Baking Process
Right then, let's get into it. Pay attention to the scents and the visual cues, as they'll tell you more than the timer will.
Prepping the Foundation
- Cream the butter and sugars. Beat the softened butter, granulated sugar, and brown sugar in a bowl. Mix until the color turns pale and the texture is fluffy. Note: This incorporates air for a lighter bite.
- Add wet ingredients. Beat in the egg and vanilla extract. Mix until just combined.
- Fold in dry ingredients. Stir in the all purpose flour, baking soda, salt, and semi sweet chocolate chips. Use a spatula and stop the moment you see no more streaks of flour. Note: Overmixing makes the bars tough.
- Press into pan. Push exactly half of the cookie dough into the bottom of your parchment lined 9x13 pan. Use the back of a spoon to ensure it's even.
Whipping the Velvet Filling
- Smooth the cheese. Beat the softened cream cheese and granulated sugar. Keep going until it's completely smooth. You shouldn't see a single lump.
- Combine remaining wet items. Add the egg and vanilla extract. Mix on low speed just until combined. Note: High speed here adds too much air, which causes cracks.
- Layer the filling. Pour the mixture over the cookie base. Use a spatula to smooth it into a flat, even surface.
- Add the toppings. Drop small spoonfuls of the remaining cookie dough on top. Leave small gaps between the mounds so the cheesecake can peek through.
Mastering the Final Bake
- Bake the bars. Put the pan in the oven at 350°F (175°C). Bake for 30 minutes. Wait until the edges are deep golden brown and the center has a slight jiggle when you nudge the pan.
- Cool and Set. Leave them at room temperature until cool. Then, slide them into the fridge for 2 hours. Slice with a serrated knife once fully chilled.
Chef's Note: If you want a truly professional look, dip your serrated knife in hot water and wipe it dry between every single cut. This prevents the cheesecake from sticking to the blade and smearing.
Solving Common Baking Issues
Even the best home cooks run into trouble. The most common issue with moms cheesecake cookie bars is usually related to temperature or timing.
Troubleshooting Common Issues
| Issue | Solution |
|---|---|
| Why Your Cheesecake Cracked | If the top has a fissure, you likely overbeat the cream cheese mixture. This traps too many air bubbles that expand and then collapse in the oven. You can also cause this by opening the oven door too |
| Why Your Base Is Soggy | A soggy bottom usually happens if the cookie dough wasn't pressed firmly enough or if the cheesecake filling was too wet. Ensure your cream cheese is drained of any excess liquid before mixing. |
| Why the Center Is Too Gooey | Underbaking is common because the edges look done while the middle is still raw. Trust the "slight jiggle" rule. If it sloshes like liquid, it needs another 5 minutes. |
Common Mistakes Checklist
- ✓ Using cold cream cheese (always soften!)
- ✓ Overmixing the flour (stop as soon as it's combined)
- ✓ Skipping the 2 hour chill (it will be a mess otherwise)
- ✓ Using a smooth knife for cutting (use serrated)
- ✓ Opening the oven door every 5 minutes
Creative Flavor Swaps
Once you've nailed the classic version, you can start playing with the flavors. The beauty of this recipe is its versatility.
The Raspberry Twist Substitute the chocolate chips for white chocolate chips and swirl in 2 tablespoons of raspberry jam into the cheesecake layer before baking. The tartness of the berry cuts through the richness of the cream cheese.
The Nutty Crunch Add 1/2 cup of chopped pecans or walnuts to the cookie dough. This adds a woody, earthy note and a bit of crunch that contrasts with the velvety topping.
The Low Sugar Route You can use a monk fruit sweetener blend for the sugars. Note: This may slightly change the browning of the cookie base, making it look paler.
Gluten-free Adjustment Replace the all purpose flour with a 1:1 gluten-free baking blend. According to Serious Eats, adding a pinch of xanthan gum (if not already in the blend) helps mimic the elasticity of wheat flour.
If you're in the mood for something even more indulgent, these pair beautifully with the flavor profile of mini salted caramel cheesecakes, though these bars are more satisfying for a crowd.
Adjustment Guidelines
Sometimes you don't need a full 9x13 pan. Here is how to handle different sizes.
Cutting the Recipe in Half Use an 8x8 inch square pan. Since you can't easily split one egg, beat the egg in a small bowl first and use half of the liquid. Reduce the baking time by about 20%, but still check for that center jiggle.
Doubling the Batch Work in batches. Do not try to mix a double batch of cheesecake filling in a standard hand mixer, as you'll likely leave unmixed clumps of cream cheese at the bottom.
If baking two pans at once, lower the oven temperature to 325°F and extend the time by 10-15 minutes to ensure even heat distribution.
Scaling Spices If you add cinnamon or nutmeg to the base, only increase them by 1.5x when doubling. Spices can become overpowering if scaled linearly.
Truths About Cheesecake Bars
There are a few things people tell you about cheesecake that just aren't true.
The "Water Bath" Myth Some say you need a water bath for all cheesecakes to prevent cracking. While true for tall, New York style cakes, it's unnecessary for moms cheesecake cookie bars. The cookie base protects the bottom, and the smaller depth of the bar prevents the center from staying raw too long.
The "Room Temp Eggs" Myth You'll hear that eggs must be room temperature or the batter will break. In this specific recipe, as long as your butter and cream cheese are soft, the eggs won't cause a major issue. However, room temp eggs do incorporate slightly faster.
Storage and Reheating Tips
Because of the dairy content, these bars need a bit of care to stay fresh.
Fridge Storage Keep them in an airtight container in the refrigerator for up to 5 days. I recommend placing a piece of parchment paper between layers if you stack them, otherwise, the cheesecake will stick and peel off.
Freezing Method These freeze brilliantly. Wrap individual bars in plastic wrap and place them in a freezer safe bag for up to 3 months. To eat, let them thaw in the fridge overnight. Avoid the microwave, as it can make the cookie base rubbery.
Zero Waste Tips If you have a bit of cookie dough left over that didn't make it into the pan, roll it into tiny balls and bake them separately for 8 minutes as "chef's snacks". If you have leftover cream cheese filling, it makes a great dip for apple slices.
Best Ways to Serve
These are rich, so a little goes a long way. I love serving them with a side of fresh raspberries or sliced strawberries to add some acidity.
For a more decadent experience, warm a square in the microwave for exactly 10 seconds. It softens the chocolate chips and makes the cheesecake layer feel like warm custard. Pair it with a strong, bitter espresso or a cold glass of milk to balance the sweetness.
If you're serving these at a party, use a pastry cutter or a ruler to make sure the squares are exactly the same size. It makes the platter look professional and ensures everyone gets an equal amount of that gorgeous layered effect.
Whether it's a holiday spread or just a Tuesday craving, these moms cheesecake cookie bars always steal the show.
Recipe FAQs
What are the most common mistakes when making these cheesecake bars?
Overbeating the cream cheese filling or under pressing the crust. Overbeating traps air bubbles that cause cracks, while a loose base results in a soggy bottom.
Is it true that opening the oven door has no effect on cracking?
No, this is a common misconception. Sudden temperature drops from opening the oven door can cause the cheesecake surface to collapse and fissure.
How to store these bars to keep them fresh?
Place them in an airtight container in the refrigerator for up to 5 days. Use parchment paper between layers if stacking to prevent the cheesecake from sticking and peeling.
Can these bars be frozen for later?
Yes, wrap individual bars in plastic wrap and freeze in a safe bag for 3 months. Thaw them in the fridge overnight; avoid the microwave to prevent the cookie base from becoming rubbery.
How to tell when the bars are finished baking?
Look for deep golden brown edges and a slight jiggle in the center. The bars will firm up completely during the required 2-hour refrigeration period.
Why is the cookie base so tender and chewy?
The specific ratio of brown sugar to granulated sugar creates a moist, chewy texture. If you enjoyed mastering this dough consistency here, see how the same principle works in our basic cookie dough.
How to get clean slices without smearing the cheesecake?
Chill the bars for at least 2 hours and use a serrated knife. This ensures the layers are fully set and the knife cuts through the crust without pulling the filling.
Mom S Cheesecake Cookie Bars