Homemade Stuffing: Cracking Good Traditional Stuffing with Sage
- Cracking Good Homemade Herb Stuffing: A Recipe Overview
- The Science of Perfect Stuffing: Moisture, Binding, and Crust
- Ingredients List and Expert Notes on Homemade Stuffing Components
- How to Make Homemade Stuffing: Step-by-Step Method
- Troubleshooting and Chef's Secrets for the Best Results
- Storing, Freezing, and Serving Your Ultimate Comfort Homemade Stuffing
- Recipe FAQs
- 📝 Recipe Card
Cracking Good Homemade Herb Stuffing: A Recipe Overview
That smell. The minute fresh sage and thyme hit melted butter in a hot skillet, you know the holidays are officially here. We are aiming for a crispy, buttery crust that gives way to an interior that is unbelievably moist, fluffy, and absolutely packed with aromatic flavour.
Forget that sad, dense bread pudding this is the traditional, classic stuffing you grew up dreaming about.
You might assume that making homemade stuffing from scratch is way too much effort, but honestly, it’s one of the most cost effective and rewarding parts of the meal. A simple, day-old loaf, basic pantry aromatics, and some quality herbs magically transform into total holiday gold.
This recipe is your secret weapon for minimizing stress on the big day.
I have personally burned, dried out, and completely soaked more stuffing than I care to admit in my early cooking years. We are going to bypass all those rookie errors and dive straight into the foolproof method that works every single time.
Get ready for the best Homemade Stuffing you’ve ever tasted.
The Science of Perfect Stuffing: Moisture, Binding, and Crust
Why Ditch the Box: The Case for Scratch Stuffing
The pre-seasoned box stuffings are easy, sure, but they often taste overwhelmingly of dried dust and lack any depth of flavour. Making yours from scratch allows you to control the quality of the butter and stock, which results in a vastly superior final product.
It also lets you customize the herbs, ensuring that gorgeous, savory taste profile we all crave. You are building flavor foundations, not just hydrating dry pellets.
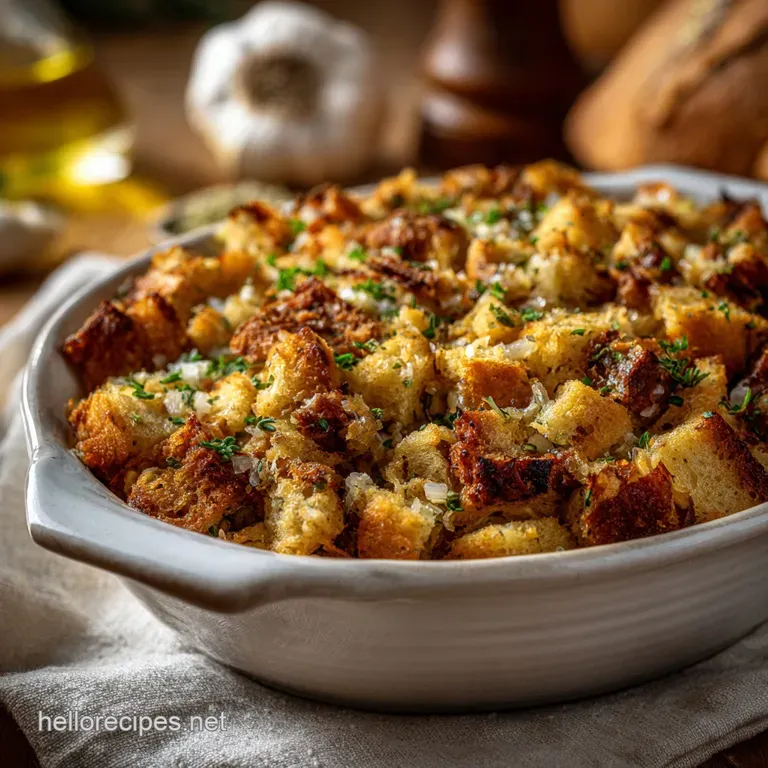
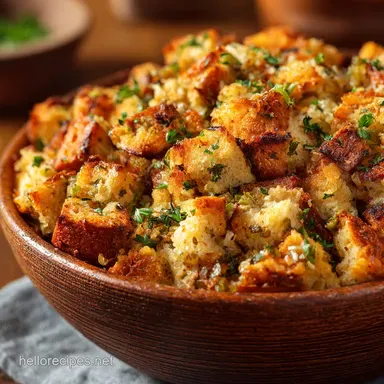
What Makes This Stuffing 'Cracking Good'?
The secret lies in the balance between the moisture (stock and eggs) and the binder (dried bread). We use plenty of melted butter for richness and a generous quantity of fresh sage and thyme for that truly authentic flavour profile.
This is how to make classic bread stuffing that achieves that ideal dichotomy of wet on the inside and crunchy on the outside.
Recipe Difficulty and Necessary Prep Time
I’d rate this recipe as medium difficulty, simply because the timing and texture checks are important. The chopping is easy, but you have to pay attention when moistening the bread.
However, the great news is that most of the heavy lifting can be done a day ahead, saving you precious time when the oven is overflowing.
Achieving the Ideal 'Wet vs. Dry' Ratio
The biggest mistake people make is not adding enough liquid, resulting in dry, choking stuffing, or adding too much , resulting in a heavy brick. Your mixture should look saturated but still hold its shape slightly when squeezed, not drip.
This critical step ensures you get the moist stuffing everyone raves about.
The Essential Role of Properly Dried Bread Cubes
This is the single most crucial step; fresh bread will turn into a mushy paste the second the warm stock hits it. We need the bread to be firm, almost rock hard, so it acts like a porous sponge ready to absorb the rich butter and stock mixture. If you love that texture, you might want to try my dedicated recipe for a super crunchy alternative: Stuffing: The Ultimate Crispy Sourdough Dressing Recipe (Not Soggy!) .
Maximizing Herb Infusion (Sage and Thyme Focus)
Don't just toss the fresh herbs into the cold bread! By sautéing the sage and thyme for one brief minute alongside the softened celery and onion, you "bloom" the oils. This releases all the volatile aromatics directly into the melted butter and vegetable base, guaranteeing every bite is deeply flavored.
Ingredients List and Expert Notes on Homemade Stuffing Components

This classic stuffing recipe relies on simple, high-quality ingredients.
Choosing the Right Bread Base (Stale vs. Toasted)
I prefer a slightly denser white loaf, French bread, or sourdough, cut into 1 inch cubes. The density holds up beautifully. Stale is always better than fresh. Toasting in the oven is a great time saver, but leaving it uncovered on the counter overnight (the truly traditional method) gives the absolute best texture.
Sourcing the Freshest Aromatic Herbs
Use fresh, always! Dried sage is fine in a pinch, but the flavor of fresh sage is incomparable in herbed stuffing . The sage should be finely chopped, and for thyme, make sure you strip the tiny leaves off the woody stem before mixing.
Liquid Options: Broth and Butter Quality
Warm the stock first; warm stock absorbs faster and more evenly than cold stock. I prefer low-sodium chicken stock because it provides richness without overpowering the herbs. Use a good quality unsalted butter so you have complete control over the final seasoning.
Ingredient Swaps and Dietary Adjustments
| If You Don’t Have... | Use... | Notes |
|---|---|---|
| Fresh Sage | 1.5 teaspoons of dried rubbed sage. | Reduce amount drastically as dried herbs are potent! |
| Yellow Onion | Shallots or leeks. | Shallots offer a slightly milder, sweeter flavor profile. |
| Chicken Stock | Vegetable stock or turkey stock. | Make sure it is warmed for better absorption. |
| Butter | Ghee or high-quality olive oil. | If using oil, you may lose a little of that quintessential buttery flavor, but the richness remains. |
How to Make Homemade Stuffing: step-by-step Method
Preparation: Drying and Toasting the Bread
Cube your bread and spread it out on baking sheets. If you didn’t do this yesterday, bake them at 300°F (150°C) for about 15 minutes. They should feel hard and dry to the touch when done. Transfer all those crisp, dry cubes to your largest mixing bowl.
Sautéing the Aromatics (The Flavor Foundation)
Melt half the butter (4 tbsp) in a large skillet over medium heat. Add the diced celery and onion. Cook slowly for 8 to 10 minutes until they are totally soft and translucent. You want soft sweetness, not crunchy raw bits!
Stir in the fresh sage and thyme for just 60 seconds; you will smell the nutty aroma immediately.
Combining and Mixing the Stuffing Mass
Scrape the entire fragrant mixture, including all the melted butter, over the dry bread. Gently toss to coat. In a separate bowl, whisk the eggs, salt, pepper, and the initial 2 cups of warmed stock. Pour this liquid over the bread mixture. Now, use your hands to gently fold everything together.
Stop mixing once the liquid is incorporated.
Chef's Note: Let the mixture sit for five minutes. The moisture needs time to fully permeate the center of the bread cubes. If, after five minutes, the bottom of the bowl is dry and the top cubes still feel hard, add the remaining stock a little bit at a time. The mixture should be springy and fully hydrated.
Baking Techniques for Maximum Crust Development
Transfer the mixed traditional stuffing recipe into a greased 9x13 inch dish, but whatever you do, do not compact it! Melt the remaining 4 tablespoons of butter, and drizzle half of it over the top surface.
Cover tightly with foil and bake at 375°F (190°C) for 30 minutes. The foil traps the steam, ensuring a moist core.
Remove the foil, drizzle the rest of that glorious butter over the top, and bake uncovered for another 15 to 20 minutes. Watch closely! When the top is deeply golden brown and beautifully crisp, it’s done.
Troubleshooting and Chef's Secrets for the Best Results
Preventing a Soggy Stuffing Interior
The number one culprit is moist bread. If you cheat the drying process, you fail the stuffing. My second tip: Don't over mix it once the liquid is added. Too much stirring will break down the softened bread and release starch, resulting in a gloopy texture. Mix gently until just combined.
Ensuring a Crisp, Golden Top Crust
This is why we use the two-stage baking process. The covered bake locks in moisture; the uncovered bake, combined with that second drizzle of melted butter, allows the top layer of bread to fry gently and achieve that desired crunch. Never skip the final butter drizzle!
Adjusting Seasoning Before Baking
I made the mistake years ago of just trusting the recipe amount of salt and ending up with bland stuffing. Always taste your mix. Take a small spoonful of the moistened bread mass (before it goes into the oven, and before the raw egg is added) and check the seasoning.
It should taste slightly over seasoned now, as the flavor will mellow during baking.
Storing, Freezing, and Serving Your Ultimate Comfort Homemade Stuffing
Can I Prepare Stuffing Ahead of Time?
Yes, absolutely! This is the best strategy for a big event. You can fully assemble the stuffing mixture (up to step 12) and store it, unbaked, covered tightly in the fridge for up to 24 hours.
When ready to bake, pull it out 30 minutes early to take the chill off before baking as instructed.
Safe Storage Guidelines for Cooked Stuffing
Any leftover cooked homemade stuffing for turkey can be stored in an airtight container in the refrigerator for up to 3 to 4 days. It is essential that you cool it quickly and put it away promptly after the meal.
Freezing and Reheating Instructions
Stuffing freezes brilliantly! Once fully cooked and cooled, portion the leftovers into freezer safe containers or heavy duty freezer bags. It will keep well for up to 3 months. To reheat, thaw overnight in the fridge.
Place the stuffing in an oven safe dish, cover with foil (to prevent drying), and reheat at 350°F (175°C) until piping hot all the way through, about 20- 30 minutes.
This herb packed stunner pairs perfectly with rich gravy and a generous spoonful of my bright, tangy Cranberry Sauce Recipe: Best Homemade, Jammy, Easy with Orange Zest . Pure comfort, guaranteed.

Recipe FAQs
Why did my homemade stuffing turn out dry and crumbly?
This usually indicates insufficient liquid (broth or melted butter) or over baking. Ensure the dried bread cubes are fully saturated before baking; they should look wet but not soup like when transferred to the pan.
If the stuffing begins to dry out during the bake, cover it tightly with foil for the last 15 minutes to trap steam and reintroduce moisture.
Can I prepare the stuffing mixture a day in advance?
Yes, you can mix all the dry ingredients, sautéed aromatics, and herbs 24 hours ahead of time and refrigerate them, tightly covered. For the best texture and safety, wait until just before baking to incorporate the eggs and any fresh poultry broth or drippings.
Always store the mixture separately from raw poultry.
Is it safe to cook the stuffing inside the turkey cavity?
It is safe only if the stuffing reaches an internal temperature of 165°F (74°C) as measured by a food thermometer, which often results in overcooked breast meat. Culinary experts generally recommend baking stuffing separately in a casserole dish.
This allows for consistent cooking, easier temperature monitoring, and a superior crispy crust.
What types of bread work best for this homemade herb stuffing?
Sturdy, dense breads like sourdough, French baguettes, or challah are ideal because they absorb moisture without immediately breaking down. Avoid standard, pre-sliced sandwich bread, which can quickly turn mushy, resulting in a dense, soggy stuffing rather than one with distinct texture.
How do I ensure my stuffing develops that desirable crispy, buttery crust?
The key to crispiness is high heat and exposure. Ensure the stuffing is baked uncovered for at least the final 20 30 minutes, allowing the top layer to dry out and crisp up. For an extra golden finish, dot the top generously with extra butter before placing the dish into the oven.
My stuffing tastes bland. How can I boost the flavor next time?
Blandness is usually due to insufficient salt or under developed aromatics. Ensure you generously season the mixture with kosher salt, as bread soaks up seasoning quickly. Additionally, make sure the onions and celery are sautéed until fully softened and translucent to concentrate their savory flavors.
Can this recipe be adapted to be gluten-free or vegan?
For a gluten-free adaptation, simply substitute the standard bread with an equal volume of sturdy, dried GF bread cubes. To make the recipe vegan, substitute the butter with high-quality olive oil or vegan butter sticks, and replace chicken broth with vegetable broth, omitting the egg binder entirely.
Homemade Stuffing With Crispy Top
Ingredients:
Instructions:
Nutrition Facts:
| Calories | 350 kcal |
|---|---|
| Fat | 20 grams |
| Fiber | 4 grams |
