The Proper Britishamerican Apple Pie Perfectly Flaky Crust Spiced Filling
- The Heritage Handshake: Why This Apple Pie Formula Succeeds
- Beyond the Basics: Defining Our Ultimate Apple Pie Experience
- Assembling the Pantheon of Pie Components
- Essential Equipment for Flawless Fabrication
- Mastering the Dough: Crafting a Truly Crumbly, Layered Pastry
- Building the Heart of the Dish: Preparing and Layering the Apple Filling
- The Grand Finale: Baking and Achieving Golden Perfection
- Troubleshooting Common Pie Pitfalls and Pro Fixes
- Elevating Your Slice: Serving Suggestions and Variations
- Recipe FAQs
- 📝 Recipe Card
The Heritage Handshake: Why This Apple Pie Formula Succeeds
There are few desserts that carry the weight of memory and tradition quite like a perfectly executed Apple Pie . It’s the quintessential image of comfort, evoking warmth, family gatherings, and that satisfying snap of a perfectly baked crust.
But achieving that ethereal balance a crust that shatters into a thousand buttery flakes while holding a vigorously bubbling, spiced fruit interior can feel like chasing a culinary ghost.
This specific formula, marrying robust American fruit expectations with time honoured pastry techniques, is designed to demystify that process. We aren’t just making an apple pie; we are engineering the absolute Best Apple Pie Recipe , ensuring every slice is structurally sound and flavourfully profound.
This commitment to balance is what sets apart a decent dessert from a truly unforgettable bake.
Beyond the Basics: Defining Our Ultimate Apple Pie Experience
To craft something truly remarkable, we must first agree on the goal. Our ultimate Apple Pie Recipe From Scratch involves two non-negotiable elements: a pastry that sings with butter and layers, and a filling that is tart, sweet, and intensely aromatic, holding its shape beautifully once cooled.
This goes far beyond simply throwing sliced fruit into a pre-made shell.
Unlocking the Secret to That Sunday Afternoon Comfort
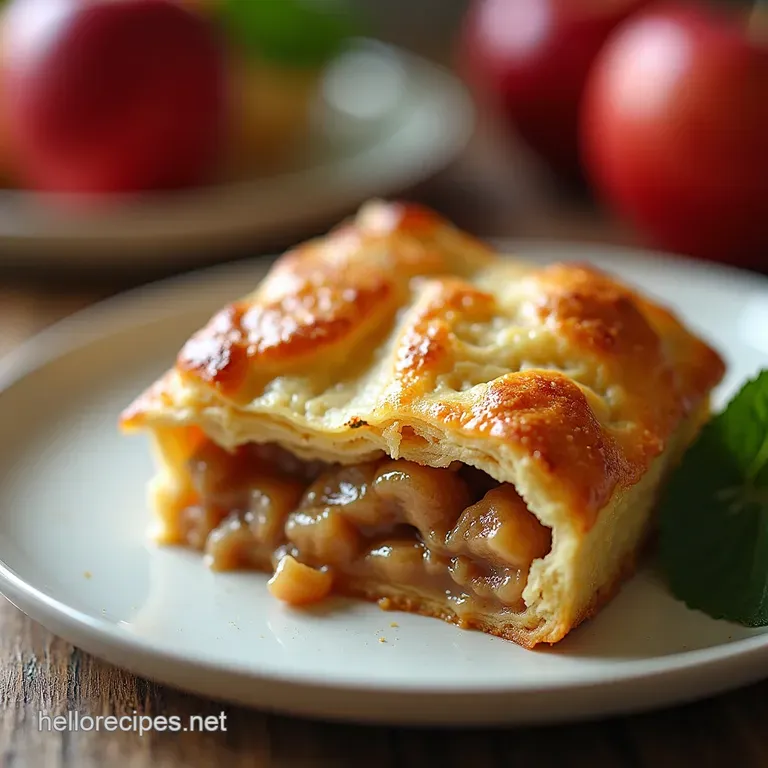
The profound satisfaction derived from a Homemade Apple Pie stems directly from its texture contrast. We aim for that satisfying resistance when your fork first breaks the surface, followed immediately by the yielding softness of the cooked fruit.
Achieving this requires respecting the role of both sugar and thickening agents too little, and you have soup; too much, and you have candy. The careful selection of apples and precise measurement of the binding ingredients are critical to delivering that iconic, comforting slice every single time.
The Dual Culture Approach to Crust Perfection
This pastry moves beyond a simple shortcrust. By adhering to cold temperatures and using 100% unsalted butter a hallmark of high end baking we ensure maximum steam generation during the initial blast of heat in the oven. This steam pushes the flour and butter layers apart, creating lift and flakiness.
We blend the best of both worlds: the tenderness found in many American recipes, coupled with the chilling rigor often emphasized in traditional European pastry arts, resulting in our signature Apple Pie Crust Recipe .
What Makes This Spiced Filling Unforgettable
The flavour profile hinges on complexity. Simply using cinnamon often results in a one-note sweetness. Here, we introduce brown sugar for depth and molasses notes, offset by the bright tang of fresh lemon juice.
The subtle inclusion of nutmeg anchors the warming spice blend, ensuring that the resulting Apple Pie Filling Recipe tastes layered and complex, rather than one-dimensional. It’s an aromatic experience that promises incredible results before the pie even enters the oven.
Assembling the Pantheon of Pie Components
Creating this masterpiece begins long before the oven is preheated. It requires thoughtful sourcing and preparation across three distinct areas: the foundational dough, the fruit core, and the aromatic elements.
Knowing exactly what ingredients you need, and understanding their function, is the first step toward making this an Apple Pie Recipe Easy Homemade success, despite its medium difficulty rating.
Essential Equipment for Flawless Fabrication
While passion is essential, the right tools make precision possible. A standard 9 inch pie dish, preferably ceramic or glass, allows for even heat distribution, which is vital for setting that bottom crust. A sturdy rolling pin is necessary for even thickness when rolling out the dough.
Perhaps the most crucial non-oven item is a pastry blender or, if you prefer a slightly faster route, a food processor. These tools allow you to incorporate the butter without excessively warming it with your hands, directly influencing the final flakiness.
Buttery Foundations: Sourcing Ingredients for the World's Best Crust
The pastry demands high-quality, very cold, unsalted butter about 1 cup (227g) should be diced and returned to the freezer briefly before use. For the dry base, 2 ½ cups of all-purpose flour, a tablespoon of granulated sugar for browning, and a teaspoon of fine sea salt are whisked together.
The final, most important component is ice water; having it ready ensures the dough remains chilled throughout the mixing process.
Choosing Your Apples: A Baker's Guide to Texture and Tartness
A truly great Apple Pie relies on a heterogeneous mix of apples. Relying solely on one type often leads to a mushy filling (if using soft apples) or an overly sharp flavour (if using only tart varieties).
We mandate a blend: aim for at least 6 or 7 large apples, ensuring they are firm and tart, such as Granny Smith, balanced perhaps with a slightly sweeter but equally firm choice like Honeycrisp or Jonagold. Peel, core, and slice these uniformly to about ¼ inch thickness consistency guarantees even cooking.
The Spice Cabinet Secrets: Crafting the Aromatic Filling Blend
The spice blend elevates the entire experience. You will need 1 ½ teaspoons of high-quality ground cinnamon and ¼ teaspoon of fresh ground nutmeg. These warm spices are balanced by ¾ cup of white granulated sugar and ¼ cup of packed light brown sugar, which introduces a lovely molasses undertone.
Finally, 3 tablespoons of either all-purpose flour or cornstarch is mixed in to absorb the liquids released by the cooking apples, preventing weepiness in the final product. A tablespoon of fresh lemon juice brightens all these heavy flavours beautifully.
Related Recipes Worth Trying
- The Best Flaky AllButter Pie Crust Recipe No Shortening — Forget the box This homemade pie crust recipe delivers gloriously flaky layers using only butter Perfect for any pie from savory to sweet Get the technique...
- Silky Dulce de Leche Cream Pie with PecanGraham Crumble — Make this showstopper Caramel Cream Pie featuring a crunchy Pecan Graham Crumble A decadent dessert recipe thats easier than you think
- The Best Dutch Apple Pie Recipe with Golden Streusel — Ditch the lattice for the ultimate Dutch Apple Pie This recipe delivers a flaky crust loaded with spiced apples and a glorious crunchy streusel topping Easy...
Mastering the Dough: Crafting a Truly Crumbly, Layered Pastry
The dough preparation begins by whisking the dry ingredients. Once combined, the ice-cold, cubed butter is cut into the flour mixture. Whether you use a pastry blender or a food processor, the goal is achieving a coarse mixture where butter pieces range from the size of small peas to small lima beans.
These larger pieces are what create those signature flakes. Next, drizzle in the ice water, just a tablespoon at a time, mixing only until the dough barely holds together when squeezed. Overmixing develops gluten, leading to a tough crust, so stop before you think you should.
Divide the dough into two slightly unequal discs, wrap them tightly, and mandate a minimum chilling time of 90 minutes though two hours is even better to allow the butter to re-solidify fully.
Building the Heart of the Dish: Preparing and Layering the Apple Filling
While the dough chills, focus on the filling. Combine your uniform apple slices with the sugars, thickener, lemon juice, and spices. Toss gently but thoroughly until every slice is dusted.
Allow this mixture to sit for about 15 minutes; this process, called maceration, draws out some liquid, allowing the thickener to begin working before baking. Once the dough is chilled, roll out the larger disc into an 11 to 12 inch circle and ease it into your pie dish.
Pour the seasoned apples into the bottom crust, mounding them slightly higher in the centre, as apples will reduce significantly during baking. Dot the top of the mound with one tablespoon of small cubes of cold butter for added richness as it melts into the fruit.
The Grand Finale: Baking and Achieving Golden Perfection
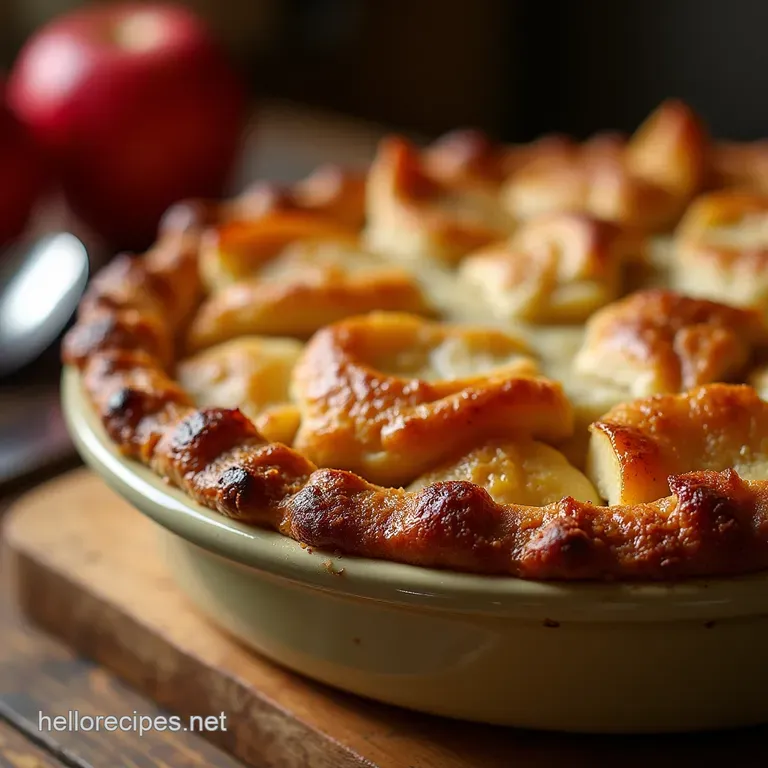
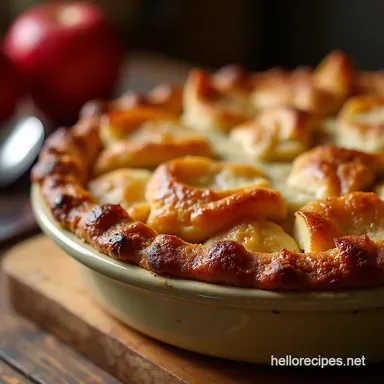
The assembly process is where we transition from preparation to presentation. Roll out the second dough disc for the top layer. You can choose a solid top, leaving vents, or opt for a more decorative lattice, which provides superior steam release.
Once the edges are sealed and crimped around the rim of the bottom crust, the pie requires a final visual enhancement: brush the entire top surface liberally with an egg wash (one egg beaten with a splash of milk or water) and sprinkle generously with coarse turbinado sugar for an irresistible crunch and shine.
This commitment to presentation results in a stunning Apple Pie .
The Ice Water Imperative: Techniques for Ultimate Flakiness
As mentioned, the coldness of the water is paramount during the initial dough creation. However, during assembly, if your kitchen is warm, it’s wise to place the assembled, unbaked pie into the freezer for 10 minutes before it goes into the oven.
This final, brief chilling ensures that the butter is rock hard, maximizing the thermal shock when it meets the hot oven air, which is the very definition of a flaky, layered pastry.
Blind Baking Anxiety: When (and How) to Par-Bake Your Bottom Crust
For this recipe, we generally advise against full blind baking because the fruit filling is relatively dense and we rely on the high initial oven temperature to set the bottom structure. However, if you are using particularly juicy apples, or if you want absolute insurance against a soggy bottom, you can par-bake.
Line the bottom crust with parchment paper, fill with pie weights or dried beans, and bake at 400° F ( 200° C) for 15 minutes. Remove the weights and paper, then proceed with filling and the top crust.
The Art of the Lattice and the Double Seal on Your Apple Pie
If opting for a lattice design perfect for showcasing that gorgeous Apple Pie Filling Recipe —ensure your strips are cut uniformly. Weave them tightly, alternating over and under. Regardless of the top style, the sealing edge is crucial.
Trim the excess dough, tuck the top and bottom edges under themselves neatly, and use a fork or your fingers to create a decorative crimp. This seal traps the steam inside, forcing it out only through the designated vents, maintaining structural integrity.
Temperature Triumphs: Monitoring the Bake for Crisp Edges
The baking process employs a two-stage temperature strategy. Start the pie hot— 425° F ( 220° C) for the first 15 minutes. This aggressive heat shock sets the crust and begins the flaking process rapidly.
After this initial burst, immediately reduce the temperature to 375° F ( 190° C) and continue baking for another 45 to 60 minutes. You are looking for a deep, rich golden brown colour and audible, thick bubbling coming from the vents.
If the edges begin to darken too rapidly around the 40-minute mark, shield them gently with strips of aluminum foil.
Troubleshooting Common Pie Pitfalls and Pro Fixes
Even the most experienced bakers face issues. The most common concern is weeping or runny filling. This is almost always solved by letting the pie cool completely. Slicing too early allows the liquid starch binder to run out before it has fully gelatinized.
If your crust browns unevenly, it usually means your oven has hot spots; rotating the pie halfway through the bake can help mitigate this. For a truly professional appearance, placing the pie on a preheated baking sheet during the bake helps conduct even heat to the bottom.
Elevating Your Slice: Serving Suggestions and Variations
Once the hard work is done and the pie has rested its required hours, the presentation truly begins. A warm slice of this Apple Pie is best served simply, allowing the pastry and filling to speak for themselves.
Preventing the Dreaded Soggy Bottom: Moisture Management Secrets
To ensure a crisp base, utilize a ceramic or glass dish, as metal transfers heat too quickly and unevenly for novice pie makers. Crucially, bake your pie on the lowest rack of the oven, ensuring the bottom crust receives the most direct radiant heat during the initial phase.
Proper chilling of the dough, as detailed earlier, is your best defence against pastry collapse.
Storage Solutions: Keeping Your Bake Fresh for Days
Once completely cooled, an Apple Pie can be covered loosely with foil or placed under a large dome and kept at cool room temperature for up to two days. Refrigeration is only necessary if you plan to keep it longer than 48 hours, though refrigeration can slightly soften the crust.
For the best texture, allow refrigerated slices to come back to near room temperature before serving.
Beyond Cinnamon: Creative Toppings and Alternative Fruit Pairings
While this recipe shines with its classic spices, consider adding a pinch of cardamom or a tiny amount of ground cloves for a more European twist. If you tire of apples, this pastry and thickening method works beautifully for a Apple Tart Recipe style using firm stone fruits like plums or cherries, perhaps leaning more heavily on cornstarch as the thickener for those wetter fruits.
Nutritional Insights for the Indulgent Baker
It is important to acknowledge that a truly rich, all-butter crust is an indulgence, delivering significant flavour through saturated fat. While our focus remains on baking perfection, remember that enjoying this slice of Americana is about balance a small, perfect portion savoured slowly holds more nutritional satisfaction than an entire, poorly made pie rushed through.
This is a treat to be enjoyed consciously, perhaps paired with a scoop of vanilla ice cream to cool the palate.

Recipe FAQs
Why is my Apple Pie crust coming out soggy on the bottom, even though I baked it for ages?
Ah, the dreaded soggy bottom a true baking tragedy! This usually happens because the bottom crust didn't get enough direct heat to set before the liquid from the filling soaked in. Try placing your pie on the lowest rack of the oven, or use a ceramic or glass pie dish, which holds heat better than metal.
A quick blast at a higher temperature at the start, like we suggest, also helps seal that base quickly.
What are the best types of apples to use for this Apple Pie? I want a good texture, not mush!
For a pie that holds its shape and offers a nice tart counterpoint to the sweet spices, you want firm, tart apples. A blend is best; Granny Smith is the classic workhorse, but mixing in firmer varieties like Honeycrisp or Jonagold gives you more flavour complexity.
Avoid Red Delicious, as they tend to break down into applesauce far too quickly during the long bake time.
My pie edges always burn before the middle is done how do I prevent this?
That’s a common frustration, especially with rich butter crusts! The simplest trick is to create a little shield. Once the crust edges look nicely browned (usually about 30 minutes into baking), fashion a ring out of aluminium foil and gently place it over the rim of the pie.
This protects the delicate edges while allowing the centre to keep cooking until the filling is perfectly bubbly.
How long does this classic Apple Pie need to cool, and can I freeze the leftovers?
You absolutely must let it cool for a minimum of three to four hours before slicing; this resting period is non-negotiable as it allows the thickener to fully set the juices. Leftovers keep beautifully wrapped tightly at room temperature for two days, or you can freeze cooled, un-sliced pies for up to three months just reheat gently in the oven when you fancy another slice!
Can I make a variation of this Apple Pie, perhaps without a top crust?
Of course! If you prefer less pastry, you can easily turn this into a gorgeous Dutch Apple Pie by omitting the top crust entirely. Instead, sprinkle the filling generously with a streusel topping made from butter, flour, brown sugar, and maybe some oats for extra crunch.
It bakes up just as delicious, perfect for a lighter feel!
Flaky Apple Pie Recipe 2
Ingredients:
Instructions:
Nutrition Facts:
| Calories | 930 kcal |
|---|---|
| Protein | 7.0 g |
| Fat | 26.1 g |
| Carbs | 88.5 g |
| Fiber | 9.6 g |
| Sodium | 5029 mg |
