The Proper Flaky Crust Apple Pie a Proper British Bake with an American Heart
- Why This Classic Apple Pie Recipe Stands Above the Rest
- The Baker’s Promise: Achieving Peak Flakiness and Flavor Balance
- Procuring the Perfect Produce: Selecting Your Baking Apples
- Crafting the Foundation: Creating the Gold-Standard Pastry
- Building the Heart: Preparing and Layering the Apple Filling
- The Grand Finale: Enclosing, Venting, and Baking Your Masterpiece
- Troubleshooting Common Pie Pitfalls
- Extending the Joy: Storing and Reheating Your Finished Bake
- Recipe FAQs
- 📝 Recipe Card
Why This Classic Apple Pie Recipe Stands Above the Rest
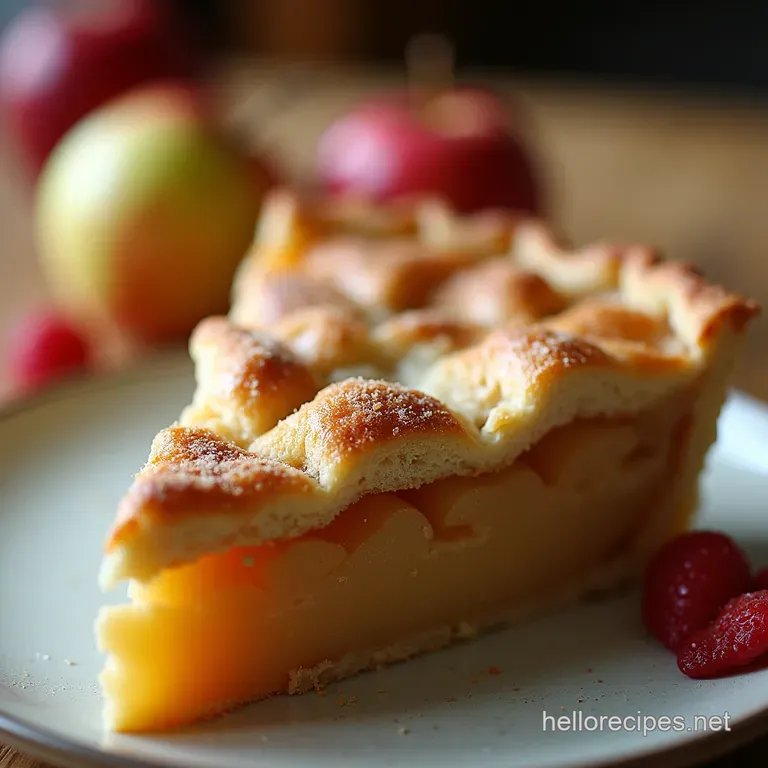
There is an inherent magic to a proper Homemade Apple Pie . It’s more than just dessert; it’s an edible tapestry woven with nostalgia, comfort, and the unmistakable scent of home.
While many recipes exist, this Classic Apple Pie Recipe is specifically engineered to conquer the two major hurdles every baker faces: achieving a shatteringly flaky crust and ensuring the filling sets up perfectly without weeping juice everywhere.
We are aiming for that quintessential experience a crisp, golden exterior yielding to tender, warmly spiced fruit. This approach marries time tested traditional techniques with practical modern insights, ensuring that whether you’re making your first ever pie or perfecting your annual tradition, the result is nothing short of spectacular.
Forget overly sweet, mushy fillings; we are creating a symphony of texture and balanced flavour that truly honors the humble apple.
The Baker’s Promise: Achieving Peak Flakiness and Flavor Balance
This journey is about control control over temperature, control over ingredients, and respect for the baking process. Success in pie making is less about complex steps and more about meticulous execution of simple ones.
We’ll guide you through the creation of the ultimate Apple Pie Crust Recipe and detail how to create an Apple Pie Filling Recipe that sings with autumnal notes.
Setting the Stage: A True Comfort Bake Unveiled
Pulling together this dessert involves thoughtful preparation across several hours, though active work is surprisingly brief. For a 9 inch pie serving eight generous slices, expect about 45 minutes of active preparation time, followed by a mandatory chilling period for the dough at least an hour and then a crucial cooling period post bake.
This Easy Apple Pie Recipe is rated as Medium difficulty, primarily because the success of the crust relies heavily on keeping everything cold, a detail many novice bakers rush past.
However, by following our step-by-step Apple Pie recipe , you will unlock the secrets to creating a dessert worthy of any village fête.
The Perfect Ratio: Balancing Tartness and Sweetness in Your Filling
The integrity of the Apple Pie Filling Recipe hinges on selecting apples that hold their shape during baking and offer a pronounced flavour contrast to the added sugars. We call for 6 to 7 medium, firm, tart apples, such as Granny Smith or the traditionally favoured Bramley.
To achieve that warm, complex sweetness, we blend granulated sugar with the richer depth of light brown sugar. Crucially, we incorporate lemon juice; this acidity brightens the overall profile, ensuring the pie tastes vibrant rather than cloyingly sweet.
Essential Hardware: Tools for Flawless Apple Pie Construction
While you certainly can execute this recipe entirely by hand, efficiency aids precision. A standard 9 inch deep dish pie dish is ideal for holding ample filling. If you wish to streamline the dough making, a food processor is handy, but a simple pastry blender or two knives works beautifully for creating the perfect texture.
Most importantly, ensure you have a sturdy rolling pin and, critically, a baking sheet placed underneath your pie dish before it enters the oven this simple foresight saves you from disaster should any filling bubble over.
Procuring the Perfect Produce: Selecting Your Baking Apples
The choice of apple dictates the texture of your finished dessert. You need apples that soften beautifully but do not disintegrate into applesauce during the 60– 75 minutes of baking time. Avoid overly soft varieties like Red Delicious, as they break down too quickly.
Heirloom Harvest: Which Apples Yield the Best Texture?
For the best texture and flavour punch in your Apple Pie Baking Tips , aim for a mix if possible. Granny Smith apples offer the requisite tartness and firmness. If you can source them, Bramley apples are legendary for their bright flavour profile that cuts through the richness of the crust.
The key is that they must be firm enough to retain a distinct shape after baking; slices should yield slightly when pressed but retain structure when cut. We prepare approximately 1.2 kilograms of apples, peeled, cored, and uniformly sliced about a quarter inch thick.
Spice Cabinet Secrets: Measuring Out Aromatic Warmth
The soul of this dessert lies in the Apple Pie Spice blend. We use 1 ½ teaspoons of ground cinnamon, which provides the primary warmth, complemented by just a whisper a quarter teaspoon of ground nutmeg.
If you happen to have a whole nutmeg, grating it fresh will elevate the flavour profile significantly. These warm spices are whisked together with the sugars and the thickening agent before being introduced to the fruit.
Mastering the Fat: The Role of Cold Butter and Lard (Optional)
The secret to a truly flaky pastry is keeping the fat cold as cold as possible without being frozen solid. For our double crust, we call for 1 cup (227g) of unsalted butter, cubed into half inch pieces.
This recipe relies solely on butter for maximum flavour, but for those seeking ultimate tenderness, replacing a quarter of the butter volume with chilled lard or vegetable shortening can inhibit gluten development further, leading to an even more tender, though slightly less flavourful, result.
Crafting the Foundation: Creating the Gold Standard Pastry

The foundation of any great pie is its Apple Pie Crust Recipe . We begin by combining 2 ½ cups of all-purpose flour with 1 tablespoon of sugar and 1 teaspoon of salt. The next step is paramount: incorporating the cold butter.
The Cold Hand Method: Ensuring Ultra Flaky Dough Development
If mixing by hand, use a pastry blender or two knives to cut the cold butter into the flour mixture. You must work swiftly to prevent the heat from your hands transferring to the fat.
The goal is a shaggy mix resembling coarse crumbs, but crucially, you want visible pieces of butter about the size of small peas scattered throughout. These pockets of cold fat steam in the oven, creating separation between the layers of dough, which results in that sought after flakiness.
Gradually drizzle in 6 to 10 tablespoons of ice water, adding just enough until the dough barely holds together when squeezed. Over hydrating is the enemy of flakiness.
Chilling Out: Essential Rest Times for Dough Integrity
Once the dough is brought together gently, with minimal kneading divide it into two discs, one slightly larger for the base. Wrap both discs tightly in plastic wrap. Now comes the necessary pause: chilling for a minimum of 60 minutes .
This rest period allows the gluten strands, tightened during mixing, to relax, making the dough easy to roll and preventing the crust from shrinking dramatically during baking.
Related Recipes Worth Trying
- The Quintessential Apple Pie Flaky Double Butter Crust Recipe — Tired of soggy bottoms Master the Homemade Apple Pie Recipe with this stepbystep guide for a truly flaky pastry and spiced filling
- The Quintessential Deep Summer Blueberry Pie Recipe — Forget soggy bottoms Learn the secrets to a perfectly thickened Blueberry Pie Filling encased in an allbutter Lattice Pie Crust Taste the true flavour of summer
- UltraMoist Apple Cinnamon Muffins with Brown Butter Streusel — Tired of dry bakes These foolproof Apple Cinnamon Muffins use brown butter for incredible depth and feature a crisp streusel topping Get the recipe
Building the Heart: Preparing and Layering the Apple Filling
While the dough rests, we focus on the filling. In a large bowl, thoroughly combine the dry ingredients: the mixed sugars (granulated and brown), 3 tablespoons of flour or cornstarch for thickening, cinnamon, nutmeg, and a pinch of salt. Add your ¼-inch thick apple slices and 1 tablespoon of fresh lemon juice.
Toss everything gently until every apple slice is coated in the spiced sugar mixture. Allow this mixture to sit briefly; the sugar will begin drawing moisture out of the apples, which will later combine with the thickener to form a luscious syrup.
Once chilled, roll out the larger dough disc to about 12 inches in diameter. Carefully transfer this to your 9 inch pie dish, trimming the edges to leave a 1 inch overhang. Place the dish back into the refrigerator while you roll the top crust. Next, mound the apple filling into the chilled base.
Dot the top of the apples with 2 tablespoons of small cubes of cold unsalted butter these melt down to enrich the top layer of the filling.
The Grand Finale: Enclosing, Venting, and Baking Your Masterpiece
This is where your Beginner Apple Pie truly transforms into an expert creation. Roll out the second disc of dough. You can opt for a full top crust or a classic lattice design.
Lay the top crust over the filling, trim the overhang, and then carefully crimp the top and bottom edges together firmly to seal them completely.
Pre-Bake Prep: The Art of Egg Washes and Sugar Sprinkling
If you used a full top crust, cut 4 to 5 vents into the dough to allow steam to escape a vital step for preventing a dome shaped crust explosion! For that irresistible shimmer and crunch, brush the entire top surface with an egg wash (one egg whisked with 1 teaspoon of milk or water).
Follow this immediately with a generous sprinkling of coarse sugar, like Turbinado, to create a sparkling, textured crown. Immediately after washing and sprinkling, place the assembled pie back into the refrigerator for a final 15-minute chill.
Oven Dynamics: Achieving Deep Golden Brown Perfection
Preheat your oven to a hot 425° F ( 220° C). Place the chilled pie on the baking sheet. The high initial temperature is critical for setting the crust structure quickly. Bake at 425° F for exactly 15 minutes.
Then, reduce the oven temperature down to 375° F ( 190° C) and continue baking for an additional 45 to 60 minutes.
You will know it is done when the juices bubbling up through the vents are thick and slow moving, not watery, and the crust is a deep, rich golden brown. If the edges brown too rapidly, use thin strips of aluminum foil to shield them.
Troubleshooting Common Pie Pitfalls
One of the most common anxieties associated with any pie is achieving a crisp bottom.
Why is my bottom crust soggy? Tips for a crisp base.
Soggy bottoms are usually the result of two factors: the bottom crust being too cool when the hot filling is added, or the filling not cooking long enough. To counteract this, ensure your base crust has a good, cold rest before filling.
When you bake, always place the pie on the lowest or second-to-lowest rack in the oven; this allows the direct heat to crisp the base effectively. On top of that,, ensure you are cooking long enough for the thickener to fully activate and the moisture to boil off slightly.
Flavor Enhancements: Simple Twists for Next Level Apple Pie
While this Apple Pie is perfect as is, don't hesitate to experiment. A splash of good quality brandy or dark rum added to the Apple Pie Filling Recipe alongside the lemon juice offers a sophisticated warmth.
For a different texture, try adding a handful of toasted pecans or walnuts right before closing the top crust.
Extending the Joy: Storing and Reheating Your Finished Bake
The final, and arguably hardest, step in the step-by-step Apple Pie recipe is waiting for it to cool.
Shelf Life Insights: Optimal Cooling and Storage Techniques
Resist the urge to slice into that pie straight from the oven! The filling needs time to fully set as it cools. Allow the pie to cool completely, ideally for 3 to 4 hours, on a wire rack.
Once cooled, it can be stored loosely covered at cool room temperature for up to two days, or refrigerated for up to four days. Reheating individual slices in a moderate oven (around 350° F/ 175° C) for 10 minutes restores the crust’s crispness better than a microwave.
Nutritional Snapshot: Understanding the Indulgence
It is important to acknowledge that a truly magnificent double crust creation, rich with butter and sugar, is an indulgence. Expecting roughly 450 500 calories per slice before adding accompaniments, this pie is a celebration.
It offers a decent dose of dietary fibre from the apples, but its true reward lies in the satisfaction of enjoying a perfectly executed, from scratch classic.

Recipe FAQs
My bottom crust always turns out soggy! How do I stop my Apple Pie from having a 'soggy bottom'?
Ah, the dreaded soggy bottom it's the bane of every pie maker's existence! To combat this, ensure your bottom crust dough is well chilled, and try baking the pie on the lowest rack or directly on a preheated baking sheet; the direct heat helps set the base quickly.
Also, make sure you don't skimp on the thickener (flour or cornstarch) in the filling.
Which apples are best for making an Apple Pie, and should I pre-cook them?
For the best texture and flavour balance, you need firm, tart apples that hold their shape well, like Granny Smith or Bramley. Never pre-cook the filling; the recipe relies on raw apples slowly releasing their moisture into the thickener during the long bake time.
This ensures the filling sets up perfectly without turning to mush.
Can I make the pastry dough ahead of time, and how long does the finished Apple Pie keep?
Absolutely, making the dough ahead is highly recommended it can be stored tightly wrapped in the fridge for up to three days or frozen for a month. Once baked, the finished apple pie is best eaten within two days, stored loosely covered at room temperature, though it's perfectly safe in the fridge for up to five days.
My crust browned too fast before the apples were bubbly. What's the trick to even baking?
That’s a common issue when you’ve got a powerful oven! Keep thin strips of aluminium foil handy; when the edges start looking a bit too 'done' (too dark), gently drape the strips over the rim to shield that part from direct heat.
This allows the centre of the pie to cook through properly without burning the beautiful crust.
I’m making a lattice top, so do I still need to cut steam vents in the pastry?
If you are creating a fully woven lattice top, you don't strictly need separate vents, as the gaps between the strips act as vents themselves. However, if your lattice strips are very close together, cutting one or two small slits right in the middle of the largest intersection won't hurt and will guarantee steam release.
How important is it to let the Apple Pie cool completely before slicing, as the recipe suggests?
It is absolutely crucial, trust me! The cooling process allows the hot, watery filling to cool down and fully set around the thickeners. If you dive in while it’s piping hot, you’ll end up with a delicious, but rather soupy, mess on your plate patience really is the secret ingredient here!
Flaky Apple Pie Recipe

Ingredients:
Instructions:
Nutrition Facts:
| Calories | 752 kcal |
|---|---|
| Protein | 13.7 g |
| Fat | 25.6 g |
| Carbs | 79.1 g |
| Fiber | 10.5 g |
| Sodium | 5137 mg |
