Stuffing (Dressing): the Ultimate Sage and Thyme Savory Herb Recipe
- The Ultimate Sourdough Dressing: Crisp Crust, Moist Interior
- Essential Ingredients for the Perfect Sage and Thyme Stuffing
- Step-by-Step: Preparing and Baking Your Savory Sourdough Dressing
- The Science of Superior Stuffing: Why Baking Separately Matters
- Troubleshooting & Chef's Secrets for Flawless Dressing
- make-ahead Strategies and Storing Leftover Dressing
- The Perfect Companions: Serving Suggestions for Herbaceous Stuffing
- Recipe FAQs
- 📝 Recipe Card
The Ultimate Sourdough Dressing: Crisp Crust, Moist Interior
That smell, you guys. It’s what tells your brain that the holidays, or at least a killer Sunday dinner, have officially started. The kitchen fills immediately with the heady scent of sizzling butter, caramelized onions, and pungent sage.
Seriously, few things capture true, rustic comfort quite like that aroma it’s quintessential classic food.
People think proper stuffing is difficult, but honestly, this homemade stuffing recipe is a total lifesaver. It’s so much faster than those overly complicated sides, relying on super cheap, day-old bread and basic aromatics already in your pantry.
This glorious dressing is the secret weapon of the host who wants high praise with surprisingly little effort.
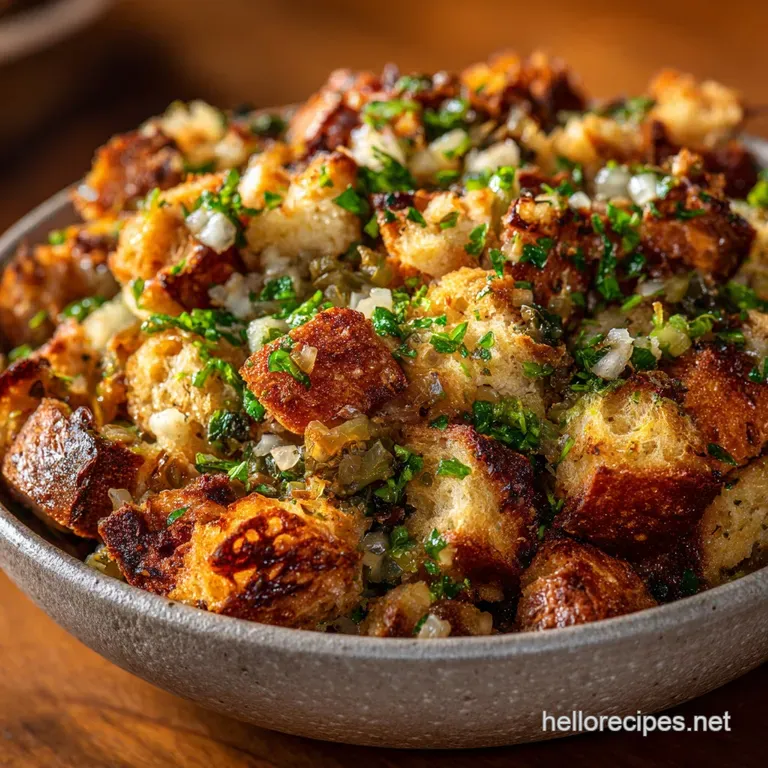
Forget those dry, cardboard boxed mixes forever, because we are making the real deal, deeply savory herb dressing. This version specifically uses tangy sourdough for an unbeatable base and bakes separately to guarantee that glorious, incredibly crispy top crust.
Let's crack on and get this savory herb masterpiece mixed up and ready for the oven.
The Difference Between Stuffing and Dressing (Why We Bake Separately)
I’m going to be really clear about this: we are making dressing . The only technical difference between stuffing vs dressing is whether you cook the mixture inside the bird or in its own pan. As a home cook who has been cooking for far too long, I firmly advise baking outside of the main roast.
Baking separately guarantees two things: food safety and fantastic texture. When you stuff a large bird, the interior of the stuffing often fails to reach a safe temperature (165°F/74°C) before the outside of the roast is dried out.
Plus, baking in a casserole dish gives you that non-negotiable, golden, crunchy crust that everyone fights over.
Why Sourdough is the Superior Base for Complex Flavor
The key to great dressing isn't magic; it's texture science and careful layering. We are using a massive amount of melted unsalted butter, which coats every single bread cube perfectly before the liquid binder is added. This rich coating prevents the bread from instantly dissolving when the warm stock hits it.
The slightly chewy, acidic sourdough holds up infinitely better than soft white sandwich bread or even some traditional white loaves. This sturdy structure gives us that ideal, desirable contrast between a buttery, crunchy exterior and a soft, moist interior. If you really want to try a classic approach, check out my Foolproof Classic Thanksgiving Stuffing Recipe with Sage Thyme for comparison the flavor profile is similar, but the texture changes entirely based on the bread you pick.
A History of Flavor: The Classic Sage and Thyme Pairing
When you smell fresh sage and thyme cooking gently in butter, you know immediately what you are making. This combination is a classic food pairing for a reason, representing the quintessential taste of autumn and the holiday table.
Sage provides that warm, earthy, slightly peppery depth, while thyme adds subtle floral and minty notes that brighten the entire dish. This ancient combination is a powerhouse that just screams savory comfort.
Essential Ingredients for the Perfect Sage and Thyme Stuffing
Sourdough Preparation: Staling vs. Drying the Bread Cubes
Listen closely: The dryness of your bread is non-negotiable for the perfect homemade stuffing recipe. If you use soft, fresh bread, the final product will be heavy, gummy, and totally lack structure.
You want the cubes to be essentially like giant croutons, ready to soak up the maximum amount of flavor without collapsing.
If you are a planner, cut your sourdough into 1 inch cubes and let them air-dry overnight on a sheet tray. If you are me (last minute always!), just spread the cubes on a baking sheet and pop them into a 250°F (120°C) oven for about 45 minutes, stirring them occasionally until they are completely dry and hard.
Selecting the Freshest Herbs (Sage vs. Thyme Ratio)
Fresh herbs are absolutely essential here; please, please do not use dried herbs for this. You need the vibrant, oils loaded punch of fresh sage and thyme to make this dish sing. Sage is much stronger than thyme, so we use a higher ratio of the former to the latter to achieve that ideal balance of savory herb flavor.
Chef's Note: If you are unsure about measuring, use your nose. The mixture should smell intensely herbaceous after the herbs have been cooked gently in the butter for sixty seconds.
Liquid Binder Options: Broth Versus Water (Impact on Texture)
The liquid binder is what holds the stuffing together, making it soft and moist inside. We use warmed, low-sodium chicken or turkey stock, plus melted butter and eggs. Warmed stock is a game changer because it absorbs faster and more evenly into the dry bread cubes than cold liquid does.
The eggs act as a binder, setting slightly during baking to hold the dressing structure without making it dense.
Detailed Ingredient List and Necessary Substitutions
| Ingredient | My Preferred Choice | Viable Substitute |
|---|---|---|
| Bread Base | Sourdough (1.5 lbs, cubed) | French Baguette, Ciabatta, or Challah (must be dry) |
| Fat | Unsalted Butter (1 cup) | Clarified Butter (Ghee) or Duck Fat (for sautéing only) |
| Aromatics | Yellow Onions & Celery | Shallots or Leeks (use same volume as onions) |
| Fresh Sage | Fresh Chopped Leaves | Can reduce slightly if using pre-dried, but highly discouraged |
| Stock | Low-Sodium Turkey/Chicken Stock | Well seasoned Vegetable Broth |
| Binder | Eggs (2 large) | Can omit if needed, but texture will be crumblier |
step-by-step: Preparing and Baking Your Savory Sourdough Dressing
Sautéing the Aromatics: Building the Flavor Base in Butter
Start by melting half of your butter in a large, heavy pot don’t rush this step. Once shimmering, add the finely diced onions and celery. Cook them low and slow, stirring often, for a solid 8 to 10 minutes until they are perfectly translucent and incredibly soft, which prevents that crunchy, undercooked celery texture nobody wants.
This process builds the core savory herb flavor base.
Now, stir in your freshly chopped sage and thyme. Cook this mixture for only 60 seconds until you smell a potent, almost nutty aroma that’s the scent of proper cooking, my friends. Pull the pot off the heat right away; we want to preserve the freshness of the herbs, not fry them.
Proper Mixing Technique: Hydrating the Bread Without Over Soaking
Transfer your dried bread cubes into the biggest mixing bowl you own. Pour the cooled aromatic butter mixture over the top and gently toss to distribute all that delicious melted fat. This initial toss coats the bread and preps it for the liquid.
Next, whisk your remaining melted butter, warmed stock, and beaten eggs together in a separate bowl. Pour about three quarters of this liquid over the solids. Use your hands or a rubber spatula to toss the mixture lightly, turning the bread over until every cube is moistened but still has distinct structure.
Crucially, do not overmix, or you’ll develop the gluten and end up with gluey, heavy stuffing. Add more stock incrementally only if the mixture looks dry or too crumbly, aiming for moist perfection.
Achieving the Signature Golden Crust (Baking Temperatures and Time)
Transfer the seasoned, rested stuffing mixture to your well greased baking dish. Pat the top gently but do not press down hard; this allows steam to circulate, preventing a dense bottom layer. Cover the dish tightly with foil and bake at 375°F (190°C) for 30 minutes.
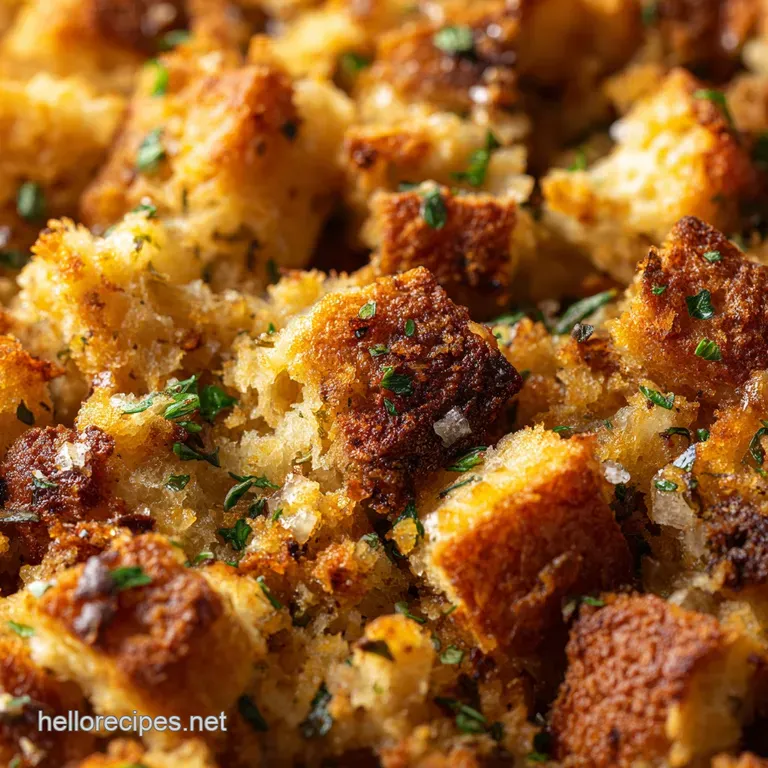
This first covered phase steams the interior, ensuring moistness throughout. After 30 minutes, remove the foil and bake for another 15 to 20 minutes until the top is deeply golden brown and the edges are bubbling fiercely. That crisp, golden brown crust is why we do this.
The Resting Period: Why You Must Wait Before Serving
I know you want to dig in the moment it comes out of the oven I get it. But please, cover the dish loosely and let it rest on the counter for 10 to 15 minutes. This essential resting period allows the internal moisture to redistribute evenly throughout the dressing.
It settles the structure and prevents the entire dish from falling apart into a crumbly mess when you try to scoop it.
The Science of Superior Stuffing: Why Baking Separately Matters
I briefly touched on this earlier, but I want to hammer this home. Baking dressing outside of the main roast gives you total control over the texture. When you stuff poultry, the exterior bread gets saturated and steamed by the meat juices, resulting in a single, homogenous, mushy texture throughout.
Baking in its own pan ensures that the exposed top layer dehydrates slightly while cooking, transforming it into that crispy, crunchy lid we adore. This duality of texture is what separates truly great dressing from the mediocre versions.
Troubleshooting & Chef's Secrets for Flawless Dressing
Achieving the Golden Ratio of Crunch and Moisture
The secret lies in the butter and the timing. Use that generous amount of butter; it adds flavor and acts as a moisture barrier on the bread. Always bake covered first, then uncovered.
If your crust isn't brown enough after the uncovered time, blast it under the broiler for 60 seconds, but watch it like a hawk my biggest kitchen mistake ever was walking away from the broiler for "just a minute" and incinerating a perfect stuffing top.
How to Fix Dry or Crumbly Stuffing
If you accidentally dried your bread cubes too much or didn't add enough stock, your dressing will come out crumbly and dry. Don't panic! Mix an extra 1/2 cup of warm stock with 1/4 cup of melted butter and gently pour it over the top of the baked dressing.
Cover it tightly with foil and return it to the warm oven for about 10 minutes. The steam will rehydrate the mixture without turning it to paste.
make-ahead Strategies and Storing Leftover Dressing
Preparing the Mixture 24 Hours in Advance
Stuffing is an excellent make-ahead dish, which is a blessing when you’re managing a big cooking day. Complete the recipe right through Step 9 (combining and resting the mixture).
Press the mixture into the prepared baking dish, cover it tightly with plastic wrap, and refrigerate for up to 24 hours. When you are ready to bake, pull it out of the fridge 30 minutes prior to baking to take the chill off, then follow Steps 11 13 as written.
Storage & Reheating
Leftover dressing keeps beautifully. Store completely cooled leftovers in an airtight container in the refrigerator for up to 4 days. You can also freeze baked leftovers tightly wrapped for up to 3 months.
When reheating, the best way to regain some crunch is to place individual servings in a toaster oven or bake covered (to prevent drying) at 350°F (175°C) until hot, then uncover for the final 5 minutes.
The Perfect Companions: Serving Suggestions for Herbaceous Stuffing
Ideal Roast Pairings and Gravy Suggestions
This classic savory herb stuffing is unbelievably versatile and pairs wonderfully with any traditional roast. It is, of course, the absolute cornerstone of any holiday feast. I highly recommend serving it alongside truly fantastic homemade gravy the crisp crust is designed to soak up every drop of rich sauce. This dressing is also the perfect earthy foil for richer dishes, such as our incredible Thanksgiving Recipes: Proper Sausage Stuffing with Cider Sage if you want a meatier option on the side.
Serve big, messy scoops right out of the casserole dish. The slight texture variation, with some pieces still crunchy and others soft from the center, is what makes it so irresistible. Don't forget a bright, tart side like cranberry sauce to cut through the richness!

Recipe FAQs
Why is my sourdough dressing turning out dry and crumbly?
Dryness usually indicates a lack of sufficient liquid (broth or melted butter) relative to the dry bread volume. Ensure the bread cubes are adequately soaked but not mushy before baking, and cover the dish with foil for the first 30 minutes of baking to trap essential moisture and steam.
Why do you recommend baking the dressing separately rather than stuffing the turkey?
Baking separately guarantees two things: food safety and superior texture. Stuffing baked outside the bird consistently achieves the safe internal temperature of 165°F (74°C) without overcooking the turkey. This method also creates the desirable crispy, golden brown crust that baking inside the cavity prevents.
Can I prepare this Sage and Thyme Dressing ahead of time?
Yes, the dressing can be fully assembled mixing the bread, herbs, and wet ingredients and refrigerated up to 24 hours in advance. If prepping ahead, let the dish sit at room temperature for 30 minutes before baking to ensure even cooking throughout the center.
What is the best substitute if I need a gluten-free bread base?
A dense, sturdy gluten-free sandwich loaf or rustic boule works best, as they hold their shape well when saturated with broth. Crucially, cut the GF bread into cubes and allow them to dry out overnight or toast them lightly to mimic the day-old texture needed to prevent sogginess.
Can I use dried herbs instead of fresh sage and thyme?
While fresh herbs provide the best flavor, you can substitute dried herbs if necessary; however, use only about one-third of the volume requested in the recipe, as they are significantly more concentrated.
To maximize the dried flavor, rub the herbs lightly between your palms before adding them to release their aromatic oils.
How do I ensure a crunchy, golden brown crust on the top?
The key to a crisp crust is removing the foil cover for the final 15 to 20 minutes of baking, allowing the surface to dehydrate and brown. For an extra rich crust, dot the top generously with small pats of unsalted butter before this final uncovered bake stage.
What is the proper way to store and freeze leftover dressing?
Store leftovers in an airtight container in the refrigerator for up to four days, or freeze cooled portions in a freezer safe bag for up to three months. To reheat, thaw overnight and warm covered in a 350°F (175°C) oven until thoroughly heated, adding a splash of broth if it seems dry.
Crispy Sage Sourdough Stuffing

Ingredients:
Instructions:
Nutrition Facts:
| Calories | 320 kcal |
|---|---|
| Fat | 18 g |
| Fiber | 3 g |
