Honey Garlic Chicken: Crisp Glaze
- Time: Active 10 mins, Passive 10 mins, Total 20 mins
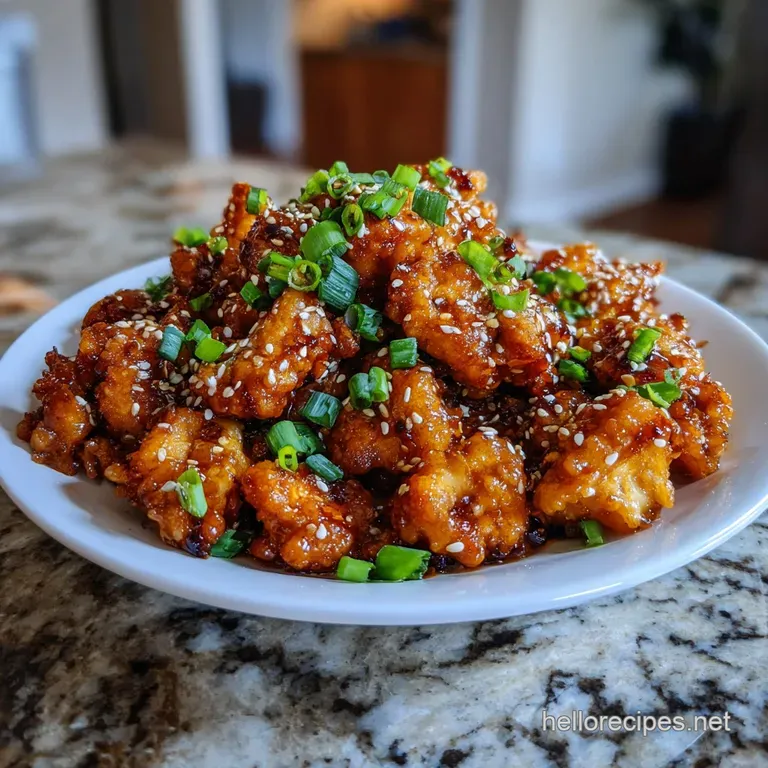
- Flavor/Texture Hook: Shatter crisp exterior with a glassy, umami sweet glaze
- Perfect for: High speed weeknight dinners or innovative meal prep
- Mastering My Crispy Honey Garlic Chicken
- Essential Specs for Balanced Flavor
- The Science of Your Ingredients
- Tools for the Perfect Sear
- Four Phases to Flawless Glaze
- Fixes for Texture and Flavor
- Creative Ways to Adapt Flavors
- Sustainable Storage and Freshness Tips
- Gastronomy Inspired Side Dish Pairings
- Recipe FAQs
- 📝 Recipe Card
Mastering My Crispy Honey Garlic Chicken
The first time I attempted a honey garlic chicken recipe, it was a total disaster. I tossed everything into a pan at once, hoping for magic, but I ended up with gray, rubbery meat swimming in a watery, overly sweet soup.
The garlic burnt to a bitter cinder before the chicken even cooked through, and my kitchen smelled like a scorched honey pot for days. It was a humbling lesson in thermodynamics and sugar stabilization.
Since then, I've spent months experimenting with the geometry of the chicken cut and the flash point of various fats. I discovered that the key isn't just the ingredients it's the sequence of the sear.
We're looking for that specific moment when the honey begins to foam and the garlic releases its essential oils without turning acrid. When you get it right, the chicken makes a distinct "snap" sound as you bite through the glaze.
We're going to use a simple starch dusting technique that provides a massive surface area for the sauce to grip. By the time we're done, you'll have a dish that looks like mahogany glass and tastes like a sophisticated balance of salt, sting, and sweetness.
It's fast, it's efficient, and quite honestly, it's the only way I'll cook this dish now.
Essential Specs for Balanced Flavor
The Physics of the Starch Snap: Cornstarch creates a rigid, microscopic lattice on the meat's surface that remains crisp even after being hydrated by the liquid honey glaze. This prevents the proteins from becoming soggy as the sauce undergoes rapid evaporation and thickening.
- Surface Dryness: Moisture is the enemy of the Maillard reaction. Always pat your 1.5 lbs of chicken breast dry with a paper towel before adding the 2 tbsp of cornstarch to ensure the coating sticks rather than becoming a gummy paste.
- Honey Polymerization: As the 3 tbsp of raw honey heats, the sugars begin to break down and reform into complex chains, creating that signature "sticky" texture that clings to the protein.
- Aromatic Infusion: We add the 5 cloves of minced garlic and 1 tsp of grated ginger at the very end. This prevents the delicate sulfur compounds in the garlic from over cooking, preserving that sharp, fresh punch.
- Acid Balance: The 1 tbsp of rice vinegar acts as a chemical foil to the honey. Without it, the dish tastes flat and cloying; with it, the flavors pop and brighten.
| Chicken Cut | Internal Temp | Rest Time | Visual Cue |
|---|---|---|---|
| 1 inch Breast Cubes | 165°F | 2 mins | Opaque center, no pink |
| 1 inch Thigh Cubes | 175°F | 3 mins | Glossy, slightly springy |
| Wing Sections | 185°F | 5 mins | Skin is taut and crackling |
To get the most out of this dish, make sure your pan is truly hot before the chicken hits the oil. If you like this style of cooking, you might also enjoy the technique used in my Creamy Tuscan Chicken recipe, which also relies on a over high heat sear to lock in juices.
The Science of Your Ingredients
Understanding why we use specific components helps you become a more intuitive cook. We aren't just choosing flavors; we are choosing functional tools that change the structure of the meal.
| Ingredient | Science Role | Pro Secret |
|---|---|---|
| Avocado Oil | High Smoke Point | Prevents the oil from breaking down and tasting "off" during the over high heat sear. |
| Raw Honey | Viscosity & Color | Provides the sugars needed for the glassy reduction and deep mahogany hue. |
| Low Sodium Soy | Umami & Salinity | Adds depth without making the final glaze mouth puckeringly salty. |
For this easy honey garlic chicken, we use 1.5 lbs of chicken breast cut into 1 inch pieces. This size is intentional; it maximizes the surface area to volume ratio, meaning more crispy bits per bite.
Ingredients & Substitutes
- Chicken Breast (1.5 lbs): Lean protein that sears quickly. Why this? Absorbs the sauce better than fat heavy cuts.
- Substitute: Chicken Thighs (adds juiciness but needs 2 mins more cook time).
- Cornstarch (2 tbsp): The secret to the crunch. Why this? Creates a thinner, crispier crust than flour.
- Substitute: Arrowroot powder (gives a similar glassy finish).
- Raw Honey (3 tbsp): The primary sweetener and thickener. Why this? Natural sugars caramelize beautifully.
- Substitute: Maple syrup (adds a woodsy note; thinner consistency).
- Low Sodium Soy Sauce (2 tbsp): The base of the umami flavor. Why this? Controls salt levels during reduction.
- Substitute: Tamari (perfect for a gluten-free version).
- Rice Vinegar (1 tbsp): Provides essential acidity. Why this? Milder than white vinegar, doesn't overpower the honey.
- Substitute: Apple cider vinegar (adds a slight fruity tang).
- Garlic (5 cloves): The aromatic backbone. Why this? Fresh garlic provides a spicy kick that jarred garlic lacks.
- Substitute: Garlic powder (use 1 tsp, but fresh is vastly superior).
- Ginger (1 tsp): Adds warmth and zing. Why this? Cuts through the sweetness of the honey.
- Substitute: Ground ginger (use 1/4 tsp).
- Avocado Oil (2 tbsp): The cooking medium. Why this? Neutral flavor and 500°F smoke point.
- Substitute: Grapeseed oil or light olive oil.
Tools for the Perfect Sear
You don't need a professional kitchen, but a few specific items make a world of difference. I highly recommend a large cast iron skillet or a heavy bottomed stainless steel pan (like an All Clad).
These materials hold heat much better than thin non stick pans, which tend to drop in temperature the second you add the chicken, leading to steaming rather than searing.
A microplane is also a game changer here for the garlic and ginger. It turns them into a paste that melts into the sauce instantly. Finally,, a whisk is essential for emulsifying the honey and soy sauce so they don't separate in the pan.
Four Phases to Flawless Glaze

- Prep the protein. Dry your 1.5 lbs of chicken breast cubes thoroughly. Note: Wet chicken will never get crispy.
- Coat the cubes. Toss the chicken with 2 tbsp cornstarch, 1/2 tsp sea salt, and 1/4 tsp black pepper in a bowl until evenly white.
- Heat the pan. Add 2 tbsp avocado oil to the skillet and wait until you see a faint shimmer on the surface.
- Sear Phase 1. Place the chicken in the pan in a single layer. Listen for a loud, consistent sizzle. If it's quiet, your pan isn't hot enough.
- Brown the edges. Cook for 3-4 minutes without moving them until the bottoms turn golden brown and release easily.
- Flip and finish. Turn the pieces and cook for another 3 minutes until the chicken is opaque and firm.
- Infuse aromatics. Lower the heat slightly and add the 5 cloves of minced garlic and 1 tsp grated ginger. Cook for 30 seconds until the air smells nutty and spicy.
- Glaze the pan. Pour in the 3 tbsp honey, 2 tbsp soy sauce, and 1 tbsp rice vinegar.
- Reduce the sauce. Stir constantly for 1-2 minutes until the liquid bubbles into large, slow popping spheres and looks like liquid glass.
- Serve immediately. Toss one last time to coat every inch and pull from the heat.
Chef's Tip: If you want an even deeper flavor, freeze your ginger for 10 minutes before grating. It prevents the ginger from becoming stringy and allows it to dissolve into the sauce for a more uniform heat.
Fixes for Texture and Flavor
Sometimes things go sideways. Maybe your honey was too thick or your heat was too high. Don't panic; most honey garlic chicken problems are easily fixed with a little kitchen chemistry.
Sauce is too thin and watery?
If your sauce isn't clinging to the chicken, it usually means the water content from the vinegar or soy hasn't evaporated enough. Simply increase the heat for 30 seconds while stirring rapidly. The honey needs to reach a certain temperature to "rope" and become sticky.
If that fails, a tiny slurry of 1/2 tsp cornstarch and 1 tsp water will fix it instantly.
The garlic tastes bitter?
This happens when garlic burns. Garlic contains natural sugars that turn acrid very quickly. If you see the garlic turning dark brown or black, you've gone too far. Next time, make sure the pan heat is lowered before the aromatics go in.
To save a bitter batch, add a tiny pinch of salt or an extra squeeze of honey to mask the sharp notes.
Chicken is tough/chewy?
This is almost always a result of overcooking. Chicken breast is lean and dries out once it passes 165°F. Using a thermometer is the best way to prevent this. If you've already overcooked it, the only fix is to ensure the sauce is extra glossy and plentiful to provide much needed moisture.
| Problem | Root Cause | Solution |
|---|---|---|
| Soggy Coating | Chicken was wet or pan was cold | Pat meat dry; wait for oil to shimmer before adding. |
| Burned Sauce | Heat was too high for too long | Remove from heat immediately; add a splash of water to loosen. |
| Bland Flavor | Not enough acidity | Add an extra teaspoon of rice vinegar or a squeeze of lime. |
Common Mistakes Checklist:
- ✓ Never crowd the pan; if the pieces touch, they steam instead of sear.
- ✓ Don't skip the cornstarch; it's the only way to get that "takeout" texture.
- ✓ Use low sodium soy sauce; regular soy will become far too salty as it reduces.
- ✓ Add the honey last; its high sugar content means it burns faster than everything else.
- ✓ Let the pan preheat for at least 3 minutes before adding the oil.
Creative Ways to Adapt Flavors
This baked honey garlic chicken technique is highly scalable. If you are cooking for a crowd, don't just double everything and throw it in one pan. You'll end up with a soggy mess.
Scaling Down (1-2 Servings): Reduce the chicken to 0.75 lbs. Use a smaller 8 inch skillet so the sauce doesn't evaporate too quickly. You can use a whole egg yolk to help the starch bind if you feel the coating isn't sticking.
Scaling Up (6-8 Servings): Double the ingredients, but work in batches. Sear the chicken in two separate rounds, then combine them all at the end for the sauce phase. If you double the liquids, only increase the salt/spices by 1.5x to avoid overwhelming the palate.
| Method | Time | Texture | Best For |
|---|---|---|---|
| Stovetop (Classic) | 20 minutes | Maximum Crisp | Quick weeknight dinner |
| Air Fryer | 15 minutes | Very Crunchy | Health conscious meal prep |
| Slow Cooker | 4 hours | Soft & Shredded | Busy days (no crispness) |
If you're looking for a different profile, this recipe adapts well to other cuts. Honey garlic chicken wings are fantastic for game days just increase the cook time to 15-20 minutes to ensure the skin renders fully. For those looking for a "one and done" meal, a Whole 30 Meal recipe offers a similar savory sweet balance using natural fruit sugars.
Myth: Searing "seals in" juices.
This is a persistent kitchen legend. Searing does not create an impermeable barrier. Instead, it creates flavor through the Maillard reaction the browning of sugars and proteins. The "juiciness" comes from not overcooking the internal temperature, not from the crust itself.
Myth: Honey is a "healthy" sugar substitute.
While honey has some trace minerals, your body processes the glucose and fructose similarly to white sugar. In this recipe, honey is used for its functional viscosity and flavor, not as a health hack. Treat it as a culinary tool for texture.
Sustainable Storage and Freshness Tips
Storage: This dish is best served immediately because the cornstarch coating will eventually soften as it sits in the fridge. However, you can store leftovers in an airtight container for up to 4 days. When reheating, avoid the microwave if possible; it will make the chicken rubbery.
Instead, use a dry skillet over medium heat or an air fryer at 350°F for 3-4 minutes to revive the "snap" of the coating.
Freezing: You can freeze the cooked chicken for up to 3 months. Let it thaw in the fridge overnight before reheating. Note that the texture will be softer after freezing, but the flavor will remain intact.
Zero Waste: Don't throw away the garlic and ginger peels! I keep a bag in my freezer for veggie scraps. Once it's full, I simmer everything with water to make a quick aromatic broth for soups or poaching liquid for rice.
If you have leftover sauce in the pan, toss in some wilted spinach or leftover roasted broccoli the residual heat will cook the greens, and the sauce is too good to waste.
Gastronomy Inspired Side Dish Pairings
To balance the intensity of the garlic chicken, you want sides that offer contrast either through freshness or neutral starch. I almost always serve this over fluffy jasmine rice or cauliflower rice to soak up the extra glaze.
A side of smashed cucumber salad with sesame oil provides a cold, crunchy contrast to the hot, sticky chicken.
If you want to lean into the innovative side of things, try pairing this with charred bok choy or even a cold soba noodle salad. The earthiness of buckwheat noodles is a brilliant match for the floral notes in the honey. If you're looking for another poultry classic to add to your rotation, the Crispy Chicken recipe provides a completely different texture profile that uses similar over high heat principles.
This dish is a testament to how three or four simple pantry staples can be transformed into something that feels like high end gastronomy. It’s all about respecting the heat and the timing. Now, get that pan shimmering and enjoy the sizzle.

Recipe FAQs
Can I use chicken thighs instead of breasts for this recipe?
Yes, thighs work well. Thighs contain more fat, leading to a juicier final product, but you must increase the cooking time by about two minutes per side.
What is the key to keeping the chicken crispy after glazing?
Use cornstarch dusting before searing. The starch creates a rigid lattice that resists immediate softening when the sauce hits it; mastering this technique is similar to how we control texture in our Poultry Seasoning recipe.
How do I stop the honey sauce from burning before it thickens?
Reduce the heat just before adding the sauce ingredients. Honey has a low burn point; add the honey, soy, and vinegar only after the garlic is fragrant (about 30 seconds) and stir constantly until it achieves the right viscosity.
Is it true that I must sear the chicken in a single layer?
Yes, single layer is non-negotiable for crispness. Crowding the pan drops the temperature dramatically, which forces the chicken to steam in its own moisture instead of searing.
How do I prevent the garlic from turning bitter in the glaze?
Add minced garlic in the final 30 seconds of searing. Garlic burns quickly due to its sugar content; cooking it briefly just before adding the liquids ensures it infuses flavor without scorching.
What is the best oil to use for achieving a high heat sear?
Use a high smoke point oil like avocado or grapeseed oil. These neutral oils can handle the necessary high temperatures without breaking down or imparting off-flavors to the crust.
Can I prepare the chicken in advance?
Yes, but only the uncooked, coated pieces. Store the cornstarch dusted chicken in the refrigerator for up to 12 hours, but ensure it cooks immediately after removing it from the fridge to maintain the coating integrity.
Crispy Honey Garlic Chicken

Ingredients:
Instructions:
Nutrition Facts:
| Calories | 338 kcal |
|---|---|
| Protein | 41.5 g |
| Fat | 9.8 g |
| Carbs | 18.2 g |
| Fiber | 0.4 g |
| Sugar | 13.8 g |
| Sodium | 745 mg |
