The Proper Pipsqueak a Truly Classic Apple Pie with a Double Butter Crust

- Setting the Standard: Why This Apple Pie Recipe Triumphs
- The Philosophy Behind Perfect Pastry Flakiness
- Curating the Components for Superior Baking
- Selecting the Ultimate Apples for Texture and Tang
- Mastering the Art of the Cold-Fat Dough
- Building the Spiced Apple Filling Layer by Layer
- The Assembly and Finishing Touches for Baking Day
- Baking Physics: Achieving Internal Perfection
- Storage Wisdom for Leftover Slices
- Elevating Your Apple Pie Experience
- Recipe FAQs
- 📝 Recipe Card
Setting the Standard: Why This Apple Pie Recipe Triumphs
There are countless iterations of baked goods we attempt in our kitchens, but few carry the cultural weight and emotional resonance of a truly magnificent Apple Pie . This isn't merely a dessert; it’s a benchmark for any serious baker.
Our goal here is to create the definitive version a Homemade Apple Pie Recipe that delivers on every promise: a deeply flavoured, perfectly tender Apple Pie Filling Recipe encased in a shatteringly crisp, impossibly Flaky Pastry Apple Pie .
We bypass the shortcuts because excellence requires attention to detail, resulting in a show stopping centerpiece for any gathering, especially as the crisp air of Apple Pie Autumn descends.
This comprehensive approach ensures that when you finish baking, you’ll understand exactly why this is considered the Best Apple Pie Recipe you’ll ever employ.
The Philosophy Behind Perfect Pastry Flakiness
The crust is non-negotiable. A soggy bottom or a tough, dry lid ruins the experience. Our philosophy centers on the principle of temperature control and fat distribution. Flakiness occurs when pieces of cold fat (butter, in our case) melt during baking, creating steam pockets that separate the layers of dough.
If the butter warms up, it incorporates too fully into the flour, leading to a tough texture. Therefore, every component, from the flour to the water, must be Arctic cold. This meticulous handling is what separates an average pie from the genuinely remarkable.
Defining 'Quintessential': Our Flavor Goals
When we discuss the quintessential flavor profile, we are seeking balance. The Apple Pie Spice blend must hum, not shout. We need the earthy warmth of cinnamon paired with the bright, sharp counterpoint of nutmeg, complemented by the depth provided by both white and brown sugars in the filling.
The apples themselves must maintain some structural integrity; a pile of sweet mush does not pass muster. We aim for tender slices that still offer a distinct bite, soaked in a thick, glossy, slightly caramelized syrup.
A Quick Note on Heritage: Origin of the Classic Apple Pie
While many associate the dessert firmly with American tradition, the ancestor of the Apple Pie actually traces its roots back to medieval Europe, where early versions used less sugar and often incorporated savory spices and meats.
The evolution towards the sweet, fruit laden dessert we cherish today took centuries, solidifying its place as a comfort staple across the globe. Understanding this history adds a layer of appreciation to the simple perfection we are recreating today.
Essential Tools for Baker’s Success
To execute this step-by-step Apple Pie Recipe flawlessly, having the right equipment is key. A deep dish 9 inch pie plate, preferably ceramic or glass, allows for even heat distribution and lets you monitor the bottom crust's browning.
A rolling pin that feels comfortable in your hands is crucial for consistent thickness. While a food processor simplifies the initial dough mixing by quickly cutting in the butter, a reliable pastry blender works just as well, provided you maintain that cold temperature ethic.
Curating the Components for Superior Baking
The success of any great dish lies in the quality of its ingredients. For this recipe, we are using an all-butter crust, which provides unparalleled richness and superior flavour, though it demands more careful handling than shortening based doughs.
The filling relies on a strategic blend of apple varieties to achieve complexity in both texture and taste.
Selecting the Ultimate Apples for Texture and Tang
The choice of apple determines the structural success of the filling. We deliberately avoid apples that break down too quickly, like McIntosh. Instead, we blend tart, sturdy Granny Smith apples providing necessary acidity with sweeter, firmer counterparts like Honeycrisp or Gala.
This dual approach ensures that the final baked product has both tang and body, preventing a watery outcome even with the addition of thickeners.
The Double Butter Crust Component List
For our Flaky Pastry Apple Pie , we rely on three core dry ingredients: all-purpose flour for structure, a touch of granulated sugar for tenderness and colour, and fine sea salt to elevate the buttery notes.
The butter must be unsalted and, critically, cut into small half inch cubes and frozen or intensely chilled before use. Finally, the hydration comes from ice water, added sparingly until the dough just comes together.
Spice Blend Ratios: Warmth Without Overpowering
The aromatic heart of this pie lies in its spice blend. We utilize 1 ½ teaspoons of quality ground cinnamon, which forms the backbone, balanced by just ¼ teaspoon of freshly ground nutmeg. This ratio ensures the warmth permeates the apples without becoming cloyingly heavy.
A whisper of fresh lemon juice added to the apples brightens the entire profile, preventing the sugars from overwhelming the natural apple essence.
Mandatory Metrics: Measuring for Precision
While baking embraces science more than cooking, accuracy in measuring dry ingredients is paramount for this Easy Apple Pie Recipe . Weighing flour (3 cups or 360g) is ideal, but if using volume measures, ensure you spoon the flour into the cup and level it off, never scooping directly from the bag, which compacts the flour and results in too much dry matter, leading to a tougher dough.
Mastering the Art of the Cold Fat Dough

The process of making the dough is where many novice bakers falter. We begin by combining the dry ingredients, then adding the icy cold butter cubes. Using a food processor pulsed briefly, or working quickly with a pastry blender, we aim for a mixture that resembles coarse cornmeal peppered with distinct, pea-sized pieces of butter.
These larger pieces are the secret weapon for flakiness. Gradually stream in the ice water, adding just enough typically between ½ and ¾ cup until the dough coheres when squeezed but doesn't feel sticky.
Immediately divide this into two slightly unequal disks (the bottom crust should be slightly larger), wrap tightly in plastic, and chill for at least one hour. This resting period allows the gluten to relax and the butter to firm up again.
Related Recipes Worth Trying
- The Quintessential Deep Summer Blueberry Pie Recipe — Forget soggy bottoms Learn the secrets to a perfectly thickened Blueberry Pie Filling encased in an allbutter Lattice Pie Crust Taste the true flavour of summer
- UltraMoist Apple Cinnamon Muffins with Brown Butter Streusel — Tired of dry bakes These foolproof Apple Cinnamon Muffins use brown butter for incredible depth and feature a crisp streusel topping Get the recipe
- The Ultimate Cinnamon Roll Apple Cake with Buttery Swirl — Bake our unforgettable Cinnamon Roll Apple Cake recipe combining tender spiced apples with a gooey cinnamon swirl Perfect for tea time Find the full recipe...
Building the Spiced Apple Filling Layer by Layer
Once the dough has chilled, we turn our attention to the fruit. In a very large bowl, gently combine the sliced apples both tart and sweet varieties with the granulated sugar, the packed light brown sugar, the flour (which acts as the primary thickener), the cinnamon, nutmeg, and lemon juice.
The key here is gentleness; we want to coat the slices evenly without bruising them or allowing them to release too much liquid prematurely.
The Assembly and Finishing Touches for Baking Day
With the components ready, assembly requires focus to maintain the cold temperature we worked so hard to establish.
Techniques for Achieving Unbeatable Flaky Layers
Roll out the larger dough disk on a lightly floured surface to a 12 inch circle. Gently transfer this to your chilled pie plate, allowing the edges to hang over by about an inch. Returning the plate to the refrigerator while you prepare the top crust helps ensure the bottom dough remains stable and cold.
Pre-Bake Filling Preparation: Juices and Thickening Agents
Before adding the filling, ensure the apples have macerated slightly, creating a small amount of liquid. Pour the entire mixture apples and released juices into the chilled bottom crust, mounding the apples slightly higher in the centre.
To enrich the flavour as the pie bakes, we dot the very top of the apple mound with two tablespoons of small, cold butter pieces.
Crimping Secrets: Sealing Your Masterpiece
Place the second dough disk over the top, trimming the excess. Tuck the top overhang underneath the bottom edge, sealing the two layers together firmly. You can then use your thumb and forefinger to create an attractive, secure crimp around the entire rim.
If you are not weaving a lattice, cutting four to five small vents in the top crust is mandatory to allow steam to escape.
The Perfect Golden Brown Finish: Egg Wash Application
For that desirable sheen and deep colour indicative of a truly Rustic Apple Pie , brush the entire top surface lightly but completely with a mixture of one beaten egg and one teaspoon of water.
Follow this immediately with a generous sprinkle of coarse Turbinado sugar; this creates a lovely textural crunch that complements the soft apples inside.
Baking Physics: Achieving Internal Perfection
To achieve perfect structure, we employ a two-stage temperature approach. Start the oven hot— 425° F ( 220° C) for the initial 15 minutes.
This blast of heat causes the butter in the crust to rapidly produce steam, setting the layers instantly into a flaky configuration. After this crucial period, reduce the heat to 375° F ( 190° C) for the remaining 55 to 65 minutes, allowing the apples to cook through without scorching the edges.
Determining Doneness: Visual and Internal Cues
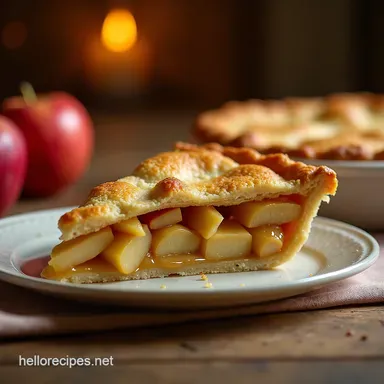
Visual confirmation is important: the crust should be a rich, deep golden brown, and the juices bubbling up through the vents must be visibly thick, not watery. For ultimate certainty, slide a thin knife or skewer through a vent hole; if you feel no significant resistance when you hit the bottom apples, they are perfectly tender.
Cooling Protocol: Patience Before Portioning
This is arguably the most difficult part of the entire Apple Pie process: waiting. The filling is molten when it leaves the oven, and the thickeners need time to hydrate and set. If you cut into it immediately, you will have hot soup.
Place the pie on a wire cooling rack and allow it to cool for a minimum of four hours, until it is merely warm to the touch.
Troubleshooting Common Crust Calamities
If the edges brown too quickly during the lower temperature bake, shield them gently with strips of aluminum foil. If the bottom crust seems undercooked, slide the pie onto the lowest rack for the final ten minutes of baking.
If the dough shrinks drastically during baking, it usually indicates you didn't chill the dough long enough before rolling or assembling.
Storage Wisdom for Leftover Slices
Once cooled and set, an un-refrigerated Apple Pie (if covered loosely) will maintain its integrity at cool room temperature for up to two days, thanks to the high sugar and acid content. For longer storage, wrap individual slices tightly in plastic wrap and then foil before freezing.
Thaw overnight at room temperature before reheating gently.
Elevating Your Apple Pie Experience
While perfection is achieved with the cooling protocol, the serving ritual can enhance the experience immensely.
Beyond Vanilla: Creative Topping Variations
While a simple scoop of high-quality vanilla bean ice cream is traditional, consider alternatives. A dollop of freshly whipped cream infused with a touch of cardamom, or serving it alongside a slice of sharp, aged cheddar cheese a time honoured pairing that balances the sweetness can transform the dessert entirely.
Determining Doneness: Visual and Internal Cues
(Note: This section was covered under Baking Physics, but to maintain flow, we will focus here on the sensory cues for when the bake is complete.) The final cue is the aroma; when the house is saturated with that unmistakable scent of warm cinnamon, butter, and baked apples, you are nearing the finish line,
but the visual evidence of thick, slow bubbling is the true confirmation of a successful bake.
Cooling Protocol: Patience Before Portioning
(Note: This section was covered under Baking Physics, but we emphasize the reason for the wait.) Allowing the filling structure to solidify is vital; the pectin released by the apples and the starch from the flour require time at a lower temperature to bond properly, guaranteeing that each slice presents
beautifully defined layers of fruit within a rich sauce, rather than a pool of runny syrup.

Recipe FAQs
Why is my Apple Pie crust coming out soggy on the bottom?
A soggy bottom is the bane of every baker’s existence! This usually happens because the filling juices seep into the dough before the bottom crust sets. To avoid this, ensure your pastry dough is well chilled before baking, and try placing a preheated baking sheet underneath the pie dish for the first 20 minutes; the shock of the heat helps the bottom crust cook through faster.
What are the best apples to use for this Classic Apple Pie recipe?
For the best texture and flavour balance, use a mix! Granny Smith apples are brilliant because they hold their shape well and offer necessary tartness to cut through the sweetness.
Pair them with a slightly sweeter, firmer apple like Honeycrisp or Gala, as the recipe suggests, ensuring you don't end up with apple sauce after baking.
My pastry edges are browning way too fast what should I do mid-bake?
That’s a common issue, especially with that gorgeous all-butter crust! If the edges start looking too dark after about 30 minutes, you need to protect them. Gently fashion a ring out of aluminium foil, often called a "pie shield," and place it over the edges of the crust.
This shields the browning while allowing the centre to finish cooking thoroughly.
Can I make the dough for this Apple Pie ahead of time, or should I use store-bought?
Absolutely, making the dough ahead of time is highly recommended, as it needs at least an hour to chill! Prepare the dough disks, wrap them tightly in cling film, and they will keep beautifully in the fridge for up to three days.
If you’re in a real rush, you can freeze the disks for up to three months just remember to thaw them properly in the fridge before rolling.
How should I store leftover Apple Pie to keep the crust flaky?
Once completely cooled, store any leftover slices loosely covered at room temperature for up to two days. If you need to keep it longer than that, cover it tightly and refrigerate it; the fridge humidity can soften the crust over time, though.
When reheating, a short spell in a moderate oven (around 325°F or 160°C) works wonders to crisp the pastry back up!
Classic Flaky Crust Apple Pie
Ingredients:
Instructions:
Nutrition Facts:
| Calories | 1180 kcal |
|---|---|
| Protein | 6.7 g |
| Fat | 29.4 g |
| Carbs | 96.9 g |
| Fiber | 10.3 g |
| Sodium | 5055 mg |
