Classic Apple Pie Recipe: the Secret to a Truly Flaky All-Butter Crust
- Unlocking the Perfect Classic Apple Pie: A Nostalgic Masterpiece
- Gathering Your Kit: Essential Ingredients and Expert Notes
- The Science of the Showstopper: Why This Recipe Doesn't Fail
- The British Bake-Off Method: Crafting Your Classic Apple Pie
- Troubleshooting Your Bake: Secrets from the Pastry Kitchen
- Planning Ahead: Storing and Freezing Homemade Pie
- How to Serve a Truly Magnificent Classic Apple Pie
- Recipe FAQs
- 📝 Recipe Card
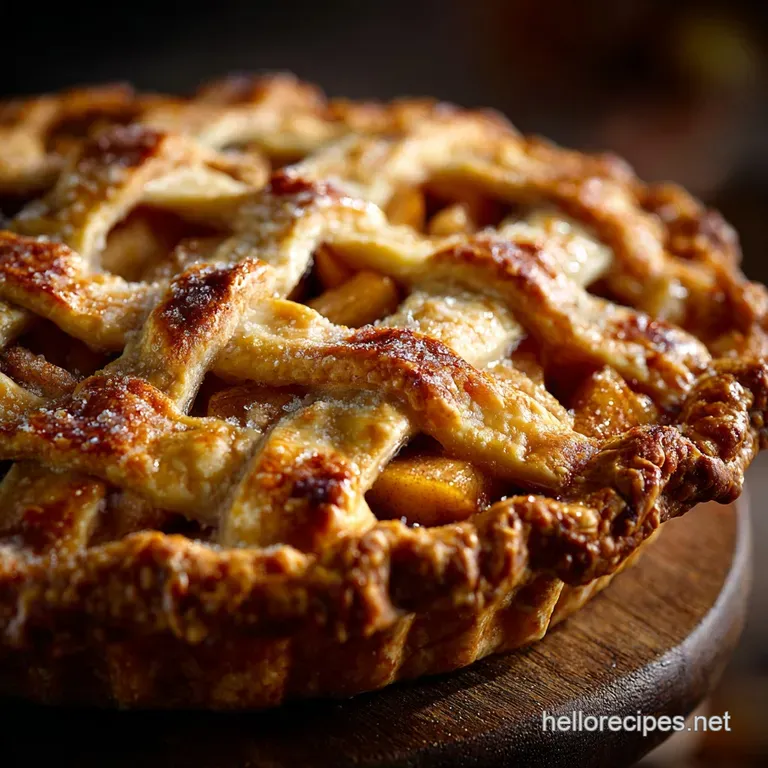
Unlocking the Perfect Classic Apple Pie: A Nostalgic Masterpiece
That smell is everything. The second that golden butter crust starts weeping cinnamon and sugar into your hot oven, the entire house changes, doesn't it? This isn't just dessert; it’s pure, sticky, warm nostalgia baked into a fluted dish.
People think baking a truly proper pie from scratch is a massive undertaking involving endless rolling and fuss. Honestly, once you nail the basics of the flaky, all-butter crust, the apple filling is a total breeze.
It’s comforting, relatively inexpensive to make, and tastes infinitely better than those thick, stodgy supermarket versions.
We are completely ditching the shortcuts here and insisting on 100% real butter for that signature golden colour and incredible texture. Trust me on this: the patience required for proper chilling time is absolutely worth the bragging rights. Let’s crack on and bake the perfect Classic Apple Pie.
Why We Need a Proper, Flaky all-butter Crust
Butter is everything, and temperature is the secret weapon. We use frozen, cubed butter because the colder the fat, the longer it takes to melt in the oven. When those distinct pockets of butter finally hit the heat, the trace water in the butter steams violently, forcing the layers of dough apart to create that glorious, towering flake.
If you overwork the dough or use warm butter, those layers merge, and you end up with a tough, sad crust.
The Essential Flavour Balance: Tart vs. Sweet Apples
Bland apple pie is the saddest thing in the world. The key to robust flavour is never using just one type of apple. Tart apples (like Granny Smith) provide necessary acidity and hold their shape beautifully during the long bake.
Sweet apples (Honeycrisp or Fuji) soften around the tart ones, creating pockets of rich, complex flavour. Without both, the filling either tastes too sharp or turns into a sugary, boring mess.
What Does 'Medium' Difficulty Actually Mean for Pastry?
I’m rating this recipe Medium, purely because of the pastry element. The filling is truly Beginner territory; you just chop and mix. However, achieving a flaky, tender, all-butter pastry demands precision and constant attention to the temperature of your ingredients.
If the dough feels sticky, you’ve overworked the butter, and the pie will be tough. The moment it starts feeling greasy in your hands, stop handling it immediately!
Gathering Your Kit: Essential Ingredients and Expert Notes
A great pie starts with great, cold ingredients. If you can, cube your butter and stick it in the freezer overnight. It makes all the difference.
The Ideal Apple Blend for Robust Flavour and Texture
| Apple Type | Quantity | Purpose | Substitute |
|---|---|---|---|
| Tart (Granny Smith) | 4 large | Provides structure and acidity. | Braeburn or Cortland (increase lemon juice slightly). |
| Sweet (Honeycrisp, Fuji) | 3 large | Softens and adds natural sweetness. | Gala or Pink Lady. |
Fats and Flours: Specifying Cold Ingredients for Maximum Flake
You absolutely must keep everything ice cold. This is the hill I will die on.
- Unsalted Butter: Must be frozen solid and cut into 1/2 inch cubes.
- Ice Water: Do not use tap water; fill a glass with water and ice and measure only the cold water you need.
- Flour and Sugar: Use standard all-purpose flour and make sure to measure accurately (spooned into the cup, not scooped).
Swapping Spices: Building Depth with Cinnamon, Nutmeg, and Allspice
The classic blend is cinnamon and nutmeg, and they are non-negotiable for that warm, nostalgic taste. I also highly recommend using freshly grated nutmeg; the flavour payoff is astronomical compared to pre-ground versions.
If you want to lean more into a festive feel, a pinch of allspice or even ginger works wonderfully.
dairy-free and Vegan Pastry Adjustments
It is completely possible to make this a vegan classic! You will need to substitute the butter with a high-quality vegan butter block (like Miyoko’s or Earth Balance sticks). Do not use spreadable margarine.
For the egg wash, mix 1 tablespoon of whole milk with 1 teaspoon of maple syrup and brush that over the top instead it browns beautifully.
The Science of the Showstopper: Why This Recipe Doesn't Fail
This method is designed to maximize flavour and texture while minimizing the chances of failure. We’re doing two crucial things:
- The over High heat Start: Baking the pie at 425°F (220°C) for the first 15 minutes causes an immediate burst of steam and rapid melting of the butter, setting the crust structure and promoting maximum flakiness before the apples have a chance to release too much juice.
- The Pre-Extraction Soak: We toss the apples with the sugar/spice mixture and let them sit for 15 minutes before assembling the pie. This pulls out excess moisture. Draining off that watery liquid ensures the filling is perfectly syrupy, not runny, when it comes out of the oven. If you've got extra apples, try them in my [make-ahead Thanksgiving Desserts: The Salted Caramel Apple Crumble Tart] as well it's a little less fussy if you're short on time.
Chef's Note: The flour or cornstarch in the filling is non-negotiable; it binds the liquid released by the apples. Use 3 tablespoons of flour, or if you want a clearer, glossier finish, swap it for 2 tablespoons of cornstarch.
The British Bake Off Method: Crafting Your Classic Apple Pie

Preventing the Dreaded Soggy Bottom (The Blind Bake Strategy)
While I don't demand a full blind bake for this pie, you can ensure a crisp bottom crust by baking the rolled out base (pricked with a fork) for 10 minutes at 375°F (190°C) before adding the filling.
This sets the foundation and is a brilliant move, especially if you have a glass or ceramic pie dish, which tends to insulate the base.
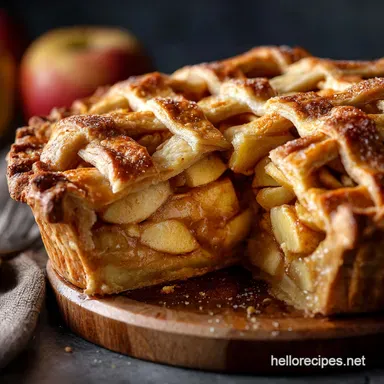
Achieving Perfectly Jammy, Not Mushy, Filling Consistency
The uniform slicing of the apples is key here. If you have thick chunks and thin slices, the thin slices will turn to mush while the thick ones remain crunchy. Aim for uniform 1/4 inch thickness. Remember the pre-extraction soak: Drain the apples before they go into the pastry case!
Phase I: Mastering the Cold Dough and Resting Process
- Combine Dry Ingredients: Whisk the flour, salt, and sugar in a huge bowl.
- Cut in the Butter: Dump in the frozen butter cubes. Using a pastry blender or your fingers, quickly cut the butter into the flour until the pieces are about the size of large peas and some look like flattened flakes. Work fast! Warm hands are the enemy.
- Add Water: Sprinkle the ice water over the mixture, 1 tablespoon at a time, using a fork to toss it gently. Stop immediately when the dough starts to clump. You should still see visible, dry flour that's good!
- Form and Chill: Divide the dough into two discs, wrap them tightly, and chill them for a minimum of 60 minutes.
Phase II: Preparing the Filling and Preventing Air Gaps
- Prep and Season: Peel, core, and slice the apples. Toss them with the lemon juice. Whisk the sugars, flour, spices, and salt together, then toss over the apples. Let this mixture sit for 15 minutes, then drain off any accumulated liquid.
- Roll the Base: Roll one chilled dough disc into a 12 inch circle. Carefully transfer it and fit it into your 9 inch pie plate. Trim the overhang, leaving 1 inch.
Phase III: Assembling, Sealing, and Venting the Pie
- Fill and Mound: Pour the apple filling into the base crust. Crucially, mound the apples slightly higher in the centre. They will collapse as they cook, and this prevents a huge air gap under your top crust.
- Top Crust: Roll the second disc into an 11 inch circle and lay it over the filling.
- Seal It Tight: Fold the top and bottom overhangs together, tucking them under to form a thick, sturdy rim. Crimp the edge tightly using your fingers or a fork to create a tight seal that prevents seepage.
- Glaze and Vent: Cut 4 6 slits in the top. Mix the egg wash (egg + milk), brush it generously over the crust, and sprinkle with coarse sugar for sparkle.
Phase IV: The Final Golden Bake Time
- Preheat and Start: Preheat the oven to 425°F (220°C). Place the pie on a foil lined baking sheet (you'll thank me for this later when the filling drips).
- High Heat Set: Bake for 15 minutes at 425°F (220°C).
- Lower Heat Finish: Reduce the temperature to 375°F (190°C) and bake for another 40– 50 minutes. The crust should be a deep golden brown, and you must see thick, viscous bubbles coming through the vents. If it's just sputtering liquid, it needs more time!
- Cooling (Essential!): Remove the pie and let it cool on a wire rack for at least 3– 4 hours . This time allows the thickener in the filling to fully set, guaranteeing a beautiful slice, not a sloppy mess.
Troubleshooting Your Bake: Secrets from the Pastry Kitchen
Why Your Pastry Might Be Shrinking (Temperature Control)
Shrinkage happens because the gluten structure in the dough was stressed (over mixed) or, more likely, because you didn't rest it long enough. Always let the dough rest, wrapped up, in the fridge for a full hour.
Once you fit the bottom crust into the pie plate, put the whole thing back in the fridge for 15 minutes while the oven preheats. This relaxes the gluten and locks the shape in.
How to Avoid a Runny or Watery Filling
This is the number one complaint! If the filling is runny, you either didn't drain the apples (see Phase II) or you didn't cook the pie long enough. That thickener (flour/cornstarch) needs internal heat to activate and needs time to visibly bubble and thicken.
Don't pull the pie until the bubbles look like slow moving lava. If you want a fun, festive alternative that uses apples and is always flavourful, check out this [Vintage Fresh Cranberry Orange Relish: Easy 10 Minute No-Cook Classic] for the side!
The Foil Shield Technique for Perfect Top Browning
If your crust edges start looking dark halfway through the bake (around the 30 minute mark), quickly take 4 strips of foil and loosely tent the edges of the pie. This deflects the heat from the delicate crimps while allowing the centre to finish browning and the filling to cook completely.
Planning Ahead: Storing and Freezing Homemade Pie
Keeping Baked Pie Fresh (Short Term Storage)
Because of the high sugar and low moisture content (after cooling), a fully baked apple pie keeps exceptionally well at room temperature for up to two days . Simply cover it loosely (don't seal it airtight, or the crust will soften).
If you need to keep it longer, refrigerate it for up to 4 days, but the crust texture will suffer slightly.
Freezing Unbaked vs. Fully Baked Pies
You bet it freezes well!
- Unbaked (My Preference): Assemble the entire pie, but do not apply the egg wash or sugar. Wrap the pie plate tightly in two layers of plastic wrap and one layer of foil. Freeze for up to 3 months. When ready to bake, remove all wrapping, apply the egg wash/sugar, and bake straight from frozen (add about 20– 30 minutes to the total baking time).
- Fully Baked: Cool the pie completely. Wrap tightly and freeze for up to 1 month. Reheat in a 300°F (150°C) oven until warmed through (about 25 minutes).
How to Serve a Truly Magnificent Classic Apple Pie
The Ultimate Pairing: Custard vs. Clotted Cream
Serving this pie warm is non-negotiable, and it demands a cold contrast. I’m a purist, so my absolute favourite is a generous serving of proper, thick vanilla ice cream (often called à la mode ).
However, if you are feeling fancy, a dollop of thick, decadent Clotted Cream or lashings of classic, rich Crème Anglaise (Pouring Custard) is absolutely the way to go. Forget that neon yellow powdered stuff; real custard makes all the difference.

Recipe FAQs
Why is the bottom crust of my apple pie soggy?
A "soggy bottom" is typically caused by the crust absorbing too much moisture from the apples before the pastry can set fully. To prevent this, ensure your filling is tossed thoroughly with the starch/flour mixture, and consider baking the pie on a preheated baking steel or stone to boost the heat transfer to the lower crust.
My filling is very runny even after cooling. What went wrong?
A runny filling suggests the starch (flour or cornstarch) did not reach its gelatinization temperature to properly thicken the liquids released by the apples. Ensure the pie is baked until the filling is visibly bubbling in the center, which confirms the internal temperature is high enough.
Most importantly, allow the pie to cool completely for 4 to 6 hours before slicing, as the filling continues to set as it cools.
Which type of apples are best for pie baking?
The ideal apple pie uses a blend of varieties to achieve optimal flavour and texture. We recommend combining a firm, tart apple like Granny Smith for structure and acidity, with a sweeter, softer apple such as Honeycrisp or Braeburn.
Avoid very soft apples like Macintosh, as they break down completely and create a mushy consistency.
Can I freeze this apple pie, and should I bake it first?
Freezing an unbaked pie yields the best result for future baking. Assemble the pie completely, wrap it tightly in plastic wrap and then foil, and store it for up to three months. When ready to bake, place the frozen pie directly into a preheated oven and increase the baking time by about 20 minutes.
How do I prevent the top crust from browning too fast?
If the crust achieves sufficient colour before the filling is fully cooked, reduce the oven temperature slightly. Alternatively, create a shield by cutting a doughnut shape out of aluminum foil and loosely covering the edges of the pie halfway through the baking time.
Remove the foil for the final 10 minutes to finish browning the center.
Is it necessary to pre-bake (blind bake) the bottom crust?
For a traditional double crust pie with adequate starch in the filling, blind baking is usually not required. However, if you are using particularly juicy apples or are working in humid conditions, blind baking the bottom crust for 15 minutes can create an excellent moisture barrier.
Be sure to chill the crust again before adding the filling.
Can this recipe be adapted to be vegan or dairy-free?
Yes, this pie adapts well to dietary restrictions by substituting the butter in the crust with a high-quality, solid vegan butter substitute or vegetable shortening. Replace the traditional egg wash used for browning with a mixture of plant based milk (like soy or oat) blended with a touch of maple syrup for a golden shine.
Classic Apple Pie With Flaky Crust
Ingredients:
Instructions:
Nutrition Facts:
| Calories | 420 kcal |
|---|---|
| Protein | 4.0 g |
| Fat | 18.0 g |
| Carbs | 63.0 g |
