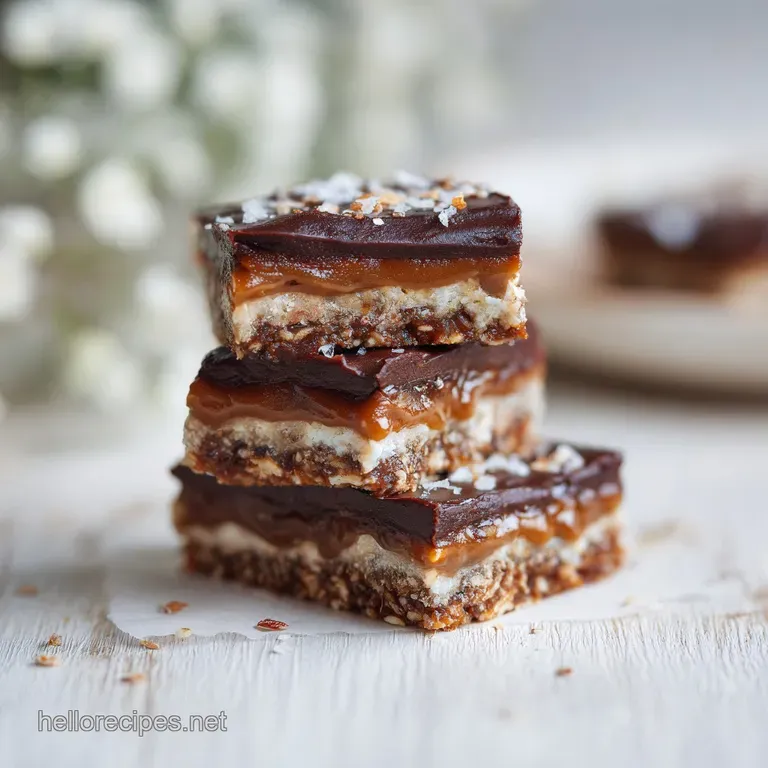
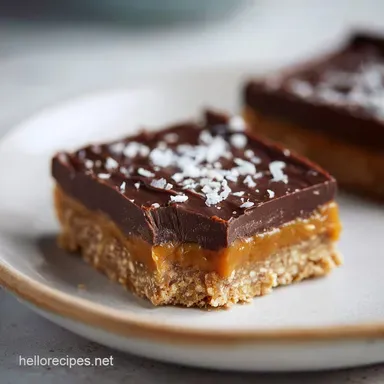
Store Bought Snack You Can Make at Home with Chocolate Chips
- Time: Active 15 minutes, Passive 35 minutes, Total 50 minutes
- Flavor/Texture Hook: A velvety chocolate exterior that gives way to a jammy, salt flecked center.
- Perfect for: High energy afternoon fuel or a sustainable alternative to processed candy.
- Store Bought Snack You Can Make At Home with Chocolate Chips
- Replicating Your Favorite Chocolate Bar Without The Additives
- The Science of the Chocolate Snap
- Component Analysis for Peak Gastronomy
- Essential Elements for Your Homemade Snack
- Tools for Precise Culinary Execution
- Engineering the Ultimate Chocolate Snack
- Refined Techniques and Common Pitfalls
- Creative Variations and Flavor Profiles
- Adjusting the Batch Size Properly
- Flavor Myths and Ingredient Realities
- Storage Strategies and Sustainable Practices
- Presentation and Professional Gifting Tips
- Recipe FAQs
- 📝 Recipe Card
store-bought Snack You Can Make At Home with Chocolate Chips
Imagine standing in your kitchen at 3 PM, that familiar sugar craving hitting like a freight train. I used to reach for a crinkly, plastic wrapped bar from the vending machine, only to feel that heavy, waxy film on the roof of my mouth afterward.
It was a cycle of instant gratification followed by immediate regret, mostly because those store-bought versions are loaded with stabilizers that mask the real flavor of the cacao.
Everything changed when I realized I could engineer a better version myself. The first time I bit into one of these, I heard that satisfying "shatter" of the dark chocolate shell, followed by the silky, oozing texture of the nut butter center.
Satisfy your sweet tooth with this easy, homemade version of a store-bought snack you can make at home with chocolate chips. It's not just a recipe; it's a technical upgrade to your snacking habits that relies on real food chemistry instead of industrial additives.
We are going to focus on the contrast between the mineral salt and the deep, dark notes of the chocolate. This isn't about throwing things in a bowl and hoping for the best. We’re going to use a few specific techniques to ensure the chocolate doesn't melt the second your fingers touch it and that the "caramel" center stays plush.
Trust me, once you see how easy it is to manipulate these textures, you'll never look at the candy aisle the same way again.
Replicating Your Favorite Chocolate Bar Without The Additives
The problem with most homemade "copycat" snacks is that they often turn into a sticky mess that lacks the structural integrity of the original. We’ve all been there, trying to recreate a candy bar only to have the chocolate seize or the filling leak out like a culinary disaster.
It's frustrating when you want that specific "snap" but end up with something soft and sad.
The solution lies in understanding the fat ratios. By introducing a small amount of coconut oil to the chocolate chips, we lower the melting point just enough to create a velvety mouthfeel while maintaining a firm shell when chilled.
This technique mimics the mouth melting quality of professional ganache without the need for heavy cream or temperamental equipment.
We are also solving the "overly sweet" issue that plagues commercial snacks. By using Medjool dates, we get a complex, molasses like sweetness that provides a fiber rich foundation.
This isn't just a sugar bomb; it's a balanced snack that utilizes the natural viscosity of the fruit to hold the roasted peanuts in place, creating a multi layered experience that feels truly innovative.
The Science of the Chocolate Snap
To get that professional finish, we have to respect the chemistry of our ingredients. It is not just about heat; it is about the arrangement of molecules within the fat.
- Lipid Integration: Adding coconut oil to dark chocolate chips introduces medium chain triglycerides that prevent the chocolate from becoming too brittle. This ensures the coating "shatters" rather than crumbles when bitten.
- Osmotic Balance: The 0.5 tsp flaky sea salt does more than just season. It suppresses our perception of bitterness in the dark chocolate and amplifies the volatile aroma compounds in the peanut butter.
- Viscosity Control: Chilling the stuffed dates before dipping creates a thermal shock. This causes the chocolate to set almost instantly, preventing the "footing" or pooling of chocolate at the base of the snack.
| Method | Time | Texture | Best For |
|---|---|---|---|
| Freezer Set | 20 minutes | Firm, brittle snap | Hot summer days |
| Fridge Set | 45 minutes | Velvety, soft bite | Casual snacking |
| Room Temp | 2 hours | Ultra creamy | Immediate serving |
The way the chocolate interacts with the cold surface of the date is a fundamental principle of thermodynamics. This is quite similar to the technique used in this How to Make recipe where temperature control determines the final crumb of the dessert. If your kitchen is particularly warm, the freezer method is your best friend to ensure that the chocolate stabilizes correctly before the fats have a chance to bloom.
Component Analysis for Peak Gastronomy
Understanding why we use specific ingredients helps us troubleshoot on the fly. We aren't just choosing things because they taste good; we're choosing them for their functional properties in this store-bought snack you can make at home with chocolate chips.
| Ingredient | Science Role | Pro Secret |
|---|---|---|
| Medjool Dates | Acts as a high viscosity binder | Use room temp dates for easier pitting and stuffing. |
| Dark Chocolate | Provides structural shell | Look for 60% cacao or higher for the best fat to sugar ratio. |
| Coconut Oil | Lowers the chocolate's snap point | Refined oil has a neutral scent; unrefined adds a tropical note. |
Essential Elements for Your Homemade Snack
To ensure success, you need to gather these specific items. Don't try to shortcut the quality of the chocolate; it's the star of the show here.
- 12 Large Medjool dates, pitted: Why this? They provide the chewy, "caramel" texture that smaller Deglet Noor dates lack. (Substitute: Dried figs for a seedier, crunchier texture).
- 0.5 cup Creamy peanut butter: Why this? It acts as the smooth, fatty counterpoint to the fibrous date. (Substitute: Almond butter or sunflower seed butter).
- 0.25 cup Roasted peanuts, halved: Why this? Essential for the "Snickers style" crunch and structural contrast. (Substitute: Toasted almonds or walnuts).
- 1 cup Dark chocolate chips, at least 60% cacao: Why this? Higher cacao content means less sugar and a more sophisticated flavor profile. (Substitute: Semi sweet chocolate chips for a sweeter finish).
- 1 tsp Coconut oil: Why this? Softens the chocolate and adds a glossy, professional looking sheen. (Substitute: A tiny bit of butter, though it alters the setting temp).
- 0.5 tsp Flaky sea salt: Why this? Provides localized bursts of salinity that cut through the richness. (Substitute: Fine kosher salt, but use half the amount).
Tools for Precise Culinary Execution
You don't need a laboratory, but a few specific tools will make this process significantly cleaner and more efficient.
- Small Paring Knife: For clean, precise slits in the dates without tearing the skin.
- Microwave Safe Glass Bowl: Glass retains heat better than plastic, keeping your chocolate fluid for longer.
- Parchment Paper: Essential for a non stick surface. Do not use foil, or you will be peeling it off your snacks for an hour.
- Two Forks: The "pro" way to dip and lift the dates without leaving massive fingerprint marks in the coating.
- Small Baking Sheet: To hold the snacks while they set in the fridge or freezer.
Engineering the Ultimate Chocolate Snack

Follow these steps precisely to achieve that store-bought look with a vastly superior flavor. The transition from the warm, melted chocolate to the cold set is where the magic happens.
1. The Prep & Stuffing Phase
Slice 12 Medjool dates lengthwise. Note: Do not cut all the way through; you want to create a pocket, not two separate halves. Remove the pits. Use a small spoon to fill each cavity with roughly 1 teaspoon of creamy peanut butter.
2. The Crunch Layer
Press 2-3 roasted peanut halves into the peanut butter. Note: Push them in firmly so they are submerged; this prevents them from falling out during the dipping process.
3. Thermal Pre Set
Place the stuffed dates on a parchment lined tray and freeze for 10 minutes. Note: This "flash freeze" firms up the nut butter, making the next step significantly less messy.
4. The Liquefaction Process
Combine 1 cup dark chocolate chips and 1 tsp coconut oil in a glass bowl. Microwave in 30 second bursts, stirring vigorously between each. Cook 2 mins total until velvety and glossy.
5. The Dipping Technique
Drop one chilled date into the chocolate. Use a fork to roll it until fully submerged and shimmering. Lift it with the fork, tapping the side of the bowl to let excess chocolate stream off.
6. The Landing
Transfer the coated date back to the parchment paper. Note: If the chocolate is setting too fast, work in smaller batches.
7. The Seasoning Strike
Immediately sprinkle a pinch of flaky sea salt over the wet chocolate. Note: If you wait until it’s dry, the salt will just bounce off.
8. The Final Stabilization
Chill the tray in the refrigerator for at least 35 minutes until the shell is matte and firm to the touch.
Refined Techniques and Common Pitfalls
Even simple recipes have nuances that can separate a hobbyist result from a professional one. One mistake I once made was trying to use natural peanut butter that had separated into a pool of oil. It was a disaster; the chocolate wouldn't stick, and the filling just ran everywhere.
Honestly, don't even bother with the super runny stuff unless you've stirred it perfectly.
Chef's Tip: To get those professional looking "drizzles" on top, wait for the base coat to set for 5 minutes, then use a spoon to swing a thin stream of leftover chocolate back and forth across the snacks.
To Prevent Seized Chocolate
If even a single drop of water gets into your melting chocolate, it will turn into a gritty, clumpy mess. Ensure your bowl and stirring spoon are bone dry. If it does seize, you can sometimes save it by whisking in a teaspoon of boiling water, but it will change the texture of the finished shell.
| Problem | Root Cause | Solution |
|---|---|---|
| Choc. Streaks | Fat bloom from heat | Keep setting temp consistent; avoid rapid temp swings. |
| Leaking Filling | Date wasn't chilled | Freeze stuffed dates for 10 mins before dipping. |
| Grainy Texture | Overheated chocolate | Melt in short bursts and stir more than you heat. |
Common Mistakes Checklist
- ✓ Avoid overfilling the dates; the "seam" needs to close slightly to hold the filling.
- ✓ Use a deep, narrow bowl for dipping rather than a wide, shallow one to ensure full submersion.
- ✓ Never skip the coconut oil; it provides the flexibility needed for the perfect bite.
- ✓ Ensure your peanuts are roasted; raw peanuts lack the aromatic depth needed to balance the date.
- ✓ Pat the dates dry with a paper towel if they seem sticky or moist before stuffing.
Creative Variations and Flavor Profiles
Once you've mastered the basic structure of this store-bought snack you can make at home with chocolate chips, you can start experimenting with different "modules" of flavor. This recipe is essentially a template for sustainable gastronomy.
For a Nut Free Alternative
Swap the peanut butter for tahini (sesame paste) and replace the peanuts with toasted sunflower seeds. The bitterness of the tahini creates a sophisticated, adult focused flavor profile that is absolutely stunning with dark chocolate.
For a Protein Boost
Mix a tablespoon of your favorite protein powder into the peanut butter before stuffing. This turns the snack into a functional post workout treat that tastes like a dessert. For more ideas on protein rich snacks, you might enjoy reading about this Irresistibly Chewy Homemade recipe which also focuses on natural binders and textures.
| Servings | Ingredient Adjustments | Prep Time | Total Time |
|---|---|---|---|
| 6 People | 6 dates, 0.25 cup PB | 10 minutes | 40 minutes |
| 12 People | 12 dates, 0.5 cup PB | 15 minutes | 50 minutes |
| 24 People | 24 dates, 1 cup PB | 25 minutes | 65 minutes |
Adjusting the Batch Size Properly
When scaling this recipe up for a party or meal prep, you can't just double everything blindly. For a 2x batch (24 servings), you actually need slightly less chocolate than you'd think because the surface area of the dates doesn't increase exponentially.
If you are scaling down to just a few pieces, I recommend still melting at least 0.5 cup of chocolate. It is very difficult to dip a date into a tiny puddle of chocolate. You can always use the leftovers to make "bark" by spreading it on parchment and topping it with nuts.
When scaling up, work in batches of 12 for the dipping process. If you have 40 dates on the counter, the last 10 will likely be too warm by the time you get to them, and your chocolate will have started to thicken. Keep half in the freezer while you work on the first dozen.
Flavor Myths and Ingredient Realities
There are a few common misconceptions about making chocolate snacks at home that often lead people astray. Let's clear those up so you can cook with confidence.
- Myth: "You need tempered chocolate for a shiny finish." While tempering is great, the coconut oil in our recipe provides a shortcut that mimics the gloss and snap of tempered chocolate without the thermometer induced headache.
- Myth: "Fresh dates are better than dried ones." For this specific snack, you actually want "soft dried" Medjool dates. If they are too fresh and juicy, the high moisture content will prevent the chocolate from adhering to the skin.
- Myth: "Salt makes things saltier." In this context, the flaky salt is a flavor enhancer. It suppresses the "bitter" receptors on your tongue, allowing the nuances of the cacao and the nuttiness of the peanuts to shine through more clearly.
Storage Strategies and Sustainable Practices
These snacks are incredibly stable, but they do have a "sweet spot" for texture.
Storage: Keep them in an airtight container in the refrigerator for up to 2 weeks. If you leave them on the counter, the chocolate might soften too much, especially if your house is warm. For long term storage, they freeze beautifully for up to 3 months.
Just let them sit at room temperature for 5 minutes before eating so you don't break a tooth!
Zero Waste: Don't throw away those date pits! You can actually boil them to make a "date pit tea" that has a light, coffee like aroma, or dry them out and grind them into a powder to use as a sustainable, caffeine free coffee alternative.
Also, if you have leftover melted chocolate and peanut butter bits, stir them together with some oats to create "scrap clusters" so nothing goes to waste.
Presentation and Professional Gifting Tips
If you’re making these for a gift, presentation is everything. Since we are mimicking a store-bought snack you can make at home with chocolate chips, let's lean into that premium aesthetic.
For Professional "Drizzles"
Use a white chocolate drizzle for a high contrast look. Melt a few white chocolate chips with a drop of coconut oil and use a toothpick to create intricate patterns. This small technological addition makes the snacks look like they came from a high end boutique.
For Gift Ready Packaging
Place each finished snack into a small paper truffle liner (the kind used for cupcakes but tiny). Arrange them in a recycled cardboard box with a bit of parchment paper between layers.
Because these are handmade and use sustainable ingredients, adding a small handwritten note about the "natural caramel" (the dates) adds a personal touch that no store-bought box can match.
Right then, you're ready to tackle the kitchen. These are honestly the best way to handle that afternoon slump without the sugar crash. Let me know how that first "snap" sounds when you take your first bite!

Recipe FAQs
What snacks can be dipped in chocolate using this recipe's method?
Yes, many small, firm items work well. Items like pretzel rods, dried pineapple chunks, or even marshmallows can be dipped by adapting the chilling time slightly. If you enjoyed mastering this coating technique, see how the same principle of controlled setting temperature applies to achieving a perfect crust in our No Bake Protein Bites recipe.
What's a good store-bought snack that can be easily replicated at home with chocolate chips?
Chocolate covered nut and caramel bars are the best fit. The date and peanut butter combination mimics the chewiness and salt contrast found in many premium candy bars. We are replicating the sensory experience without the industrial stabilizers.
What is a good chocolate snack to bring to a party that travels well?
These chocolate covered dates are excellent for transport. Because they are fully set and chilled, they maintain their structural integrity much better than items filled with soft ganache or cream. Just keep them in a cooler box if the ambient temperature is high.
What is the most popular chocolate snack that uses a similar date/nut filling base?
High end, vegan "Snickers" style bars are currently trending. These snacks leverage the fibrous chewiness of dates to replace processed caramel, offering a richer, more complex flavor profile.
How can I make the chocolate shell thinner, like a commercial coating?
Increase the ratio of coconut oil slightly in your melting mixture. Adding an extra half teaspoon of oil to the chocolate chips will further lower the viscosity, allowing it to flow off the date more thinly during the dipping stage.
Is it true I must use premium tempering chocolate instead of basic chips for a smooth finish?
No, this is a common misconception when using stabilizing fats. Adding a precise amount of coconut oil lowers the required cocoa butter content, effectively creating a stable, glossy coating that sets hard without the need for professional tempering.
How to ensure the date centers are not overly sticky before I dip them in chocolate?
Freeze the stuffed dates for 10 minutes prior to dipping. This rapid chilling hardens the peanut butter core, preventing it from squishing out when you press it into the warm chocolate mixture. For a different application of rapid chilling to control texture, review the steps in our and Decadent Chocolate Sauce recipe.
Chocolate Chip Copycat Snack
Ingredients:
Instructions:
Nutrition Facts:
| Calories | 226 kcal |
|---|---|
| Protein | 4.5 g |
| Fat | 12.2 g |
| Carbs | 28.6 g |
| Fiber | 3.1 g |
| Sugar | 24.4 g |
| Sodium | 155 mg |
