Homemade Bagels: Authentic New York Style

- Time: Active 30 mins, Passive 70 mins, Total 100 mins
- Flavor/Texture Hook: Glossy, mahogany crust with a dense, tug worthy crumb
- Perfect for: Weekend brunch or high protein meal prep
- How to Actually Nail the Technique
- The Necessary Specs for Your Batch of Eight
- Selecting Your Elements and Substitutes
- The Essential Arsenal for Success
- Bringing the Dough Together
- How to Fix Common Problems
- Variations and Sustainable Gastronomy
- Keeping the Harvest Fresh
- Serving Suggestions for the Perfect Schmear
- Debunking Bagel Myths
- Scaling the Production
- Recipe FAQs
- 📝 Recipe Card
| Boiling Time | Resulting Texture | Exterior Finish | Best For |
|---|---|---|---|
| 30 Seconds | Softer, roll like | Pale and thin | Sandwiches |
| 1 Minute | Classic "New York" chew | Shiny and firm | The Homemade Bagel Recipe standard |
| 2 Minutes | Heavy, dense tug | Very thick and dark | Serious bagel enthusiasts |
Understanding how the boiling time alters the finished product allows you to customize the density. A shorter boil gives the yeast more "oven spring" or room to expand, while a longer boil sets the crust so firmly that the inside stays remarkably compact.
Component Analysis: Ingredient Deep Dive
| Ingredient | Science Role | Pro Secret |
|---|---|---|
| Bread Flour | High protein content (12-14%) | Provides the structural strength needed for a dense chew. |
| Barley Malt Syrup | Natural sugar and enzymes | Creates the specific "malty" flavor profile and a darker crust. |
| Yeast (Active Dry) | Biological leavening | Bloom it in 110°F water to ensure the colony is healthy. |
| Fine Sea Salt | Flavor and gluten control | Tightens the protein network and prevents the dough from over proofing. |
Using the right flour is the most critical decision in this Homemade Bagel Recipe. All purpose flour simply does not have the protein power to stand up to the boiling process. It will result in a bagel that feels more like a circular piece of white bread.
How to Actually Nail the Technique
To achieve success with real homemade bagels, you must respect the hydration levels. We are working with a relatively stiff dough, around 60% hydration. This stiffness is what allows the bagel to hold its shape during the boil.
If the dough is too wet, it will deflate the moment it hits the water, leaving you with flat discs rather than plump rings.
The temperature of your water for the yeast bloom is your first checkpoint. If it is too cold, the yeast remains dormant, too hot and you kill the culture. Aim for exactly 110°F. I use a digital thermometer because guessing is the quickest way to end up with a bowl of dead flour.
Once that yeast is foamy and smells like a fresh brewery, you are ready to build your layers of flavor.
Chef's Tip: If your kitchen is cold, let your dough rise inside the oven with just the oven light turned on. The heat from that single bulb creates a sustainable, warm environment of about 75-80°F, which is the sweet spot for fermentation.
The Necessary Specs for Your Batch of Eight
This recipe is designed to yield 8 standard sized bagels. Keeping the sizes consistent ensures they all cook at the same rate. Using a digital scale to divide the dough into 8 equal portions (usually around 100-110g each) is a trick that ensures your baking sheet looks professional and every bagel has the same ratio of crust to crumb.
- Prep Time: 80 minutes (includes 60 minutes of rising time)
- Cook Time: 20 minutes
- Total Time: 100 minutes
- Oven Temp: 425°F (218°C)
| Feature | Fresh Homemade Bagels | Shortcut store-bought |
|---|---|---|
| Texture | Dense, elastic, and chewy | Soft, airy, and bread like |
| Crust | Glossy and shatter crisp | Dull and leathery |
| Ingredients | Five simple pantry staples | Often contains preservatives and corn syrup |
The difference in quality is massive. While a store-bought shortcut might save time, it fails to deliver the structural integrity required for a proper schmear of cream cheese. A fresh bagel should hold its own against the densest toppings without squishing flat.
Selecting Your Elements and Substitutes
When gathering your supplies for this homemade bagel recipe, quality matters. For the 500g of bread flour, look for a brand with a high protein percentage. The 2 tablespoons of barley malt syrup can be swapped for honey if you cannot find malt, but the flavor will be sweeter and less "earthy."
- 500g Bread Flour: Why this? High protein creates the necessary gluten structure for that classic chew.
- 300ml Warm Water (110°F): Why this? Precise temperature activates yeast without damaging the delicate culture.
- 2.25 tsp Active Dry Yeast: Why this? Provides the lift; one standard packet is usually 2.25 teaspoons.
- 1.5 tsp Fine Sea Salt: Why this? Controls yeast growth and enhances the natural wheat flavor.
- 3 tbsp Everything Seasoning: Why this? Adds texture and a savory finish to the crust.
| Original Ingredient | Substitute | Why It Works |
|---|---|---|
| Barley Malt Syrup | Honey | Similar sugar content for browning, though the flavor is more floral. |
| Active Dry Yeast | Instant Yeast | You can skip the blooming step, but reduce the amount by 25%. |
| Everything Seasoning | Sesame or Poppy Seeds | Provides the same crunch with a simpler, more focused flavor profile. |
If you are feeling adventurous, you could even look into the techniques used for Homemade Croissants to understand how fat and flour interact, though for bagels, we intentionally keep the fat content near zero to maintain that specific density.
The Essential Arsenal for Success
You do not need a bakery full of industrial gadgets to make authentic New York style bagels at home. However, a stand mixer such as a KitchenAid makes the 7 to 10 minutes of kneading much more manageable. If you are kneading by hand, be prepared for a workout, this dough is stiff!
You will also need a wide, shallow pot for the boiling stage. A 4 quart Dutch oven works beautifully. A slotted spoon or a "spider" strainer is essential for flipping and removing the bagels from the water without burning yourself or deflating the dough.
Finally, a heavy duty baking sheet lined with parchment paper ensures the bagels do not stick after their bath.
Bringing the Dough Together
- Activate the yeast. Combine 300ml warm water, 2.25 tsp active dry yeast, and 1 tbsp malt syrup in your mixer bowl. Let it sit for 5 to 10 minutes until it looks foamy and alive.
- Incorporate the dry ingredients. Add the 500g bread flour and 1.5 tsp fine sea salt to the bowl.
- Develop the gluten. Use the dough hook to knead on low medium speed for 7 to 10 minutes until the dough is smooth, elastic, and clears the sides of the bowl.
- First fermentation. Place the dough in an oiled bowl, cover it, and let it rise in a warm spot for 60 minutes until doubled in volume.
- Divide and shape. Punch down the dough and divide into 8 equal pieces. Roll into balls, then poke a hole through the center and stretch it out to about 2 inches wide.
- Prepare the bath. Bring a large pot of water to a boil with 1 tbsp malt syrup and 1 tsp baking soda.
- The boiling phase. Boil the bagels in batches for 1 minute per side. Use your slotted spoon to flip them gently.
- Apply the toppings. Place the wet bagels on your parchment lined sheet and immediately sprinkle with everything seasoning while they are still tacky.
- The final bake. Bake at 425°F (218°C) for 20 minutes until the crust is deeply golden brown and sounds hollow when tapped.
How to Fix Common Problems

Making homemade chewy bagels recipe can sometimes result in "flat bagels" if the proofing time is too long. If the yeast consumes all the sugar during the first rise, there is nothing left for the "oven spring," and they will deflate in the water.
Why Your Bagels Stay Flat
This usually happens because the dough over proofed. If your kitchen is very warm, check the dough at 45 minutes instead of 60. You want it doubled, not tripled. If the dough feels like it is full of large air bubbles and has no tension, it has gone too far.
| Problem | Root Cause | Solution |
|---|---|---|
| Wrinkled Skin | Over proofing or too much handling | Reduce rise time by 10 mins and handle shaped rings gently. |
| Dense, Heavy Crumb | Under kneading | Knead for the full 10 minutes to ensure a strong gluten network. |
| Toppings Falling Off | Bagels dried before seasoning | Sprinkle seasonings the second they come out of the boiling water. |
Common Mistakes Checklist
- ✓ Use a digital scale for the flour; measuring by cups is often inaccurate and leads to dry dough.
- ✓ Ensure the water for boiling is at a rolling boil, not just a simmer.
- ✓ Don't skip the baking soda in the water; it is the key to the glossy crust.
- ✓ Let the bagels rest for at least 15 minutes after baking before slicing.
Variations and Sustainable Gastronomy
Once you have mastered the classic boiled bagel recipe, you can start experimenting with innovative flavor profiles. For a sweet twist, you can incorporate cinnamon and raisins during the final minute of kneading. Just be careful not to add too much moisture with wet fruit.
- The Cinnamon Raisin Twist: Add 1 tsp cinnamon and 1/2 cup raisins to the dough.
- The Jalapeño Cheddar: Press sliced peppers and shredded cheese onto the bagels after the boil but before baking.
- The Sustainable Bagel Chip: If you have leftovers that have gone hard, slice them thin, toss with olive oil, and bake at 300°F until crispy.
If you want X, do Y: If you want a softer crust, replace the boiling water's malt syrup with white sugar. If you want maximum flavor, let the shaped bagels sit in the fridge for 24 hours before boiling.
If you want a vegan version, ensure your malt syrup or sugar source is certified vegan (some sugars use bone char).
Keeping the Harvest Fresh
Bagels are best eaten within the first 6 hours of baking, but you can keep them in a sealed paper bag for up to 2 days at room temperature. Avoid plastic bags if you want to keep the crust crispy, as plastic traps moisture and turns the exterior leathery.
For long term storage, slice the bagels first and then freeze them in a vacuum sealed bag for up to 3 months. By slicing them before freezing, you can pop a frozen half directly into the toaster, which revives the interior moisture while re crisping the crust.
Zero Waste Tip: Don't throw away the bagel "holes" if you decide to cut them out instead of stretching the dough. Boil and bake them as "bagel bites" for a quick snack!
Serving Suggestions for the Perfect Schmear
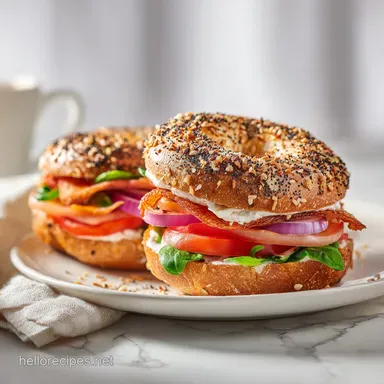
The beauty of easy homemade bagel recipe is its versatility. The classic move is a thick layer of cream cheese, smoked salmon, capers, and red onion. The fat from the salmon and the acidity of the capers cut through the dense, chewy dough perfectly.
For a more innovative approach, try a savory breakfast sandwich with a steamed egg, sharp cheddar, and a hit of hot honey. The high protein structure of the bagel ensures the sandwich doesn't fall apart, even with messy fillings.
Debunking Bagel Myths
One common myth is that you need "New York water" to make a great bagel. This has been scientifically debunked. It is the boiling technique and the high protein flour that matter, not the mineral content of the tap water. You can make an world class bagel anywhere in the world if you follow the steps.
Another misconception is that the hole is just for aesthetics. Historically, the hole allowed bagels to be strung on poles and sold on the street. In modern cooking, the hole increases the surface area, allowing the boiling water and the oven's heat to cook the center of the dough as quickly as the outside.
Scaling the Production
If you want to double this recipe to 16 bagels, do not simply double everything. Increase the flour and water 2x, but only increase the yeast and salt by 1.5x. Large batches of dough generate more internal heat during kneading, which can cause the yeast to act faster than expected.
For smaller batches (4 bagels), you can halve the recipe exactly. However, I find that a small batch is often harder for a stand mixer to grab, so you might need to finish the kneading by hand to ensure the gluten is fully developed. Use the same boiling and baking times regardless of the batch size.

Recipe FAQs
Is it necessary to use bread flour instead of all-purpose?
Yes, use bread flour for the best chew. The higher protein content in bread flour develops the gluten structure required for that signature dense, chewy bagel texture.
How to ensure the bagels get that characteristic glossy exterior?
Boil the shaped dough in water mixed with malt syrup and baking soda for one minute per side. This gelatinizes the starches on the surface before baking at 425°F, creating a shiny, set crust.
Is it true I can skip the boiling step to save time?
No, this is a common misconception. Skipping the boil prevents the exterior from setting properly, resulting in a bread like roll rather than a traditional bagel.
How to tell when the dough has proofed enough?
Wait until the dough has visibly doubled in size, which typically takes about 60 minutes. If you enjoyed learning how to control dough expansion here, the same proofing principles apply when preparing our Sourdough Sandwich Bread.
Why is my dough too sticky to handle after kneading?
Ensure you knead for the full 7-10 minutes on low-medium speed. Proper gluten development turns a shaggy, sticky mass into a smooth, elastic ball that is much easier to shape.
How to keep the hole in the center from closing while baking?
Stretch the center hole to at least two inches in diameter before boiling. The dough will puff up significantly during the boil and the 20-minute bake, so a larger initial opening ensures the hole remains visible.
How to store leftovers so they stay fresh?
Keep them in an airtight container at room temperature for up to two days. For longer storage, freeze them immediately after they have cooled completely to maintain their texture.
Authentic Homemade Bagels
Ingredients:
Instructions:
Nutrition Facts:
| Calories | 258 kcal |
|---|---|
| Protein | 8.4 g |
| Fat | 1.1 g |
| Carbs | 53.8 g |
| Fiber | 2.1 g |
| Sugar | 6.2 g |
| Sodium | 610 mg |
