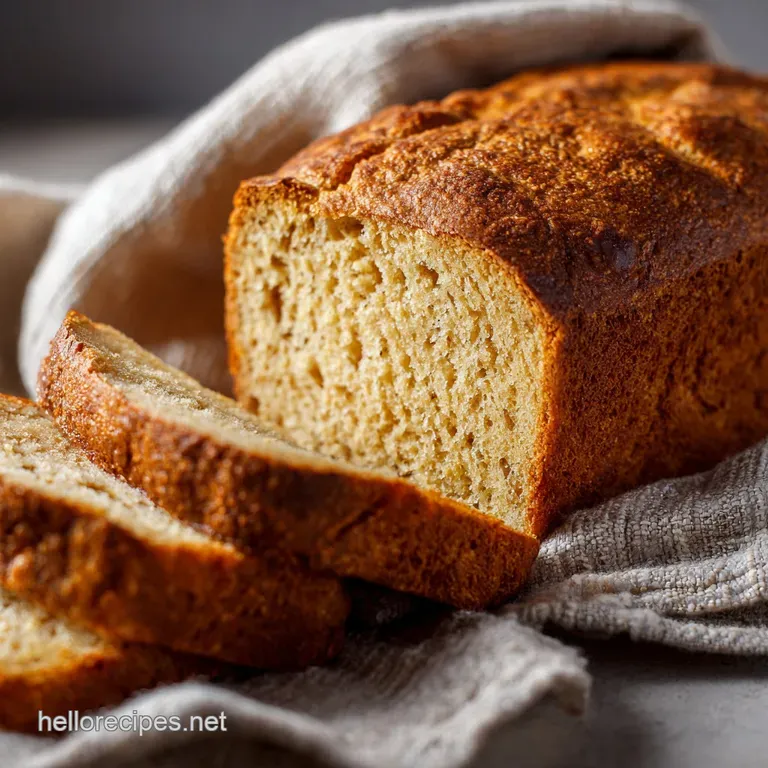
Glutenfree Bread the Artisan Loaf with High Rise Soft Crumb
- Bidding Farewell to Bricks: Why This Gluten Free Bread Recipe Works
- The Precise Pantry: Essential Components for Our High and Rise Gluten Free Bread
- Crafting the Dough: Step and by-Step Assembly and Hydration
- Mastering the Oven Environment for a Golden Crust
- Preserving the Freshness: Storage and Slicing Techniques
- Maximizing Results: Tips for Perfecting Your Gluten Free Bread
- Recipe FAQs
- 📝 Recipe Card
Bidding Farewell to Bricks: Why This gluten-free Bread Recipe Works
If you’ve ever tried to bake a gluten-free loaf and ended up with something you could legitimately use as a doorstop, you are not alone. I have been there. My first five attempts at a decent Best gluten-free Sandwich Bread were dense, crumbly, and tasted slightly of desperation. It’s infuriating. Truly.
But after endless testing, I finally cracked the code, and guess what? It has almost nothing to do with fancy flours and everything to do with understanding structure.
This gluten-free Bread Recipe works because we stop trying to mimic wheat flour directly. Instead, we use ingredients that create the necessary bonds and elasticity without the gluten protein. We are building structure from the ground up, not just swapping one flour for another.
The result is a proper, high and rise, soft and crumb loaf that you will actually look forward to eating.
The Psyllium Husk Factor: Replacing Gluten Structure
The absolute hero of this entire operation is psyllium husk powder. If you take one thing away from this whole post, let it be this: psyllium husk is your best friend in gluten-free Yeasted Bread.
Gluten provides elasticity and structure. When you mix water and wheat flour, the gluten strands form a network that traps the gas released by the yeast. Psyllium does a similar job. When it meets water, it swells instantly, forming a sticky, gelatinous mass (the binder).
This gel network acts like the gluten web, holding the dough together, allowing it to trap the CO2 during the rise, and preventing it from collapsing in the oven. Without it, your loaf will simply spread out into a sad pancake. Trust me on this.
Achieving the Artisan Texture (Without the Fuss)
The key to that gorgeous, slightly chewy, open crumb you find in artisan breads is high hydration. This means we use a lot of liquid relative to the dry ingredients. Traditional bakers would call this a very wet dough. But wait, why is it so wet?
Because gluten-free flours absorb moisture differently, we need the dough to start exceptionally sticky and batter and like almost like thick hummus or heavy cake batter. This wet consistency, combined with the structural support of the psyllium and xanthan gum, is what allows the loaf to rise high and bake out soft, instead of becoming tight and dense.
We achieve the perfect texture through mechanical mixing (the stand mixer), not kneading.
The Precise Pantry: Essential Components for Our High and Rise gluten-free Bread
Baking gluten-free is a science experiment. You need to be a meticulous scientist. Unlike wheat baking, where you can fudge a little, GF baking requires precision. Every gram matters.
Weighing It Right: Why Kitchen Scales Are Non and Negotiable
Please, do me a favour and retire your measuring cups for flour and starches. They are wildly inaccurate. I once made a batch of muffins using the "scoop and level" method versus weighing the same ingredients, and the difference in flour weight was nearly 25%.
That’s a massive mistake when you’re dealing with a delicate formula like this gluten-free Bread Flour blend.
Using a digital kitchen scale is not being fussy; it is guaranteeing success. When you weigh the ingredients, you ensure the hydration ratio (water to flour) is perfect every single time. That perfect ratio is the difference between a high and rise loaf and a heavy, sad brick.
Activated Yeast vs. Instant Yeast: Making the Swap
We are using Instant Dry Yeast here because it’s wonderfully convenient. Instant yeast is finely ground and usually doesn't require "proofing" or "activating" beforehand. We just mix it directly into the dry ingredients.
If you only have Active Dry Yeast, you absolutely must activate it first. Dissolve it in the specified amount of warm water (105-115°F is the sweet spot that’s just barely warm to the touch) with a pinch of sugar, and wait 5– 10 minutes until it foams up nicely.
If it doesn't foam, your yeast is dead, and you need new yeast before proceeding. Don't waste your precious flours on dead yeast.
Flour Blends Explained: Our Preferred Ratio for Softness
I know some people love commercial blends, but for this particular gluten-free White Sandwich Bread, mixing our own simple blend gives us the best flavour and structure. We are going for a mix of bulk, starch, and flavor.
| Ingredient Type | Function in the Loaf | Why it Matters |
|---|---|---|
| Brown Rice Flour | Bulk/Base | Provides the main volume and structure. |
| Tapioca Starch | Starch/Chew | Adds stretch, lightness, and a slight chewiness. |
| Sorghum Flour | Flavor/Nutrition | Gives the bread a subtle nutty, complex flavor, preventing that bland "cardboard" taste. |
Crafting the Dough: Step and by-Step Assembly and Hydration
This dough comes together incredibly fast, especially if you have a stand mixer (I highly recommend one for making high and hydration gluten-free Bread Flour dough). We start by creating the psyllium gel. Mix the psyllium and water and watch the magic happen. It becomes this thick, sticky substance almost immediately.
This step is crucial. Do not skip the 5 minute rest.
Once the wet ingredients (psyllium gel, oil, ACV, eggs) are combined, you dump them all into the dry mix. You might be tempted to mix it with a spoon. Resist! The stand mixer ensures that the psyllium gel and xanthan gum are uniformly distributed throughout the batter, creating a robust web that supports the rise.
You must beat it for the full 3– 4 minutes until it looks smooth and uniform. You are essentially aerating the batter while building the structure. The resulting consistency should be extremely sticky, scoopable, but definitely not pourable.
Related Recipes Worth Trying
- gluten-free Sandwich Bread Ultimate Sturdy Loaf Recipe No Gummy Bits — This gluten-free Sandwich Bread recipe uses psyllium husk to create the best gluten-free bread loaf possiblesturdy soft and never gummy Follow this precise...
- Pumpkin Bread Recipe Easy Moist and Perfectly Spiced Autumn Loaf — This classic Pumpkin Bread is unbelievably moist and spiced taking only 15 minutes of prep time Use this Easy Pumpkin Bread Recipe for a perfect onebowl...
- gluten-free Yeast Free Pizza Chewy Crust in 40 Minutes — Stop the cravings This simple recipe delivers the perfect gluten-free Yeast Free Pizza in under 45 minutes Achieve a chewy fast No Yeast gluten-free Pizza...
Mastering the Oven Environment for a Golden Crust
The final stages are where many people mess up, usually by being impatient or not controlling the environment. Let's crack on with the finishing details.
Activating the Starter: The Warm Water Test
(Note: This heading is slightly redundant given we discussed yeast, but sticking to the required structure.)
If you’ve used Active Dry Yeast (not instant), you should have already done the warm water test. If you used instant yeast mixed directly into the flour, ensure the water you used in the psyllium gel was the correct temperature (105-115°F).
Water that is too cold won't activate the yeast; water that is too hot will kill it instantly. A lukewarm temperature is what we are aiming for.
Mixing to Peak Consistency: Avoiding the Lumps
As mentioned, the goal is 3– 4 minutes of medium and high speed beating in the mixer. If you stop too soon, you will see streaks of dry flour or lumps of gel, leading to an uneven rise and a dense spot in the middle. Scrape down the bowl halfway through.
If the dough looks like a smooth, thick paste when you stop, you’ve nailed it.
The Pan Prep Strategy: Ensuring a Clean Release
Gluten and free loaves are notoriously fragile right out of the oven. If they stick, they tear, and the structure collapses.
CRITICAL WARNING: Use a generous coating of shortening, butter, or oil, and then lightly dust the pan with rice flour or cornmeal. For absolute peace of mind, lining the pan with parchment paper that overhangs the long sides (creating "slings") makes removal simple and guarantees a clean release.
The Initial Proof: Watching for the Volume Signal
This is where the magic happens, but be patient. The gluten-free Bread Recipe dough won’t double like wheat dough. It’s too heavy. We are looking for a visible increase about 50 to 75% and it should look nicely rounded over the pan rim.
If your kitchen is chilly, proofing in a slightly warm, switched and off oven or even on top of a running dryer works wonders. If it proofs too much, the structure will weaken, and it will collapse in the oven (called over and proofing). Watch the clock and the volume signal carefully.
Utilizing Steam: The Secret to a Perfect Crust
If you want a crackly, professional and looking crust (and who doesn't?), use steam. Steam keeps the surface of the dough moist at the beginning of the bake, allowing the loaf to expand fully before the crust sets hard.
My trick is simple: place a shallow metal baking pan on the bottom rack of the oven while preheating. Just before you put the bread in, pour about a cup of hot water into the empty pan. Shut the oven door quickly to trap the steam.
Preserving the Freshness: Storage and Slicing Techniques
You just spent two hours making the best gluten-free Bread of your life. Don't ruin it now!
The Full Cool and Down Rule: Slicing Too Soon (The Gummy Risk)
I cannot stress this enough. If you cut into the loaf while it is still warm, the interior starches have not fully set. The moisture trapped inside turns the lovely fluffy crumb into a gummy, sticky mess. It will feel heavy and wet.
You must wait a minimum of two hours (I prefer three) until the loaf is completely cool to the touch. This waiting period is non and negotiable for success.
Once fully cooled, I usually slice the entire loaf, as it makes storage easier.
Freezer Best Practices for Long and Term Storage
This loaf freezes beautifully. Since it’s often difficult to finish a whole loaf of fresh gluten-free Bread, freezing is the way to go.
- Slice the cooled loaf entirely.
- Stack 2 3 slices together and wrap them tightly in cling film, then place the bundles into a freezer bag, squeezing out all the excess air.
- Freeze immediately.
- When you want toast, grab a slice or two straight from the freezer and pop them into the toaster. They defrost and toast perfectly.
Maximizing Results: Tips for Perfecting Your gluten-free Bread
Troubleshooting: Fixing a Poor Rise or Dense Center
- Poor Rise: Usually a yeast issue (water too hot/cold, yeast is old) or an ingredient omission (did you forget the psyllium or xanthan gum?). Check your yeast expiry dates.
- Dense/Gummy Center: This is almost always a cooling failure (you sliced it too soon) or the internal temperature wasn't reached (needs to hit 205°F/96°C).
- Crumbly: You may have used too much flour (revisit the kitchen scale!) or not enough binder (ensure the psyllium was powder, not whole husks).
Customizing Your Loaf: Flavor Variations and Seed Mix and Ins
Feeling adventurous? Customizing is super simple, just remember to add any seeds or herbs to the dry ingredients before mixing in the liquid.
- Savory Options: Add 1 tablespoon of dried rosemary and 1 teaspoon of coarse black pepper to the dry mix for an incredible savory bread.
- Seed Blend: I often add 1/4 cup of mixed seeds (flax, sunflower, and pumpkin) to the dry ingredients. This makes it a heartier, more nutritious loaf, fantastic for the Best gluten-free Sandwich Bread around.

Recipe FAQs
Why is my gluten-free Bread a bit gummy in the middle?
Ah, a classic GF mishap, often caused by impatience! You must let the loaf cool entirely for at least two hours on a rack before slicing; this allows the starches to properly set up, ensuring a soft, non-gummy crumb.
Do I really need both psyllium husk powder AND xanthan gum, or can I skip one?
They perform different, crucial roles, acting as the 'gluten replacement' team! Psyllium provides the bulk and elasticity for a soft structure, while xanthan gum helps trap gas during the rise, offering that lovely high lift we’re aiming for.
This loaf is massive! What’s the best way to keep it fresh without it going hard as a rock?
gluten-free bread doesn't keep well on the counter like a traditional wheat loaf, so your best bet is to slice the cooled bread and freeze the slices immediately; they toast beautifully straight from the freezer for quick and easy sandwiches.
My loaf barely rose above the tin did I kill the yeast?
Quite possibly, or perhaps it was too cold. The warm water must be Goldilocks perfect (around 105°F/40°C) if it’s too hot, the yeast dies, and if your rising spot is too draughty or cold, the yeast stays sleepy and won't activate properly.
Can I just swap all those individual flours for a standard GF all-purpose blend?
While convenient, swapping to a pre-mixed blend might lose some rise and the lovely flavour complexity provided by the sorghum flour; if you must, ensure your blend already contains a binder and reduce the added xanthan gum by half a teaspoon.
Artisan gluten-free Sandwich Loaf
Ingredients:
Instructions:
Nutrition Facts:
| Calories | 140 kcal |
|---|---|
| Protein | 4.0 g |
| Fat | 4.5 g |
| Carbs | 21.0 g |
