Thanksgiving Recipes Collection: the Classic Brown Butter Apple Stuffing
- Elevating the Unsung Hero of the Feast
- Why This Brown Butter Stuffing Belongs in Your Thanksgiving Recipes Collection
- Sourcing Your Stuffing Staples: The Essential Components
- Essential Kitchen Tools for Stuffing Success
- Precision Steps for Maximum Flavour Infusion
- Expanding Your Holiday Table: More Thanksgiving Recipes Collection Advice
- Expert Tips for Stuffing Troubleshooting and Variations
- Recipe FAQs
- 📝 Recipe Card
Elevating the Unsung Hero of the Feast
Okay, friend, let’s talk turkey or rather, let's talk about the dish that is actually the measure of a good Thanksgiving meal. It’s the stuffing. Every single year, I see perfectly orchestrated full Thanksgiving dinners marred by a tragically soggy, bland scoop of dressing.
Why do we let this happen? We spend days wrestling a 20 pound bird, but we phone in the side dish that has the potential to soak up all that incredible gravy. Not this year.
This specific recipe, the Brown Butter Sage & Apple Stuffing, is the culmination of years of mistakes. I’ve burned the onions. I’ve used sad, soft white bread (never again). I’ve added too much stock and created a kind of savoury porridge.
But I finally nailed it, and honestly, this dish is what gets requests now not the turkey. If you’re building your ultimate Thanksgiving Recipes Collection, this needs to be on page one.
Why This Brown Butter Stuffing Belongs in Your Thanksgiving Recipes Collection
When I’m looking for cool Thanksgiving ideas, I’m prioritizing depth of flavour and smart prep. Stuffing usually requires heaps of butter and broth, which is great, but we can make that butter work overtime.
The Magic of Brown Butter: Depth and Nutty Notes
Brown butter, or beurre noisette , is honestly liquid gold. It’s butter that you've cooked long enough for the milk solids to toast, turning them deep amber and giving off this rich, intoxicating, nutty aroma. It’s brilliant.
Instead of tasting like flat, plain butter, the whole dish takes on a complexity that screams "I put effort into this."
I remember the first time I tried this. I was so stressed about timing all the Thanksgiving day dishes that I almost forgot I was browning the butter. It went from perfect amber to black char in about twelve seconds. Disaster averted, but the lesson learned: Watch it like it's a puppy about to chew your favourite shoe.
It transforms the flavour profile completely, moving it far away from "simple side" status.
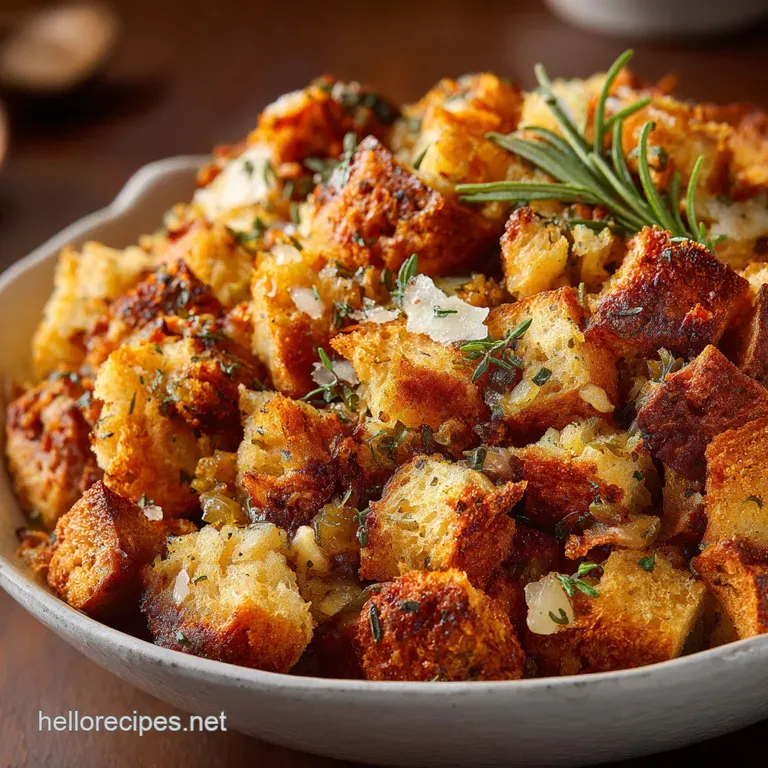
Sourdough vs. Cubed Bread: Achieving the Perfect Texture
If you use soft sandwich bread, you might as well just skip ahead to making a bread pudding. It has no structure. It turns to paste the moment it hits the warm stock. We need a dense bread with great crumb structure. That's why we use sourdough.
Sourdough holds its shape. It has that lovely tang that cuts through the richness of the butter and stock, and when you dry it out which we absolutely must do it achieves that perfect, crouton and like texture that can handle a substantial amount of liquid without collapsing.
The difference between chewy, textured stuffing and mush is all in the bread choice and the drying process.
A Chef’s Rationale: Moving Beyond Soggy Sides
The primary reason stuffings fail is too much liquid, absorbed too quickly, by bread that wasn't prepared properly.
CRUCIAL NOTE: We are building layers. The liquid is added in stages. First, the sautéed vegetables (mirepoix) are mixed with the dried bread. They release a little moisture, but mostly they coat the bread with flavour. Then we gently pour in the stock/egg binder.
If the bread cubes are bone and dry, they suck up that warm broth perfectly, getting soft on the inside but staying intact on the outside. That’s how you avoid the dreaded soggy bottom.
Sourcing Your Stuffing Staples: The Essential Components
You cannot skimp on the main components here. This is an easy dish for Thanksgiving, but it demands quality. When Ree Drummond shares her Thanksgiving recipes, she always emphasizes fresh herbs, and she's not wrong. For this particular recipe, the sage has to be fresh.
The dried stuff just doesn't offer that essential aromatic punch we need to stand up to the richness of the brown butter.
As for the apples, don't use a mushy variety like McIntosh. We want something that holds its shape and offers a tart and sweet counterpoint. Honeycrisp or Gala are perfect. They soften slightly during the sautéing process but don't dissolve.
Related Recipes Worth Trying
- Slow Cooker Thanksgiving Sangria The Warm Aromatic Holiday Punch — Slow Cooker Thanksgiving Sangria is the ultimate fussfree Thanksgiving punch recipe This warm holiday sangria uses spices and seasonal fruit for deep flavor...
- Dip Recipes Easy Whipped Feta Dip Perfect for Parties — Dip Recipes dont get easier or more impressive than this showstopping Whipped Feta Crowned with sticky chilihoney tomatoes its the perfect dip recipes for...
- Smoky CiderBraised Pulled Pork The Best CrockPot Recipes for Two — Effortlessly make forktender pulled pork perfect for two This easy slow cooker pork shoulder recipe uses cider for rich smoky depth Its comforting reliable...
Essential Kitchen Tools for Stuffing Success

You don't need a fancy stand mixer for this, thank goodness. What you need is heat control and space.
Choosing the Right Aromatics and Herbs (Fresh Sage Focus)
Seriously, fresh sage is non and negotiable here. It is the defining flavour of this stuffing. Get a big bunch. You want that slightly fuzzy, deeply fragrant leaf, finely chopped. We're using thyme too, but sage is the star.
If you use dried, use about a third of the amount specified in the recipe, but your results won't be as vibrant.
We also use a touch of white wine to deglaze the pan after sautéing the onions and celery. This step is huge! It picks up all those beautiful browned bits (the fond ) left behind by the aromatics and the residual butter, pulling that flavour straight into the vegetable mixture before it hits the bread.
The Required Prep: Cubing and Drying Your Bread Base
This is where the magic starts. Get that bread sliced into neat, one and inch cubes. Uniformity helps ensure even absorption. Then, you MUST dry it out. I prefer the low and oven toast method (300°F / 150°C for 20 minutes) because it’s fast and guarantees the dryness we need, which is essential for pretty Thanksgiving food that holds its shape.
Overnight on the counter works too, but if your kitchen is humid, that oven is your best bet.
Liquids and Fats: Mastering the Brown Butter Technique
When you are making the brown butter, remember: medium heat. You want the milk solids to toast, not burn. Once the foaming subsides, you’ll see those gorgeous brown bits forming at the bottom.
The second they turn a nice chestnut colour and the smell goes intensely nutty (like toasted hazelnuts), remove it from the heat immediately . Trust me on this.
Necessary Equipment Checklist (From Skillet to Baking Dish)
You’ll want a large, heavy and bottomed pan for the browning and sautéing (a Dutch oven is perfect for heat retention) and a standard 9x13 casserole dish. But the unsung hero is the biggest bowl you own. You need room to mix the ingredients gently without squishing the bread cubes.
Precision Steps for Maximum Flavour Infusion
The secret to incredible flavor is doing things in the right order. We're not just dumping things together; we're building a foundation.
Phase One: Clarifying the Butter and Sautéing the Mirepoix
We melt the whole cup of butter, brown it, and then pour it out. Why? Because we only need a couple of tablespoons of that beautiful brown butter residual fat left in the pan to sauté the onions, celery, and apples. This infuses the aromatics right from the start.
Once the vegetables are soft and translucent, then we introduce the apples and fresh herbs. Everything smells amazing right about now.
The Critical Basting Step: Introducing the Broth Mixture
Once the aromatics are cooled slightly and mixed with the dry bread cubes, we get to the tricky part. We are hydrating, not soaking.
| Hydration Step | Ratio Focus | Goal |
|---|---|---|
| Step 1: Egg/Stock | Binder | Ensures the stuffing holds together when sliced. |
| Step 2: Remaining Stock | Moisture | Keeps the interior soft and tender. |
Use warm stock. If the stock is cold, it shocks the dried bread and hinders absorption. Add the stock slowly, tossing very gently. You want the cubes to feel spongy, but not saturated enough that they release liquid when pressed.
Mixing and Resting: Allowing the Flavors to Marry
Don't use a spatula to violently stir the stuffing. Use your hands or a gentle wooden spoon to fold the ingredients together. Once everything is combined, let the mixture rest in the bowl for five minutes. This rest time lets those bone and dry sourdough cubes really absorb the moisture.
It’s a small, easy dish for Thanksgiving that benefits hugely from patience.
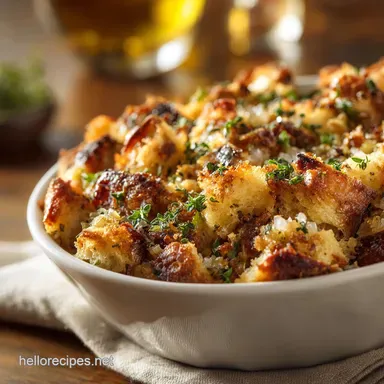
Temperature Control: Achieving Crispness Without Dryness
We start covered (foil is key) for the first 25 minutes. Why? Because we are essentially steaming the interior. This ensures the eggs set and the internal temperature rises without the edges drying out. Then, off comes the foil. This is when the surface can caramelize and crisp up.
The contrast between that crunchy, golden and brown top and the soft, moist interior is spectacular.
Expanding Your Holiday Table: More Thanksgiving Recipes Collection Advice
This stuffing is robust enough to pair with anything whether you’re serving a classic turkey or a fancy prime rib. If you are planning a full Thanksgiving dinner, think about how the savory richness of this stuffing balances out the sweet elements, like sweet potato casserole or glazed carrots.
It’s perfect because it brings a complex, savoury, herbaceous note to the plate. If you need more recipes, start simple with a perfect mashed potato recipe and a ridiculously simple cranberry sauce. Focus on execution over novelty.
Expert Tips for Stuffing Troubleshooting and Variations
Make and Ahead Strategies: Prepping 24 Hours in Advance
Thanksgiving morning is always absolute chaos. To save yourself some sanity, prepare this entire recipe (stopping just before baking) the day before. Cover the baking dish tightly with plastic wrap and refrigerate.
The next day, pull it out 30 minutes before baking to bring it closer to room temperature. Add about 10 minutes to the covered baking time, just to ensure it heats through properly.
Storage, Reheating, and Handling Leftovers Safely
Because this recipe uses eggs and broth, food safety is important. Stuffing should be refrigerated within two hours of baking. To reheat, cover the leftovers in a foil and lined baking dish with a splash of extra stock or gravy (to re and introduce moisture), and bake at 350°F (175°C) until piping hot throughout.
Leftovers are great for turkey sandwiches, naturally!
Dietary Tweaks: Gluten and Free and Vegetarian Substitutions
If you need a gluten and free dish, the substitution is easy: just swap the sourdough for a high and quality GF rustic loaf and dry it aggressively. For a vegetarian version (since this already uses vegetable stock), you might want to ramp up the umami to replace the potential flavour depth of turkey drippings.
Try stirring in a tablespoon of white miso paste into the warm stock before mixing.
Nutritional Snapshot: Calorie Breakdown and Serving Suggestions
This estimate helps you plan, especially if you are loading up your Thanksgiving Recipes Collection with rich dishes. Remember, servings are generous!
| Focus Area | Quick Data Point |
|---|---|
| Estimated Calories | 375 kcal per serving |
| Highest Component | Carbohydrates (from bread) |
| Tip for Lightening | Reduce butter by 1/4 cup; use less stock. |
| Pairing Suggestion | Sharp cranberry sauce or tart gravy. |
Enjoy this one. It's truly a game and changer.

Recipe FAQs
Why does my stuffing sometimes turn out mushy, and how do I fix that with this recipe?
Mushiness happens if the bread isn't bone dry or you've added too much liquid you need those crumbs to be crouton hard before mixing. The secret here is gradually adding the warm stock until the mixture is thoroughly moistened but not soaking wet, which ensures a fantastic, crisp crust upon baking.
Can I prep this sage and apple stuffing ahead of time to save myself a headache on Thanksgiving morning?
Absolutely. You can assemble the entire mixture (up to the point of baking) and chill it covered for up to 24 hours; just remember to let it come back to room temperature for about 30 minutes before baking to guarantee even heat distribution and a proper bake time.
Crikey, browning butter sounds risky! What's the trick to getting the nutty flavour without burning it?
Brown butter moves quickly, so watch it like a hawk over medium heat until the foaming subsides and the milk solids form nutty, light brown specs at the bottom of the pan pull it off the heat immediately the moment you smell that gorgeous nutty aroma.
What's the best way to handle leftovers from this Thanksgiving Recipes Collection winner?
Store any leftover stuffing in an airtight container in the fridge for up to four days; for the crispiest and best reheat, pop individual portions in a 350°F (175°C) oven or an air fryer until piping hot, rather than using the microwave.
I have a few gluten-free guests; can I easily adapt this recipe?
Yes, swapping the sourdough for a sturdy, high-quality gluten-free artisan loaf works brilliantly, but you must ensure that the GF bread is also thoroughly dried out otherwise, it might collapse into a dense, undesirable texture.
Thanksgiving Stuffing Recipe Brown Butter
Ingredients:
Instructions:
Nutrition Facts:
| Calories | 1507 kcal |
|---|---|
| Protein | 28.6 g |
| Fat | 66.6 g |
| Carbs | 155.1 g |
