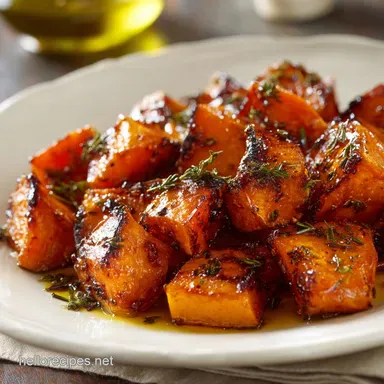
Maple Glazed Roasted Sweet Potatoes Sticky Herbroasted and Simply the Best

Why This Maple Glazed Roasted Sweet Potatoes Recipe Works Wonders
If you’ve ever tried to make glazed sweet potatoes and ended up with a tray of slightly sticky, but mostly soft, greyish cubes and a puddle of black, bitter, burnt syrup stuck immovably to your baking sheet... trust me, I have been there. It’s a proper tragedy.
You think, "Maple syrup is already sweet, surely I just toss it all together and roast it?" Nope. You end up burning the most expensive ingredient and losing all that beautiful flavour.
This recipe flips the script on that common disaster. We don't apply the glaze until the potatoes have a good 20 minute head start. They need to roast, dry out slightly, and develop a crust before they even meet the sugar.
This method ensures you get that gorgeous, deep caramelization and the unbelievably sticky edges you’re dreaming of, all while keeping the centre creamy. It’s brilliant.
The Secret to Perfect Caramelization (Avoiding the 'Proper Tragedy')
The key to achieving true, glorious stickiness instead of acrid bitterness lies in timing and high heat. When you throw raw potatoes coated in sugar into a 400°F (200°C) oven, the sugar melts and burns well before the dense potato flesh is cooked through. Simple thermodynamics, really.
We roast the potatoes initially with just oil, salt, and pepper. This step achieves two things: it cooks the potato most of the way through, and, crucially, it drives off surface moisture.
Once those cubes are slightly dehydrated and hot ( 20 minutes in), they are perfectly primed to soak up that buttery maple glaze. The glaze then has just 10 to 15 minutes to bubble and turn deep golden brown without turning black. It’s the sweet spot.
Balancing Sweetness: Why We Add Savoury Herbs
I know what you're thinking. Maple, sweet potato, cinnamon isn't this going to taste like dessert? And the answer is, yes, if you leave out the other two critical ingredients: fresh herbs and acid.
If you just rely on sweetness, the dish falls flat. It tastes cloying and heavy. But when you introduce the aromatic, slightly piney notes of fresh thyme (or rosemary, if you prefer), suddenly that sweetness pops, rather than overwhelms. The herbs add a lovely grounding, earthy note.
And then there's the secret weapon... that tiny splash of apple cider vinegar (ACV) in the glaze. That acid cuts right through the richness of the butter and the sugar of the maple syrup, brightening the entire dish. Don't skip the ACV. Seriously.
Beyond a Side Dish: Pairing and Presentation Ideas
I used to only make these for Thanksgiving or Christmas, but honestly, these maple glazed roasted sweet potatoes are way too easy and delicious to be restricted to holidays. They upgrade literally any simple weeknight meal.
They are traditional with roast chicken, gammon, or a beautiful pork tenderloin, sure, but I love serving them alongside a simple bowl of black beans and rice for a quick veggie dinner. Or, try topping a massive pile of these with a fried egg and a dash of hot sauce for the best brunch ever.
A critical pro and tip for serving: Transfer them from the sheet pan immediately to a warm serving dish, scraping any remaining sticky glaze from the parchment paper right over the top. Then, sprinkle with flaky salt. That salt finish is non and negotiable for maximum flavour contrast.
Sourcing the Essentials for the Ultimate Sticky Glaze

Great food starts with great ingredients, and this recipe is so short that every component really needs to pull its weight.
Selecting and Chopping the Right Sweet Potato Variety
When you’re at the shop, look for bright orange sweet potatoes (often labeled Beauregard or Jewel). They have the sweetest flesh and the best texture for roasting. Avoid anything bruised or sprouted.
Now, chopping. This is where many people mess up and end up with mixed results. You must aim for consistent 1 inch (2.5 cm) cubes . I know, chopping is boring.
But if you have tiny little half and inch bits next to huge two and inch chunks, those tiny bits will burn while the big ones are still raw in the middle. Consistency is key to even cooking. Peel them first, please. We are going for smooth caramelization here, not tough skin.
Our Flavour Foundation: Building the Buttery Maple Syrup Glaze
This isn't the time for 'pancake syrup' (you know, the corn syrup stuff). We need pure, proper maple syrup here. I prefer Grade A Dark Robust Taste because it has a deeper, more complex flavour that stands up well to the roasting process.
The glaze needs four things: a fat (melted butter, which helps the glaze stick), the sweetener (maple syrup), the acid (ACV hello, balance!), and the spice (a little cinnamon or nutmeg just makes it smell incredible). Whisk it all together until it looks like a single, lovely golden liquid.
That’s your flavour foundation, right there.
Kitchen Arsenal: Tools Required for Roasting Success
You don't need fancy gear, but the quality and size of your baking sheet matters immensely. It’s the difference between true roasting and an embarrassing steaming session.
- Large, Heavy and Duty Baking Sheet: I swear by my half and sheet pans (13x18 inches). The heavier the metal, the better the heat distribution.
- Parchment Paper: Mandatory. I mean, unless you genuinely enjoy soaking and scrubbing burnt sugar later. Parchment paper saves your soul.
- Good Chef’s Knife: For those consistent 1 inch cubes we talked about.
- Small Bowl and Fork/Whisk: For making the glaze while the potatoes do their first round in the oven.
Related Recipes Worth Trying
- Sweet Potato Casserole with Marshmallows The Best Creamy Southern Recipe — Sweet Potato Casserole with Marshmallows is the creamy custardlike side dish your holiday table needs This Southern Sweet Potato Casserole recipe is easy to...
- Grilled Corn Sweet Charred Cobs with Zesty Lime Chili Butter — This ultimate Grilled Corn recipe transforms simple sweetcorn into a smoky side dish with perfect charred kernels Our grilled corn on the cob is finished...
- Caramelized Walnuts Recipe UltraCrispy Glazed Nuts for Salads — Master the perfect batch of Caramelized Walnuts with our easy oven recipe This technique yields ultracrispy Glazed Walnutsideal for salads or sweet snacking...
The Step and by-Step Guide to Perfectly Sticky Maple Glazed Sweet Potatoes
Ready? Let’s crack on. The whole process takes less than an hour, most of which is inactive cooking time.
Prepping the Potatoes and Initial over High heat Roast
First things first: crank that oven up to 400°F (200°C) and line that big tray.
Toss your evenly cut cubes with just the olive oil, salt, and pepper. Don't be shy with the oil; it helps the seasoning adhere and promotes that crucial initial browning. Now, spread them out. Seriously, give them space. If you have to use two trays, use two trays.
They should not be touching or overlapping much. That space allows the hot air to circulate and kiss every single side, leading to proper roasting. Pop that tray in the oven for 20 minutes.
The Mid and Roast Glaze Application Technique
When your timer goes off, the potatoes should look slightly dry on the edges and maybe, just maybe, starting to show a hint of gold. This is when they are screaming for the glaze.
Pull the tray out quickly. Pour the sticky glaze evenly over the hot potatoes and use a spatula to gently turn and fold the potatoes right on the tray. You want every piece lightly coated, but you don't want a massive puddle of liquid pooling at the bottom that will happen soon enough as the butter melts further.
The potatoes are hot, so they start absorbing that flavour immediately. Get them back in the oven right away.
Achieving the Deep Golden Finish (Browning Without Burning)
The final stage is fast, so keep an eye on them. We are aiming for another 10 to 15 minutes.
You’ll know they are done when they are fork and tender and the surface of the potatoes looks significantly darker than when they went back in. The glaze should be actively bubbling and reduced, leaving a sticky, film and like coating.
If you notice the glaze on the edges of the parchment paper getting too dark (think dark brown, almost black), pull them out immediately, even if it hasn’t been 15 minutes.
Every oven is a little different, and it's better to have slightly less sticky potatoes than burnt ones.
| Appearance Check | What It Means |
|---|---|
| Light Gold Edges | Ready for Glaze (After 20 mins) |
| Deep Copper/Sticky Glaze | Done! (After 30- 35 mins total) |
Mastering Your Roasted Sweet Potatoes: Tips, Storage, and Variations
Smart Storage and Reheating Methods
Let’s be honest: these are best eaten straight out of the oven, piping hot and sticky. But sometimes we have leftovers (the best kind of problem!).
Store any remaining potatoes in an airtight container in the fridge for up to four days. Please, avoid the microwave for reheating. It turns those beautiful caramelized edges into sad, soggy little blobs.
Instead, spread them back out on a baking sheet lined with fresh parchment and pop them into a 350°F (175°C) oven or, even better, an air fryer for about 5- 8 minutes until they crisp back up and feel sticky again. Sorted.
Troubleshooting Common Roasting Issues (Too Dry or Too Soft)
The two biggest complaints I hear are "Why are mine mushy?" or "Why are mine dry?"
If they are too mushy or soft , the cause is almost always overcrowding on the tray. Remember: if the potatoes touch, they steam. Use two trays next time to ensure proper hot air circulation.
If they are too dry and hard , you likely roasted them at too low a temperature for too long, or your cubes were unevenly cut, causing the smaller pieces to desiccate completely. Ensure your oven temperature is accurate (a thermometer helps!) and stick to that initial high heat blast.
The Critical Moisture Warning
If you pull the potatoes out for the initial glaze application and see a lot of liquid (water) weeping from the potatoes, roast them for an extra five minutes before glazing. Excess moisture will prevent stickiness and dilute your expensive maple syrup.
Flavour Twists: Creative Variations on the Maple Herb Glaze
The beauty of this basic formula is how easily you can customize the spices and herbs.
- Make it Spicy: Whisk in ¼ tsp of cayenne pepper and a pinch of smoked paprika alongside the cinnamon. The heat is incredibly addictive against the maple.
- Make it Citrusy: Skip the cinnamon and add the zest of half an orange and 1 tablespoon of fresh orange juice to the glaze. This makes them feel very festive and bright.
- Make it Savory and Focused: Reduce the maple syrup to 2 tbsp, replace the cinnamon with ½ tsp of rubbed sage, and add 1 teaspoon of grainy Dijon mustard to the butter mixture. Pair this version with roast pork chops. It's a game changer for Sunday dinner.

Recipe FAQs
Crikey, why do you suggest glazing the sweet potatoes halfway through roasting instead of at the start?
Applying the sticky maple glaze too early is a proper tragedy, as the high sugar content will burn and turn bitter before the potatoes are cooked through; waiting ensures you get beautifully sticky edges and a soft, creamy interior.
Can I prep these Maple Glazed Roasted Sweet Potatoes ahead of time for a big Sunday lunch?
Absolutely; you can chop and thoroughly dry the potatoes the day before, storing them in an airtight container in the fridge, but always apply the oil and glaze just before cooking to prevent sogginess.
I'm fresh out of maple syrup what’s a decent stand-in for the glaze?
You can use runny honey or agave nectar as a quick substitution, but since they are often sweeter than maple, start with three tablespoons in the glaze mixture and taste it before adding more.
My last batch of roasted potatoes went a bit mushy what's the secret to getting them caramelized and crispy?
The secret, mate, is the ‘Single Layer Rule’; ensure the potatoes aren't touching or overlapping on the tray, as crowding traps steam and prevents the glorious caramelization needed for crisp edges.
Are these too sweet for a main meal, and what proteins do they go best with?
Not at all, thanks to the necessary splash of apple cider vinegar and a final pinch of flaky sea salt which balance the sweetness perfectly; they are a fabulous companion to rich, savoury proteins like roast ham, duck breast, or a proper pork tenderloin.
Sticky Maple Glazed Roasted Sweet Potatoes
Ingredients:
Instructions:
Nutrition Facts:
| Calories | 295 calories |
|---|---|
| Fat | 9 g |
| Fiber | 5 g |
