Thanksgiving Cake Pops: Autumnal Spiced Treats for Your Dessert Spread
- Bypassing the Pie Plate: Why Handheld Treats Rule the Thanksgiving Table
- Assembling Your Toolkit: Essential Components for Perfect Thanksgiving Cake Pops
- Sculpting Sweetness: Step and by-Step Guide to Crafting Thanksgiving Cake Pops
- Maximizing Your Yield: Troubleshooting, Storage, and Flavor Twists
- Recipe FAQs
- 📝 Recipe Card
Bypassing the Pie Plate: Why Handheld Treats Rule the Thanksgiving Table
Look, I love a perfect slice of pumpkin pie as much as the next person. But let’s be honest: after the main course chaos, who wants to deal with slicing, serving, and making sure everyone gets a corner piece? Not me.
This year, we are simplifying the dessert game by serving up my famous easy Thanksgiving Cake Pops . These little bites give you all the spiced, cozy flavour of autumn in a handheld format that requires zero forks or plates. It’s genius.
And frankly, the presentation of a dozen little sparkling Thanksgiving Themed Treats is just unbeatable. Think of the styling potential! We bypass the stress and get right to the good stuff. Plus, these can be made days ahead, freeing up your oven and your sanity on the big day. Right?
The Magic of the Spice Blend: Achieving True Autumnal Flavor
While we're cheating a little by starting with a boxed cake mix (shhh, no one needs to know!), we absolutely are not cheating on the flavour. The real secret to making these feel like a sophisticated holiday dessert, and not just kids’ party fare, is boosting the spice.
Even if you use a spice cake mix, adding extra pure pumpkin purée and a hefty tablespoon of good quality pumpkin pie spice is non and negotiable. This takes the base from "yellow cake that’s vaguely brown" to "rich, moist, autumnal perfection." Don’t skimp on the cinnamon or nutmeg here.
That extra warmth is what makes these the perfect Treats For Thanksgiving .
Cream Cheese Binder Mastery: Ensuring the Perfect Ball Texture
This is where many people panic, and I get it. I’ve been there. I once used way too much frosting, turning my beautiful cake crumbs into sticky, inedible paste. It was a disaster. I tried making sad, greasy Turkey Cake Pops that year, and they all melted before anyone could eat them.
Total fail.
The goal here is a texture that’s exactly like Play and Doh. Pliable, firm, not sticky, and not falling apart. We want density. You start with the minimum amount of binder (the cream cheese frosting) and slowly work in more until the mixture holds its shape firmly when squeezed.
You rarely need all the frosting the recipe yields, so add it cautiously. The better the texture, the less likely your Thanksgiving Cake Pops will crack or slide off the stick later. Trust me on this.
Assembling Your Toolkit: Essential Components for Perfect Thanksgiving Cake Pops

You don't need a professional pastry kitchen, but you do need to be prepared. Think of this as a reconnaissance mission.
The Foundation: What Kind of Cake Base Works Best?
When making cake pops, you actually want a slightly denser cake than you would for eating plain. That’s why a high and quality boxed mix (like Duncan Hines or Betty Crocker) combined with pumpkin purée works so well.
Scratch cakes, while delicious, sometimes crumble too finely or are too rich in butter, making the final pop greasy. Using a mix ensures the necessary sponginess to bind perfectly with the cream cheese. I always opt for a yellow or spice mix for that reliable structure.
The Binding Agent Lineup: Cream Cheese, Butter, and Sweeteners
Go full and fat or go home. Seriously. The binder is what provides structure and flavour, and low and fat cream cheese or margarine simply doesn't set up the same way. The full and fat cream cheese lends a beautiful tanginess that cuts through the sweetness of the cake and the candy coating.
This is why these taste sophisticated, not sickly sweet. We soften both the butter and the cream cheese thoroughly beforehand, ensuring a totally smooth frosting mixture before it touches the crumbs.
Dipping and Decorating Requirements: Waxes and Candy Melts
We use candy melts here because they are far more stable and easier to manage than tempered chocolate. If you were only making four pops, maybe go for the fancy tempering. But when you’re batching 30+ for the whole extended family, you need reliability.
CRITICAL TIP: The key to using candy melts successfully is thinning them out. They are too thick right out of the bag, which leads to cracks when they dry. Always mix in a little vegetable shortening (like Crisco) or refined coconut oil.
This makes the coating smooth as silk and guarantees a beautiful, professional finish for your Thanksgiving Cake Pops DIY project.
Must and Have Equipment: Beyond the Mixing Bowl
You can survive without a stand mixer (though it speeds up the crumbing process), but you absolutely need two things:
- A good, deep container for melting: A tall mug or measuring cup. Why? So you can fully submerge the cake ball quickly without wrestling the stick around.
- A Styrofoam Block (or a dedicated stand): Where are these things going to dry? You need to stick them upright immediately after dipping. Trying to lay them down ruins the finish and creates a flat spot. Grab a cheap craft block from the dollar store. It’s essential.
Related Recipes Worth Trying
- Apple Crisp Mini Cheesecakes: Easy Fall Dessert Recipe — Apple Crisp Mini Cheesecakes are the ultimate sophisticated fall dessert. Combining creamy richness and spiced crumble, this easy recipe is perfect for...
- Thanksgiving Recipes: Proper Sausage Stuffing with Cider Sage — Thanksgiving Recipes just got an upgrade. Master this refined Sausage Stuffing Recipedeeply savory, wonderfully moist, and infused with spiced cider and...
- Thanksgiving Recipes Collection: Perfect Brown Butter Stuffing — Thanksgiving Recipes Collection features this Brown Butter Stuffing, the unsung hero of your Full Thanksgiving Dinner. Get the perfect moist inside,...
Sculpting Sweetness: Step and by-Step Guide to Crafting Thanksgiving Cake Pops
We’ve baked, we’ve mixed. Now for the fun (and occasionally frustrating) part.
Phase One: Preparing the Cake Dough and Achieving Optimal Density
Once your spiced cake is cooled, you need to turn it into dust. Really fine dust. If you have a stand mixer, let it run on low speed with the paddle attachment until the cake is nothing but fine crumbs. If you’re doing this by hand, take your time breaking up every single lump.
Then, slowly mix in your cream cheese binder. Stop mixing the second the dough holds together when you squeeze it. It should be firm enough to roll without sticking to your palm. If it feels sticky, add a teaspoon of powdered sugar (or a tablespoon more cake crumbs, if you saved some).
Precision Rolling and Initial Chilling Protocols
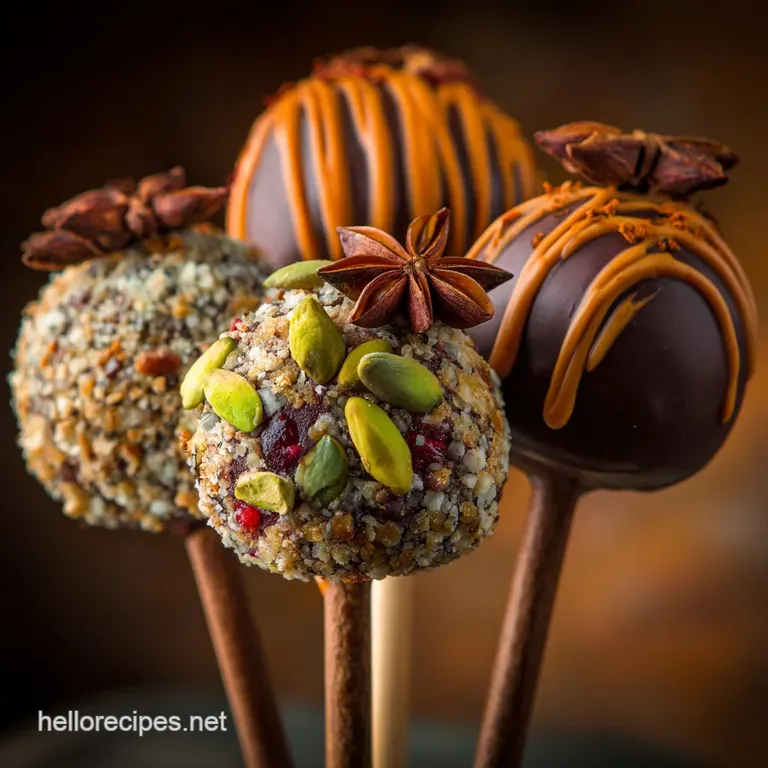
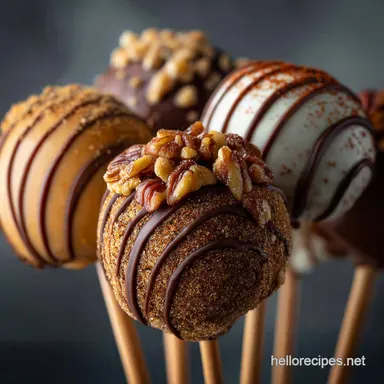
Uniformity is key for a beautiful Thanksgiving Table Treats display. I use a small cookie scoop or a measuring tablespoon to make sure every single pop is the same size (about 1.5 inches). This ensures they all bake and look the same.
Roll them tightly in your hands, pressing out any air pockets. Place them snugly onto a parchment and lined sheet. Now, the chill factor. They need at least 30 minutes in the fridge to become rock hard. If they aren't totally firm, they will tear when you dip them.
Securing the Stick: The Critical Pre and Dipping Step
This is your security deposit. Do not skip the "glue" step. Melt a small portion of your candy melts and dip the tip of your stick into it. Push that gooey tip halfway into your chilled cake ball. This anchors the pop firmly.
After the stick is in, put the entire tray back into the freezer for a quick 5 minute flash freeze. This sets the chocolate glue instantly and ensures the cake pop won't slide right off the stick when you dip it into the warm coating.
Mastering the Melt: Techniques for a Smooth, Crack and Free Coating
When melting your main coatings, remember the temperature rule: warm, not hot. If the coating is too hot, it will melt the cold cake pop from the inside out, causing cracks or catastrophic stick slippage. Melt the candy melts slowly in 30 second bursts, stirring vigorously.
Add your shortening/oil to thin it immediately.
Hold the pop straight up, dip it completely in one smooth motion, and lift straight out. Do not swirl.
Tap the stick gently against the edge of the container to remove the excess coating. If you tap too hard, the cake pop flies off (I learned that the hard way). Once it stops dripping, immediately place it into your Styrofoam block to dry upright.
You now have a gorgeous Thanksgiving Cake Pops Recipe Easy success story!
Maximizing Your Yield: Troubleshooting, Storage, and Flavor Twists
We’re almost done. Let's make sure these beautiful creations last and look perfect.
Common Cake Pop Mistakes and How to Avoid Them
- Pops are cracking: This means the difference between the temperature of the cake ball and the coating is too great. Either the cake was too cold (straight out of the freezer for too long) or the coating was too hot. Use a slightly warmer pop or slightly cooler coating next time.
- Coating is too thick: You need more thinning agent! Add a bit more coconut oil or shortening until the coating runs smoothly off the spoon.
- Pop keeps sliding down the stick: You didn't secure the stick properly with the chocolate "glue" or you dipped it into the main coating too aggressively.
Storage Secrets: Keeping Your Decorated Pops Fresh for Days
One of the best things about cake pops is their incredible shelf life. Once the coating is completely set and hardened, they act like little sealed time capsules of deliciousness.
Store your finished pops in an airtight container at cool room temperature (like a pantry) for up to 5 days. You can refrigerate them, but sometimes the condensation that forms when they come out of the cold will leave water spots on your perfect candy shell, dulling the finish.
Keep them out if you can.
Alternative Holiday Flavors: Swapping Pumpkin for Cranberry or Pecan
If you want to offer a variety of Thanksgiving Table Treats , it's easy to switch up the base.
- Try a lemon cake mix with finely diced, dried cranberries mixed into the crumbs. Dip in white chocolate for a beautiful contrast.
- For the truly ambitious, a butter pecan cake base with finely toasted pecans mixed in makes a fantastic "Pecan Pie Pop."
These substitutions make the overall dessert platter feel much more diverse, without actually changing the core recipe structure.
Nutrition Snapshot: Understanding the Dessert Bite
Look, this is a holiday dessert. We are not pretending it’s a salad. The reason these are so great is that they offer a concentrated burst of buttery, spiced flavour in a perfectly portion and controlled bite. They are rich, they are decadent, and they are everything a holiday treat should be.
They save you from having a massive slab of pie, offering just that tiny hit of sugar to end the night perfectly. Enjoy every single bite!

Recipe FAQs
I'm cooking for the masses; how far ahead can I prep these magnificent Thanksgiving Cake Pops?
You can make the rolled cake balls up to three days ahead and keep them refrigerated until you are ready to dip; once fully coated, the finished Thanksgiving Cake Pops keep wonderfully in an airtight container at cool room temperature for up to a week.
Why do my cake pops keep falling off the stick when I dip them it’s a proper faff!
This means your cake balls weren't "rock solid" when dipped; ensuring they are thoroughly chilled, and flash frozen for five minutes after inserting the glue tipped stick, prevents the cake from warming up and sliding off.
My lovely coating keeps cracking or sweating what's the secret to a perfectly smooth finish?
Cracking usually happens when the coating is too thick or too hot, or if the cold cake pop is shocked; always thin your coating with a bit of vegetable shortening, and try to dip quickly at a warm, steady temperature around 105°F (40°C).
I fancy a twist on the pumpkin flavour. Are there easy variations I can try?
Absolutely; try swapping the spice cake for butter pecan and adding finely chopped toasted pecans to the crumb, or use a vanilla cake base mixed with dried cranberries and orange zest for a zesty, festive alternative.
Are candy melts really necessary, or can I use proper chocolate instead?
You certainly can use real white chocolate, but for the best results, you must temper it to achieve a hard, shiny finish; if you skip tempering, you should add a small amount of cocoa butter or shortening to thin the chocolate for easier dipping.
Spiced Thanksgiving Cake Pops Recipe
Ingredients:
Instructions:
Nutrition Facts:
| Calories | 249 kcal |
|---|---|
| Protein | 1.7 g |
| Fat | 12.7 g |
| Carbs | 31.3 g |
