Peach Galette the Easiest Rustic Summer Tart with Flaky Pastry
- The Rustic Revolution: Why a Galette Beats a Pie
- Mastering the Effortless Peach Galette
- Essential Components for the Ultimate Flaky Dough
- From Mixing Bowl to Marble: Preparing the Pastry Base
- Folding and Finishing: Assembling the Rustic Tart
- Baking to Golden Perfection: Oven Management 101
- Troubleshooting and Advanced Tips for Your Next Bake
- Recipe FAQs
- 📝 Recipe Card
The Rustic Revolution: Why a Galette Beats a Pie
Okay, let's talk pie. I love pie. Truly, I do. But sometimes (most times, honestly), pie is a total pain. That precise crimping, that perfect lattice top, the fear of your bottom crust collapsing into a sticky, wet mess? Hard pass.
Enter the galette. My friends, the galette is the rustic revolution we needed. It’s basically pie’s cooler, more laid and back cousin who shows up in perfect vintage jeans and somehow looks amazing without trying.
It's a French free and form tart, which means the dough is simply rolled out, filled, and the edges are lazily folded over the fruit. That’s it. No special pan required. If you can roll dough into a mostly round shape, you can nail this Peach Galette Recipe. It’s brilliant.
And let me tell you, when you pull this thing out of the oven, smelling of warm peaches and burnt sugar, nobody will care that the edges aren't perfect. They’ll just see gold.
Mastering the Effortless Peach Galette
This recipe is built around three core principles: extreme flakiness, maximum peach flavor, and zero structural anxiety. We’re aiming for that beautiful, deep golden crust that shatters when you slice it, and a filling that stays exactly where it should be on top of the base, not soaking through it.
We need to address the number one issue with all fruit tarts, especially when dealing with juicy stone fruit like peaches. Soggy bottoms. The horror.
The Secret to a Non and Soggy Crust
This is the trick that separates a good galette from a weeping disaster. Peaches are juicy. When they hit that 400°F (200°C) oven, they release liquid, and if that liquid hits the raw pastry dough, you get sadness.
To combat this, we use a sugar barrier technique . Before we place a single peach slice down, we sprinkle a thin layer of almond flour (or finely crushed graham crackers, if that’s what you have) over the dough base.
Almond flour is greedy; it soaks up that initial burst of moisture like a sponge, allowing your pastry underneath to crisp up instead of steam. Trust me, this small step changes everything.
Free and Form Baking: Perfect Results for Beginner Bakers
I’m serious when I say that you don't need to stress over the shape. If your dough rolls out a little oblong or maybe looks like a map of Texas (it happens), nobody cares! The beauty of the Peach Galette is its rustic charm.
When you fold those pleated edges over, you’re covering up any imperfections you might have made during rolling. It’s the ultimate forgiving bake. It’s what makes this such a great Galette Recipe for starting out.
Understanding the Difference: Galette vs. Crostata
I get asked this all the time, especially when I make this recipe. What's the deal?
| Feature | Galette (French) | Crostata (Italian) |
|---|---|---|
| Crust Style | Typically flaky, all and butter pastry. | Often uses a more cookie and like pasta frolla . |
| Shape | Free and form, rustic, round or oblong. | Can be free and form or baked in a tart pan. |
| Filling | Sweet or savory. | Almost always sweet (jams or fruit). |
Honestly, functionally, they're the same delicious thing: an open and faced tart without a fussy edge. I use the terms interchangeably in casual conversation, but technically, this all and butter crust leans French.
Essential Components for the Ultimate Flaky Dough
The dough is non and negotiable. You want maximum butter flavor and maximum flake. It’s only three ingredients plus water, but the technique is everything. I once made the mistake of using slightly softened butter (I was impatient, shocking) and ended up with a tough, sad crust instead of a delicate, layered one.
Never again.
Cold Butter is Your Best Friend: The Key to Flakiness
This is probably the most critical instruction in the entire recipe: your butter must be absolutely frozen or at least ice and cold. We want those small, pea and sized chunks of butter to remain visible in the flour mixture. Why?
When the pastry dough hits the hot oven, those little pockets of butter melt, instantly releasing steam, which pushes the layers of dough apart. That steam explosion is what creates flakiness.
If your butter is too warm, it incorporates fully into the flour, resulting in a dense, cookie and like crust instead of a flaky one. I often cube my butter and toss it in the freezer for ten minutes before I even start mixing.
Choosing the Right Peaches: Freestone vs. Clingstone
When you’re at the market, try to find freestone peaches. They are far easier to slice because the pit separates easily from the flesh. If you accidentally grab clingstone (where the fruit clings stubbornly to the pit), just know that slicing might be a little messier, but the end result will taste just as good.
Ripe, but still slightly firm, is the sweet spot. Too mushy, and you get pure liquid when baking.
Necessary Kitchen Tools for Seamless Assembly
- A scale (for measuring flour accurately, highly recommended).
- A food processor (makes quick work of the dough).
- Parchment paper (crucial for easy transfer and cleanup).
- A pastry brush (for the egg wash that gives you that beautiful, deep golden color).
Spice Swaps: Adding Depth Beyond Cinnamon
Cinnamon and peaches are a classic pairing, sure, but why not play around a little? For a Peach Galette that truly sings, try these flavor boosts:
- Cardamom: Just a quarter teaspoon of ground cardamom adds a bright, floral complexity. It’s phenomenal.
- Nutmeg: Use a tiny grating of fresh nutmeg for a warmer, richer flavor that leans into autumn vibes.
- Ginger: Add half a teaspoon of dried, ground ginger, or even better, a tablespoon of crystallized ginger pieces mixed right into the filling for a lovely warmth.
Related Recipes Worth Trying
- 25Minute Grilled Halloumi Peach Summer Salad MintChilli Vinaigrette — This easy Summer Salad pairs salty halloumi with sweet caramelised peaches and peppery rocket Its a clean eating masterpiece and an impressive easy summer...
- The Best Homemade Peach Cobbler with Flaky Biscuit Topping — Forget soggy crusts Nail this easy peach cobbler recipe featuring a light buttery buttermilk biscuit topping that bakes up perfectly golden Your new...
- The Best Homemade Peach Cobbler Recipe with Flaky Biscuit Topping — Forget soggy bases This easy peach cobbler recipe features sunripened fruit under a light buttery biscuit crown The perfect summer peach dessert is here
From Mixing Bowl to Marble: Preparing the Pastry Base
If you’re using a food processor for the pastry, it takes about 90 seconds. Combine the flour, sugar, and salt. Pulse. Toss in the frozen butter chunks. Pulse until it looks like coarse sand mixed with little pebbles.
Then, spoon in your ice water, one tablespoon at a time, until the dough just starts to stick together. Stop immediately. Seriously, the second it looks shaggy and you can pinch a bit and it holds shape, STOP. Overmixing develops too much gluten, and you’re back to a tough crust.
Form that shaggy mess into a flat disk (flat disks chill faster, big tip there), wrap it up, and toss it in the fridge. Now go watch an episode of something on Netflix.
Folding and Finishing: Assembling the Rustic Tart
Chilling Time: Why Patience Yields a Tender Crust
The one and hour minimum chill time isn't just about keeping the butter cold (though that’s vital). It also gives the gluten you activated during mixing time to relax. Relaxed gluten equals a tender crust.
Rushing this step is a guarantee for a tough, difficult and to-roll dough that shrinks dramatically in the oven. Just chill.
The Sugar Barrier Technique for Juicy Fruits
Remember our secret? Once you roll out your dough circle (aim for 12 or 13 inches), transfer it gently to your parchment and lined baking sheet. Before the peaches go anywhere near it, sprinkle the almond flour barrier (Almond Flour or finely crushed vanilla wafers work perfectly) right across the center, leaving a two and inch border all the way around.
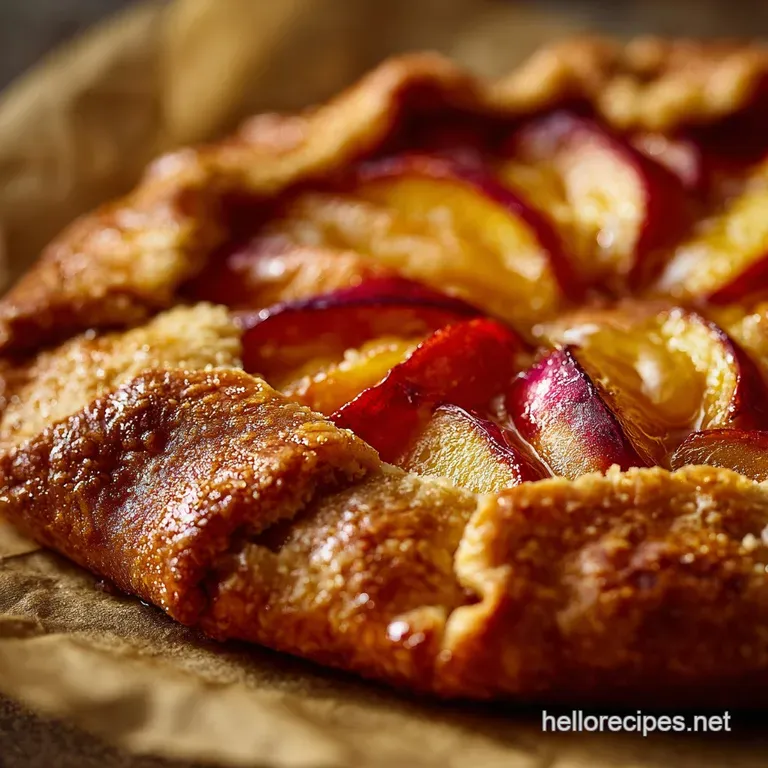
Creating the Signature Pleats: Shaping the Edges
Pile your beautiful, spiced peach filling (discard any excess liquid that settled at the bottom of the bowl while resting!) neatly over the almond barrier. Now comes the fun part: fold the clean edge of the dough up and over the outer peaches. Pleat the dough roughly every two to three inches, overlapping slightly.
It doesn’t have to look uniform. That’s the rustic magic.
Achieving the Perfect Glaze and Shine
Whisk up that egg wash (egg mixed with a splash of cold water) and brush it liberally over all the exposed pastry. This creates that high and shine, deep golden crust we are after. Then, sprinkle the entire border heavily with Turbinado or Demerara sugar.
That coarser sugar doesn’t just look pretty; it caramelizes into crunchy, beautiful jewels during baking.
Baking to Golden Perfection: Oven Management 101
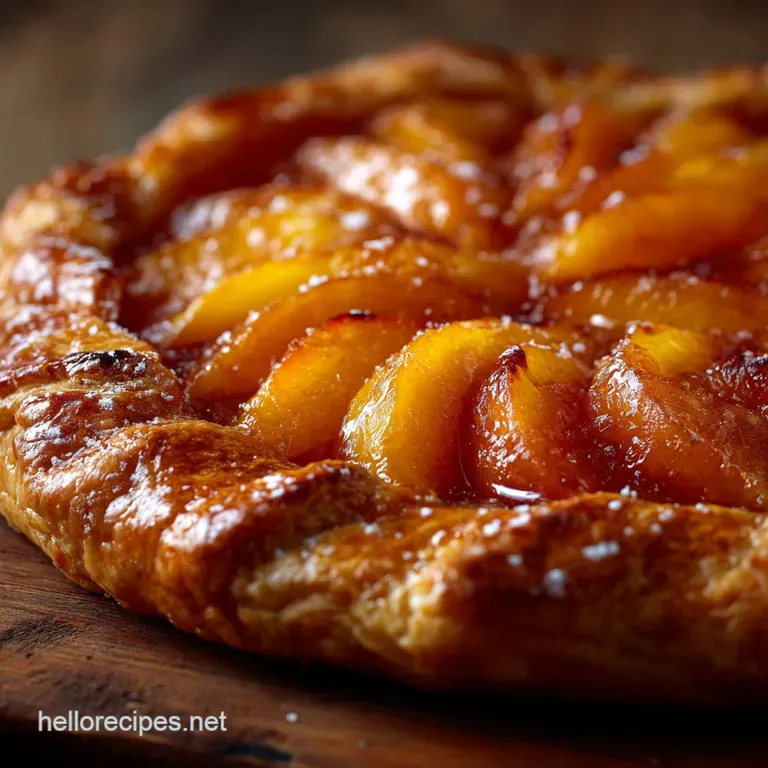
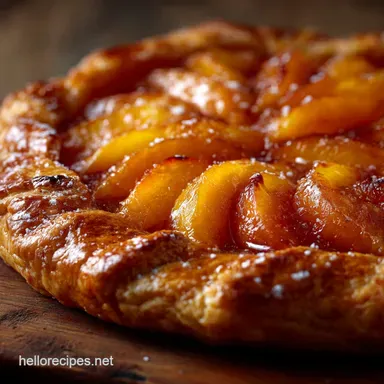
Bake at 400°F (200°C). This high heat is necessary to activate the butter and get that crust crispy before the filling has a chance to soak through. You’re looking for a deep golden brown color, not just a light tan. That indicates the crust is cooked through and the butter has done its job.
If you notice the edges browning too quickly after about 30 minutes, you can carefully cover them with strips of foil.
CRUCIAL NOTE: Do not skip the cooling process. I know the smell is driving you crazy, but slicing a galette right out of the oven means the runny, hot filling will pour out and the cornstarch won't have time to set. Let it cool for at least 30 minutes, ideally an hour, for clean slices.
Troubleshooting and Advanced Tips for Your Next Bake
Expert Fixes for a Runny Filling
If you pull your galette out and the filling looks less like thick jam and more like soup, don’t panic. This usually means the peaches released too much liquid and you needed more cornstarch.
Next time, try tossing the peaches with 1.5 tablespoons of cornstarch instead of one, or let the peaches rest longer ( 15 minutes) and drain off any liquid that accumulates before assembling.
Can I Use Frozen Peaches? Substitutions Explained
Yes, you absolutely can make a Peach Galette with frozen peaches, especially if peaches aren't in season. The key is to thaw them first and blot them aggressively dry with paper towels.
Frozen fruit releases significantly more water than fresh, so increase the cornstarch to 1.5 tablespoons and make extra sure you have a solid almond flour barrier. Using Peach Galette with Frozen Peaches works best when the fruit is truly dry before it hits the crust.
Best Ice Cream Pairings for a Warm Slice of Peach Galette
You can’t serve a warm Peach Galette naked. It’s an insult to baking!
- Mascarpone Whipped Cream: This is my personal favorite. Whip mascarpone cheese with a little powdered sugar and vanilla for a stable, creamy counterpoint.
- Brown Butter Ice Cream: The nutty flavor of brown butter takes the caramelization notes in the crust and runs with them. Divine.
- Simple Vanilla Bean: You can never go wrong with a high and quality vanilla bean ice cream that slowly melts into the warm crevices of the fruit.
Storing Leftovers and Maximizing Freshness
If, by some miracle, you have leftovers, store them uncovered or lightly tented at room temperature for the first day to keep the crust crisp. After that, they should go in an airtight container in the fridge.
To reheat a slice, put it on a baking sheet and pop it into a 350°F (175°C) oven for about 8 minutes. Microwaving just turns the pastry soggy, and we worked too hard to let that happen!

Recipe FAQs
Why choose a Peach Galette over a traditional pie?
A galette is delightfully rustic and free form, requiring no pie dish and minimal technical effort perfect for when you want delicious results without the pastry faff and fuss of complex crimping. Its open structure ensures a higher crust-to-filling ratio, which is always a winner in our books!
Help! How do I avoid that dreaded soggy bottom with juicy peaches?
The secret is a dual moisture defence: ensure the pastry butter is ice-cold when mixing, and don't skip dusting the rolled dough base with a thin layer of almond flour or crushed biscuits to absorb initial juices.
Crucially, allow the baked galette to cool fully (at least one hour) before slicing, which allows the filling to set properly.
I haven't got fresh peaches; can I use frozen fruit, or swap it entirely?
Absolutely; if using frozen peaches, do not thaw them completely before tossing with cornstarch, or you risk a very watery filling; you can also easily swap peaches for firm plums, apples, or berries (check the variations section for specific spice substitutions).
What’s the best way to store leftover Peach Galette and does it keep its crispness?
Store cooled leftovers loosely covered at room temperature for up to two days, or refrigerated for four days; to revive that beautiful, buttery crunch, reheat slices briefly for 5 10 minutes in a 180°C (350°F) oven.
Is there a way to make the crust gluten-free or reduce the sugar content?
For a gluten-free crust, substitute the plain flour with a quality 1:1 GF blend (ensuring it contains xanthan gum for structure); you can easily halve the filling sugar, as the peaches' natural sweetness usually carries the dish beautifully without requiring extra sweetness.
Rustic Peach Galette Recipe
Ingredients:
Instructions:
Nutrition Facts:
| Calories | 400 kcal |
|---|---|
| Fat | 20 g |
| Fiber | 3 g |
