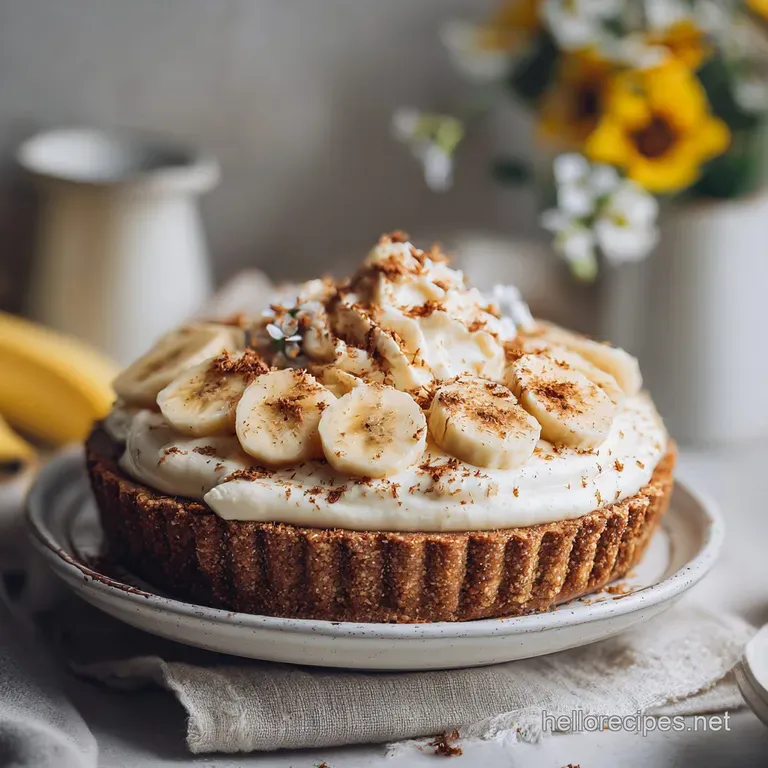
Raw Vegan Banana Cream Pie
- Time: Active 30 minutes, Passive 4 hours, Total 4 hours 30 mins
- Flavor/Texture Hook: Silky banana custard paired with a buttery, shattering nut crust
- Perfect for: Summer dinner parties, gluten-free guests, or nutrient dense meal prep
- Creating the Best Raw Vegan Banana Cream Pie
- Master Techniques for Silky Filling
- Critical Recipe Specifications
- Selecting Your Vibrant Ingredients
- Essential Tools for Best Results
- Steps for Assembly and Chilling
- Troubleshooting Your Creamy Dessert
- Creative Flavor Variations and Swaps
- Storing for Maximum Freshness
- Serving and Plating Your Tart
- Recipe FAQs
- 📝 Recipe Card
Creating the Best Raw Vegan Banana Cream Pie
The second you press that walnut date crust into the pan, the aroma of toasted nuts and sweet fruit fills the kitchen. It’s that deep, earthy scent that promises something substantial, even though we aren’t turning on the stove.
I remember the first time I tried a version of this in a tiny plant based cafe in Bali; the contrast between the icy, velvety filling and the chewy, salty base was a total revelation for my taste buds. It’s vibrant, rich, and feels far more indulgent than its wholesome ingredients suggest.
But let’s be real, raw desserts can sometimes turn into a puddle or taste like a block of frozen coconut oil if you don’t balance the fats correctly. We’ve all been there, staring at a grainy filling that refuses to set.
This recipe fixes those issues by focusing on the harmony of soaked cashews and high-quality fats. You get a clean, bright banana flavor that isn’t masked by heavy sweeteners, making it the ultimate treat for a hot afternoon or a special celebration.
Whether you are a seasoned vegan baker or just someone looking to experiment with fresh, vibrant ingredients, this pie is your ticket to a show stopping dessert. We are going to skip the refined sugars and the heavy dairy, opting instead for nature’s own buttery textures.
Trust me, once you see that first clean slice come out of the pan, you’ll never look at a box mix pudding the same way again. It's brilliant, fuss free, and honestly, better than the original.
Master Techniques for Silky Filling
The Science of Why it Works: This recipe relies on emulsification, where high speed blending binds water based maple syrup with fats from cashews and coconut oil.
Once chilled, the saturated fats in the coconut oil and cream undergo crystallization, creating a solid, sliceable structure without eggs or cornstarch.
| Servings | Ingredient Adjustments | Pan Size | Cook Time |
|---|---|---|---|
| 5 people | Halve all ingredients | 15cm Springform | 4 hours chill |
| 10 people | Use Schema quantities | 23cm Pie Dish | 4 hours chill |
| 20 people | Double all ingredients | Two 23cm Dishes | 5 hours chill |
Adjusting the serving size is straightforward, but remember that the depth of your pan affects the setting time. A deeper dish needs an extra hour of passive cooling to ensure the center is firm enough to hold its shape.
If you’re making a smaller batch, keep the crust thickness the same to maintain that buttery to creamy ratio we all crave.
| Component | Science Role | Pro Secret |
|---|---|---|
| Raw Cashews | Protein/Fat Base | Soak in warm water to soften the cell walls for a silky finish. |
| Coconut Oil | Structural Binder | Use cold pressed for a subtle floral note that complements banana. |
| Lemon Juice | pH Balancer | Prevents the bananas from oxidizing while brightening the heavy fats. |
The cashews are the heavy lifters here, providing the "dairy" feel through their high oleic acid content. When blended with the coconut oil, they create a matrix that traps air, resulting in a light, mousse like mouthfeel. If you love fruit forward desserts, you might find this as comforting as my Classic Apple Pie recipe.
Critical Recipe Specifications
| Comparison | Fresh Cashew Cream | Coconut Milk Shortcut | Frozen Banana Base |
|---|---|---|---|
| Texture | Silky and firm | Soft and runny | Icy and melty |
| Stability | Stays firm at room temp | Wilts quickly | Must be eaten immediately |
| Flavor | Neutral, lets banana shine | Strong coconut dominance | Very sweet/starchy |
Using fresh cashews is the only way to get that authentic "cream pie" thickness. While using only coconut milk is faster, it lacks the protein structure needed to hold up the sliced bananas. The cashew method ensures your Raw Vegan Banana Cream Pie looks as good on the plate as it does in the pan.
Selecting Your Vibrant Ingredients
To get this right, you need 200g of raw walnuts and 150g of Medjool dates for the base. Don't swap for regular dates unless you soak them first, as they lack the "caramel" stickiness needed to bind the nuts. A tiny 0.25 tsp of sea salt is non negotiable here; it cuts through the richness and makes the flavors pop.
For the luscious center, grab 300g of raw cashews. Why this? They have a neutral flavor that mimics heavy cream perfectly when blended. You'll also need 120ml of full fat coconut milk and 80ml of maple syrup.
The structure comes from 120ml of melted coconut oil, while 15ml each of vanilla extract and lemon juice add those high notes.
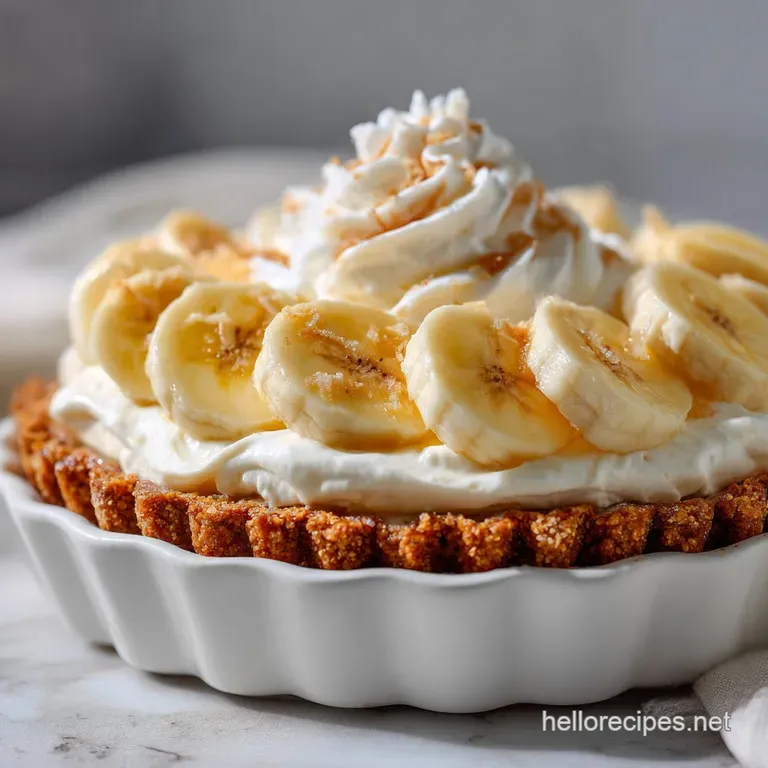
Finally, the stars are the 3 large firm ripe bananas. Why this? Firm ripe fruit holds its shape and prevents the filling from becoming soggy. For the topping, use 400ml of chilled coconut cream whipped with 15ml of maple syrup.
This adds a cloud like finish that contrasts with the dense pudding layer.
Essential Tools for Best Results
- High Speed Blender: Necessary to pulverize cashews into a liquid state without grit.
- Food Processor: Best for the crust to keep the walnut pieces from turning into butter.
- 9 inch Pie Dish: Glass or ceramic works well for presentation.
- Offset Spatula: Helps smooth the filling for a professional, level look.
- Mixing Bowls: For prepping the coconut whipped cream.
Chef's Tip: Freeze your blender carafe for 10 minutes before making the topping. This keeps the coconut cream cold while the motor runs, preventing it from melting into a puddle.
Steps for Assembly and Chilling
Phase 1: Pressing the Foundation
Pulse 200g walnuts, 150g dates, 0.25 tsp salt, and 15ml melted coconut oil in a food processor. Process until it clumps together like wet sand when squeezed. Press this mixture firmly into the bottom and sides of your 23cm pie dish.
Note: Using the bottom of a flat glass helps create a uniform, compressed surface.
Phase 2: Blending the Silky Custard
Combine 300g soaked cashews, 120ml coconut milk, 80ml maple syrup, 120ml melted coconut oil, 15ml vanilla, and 15ml lemon juice in a blender. Blend on high for 2 minutes until the mixture is completely glossy and no visible specks remain.
Phase 3: The Assembly and Setting
Slice 2 of the bananas into thin rounds and layer them across the bottom of the crust. Pour the cashew custard over the bananas, using a spatula to smooth the top. Tap the dish on the counter to release any trapped air bubbles.
Phase 4: The Final Chill
Place the pie in the refrigerator for at least 4 hours. Wait until the center feels firm to a light touch. While it sets, whip the 400ml chilled coconut cream with 15ml maple syrup until stiff peaks form.
Phase 5: The Finishing Touches
Top the chilled pie with the whipped coconut cream. Slice the remaining banana and arrange it on top just before serving to prevent browning. For a decadent finish, drizzle with my Indulge in Homemade recipe.
Troubleshooting Your Creamy Dessert
Stable Filling Methods
If your filling seems too soft after the initial blend, it might be because the coconut oil was too warm. The oil needs to reach a "setting point" below 75°F (24°C). If the room is hot, the pie will take longer to firm up.
Always use full fat coconut milk, as the "lite" versions contain too much water and will cause the filling to crystalize and turn icy.
Preventing Fruit Browning
Bananas turn brown due to enzymatic browning when exposed to oxygen. By layering the sliced fruit under the cashew custard, you seal them away from the air. For the topping bananas, a quick dip in a mixture of lemon juice and water will keep them looking vibrant for hours.
Making a Firm Crust
A crumbly crust usually means the dates weren't sticky enough or the nuts were too dry. If the mixture doesn't hold when pressed, add one more pitted date and pulse again. The goal is a base that feels like a buttery shortbread but stays raw and nutrient dense.
| Problem | Root Cause | Solution |
|---|---|---|
| Grainy Filling | Cashews didn't soak long enough | Soak in boiling water for 30 mins next time. |
| Soggy Base | Bananas were overripe/mushy | Use firm ripe fruit and slice them thick (0.5cm). |
| Whipped Cream Collapses | Coconut cream wasn't cold enough | Chill the tin for a full 12 hours before whipping. |
Common Mistakes Checklist
- ✓ Drain and rinse cashews thoroughly to remove excess phytic acid and grit.
- ✓ Don't skip the lemon juice; it's the secret to keeping the flavor "bright" and not "fatty."
- ✓ Press the crust up the sides of the dish to create a wall for the custard.
- ✓ Let the pie sit at room temp for 10 minutes before slicing for the cleanest cuts.
- ✓ Chill your mixing bowl before whipping the coconut cream.
Creative Flavor Variations and Swaps
| Original Ingredient | Substitute | Why It Works |
|---|---|---|
| Raw Walnuts (200g) | Raw Pecans (200g) | Similar fat content. Note: Adds a sweeter, more buttery flavor profile. |
| Maple Syrup (80ml) | Agave Nectar (80ml) | Neutral sweetness. Note: Agave is thinner, so chill the pie for an extra hour. |
| Coconut Oil (120ml) | Cacao Butter (120ml) | Higher melting point. Note: Gives the pie a white chocolate undertone and firmer set. |
If you want a nut free alternative, you can try using sunflower seeds for the crust and a base of silken tofu for the filling, though the texture will be more like a soft pudding than a firm cream pie.
For a chocolate swirled upgrade, whisk 2 tbsp of raw cacao powder into half of the cashew filling before pouring it into the crust.
Scale Down or Up
To make a half batch, use a standard muffin tin with liners to create individual tartlets. Reduce the chill time to 2 hours. If you are doubling the recipe for a large party, don't double the salt or lemon juice fully; use 1.5x the amount to avoid over seasoning.
Storing for Maximum Freshness
Keep this Raw Vegan Banana Cream Pie in the refrigerator for up to 4 days. Because it contains fresh bananas, the fruit will naturally soften over time, but the cashew cream does a great job of preserving them.
Cover the dish loosely with parchment paper rather than plastic wrap to prevent condensation from dripping onto the whipped topping.
For long term storage, you can freeze the pie (without the whipped topping) for up to 2 months. Thaw it in the fridge for 3 hours before serving. I love using any leftover crust crumbles as a topper for morning smoothie bowls nothing goes to waste in this kitchen!
Serving and Plating Your Tart
When you're ready to serve, use a sharp knife dipped in hot water to get those professional, clean edges. The contrast between the white cream and the pale yellow custard looks stunning on a dark plate. I often add a sprig of fresh mint or a few toasted walnut halves on top for a bit of crunch.
Chef's Tip: Add a pinch of espresso powder to the crust mixture. It doesn't make it taste like coffee, but it deepens the earthy notes of the walnuts and makes the banana flavor feel more sophisticated.
Don't feel limited to serving this as a traditional wedge. You can also scoop it into glass jars for a deconstructed "pudding" look, which is great for outdoor picnics where you don't want to worry about perfect slices. This recipe is all about celebrating fresh, vibrant food in a way that feels like a true indulgence.
Right then, let's get those cashews soaking and crack on!

Recipe FAQs
What makes this pie "raw vegan"?
No cooking is involved. This pie uses ingredients that are not heated above 118°F (48°C), relying on chilling to set the filling, making it entirely plant based and uncooked.
Can I substitute the cashews for a nut-free option?
Yes, with texture changes. You can use sunflower seeds for the crust and silken tofu for the filling, but the texture will lean towards a soft pudding rather than a firm cream pie.
How do I prevent the banana slices from browning?
Layer them under the custard. Placing the banana slices beneath the cashew filling seals them away from oxygen. For any topping bananas, a quick dip in lemon water helps maintain their color.
My filling is too soft, what went wrong?
The coconut oil might have been too warm. Ensure the oil is at a "setting point" below 75°F (24°C) before blending, especially in warmer environments. Full fat coconut milk is crucial for proper structure.
What's the secret to a stable filling?
It's all about the fats and emulsification. Soaked cashews provide the creamy base, while coconut oil crystallizes upon chilling to create a firm, sliceable structure. If you mastered the stable emulsion in this dressing, use the same whisking method in our The Real Deal Creamy Tangy Homemade Buttermilk Ranch Dressing.
How long does this pie last in the refrigerator?
Up to 4 days. Cover loosely with parchment paper to avoid condensation. The fresh bananas will soften over time, but the cream holds them well.
Can I make this pie ahead of time for a party?
Yes, it's ideal for making ahead. The pie needs at least 4 hours to chill and set. You can prepare it the day before and add the whipped topping and fresh banana slices just before serving.
Raw Vegan Banana Cream Pie
Ingredients:
Instructions:
Nutrition Facts:
| Calories | 595 kcal |
|---|---|
| Protein | 9.7 g |
| Fat | 47.0 g |
| Carbs | 42.0 g |
| Fiber | 4.5 g |
| Sugar | 28.1 g |
| Sodium | 42 mg |
