Peanut Butter Pie: the Easy, Decadent No-Bake Dream Pie
- The Ultimate No-Bake Peanut Butter Pie: Why You Need This Recipe Now
- The Science of Silky Smoothness: Balancing Flavor and Texture
- Essential Ingredients for Your Dream Peanut Butter Pie
- Step-by-Step Method: Assembling Your Decadent Dessert
- Expert Chef Julian's Tips and Troubleshooting Guide
- Preparation and Longevity: Storage and Freezing Instructions
- Elevating the Experience: Creative Toppings and Pairings
- Recipe FAQs
- 📝 Recipe Card
The Ultimate No-Bake Peanut Butter Pie: Why You Need This Recipe Now
Listen up, because this is the pie you actually want to make when you need maximum payoff for minimal effort. The aroma of rich, salty peanut butter blending with deep chocolate crumbs is intoxicating.
You get that satisfying, crisp crack when you slice the chilled crust, giving way to a filling that is pure, unapologetic, creamy velvet.
This recipe is my absolute lifesaver when unexpected guests arrive, or when I just need a huge dose of comfort food fast. We are talking about the easiest no-bake peanut butter pie with cream cheese that you will ever whip up.
No need to heat up the kitchen, no tricky pastry techniques, and it’s surprisingly inexpensive to make.
Forget those dry, crumbly attempts you tried in high school; this is the definitive version. We are going to nail the texture, we are going to nail the flavor, and you are going to wonder why you didn't try this homemade peanut butter pie sooner. Let’s crack on and get this decadent dessert chilling.
The Science of Silky Smoothness: Balancing Flavor and Texture
The goal here is a perfectly stable, creamy fluffy pie that doesn't collapse into a soupy mess the second you slice it. The key is balance, pairing the heavy fat from the peanut butter with the tangy structure provided by full fat cream cheese.
We then lighten the entire thing with stiffly whipped cream, turning a simple mix into a heavenly mousse.
The Magic of the Chocolate Biscuit Base
You could use a plain graham cracker base, sure, but why would you? The deep, slightly bitter cocoa of a chocolate biscuit crust provides the perfect counterpoint to the intensely sweet and salty peanut butter filling. Don't skimp on the butter when pressing the crust.
That fat melts and re-solidifies, gluing the crumbs together, ensuring your crust doesn't just crumble when you serve it.
Prep Time vs. Chill Time: Setting Expectations
The active prep time for this peanut butter pie recipe easy version is genuinely about 20 minutes. It’s brilliant. The catch, however, is the chill time; this dessert needs its beauty rest to truly set up. If you try to slice it after only two hours, you'll end up with creamy chaos.
Give it a minimum of four hours, but overnight is honestly best for achieving professional level slices.
How This Pie Became a Dessert Classic
Every diner in America seems to have some variation of this recipe, usually called a Peanut Butter Crunch Pie or No Bake Reeses Pie. The reason it’s such a classic is its adaptability and simplicity.
I once accidentally grabbed powdered sugar instead of granulated, and realized the powdered sugar blends instantly, giving the filling an impossibly smooth texture right away. Sometimes mistakes lead to major upgrades!
Achieving the Perfect Airy, Yet Stable Filling
Structure comes from two places: the cold fat in the cream cheese and the air beaten into the heavy cream. You must whip the heavy cream until it holds stiff peaks; the whisk should leave dramatic trails that stay put.
This air is what makes the final filling so light and prevents it from tasting heavy or oily, a common mistake in less effective recipes.
The Importance of Full Fat Cream Cheese in Structure
We use cream cheese not just for its subtle tang, but because it acts as a binder. When combined with the peanut butter and sugar, the chilled fat creates a rock solid, yet creamy, scaffolding.
If you try to use reduced fat cream cheese here, you risk introducing too much moisture, which can make your filling loose and runny. Always use the full fat block.
Sweet and Salty Synergy: Choosing the Right Peanut Butter
Peanut butter is naturally sweet, but it needs that salt to pop. Trust me, if you use totally unsalted, natural peanut butter, the flavor will fall flat. The best commercial brands (like Jif or Skippy) already have that perfect sweet salty ratio built in, making them ideal for this Homemade Peanut Butter Pie.
Essential Ingredients for Your Dream Peanut Butter Pie
Here’s what we need, along with my go-to substitutions for when the pantry is running low.
Selecting the Best Type of Peanut Butter (Creamy vs. Natural)
I strongly recommend using smooth, processed peanut butter (the kind that stays emulsified and doesn't separate). Natural peanut butter, while delicious, often separates oil when mixed into the cream cheese, leading to a slightly greasy, less uniform final texture.
Crust Alternatives: Graham Cracker vs. Chocolate Biscuit Base
We are using chocolate sandwich cookies (like Oreos) because they are fantastic, but you have options.
| Original Ingredient | Viable Substitution | Why It Works |
|---|---|---|
| Chocolate Sandwich Biscuits | Graham Crackers or Vanilla Wafers | Neutral base, still binds well with butter. |
| Unsalted Butter | Salted Butter (Omit salt in filling) | Adds great depth, just adjust overall salinity. |
| Full Fat Cream Cheese | Mascarpone Cheese (Use slightly less sugar) | Richer and sweeter, provides similar stable structure. |
| Heavy Cream (Cold) | Thawed Stabilized Whipped Topping (like Cool Whip) | Easier, maximum stability, no risk of over whipping. |
| Icing Sugar (Powdered) | Granulated Sugar (Will be slightly grainier) | It works, but powdered sugar dissolves faster for silkiness. |
Dairy Deep Dive: Heavy Cream vs. Stabilized Whipped Topping
Whipping your own heavy cream results in the lightest, airiest filling, which is what I always prefer. However, sometimes speed and guaranteed structure are necessary. If you are worried about the cream falling or over whipping, using a pre-made, thawed stabilized whipped topping is a fantastic shortcut.
This creates an incredibly creamy, fluffy texture instantly. If you go that route, you are making the famous Peanut Butter Pie With Cool Whip, and it’s a brilliant way to go, too.
Measuring Precision: Why Room Temperature Ingredients Matter
The cream cheese MUST be fully softened to room temperature. This is non-negotiable! If your cream cheese is cold, it will form lumps when you mix it with the peanut butter, leaving you with chunky filling that defeats the purpose of making a silky smooth dessert.
step-by-step Method: Assembling Your Decadent Dessert

Follow these steps closely, and remember: gentle folding is the key to that perfect, light consistency.
Phase 1: Perfecting the Pressed Chocolate Crust
- Process the biscuits until fine crumbs are formed; do not leave large chunks. Pour the melted butter over the crumbs and pulse until the mixture looks like wet sand.
- Transfer the crumb mixture to your 9 inch pie plate. Use the bottom of a measuring cup or glass to press the crumbs firmly and evenly across the bottom and up the sides. Firm pressing prevents crumbling.
- Chill the crust in the fridge for 30 minutes. This allows the butter to set, securing the crust.
Phase 2: Combining the Rich Peanut Butter Base
- In a large bowl, beat the room temperature cream cheese until it is smooth and completely free of lumps. This should take about a minute with an electric mixer.
- Add the icing sugar, peanut butter, vanilla, and milk. Beat on medium speed until the mixture is uniform, lightened, and perfectly smooth. Scrape down the bowl constantly, ensuring everything is incorporated.
Phase 3: Folding and Filling for Maximum Airiness
- In a separate, chilled bowl, whip the heavy cream until stiff peaks form. When you lift the whisk, the peaks should stand straight up without drooping. This is the moment where structure is born!
- Carefully fold one-third of the whipped cream into the peanut butter mixture. This step "lightens" the base, making it easier to incorporate the remaining cream without deflating the air.
- Gently fold in the remaining whipped cream in two batches. Use a rubber spatula, cutting down the center and sweeping the base mixture over the top. Stop immediately when no white streaks remain. This ensures your filling remains airy.
The Critical Chill and Final Garnishing
- Spoon the airy filling into your prepared, chilled crust, spreading it evenly.
- Cover the pie loosely (don't let the plastic wrap touch the top) and refrigerate for a minimum of 4 hours, or ideally, overnight. Seriously, don't rush this part.
Chef's Note: If you want a fun alternative to this dessert, especially around the holidays, you should definitely try my recipe for Maple Pecan Pie: Deep Dish, Flaky Crust Southern Dessert — it’s also incredible, but definitely requires an oven!
Expert Chef Julian's Tips and Troubleshooting Guide
Avoiding a Loose, Runny Filling (The Temperature Factor)
If your filling turns out too soft, it is almost always due to two factors: the cream cheese was cold when mixed, creating lumps and preventing proper emulsification, or the heavy cream wasn't cold enough when whipped, resulting in weak peaks that quickly collapse.
Make sure your heavy cream is screaming cold.
Common Mistakes When Preparing No-Bake Desserts
The most common failure point is over mixing the lightened filling. Once you introduce the whipped cream, every fold you make decreases the volume of air you just worked so hard to incorporate. You must be gentle. If the filling seems too dense, you folded too much and popped all the air bubbles.
Next time, stop when you see that last white streak disappear.
Achieving Professional Level Slices
Wait until the pie is fully chilled (overnight is best). To get clean, sharp slices, dip a long, sharp knife into hot water, wipe it dry, and make your cut. Repeat this process dipping and wiping before every single slice. It prevents the sticky filling from dragging and ruining the crust.
Preparation and Longevity: Storage and Freezing Instructions
Short Term Refrigeration: Keeping the Pie Fresh
Because of the high dairy content, this pie must be stored in the refrigerator. Covered loosely, it will stay fresh and delicious for 3 to 4 days. After day four, the crust tends to soften dramatically, losing its snap.
Can You Freeze Peanut Butter Pie? (Best Practices)
You bet you can! This is one of the best Peanut Butter No Bake Desserts for freezing. Once the pie is fully set (at least 6 hours in the fridge), wrap it tightly first in plastic wrap, and then in a layer of foil. It will last beautifully in the freezer for up to 2 months.
To thaw, simply transfer it to the refrigerator overnight. Do not attempt to thaw at room temperature, as the rapid temperature change can make the filling weep.
Elevating the Experience: Creative Toppings and Pairings
This pie is incredible on its own, but sometimes you just need that extra bit of wow factor.
Decadent Drizzle Options (Chocolate Ganache or Caramel)
- Dark Chocolate Ganache: Melt quality dark chocolate with a splash of cream and drizzle it over the top just before serving. A cold pie needs warm contrast.
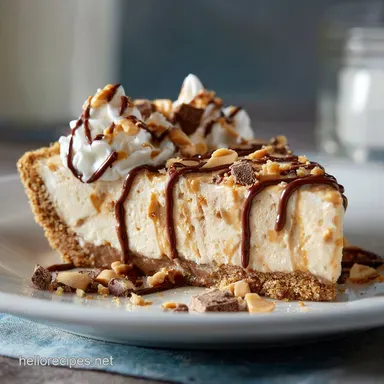
- Salted Caramel: A thin swirl of good salted caramel sauce adds complexity. If you want a true chocolate peanut butter experience, this pie is perfect for adding mini chocolate chips into the filling or crushed peanut butter cups on top.
If you loved the simplicity of this, you really need to try my other quick versions, especially the NoBake Peanut Butter Pie: Creamy Fluffy Pie with Chocolate Crust which uses a slightly different stabilization technique for maximum fluffiness.

Recipe FAQs
How long does the pie need to chill before serving?
This pie requires a minimum of 6 hours of chilling time to ensure the cream cheese and whipped cream mixture sets firmly. Ideally, refrigerate it overnight for the best structure and slice definition. Do not attempt to serve it early, or the filling will be too soft and messy.
My filling seems too runny. What did I do wrong?
The most common culprit is not fully stabilizing the whipped cream or using natural peanut butter that has separated oil. Ensure your heavy cream is whipped to stiff, firm peaks before folding, as this is the primary setting agent in a no-bake pie.
If the mix is already complete, try returning it to the mixer for a quick, low-speed whisk to incorporate more air before chilling.
Can I use natural or oil-separated peanut butter?
It is strongly recommended to use standard, shelf stable creamy peanut butter (like Jif or Skippy) for this no-bake recipe. Natural peanut butters tend to weep oil when mixed with dairy, which can prevent the fats from properly binding and setting the filling.
If you must use natural peanut butter, drain off as much oil as possible first.
How should I store leftover pie, and how long does it last?
Store any leftover slices tightly covered in the refrigerator, preferably in an airtight container to prevent absorbing other fridge odours. The pie will maintain its peak texture and flavour for about 3 to 4 days.
After this period, the chocolate crust may begin to soften slightly due to moisture migration from the filling.
Can I freeze the Peanut Butter Pie?
Yes, this pie freezes exceptionally well and is often enjoyed slightly frozen for an ice-cream like dessert. Wrap the fully chilled pie tightly in plastic wrap and then foil, and freeze for up to one month.
Thaw it in the refrigerator for 2-3 hours before serving for a softer texture, or slice it directly from the freezer.
I don’t want a chocolate crust. What can I substitute?
A classic Graham cracker (Digestive biscuit) crust makes an excellent and complementary substitution for the chocolate. You can also use vanilla sandwich cookies or crushed shortbread biscuits mixed with melted butter.
Ensure you maintain the same ratio of crumbs to melted butter (typically 1.5 cups crumbs to 6 tablespoons of butter).
What is the best way to slice the pie cleanly?
For pristine slices, ensure the pie is thoroughly chilled, ideally straight from the freezer for 15 minutes before cutting. Dip a sharp, thin knife into hot water and wipe it dry between each cut.
This technique warms the blade slightly, allowing it to glide smoothly through the firm filling and the chocolate crust without dragging.
No Bake Decadent Peanut Butter Pie
Ingredients:
Instructions:
Nutrition Facts:
| Calories | 520 kcal |
|---|---|
| Fat | 40 g |
| Fiber | 2 g |
