The Brunch Buzz Sparkling Citrus Curd Tart with Prosecco Reduction
- Elevating Brunch: Trading Sips for Slices of Sunshine
- Why This Dessert Captures the Ultimate Mimosa Spirit
- Assembling Your Sparkling Pantry: What You Need
- Mastering the Components: Tart Crust, Curd, and Topping
- Phase One: Building the Foundation – The Crisp Shell
- Phase Two: Crafting the Signature Mimosa-Inspired Curd
- Phase Three: The Bubbly Finish – Reduction and Assembly
- Troubleshooting and Pro-Tips for Perfection
- Creative Twists to Personalize Your Tart
- Frequently Asked Questions
- 📝 Recipe Card
Elevating Brunch: Trading Sips for Slices of Sunshine
The Mimosa is an undisputed icon of the weekend table a bright, bubbly lift that signals relaxation and good times. But what if we could capture that effervescent joy, that perfect marriage of sharp citrus and crisp fizz, and transform it into something truly decadent?
Today, we are elevating this classic Brunch Cocktail Recipes staple by taking it from the flute to the finest pastry case. We are making the Mimosa Inspired Lemon & Orange Curd Tart .
This Easy Mimosa Recipe adaptation is designed to shine as the star centerpiece, perfect for everything from Mother’s Day brunch to an elegant afternoon tea.
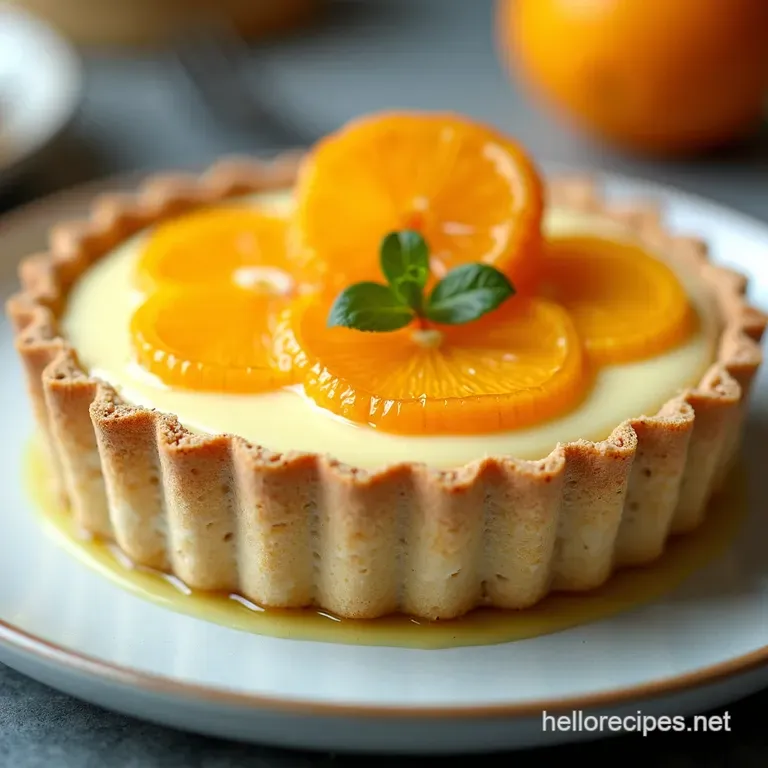
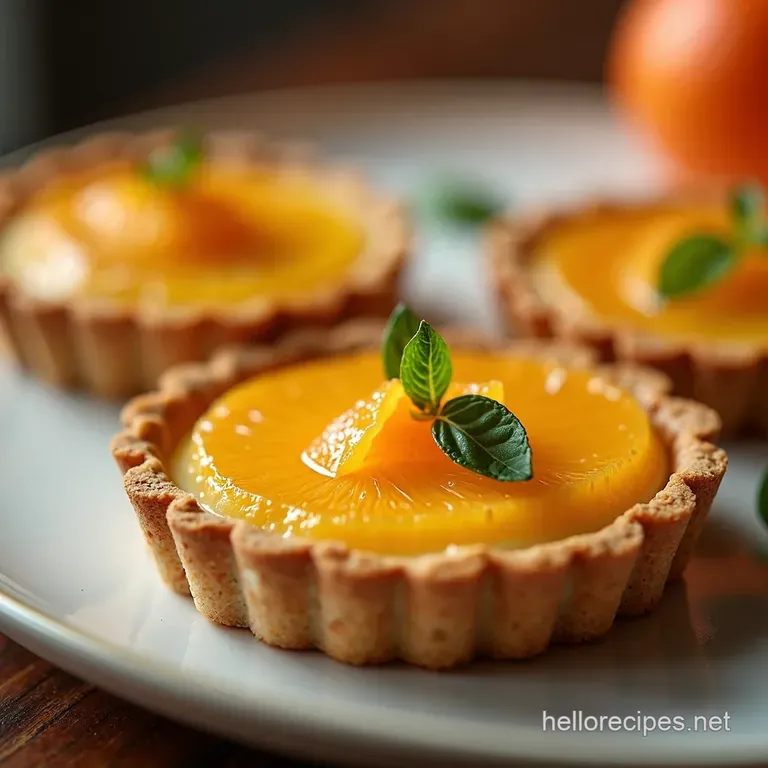
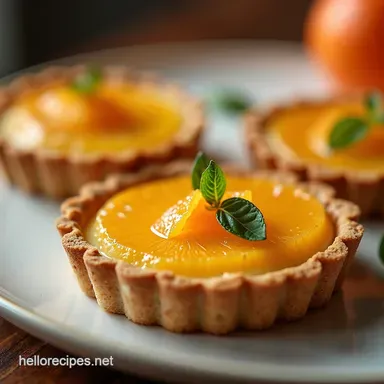
Forget the simple mix of two ingredients; this Mimosa Cocktail Recipe captures the spirit of the drink in a sophisticated, intensely flavoured Lemon Curd Tart nestled within a shatteringly crisp shortbread shell, all finished with a shimmering, reduced Prosecco glaze.
Why This Dessert Captures the Ultimate Mimosa Spirit
This tart is more than just a dessert; it’s an experience designed to mimic the sensation of that first perfect sip. It hits all the high notes: the zing of the fresh citrus mimics the lift of the bubbly, while the rich egg and butter base provides the smooth foundation you expect from a carefully crafted drink.
It’s sunshine, bottled and then baked.
Unpacking the Citrus Symphony: More Than Just OJ and Bubbly
A traditional Orange Juice Mimosa relies on the sheer brightness of the fruit balanced by the dryness of the sparkling wine. Our tart focuses on maximizing that impact. We incorporate both freshly squeezed orange juice and vibrant orange zest to deliver a full bodied citrus hit.
This is then sharply contrasted by an equal measure of tart lemon juice, preventing the overall flavour from becoming cloyingly sweet. The resulting Mimosa Inspired Lemon & Orange Curd Tart is a perfectly balanced expression of sweet and sour.
The Perfect Centerpiece for Garden Parties and Celebrations
When you present this tart, you are offering something instantly recognizable yet beautifully elevated. Its vibrant yellow hue is naturally celebratory, making it the ideal Brunch Tart Recipe centerpiece.
Imagine slicing into this golden beauty at a garden party it requires no extra garnish other than perhaps a few fresh raspberries to complement the richness. It truly belongs in the realm of sophisticated Mimosa Dessert Ideas .
Decoding the Flavor Profile: Tart, Sweet, and Effervescent
The magic lies in the texture and flavour interplay. The shortbread crust offers a necessary buttery, grounding element. The curd itself is intensely smooth, thanks to the careful tempering process and the addition of sparkling wine right at the end of cooking.
Finally, the subtle, sticky glaze made from reduced Prosecco offers that ghost of effervescence right on the palate, completing the illusion of the Mimosa recipe in dessert form.
Assembling Your Sparkling Pantry: What You Need
To create this showstopper The "Brunch Buzz": Sparkling Citrus Curd Tart with Prosecco Reduction we need three distinct sets of ingredients. We will rely heavily on fresh, high-quality components, particularly the citrus and the sparkling wine, as they are the defining flavours of this experience.
For the crust, we need flour, cold butter, sugar, one egg yolk, and a touch of ice water for that perfect shortbread snap.
The heart of the Mimosa Cocktail Recipe adaptation, the curd, calls for four whole eggs plus two extra yolks for ultimate richness, sugar, fresh orange juice, lemon juice, the zest of one orange, rich unsalted butter cut into cubes, and crucially, two tablespoons of dry sparkling wine Prosecco is the recommended choice for its clean profile.
Finally,, the glaze requires just half a cup of the same dry sparkling wine and two tablespoons of sugar to concentrate that bubbly flavour.
Mastering the Components: Tart Crust, Curd, and Topping
This tart involves mastering three distinct baking techniques: creating a blind baked shell, gently cooking a stable curd, and reducing a liquid glaze. Each step requires precision, but with attention to temperature, success is guaranteed.
Essential Tools for Flawless Curd Consistency
The single most critical tool for achieving that restaurant quality, velvety smooth texture for the curd is a fine mesh sieve . After cooking, the curd must be strained.
This step removes any trace elements of zest or any tiny bits of egg that may have started to coagulate, ensuring that every bite of your Mimosa Inspired Lemon & Orange Curd Tart is utterly silky.
A heavy bottomed saucepan is also vital to ensure even heat distribution, preventing hot spots that could scorch the sugars or scramble the eggs.
Sourcing the Right Sparkling Wine for Maximum Flavor Impact
Since the sparkling wine features both in the curd base and the final glaze reduction, its quality matters. We are looking for dry, crisp acidity. Prosecco (Brut) is ideal because it offers bright, clean citrus notes without overpowering the fruit.
If you prefer something more structured, Cava is an excellent substitute. Save the expensive Champagne for sipping; a good quality mid-range Brut is perfect here, as the flavour will be intensely concentrated during the reduction process.
The Citrus Ratio: Balancing Fresh Lemon and Bright Orange Zest
The balance between tartness and sweetness is what separates a memorable tart from a mediocre one. For this recipe, we lean slightly toward the tart side to mimic the bracing quality of a perfect drink.
We use a generous amount of both fresh orange and lemon juice, but it is the zest of one large orange that carries the aromatic "Mimosa" essence. Remember, zest contains the oils, delivering flavour without excessive liquid.
Phase One: Building the Foundation The Crisp Shell
We begin by creating a sturdy, flavourful foundation using a simple shortbread dough. Whisk together the flour, sugar, and salt. Next, quickly cut in the cold, diced butter using a pastry blender or your fingertips until the mix resembles coarse sand. It’s imperative that the butter remains cold.
Bind the mixture with one chilled egg yolk and just enough ice water usually a single tablespoon to bring the dough together without overworking it. Overmixing develops gluten, resulting in a tough crust, which we absolutely want to avoid for this delicate Brunch Tart Recipe .
Flatten the dough into a disk, wrap it tightly, and allow it to chill in the refrigerator for a full hour to relax the gluten structure.
Phase Two: Crafting the Signature Mimosa Inspired Curd
Once the dough is chilled, roll it out and carefully press it into your 9 inch tart pan. After docking the base liberally with a fork, it’s time for the crucial blind baking process. This ensures the base is fully cooked and won't succumb to a soggy bottom when the wet curd filling is added.
Once the crust is pale gold, remove it from the oven.
Now, turn your attention to the signature filling. In your heavy bottomed saucepan, gently whisk together the eggs, extra yolks, sugar, orange juice, lemon juice, and that aromatic orange zest. The heat must be kept low to medium low.
You are aiming to cook the eggs slowly until the mixture thickens enough to coat the back of a spoon without scrambling a process requiring constant, patient whisking.
Phase Three: The Bubbly Finish Reduction and Assembly
Once the curd base has reached the appropriate temperature (around 170° F or 77° C), immediately remove it from the heat. This is where we introduce the luxurious final touches.
Pass the warm mixture through the fine mesh sieve into a clean bowl this is your secret weapon for silkiness. While still warm, whisk in the cold, cubed butter until it melts fully and creates a rich emulsion. Finally, whisk in the two tablespoons of dry sparkling wine.
Pour this radiant Orange Juice Mimosa -esque curd into the pre-baked crust. It then bakes briefly at a slightly lower temperature, just enough to set the very edges while leaving a delicate quiver in the centre.
After cooling completely on a rack, it must chill for at least three hours to fully firm up.
Blind Baking Secrets for a Shatteringly Crisp Crust
To achieve that perfect, crisp shell, make sure your pie weights (or dried beans) are ample enough to hold the dough in place right up to the edges. After the initial 15 minutes of baking with the weights, remove them and bake for an additional 5- 7 minutes until the base is visibly dry and lightly coloured.
This extended dry heat is what prevents the crust from collapsing under the wet filling.
Tempering Eggs Gently: Avoiding Scrambled Citrus Disaster
The difference between perfect curd and scrambled eggs is temperature control. You are not making custard; you are creating a stable emulsion with the yolks. Never let the mixture boil. If you see thick clumps forming, remove the pan from the heat immediately and whisk vigorously in a cooler bowl.
The residual heat will continue the cooking process gently, leading to a wonderfully smooth Mimosa Inspired Lemon & Orange Curd Tart .
Achieving the Perfect 'Setting Point' for Silky Smooth Curd
When testing the curd before adding it to the tart shell, the "back of the spoon" test is key. If you draw your finger across the coating on the back of a metal spoon and the line holds cleanly without the mixture running back to fill the gap, it is ready. For the final bake in the shell, watch carefully.
The tart should emerge from the oven when the edges are set but the very middle still wobbles slightly; it will continue to set as it cools.
Creating the Decadent Prosecco Drizzle Reduction
While the tart chills, focus on the finishing touch. In a small saucepan, combine the remaining sparkling wine and sugar. Bring this to a gentle simmer over medium heat. Allow it to reduce by nearly half until it lightly coats the back of a spoon it should be syrupy but still pourable.
This concentration intensifies the bubbly flavour, creating a perfect acidic counterpoint to the richness of the curd. Let this glaze cool slightly before drizzling it artfully over the chilled Mimosa Dessert Ideas just before serving.
Troubleshooting and Pro-Tips for Perfection
If your curd curdles slightly despite your best efforts, don't panic. Passing it through the fine mesh sieve multiple times can often salvage the texture. For the crust, if it shrinks slightly during blind baking, gently press it back into shape with the base of a measuring cup while it is still warm.
Always ensure your butter added to the hot curd is cold and cubed; this helps it incorporate smoothly without overheating the mixture during the final emulsification step.
Creative Twists to Personalize Your Tart
While this Mimosa recipe stands beautifully on its own, customization is always encouraged! If you have any leftover egg white from the yolk separation, consider whisking it with a dash of powdered sugar and using it to create a very thin, crisp meringue layer brushed over the top before the final 5-minute bake for an extra textural contrast.
Storage Solutions: Keeping Your Citrus Tart Fresh
This tart is best eaten within 2-3 days. Keep it covered loosely in the refrigerator. Because of the high acidity and sugar content, it holds up quite well, but the crust will inevitably soften slightly over time. Ensure it is fully chilled before slicing for the cleanest cuts.
Expert Tips for an Ultra Glossy Curd Surface
If you desire that mirror like, glossy finish, use a small pastry brush to gently sweep a thin layer of warmed, strained apricot jam over the cooled curd before applying the Prosecco reduction. This acts as a final sealant and reflector of light.
Alternative Fizz: Swapping Prosecco for Champagne or Cava
As mentioned, swapping out the Prosecco is simple. For a drier, more minerally flavor, use Cava. For a richer, more yeasty note, use a Brut Champagne. The key is to ensure the fizz you use is dry, otherwise, the sugar in the reduction may become overwhelming.
Variations: Incorporating Berries into Your Mimosa Dessert
To integrate fresh fruit, consider serving this tart with a side of very lightly sweetened, macerated raspberries or small, segmented mandarin oranges. Alternatively, if you wish to bake them in, gently scatter whole raspberries over the surface of the curd just before it goes into its final 10-minute bake; they will sink slightly and burst during baking, adding pockets of intense colour and flavour to your Brunch Tart Recipe .

Frequently Asked Questions
Why is my Mimosa Curd grainy instead of silky smooth?
Ah, the dreaded grainy curd it usually means the eggs cooked too quickly and scrambled slightly, even if you didn't see a full boil. To avoid this next time, cook the mixture over medium low heat ONLY, whisking constantly until it coats the back of a spoon.
The non-negotiable step is straining the warm mixture through a fine mesh sieve right after cooking; this catches any cooked bits and guarantees that professional, velvety texture.
Can I make the shortbread crust for this Mimosa tart ahead of time?
Absolutely! The crust is perfect for making ahead, which is a huge time saver when planning a brunch. You can fully bake (blind bake) the crust, cool it completely, and store it wrapped tightly at room temperature for up to two days.
Some even prefer to brush the baked shell with a thin layer of egg white before cooling to create an extra moisture barrier against the curd a real nifty trick!
What’s the best substitute if I don’t have Prosecco on hand for the glaze?
If you’re short on Prosecco, Cava is a brilliant, dry Spanish substitute that works just as well in the reduction, providing similar acidity. Failing that, you can use a dry white wine, like a Pinot Grigio, but you might want to add just a touch more sugar to compensate for the lack of residual sweetness often found in sparkling wines.
Just remember to reduce it until it nicely coats the back of a spoon!
How should I store leftovers of the Mimosa Curd Tart?
Because this tart is filled with delicate citrus curd and relies on being perfectly chilled to set, it must be stored in the refrigerator. Keep it covered gently (perhaps with some lightly tented foil or plastic wrap) for up to four days.
It’s always best enjoyed cold, straight from the fridge, as the texture will soften if left out too long on the counter.
I'm worried about the 'soggy bottom' curse how can I guarantee a crisp crust?
That soggy bottom is the bane of any tart maker’s existence! The key here is aggressive blind baking. You must bake the crust until it's visibly pale golden before adding any filling.
A professional tip is to brush the hot, baked shell with a thin, beaten egg white right after removing the weights and bake for two more minutes; this seals the pastry beautifully before the wet curd goes in.
Mimosa Citrus Curd Tart
Instructions:
Nutrition Facts:
| Calories | 320 kcal |
|---|---|
| Fat | 18g |
| Fiber | 1g |
