Juicy Roast Beef with Pan Gravy: Our Best-Ever Restaurant-Quality Sunday Roast
- Elevating the Sunday Roast: Mastering Juicy Roast Beef with Pan Gravy
- The Science of Juiciness: Why Our Roasting Method Guarantees Perfection
- The Power of the over High heat Initial Sear (Maillard Reaction)
- Precision Temperature Cooking vs. Timed Roasting
- Essential Ingredients for Juicy Roast Beef with Pan Gravy
- Step-by-Step Guide: Preparing and Roasting the Perfect Joint of Beef
- From Drippings to Delicious: Crafting the Pan Gravy
- Troubleshooting Your Roast: Chef's Tips and Common Mistakes to Avoid
- Handling Leftovers: Storage and Reheating Juicy Roast Beef
- Completing the Feast: Ideal Serving Suggestions for Your Sunday Roast
- Recipe FAQs
- 📝 Recipe Card
Elevating the Sunday Roast: Mastering Juicy Roast Beef with Pan Gravy
There is nothing in the world quite like the aroma of a proper roast drifting through the house on a Sunday afternoon. That rich, herby smell, mingled with the earthy scent of the drippings starting to caramelize, instantly signals comfort.
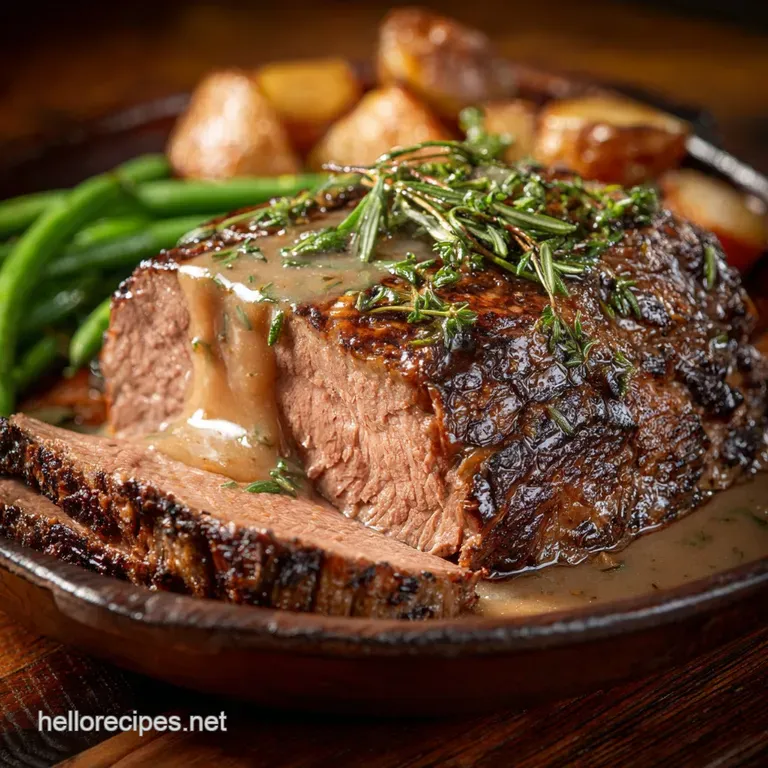
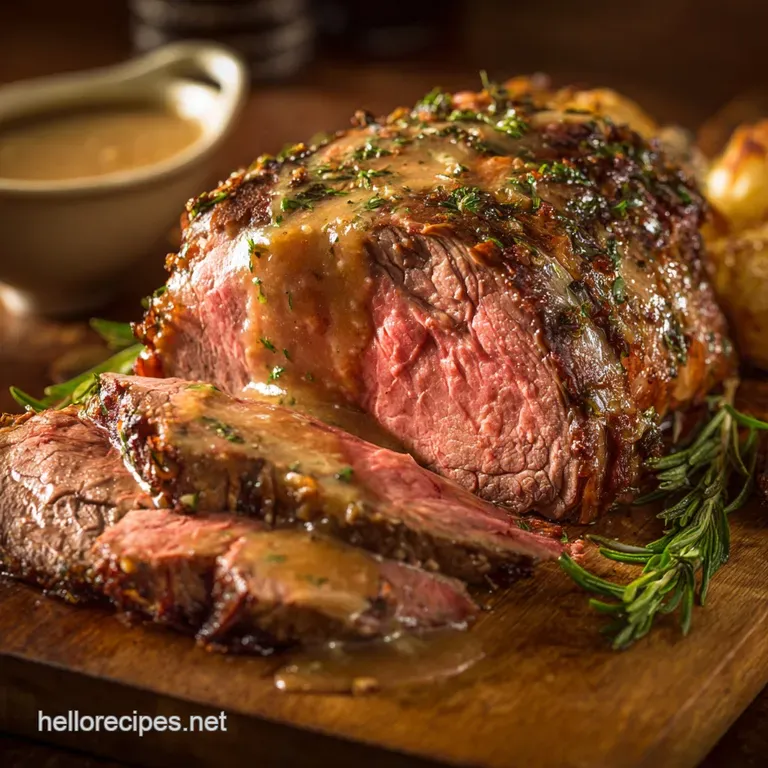
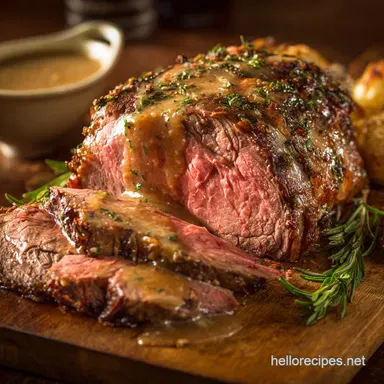
When you slice into the joint, the crust should crackle just slightly, revealing a perfectly rosy, glistening interior.
For years I struggled, ending up with dry, grey edges that were utterly disappointing, but I cracked the code through sheer stubbornness. This method isn't complicated or expensive; it just requires a meat thermometer and an iron will to follow the crucial resting steps.
It completely takes the guesswork out of serving restaurant quality beef every time, making your Sunday prep surprisingly stress free.
So, ditch the guesswork, forget those confusing timers your grandma used, and let’s get this glorious, juicy roast beef recipe sorted. We are making a joint that is tender edge-to-edge, served with a pan gravy so deep and rich it'll make you weep.
The Science of Juiciness: Why Our Roasting Method Guarantees Perfection
The Secret to Restaurant Quality Rosy Beef
The secret sauce here is temperature control, not timing, which I learned the hard way after overcooking a beautiful ribeye joint a few years ago. We are relying on that instant read thermometer to tell us exactly when the internal structure of the muscle is perfect.
Pulling the roast at the right moment ensures that glorious rosy center without turning the outer layers grey and tough.
Ditching the Dry: A Guarantee of Edge-to-Edge Tenderness
Tenderness is all about how the muscle fibers contract under heat. If you cook it too quickly or fail to let it rest, all those juices rush out when you slice it. Resting the beef is non-negotiable.
It allows those essential moisture molecules to redistribute throughout the meat, guaranteeing succulence right up to the crust.
Why This Recipe Will Be Your New Sunday Staple
It’s fast, really simple, and uses kitchen staples you already have lying around. Once you master this juicy roast beef recipe, you can confidently turn your attention to the sides, perhaps starting off with a quick appetizer like Blistered Shishito Peppers with Dip: 15 Minute Recipe Umami Miso Sauce before the main event. Trust me, the sheer flavour payoff for minimal active effort makes this a winner.
The Power of the over High heat Initial Sear (Maillard Reaction)
This is where the magic happens and where we build that incredible, deeply coloured crust. By blasting the beef at a scorching 450°F (230°C) for the first 15 minutes, we rapidly kickstart the Maillard reaction.
This is just a fancy way of saying we are caramelizing the proteins on the surface, locking in flavour and creating that satisfying, savoury texture that separates good roast beef from outstanding roast beef.
Precision Temperature Cooking vs. Timed Roasting
If you are still calculating your roast based on " 20 minutes per pound," please stop immediately; that method is unreliable and often leads to dry beef. Cuts vary wildly in shape, fat content, and starting temperature, making time metrics useless.
The only way to guarantee the perfect medium rare (which is my favourite for maximizing juiciness) is by using a digital probe.
The Critical Role of Resting for Ultimate Moisture Retention
Seriously, do not skip this step. Even if your family is hovering and complaining, you must let the roast rest for at least 20 minutes once it comes out of the oven.
During this time, the internal temperature actually rises another 5°F (3°C) (that’s carryover cooking!) and those turbulent juices calm down. If you slice too early, you’re not serving juice in the beef, you are serving it on the cutting board.
Essential Ingredients for Juicy Roast Beef with Pan Gravy
Selecting the Optimal Cut: Bone-In vs. Boneless Joints
For maximum juiciness and flavor, a bone-in Ribeye is unbeatable, but it can be pricey and trickier to carve. For a simple, reliable Sunday dinner, I usually stick to a boneless joint like Topside or Sirloin Tip, which slices beautifully and holds its shape.
Make sure it’s tied securely with butcher’s twine; this ensures a uniform shape, which means beautifully even cooking.
Enhancing the Aroma: Key Seasonings and Fat Sources
I keep the seasoning straightforward because a gorgeous piece of roasted beef doesn’t need complicated sauces until later. We need lots of coarse salt like, way more than you think pepper, and fresh woody herbs like rosemary and thyme.
The oil acts purely as a binder, helping that glorious seasoning stick firmly to the outside crust.
| Ingredient | My Recommendation | Substitution Tip |
|---|---|---|
| Beef Joint (Topside/Sirloin) | Boneless, tied cut. | Pork Loin: Use chicken stock in the gravy, swap rosemary for sage. |
| Fresh Herbs | Rosemary and Thyme. | Dried Herbs: Use half the quantity, or skip them and use garlic powder instead. |
| Red Wine (Gravy) | Dry Merlot or Cabernet. | Substitute with the same amount of strong beef stock plus a splash of balsamic vinegar. |
From Drippings to Gravy: Building the Rich Flavor Base
The pan drippings are the gold standard for incredible gravy; they are concentrated flavor in liquid form. We’ll be using the rendered fat to build a classic roux, and then the dark, savoury jus left beneath the fat becomes the soul of the sauce. Don’t pour that beautiful dark jus away!
Chef’s Note: Before starting the gravy, make sure you properly skim the fat from the drippings. Too much fat makes for a greasy gravy, while the remaining jus provides the crucial umami depth.
step-by-step Guide: Preparing and Roasting the Perfect Joint of Beef
- Preparation is Key: Pat that joint bone dry and tie it up securely if it needs shaping. You want the surface to be as dry as possible so you can get a crisp sear, not a steam bath.
- Season Heavily: Rub the oil and the aggressive herb and salt mixture all over the surface, pressing it right into the meat.
- The Wait: Let the seasoned roast sit out at room temperature for a full hour. This step prevents the exterior from overcooking while the cold center catches up.
- The Blast: Preheat your oven to 450°F (230°C). Place the beef on a rack in a roasting pan (we need air circulation underneath!), and roast for exactly 15 minutes to achieve that initial searing crust.
- Cool Down: Immediately drop the oven temperature to 325°F (160°C). Continue roasting, undisturbed, for the remainder of the cook time.
From Drippings to Delicious: Crafting the Pan Gravy
Achieving the Perfect Internal Temperature Calibration
Start checking the temperature about 30 minutes after reducing the heat, especially if you have a smaller joint. Aim for that thickest center point, avoiding bone. Remember, we pull it before it hits the target!
| Desired Doneness | Pull Temperature | Final Temperature (after resting) |
|---|---|---|
| Medium Rare (Recommended) | 125 130°F (52 54° C) | 130 135°F (54 57°C) |
| Medium | 135°F (57°C) | 140°F (60°C) |
The Two-Stage Roasting Method Explained
The over high heat/over low heat method gives you the best of both worlds: intense flavor development on the exterior from the high sear, and then gentle, even cooking deep inside from the low temperature. This is how you avoid that dreaded grey layer just under the crust.
Expert Technique for Slicing Against the Grain
Once the meat has rested, look closely at the muscle fibers running across the surface. You must slice perpendicular to those lines. Slicing against the grain shortens the fibers, making every slice incredibly tender and easy to chew.
Deglazing the Roasting Pan for Maximum Flavor Extraction
While the beef is resting, carefully skim 4 tablespoons of fat from the drippings and heat them in a saucepan. Sauté your shallots until they are sweet and soft. After adding the flour, pour in the red wine while scraping up all those dark, sticky bits (the fond ) from the bottom of the pan that is pure flavor magic!
Fixing Gravy That Won't Thicken (or is Too Thin)
If your gravy is too thin, create a quick cornstarch slurry: mix 1 teaspoon of cornflour with 2 teaspoons of cold water. Whisk this into the simmering gravy until it thickens up perfectly. If it’s too thick, simply add more warmed beef stock until you reach the consistency you prefer.
Troubleshooting Your Roast: Chef's Tips and Common Mistakes to Avoid
Avoiding the Grey Ring: Prepping Beef for Even Cooking
The number one mistake I used to make was cooking beef straight from the fridge. When the joint is ice-cold, the heat aggressively cooks the outside before it even starts penetrating the center, resulting in that ugly, dry, grey ring under the crust.
Always allow the joint to rest for 60 minutes at room temperature before roasting.
What to Do If Your Roast Finishes Too Early
Say you hit your target temperature a whole hour before your guests arrive. Don't panic! Remove the beef, rest it, slice it thinly against the grain, and arrange the slices slightly overlapping in an ovenproof dish.
Pour a little of the gravy or a spoonful of beef stock over the slices, cover tightly with foil, and hold it in a very low oven, around 180°F (82°C). This keeps it moist and warm without cooking it further.
Handling Leftovers: Storage and Reheating Juicy Roast Beef
Best Practices for Refrigerating Cooked Beef
Once the beef and gravy have cooled, store them in separate, airtight containers. Cooked slices will keep beautifully in the fridge for up to 4 days. If I know I won’t eat it within a couple of days, I immediately slice it thinly and use it for sandwiches or quick stir fries.
Freezing Beef and Gravy Separately for Optimal Texture
Yes, you can freeze both! Freeze the gravy in a separate container, preferably a zip-top bag laid flat, for up to 3 months. For the beef, slice it and place pieces in a freezer bag with a thin layer of the cooled gravy or stock to prevent freezer burn.
Reheating Slices Without Drying Them Out
Never microwave slices of roast beef unless you enjoy chewing shoe leather. The best way to reheat is low and slow. Place the slices in a shallow oven dish with a spoonful of gravy and cover them tightly with foil.
Pop them into an oven preheated to 300°F (150°C) for about 10– 15 minutes until just warmed through.
Completing the Feast: Ideal Serving Suggestions for Your Sunday Roast
This juicy roast beef deserves truly excellent partners. You could go simple, or you could go all out and try something slightly autumnal and fancy, like the Pan-Seared Duck with Cider Risotto method you can easily swap the duck for the beef slices if you want a beautiful, creamy base! Al Fresco Fall Candlelight Dinner: Pan-Seared Duck with Cider Risotto .
The Mandatory Accompaniment: Crispy Roasted Potatoes
A Sunday roast is fundamentally incomplete without potatoes roasted in the same pan fat. Roast them separately, tossing them in some of that gorgeous rendered beef fat for maximum crispiness. And, of course, serve with sharp horseradish cream the heat cuts through the richness of the pan gravy perfectly.

Recipe FAQs
Why did my roast beef turn out dry or grey instead of juicy and rosy?
The most common culprit for dry beef is overcooking past the desired internal temperature, even by a few degrees. Ensure you pull the beef from the oven about 5-10°F below your target temperature, as it will continue cooking while resting.
Furthermore, you must rest the beef for 15-20 minutes, loosely tented, so the internal juices redistribute instead of running out when sliced.
What is the best cut of beef to use for maximum juiciness and flavor?
For the juiciest results, choose cuts with a good amount of marbling and exterior fat, such as a Bone-In Ribeye Roast (Standing Rib) or a Top Sirloin Roast. Fattier cuts are more forgiving and stay moist during the high heat searing and slow roasting process required for this recipe.
If you prefer a leaner option, choose the Tenderloin, but watch the internal temperature carefully.
My pan gravy is lumpy or too thin. How do I fix the consistency?
If your gravy is too thin, bring it to a simmer and create a simple cornstarch slurry (equal parts cornstarch and cold water), whisking it in gradually until it reaches the desired thickness.
If it is lumpy, remove it from the heat and vigorously whisk it through a fine mesh sieve to remove any unincorporated flour or granules.
Can I prep the seasoning rub on the beef the night before roasting?
Yes, prepping the beef 12 to 24 hours in advance is highly recommended for optimal flavor development. Salting the roast ahead of time allows the sodium to penetrate the muscle fibers, resulting in a significantly more tender and seasoned finished product.
Just remember to let the beef sit at room temperature for one hour before placing it in the oven.
What is the recommended safe internal temperature for medium rare roast beef?
For a perfect, classic medium rare, pull the beef from the oven when the internal temperature reaches 125°F (52°C) in the thickest part. The roast will carry over and increase by 5 10 degrees as it rests, bringing it to the ideal 130 135°F (54 57°C) serving temperature.
Always use a reliable meat thermometer inserted sideways into the center of the roast.
I don't have enough drippings for the gravy. What can I use to supplement the flavor?
If drippings are scarce, supplement the fat by adding a tablespoon of butter or neutral cooking oil to the pan before whisking in the flour for the roux base. The greatest flavor boost comes from using high-quality, rich beef stock or bouillon instead of plain water to create the liquid base for the gravy.
You can also deglaze the pan with red wine or sherry for added depth.
How should I store leftover roast beef, and can I freeze it?
Store sliced leftover roast beef in an airtight container in the refrigerator and consume it within 3 to 4 days. While you can freeze the cooked beef, it is best to slice it first and freeze pieces flat in heavy duty foil or vacuum sealed bags to minimize freezer burn. It will retain optimal quality for up to 3 months.
Juicy Roast Beef Pan Gravy Recipe
Ingredients:
Instructions:
Nutrition Facts:
| Calories | 507 kcal |
|---|---|
| Protein | 30.4 g |
| Fat | 31.1 g |
| Carbs | 10.6 g |
