Homemade Fruit Tart: the Classic Pâtisserie Recipe for Home Cooks

- Elevating Your Dessert Game: Crafting the Perfect Homemade Fruit Tart
- The Science of Texture: Why This Fruit Tart Recipe Stands Out
- Gathering Your Arsenal: Detailed Ingredients and Essential Substitutions
- Phase 1: Building the Foundation (Mastering the Pâte Sablée)
- Phase 2: Whipping Up the Flawless Crème Pâtissière
- Phase 3: Assembly, Glazing, and Finishing Your Homemade Fruit Tart
- Troubleshooting Your Tart: Chef's Tips and Avoiding Common Mistakes
- Keeping Your Creation Fresh: Storage and Freezing the Homemade Fruit Tart
- Perfect Pairings: Elegant Serving Suggestions
- Recipe FAQs
- 📝 Recipe Card
Elevating Your Dessert Game: Crafting the Perfect Homemade Fruit Tart
Forget the frantic pace of the professional kitchen; this is baking in your favorite old t-shirt. There is absolutely nothing better than the smell of vanilla infused milk simmering on the stove, mingling with the deep, nutty scent of a perfectly blind baked butter crust.
That contrast the crisp snap of the shell giving way to smooth, cold vanilla cream is dessert heaven, pure and simple.
You might think a truly classic French fruit tart is reserved for a fancy pâtisserie. I used to feel that way, too. But this recipe is genuinely a weekend lifesaver because it’s a brilliant exercise in manageable stages.
You can knock out the crust one night, the pastry cream the next morning, and assemble the whole masterpiece just before guests arrive. It looks utterly impressive, yet the actual active work is surprisingly low-key.
So, let's ditch the intimidation factor surrounding fancy French names. We are going to build the most glorious, creamiest, snappiest homemade fruit tart you’ve ever tasted. Get your stand mixer ready, and let’s crack on.
The Science of Texture: Why This Fruit Tart Recipe Stands Out
What Makes a Pâtisserie Quality Tart?
The difference between a good homemade tart and a great one comes down to two things: temperature and texture contrast. We aren't aiming for a soggy bottom or a weeping custard here. We want a sharp, defined edge and a mirror like sheen on the fruit.
Achieving that perfect texture profile is all about understanding the role of fat and starch in this process.
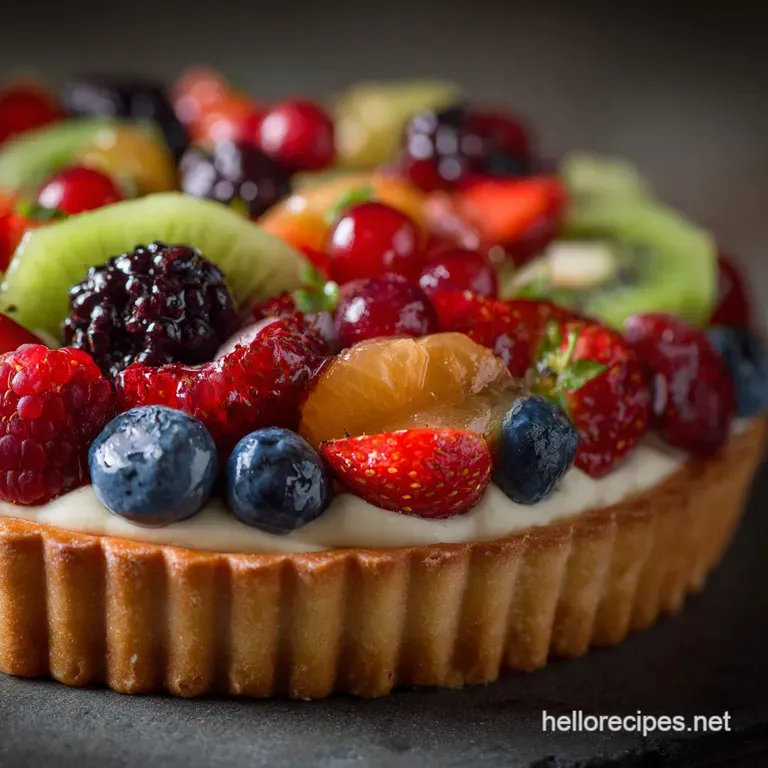
Overview of the Three Essential Components (Sablée, Crème, Fruit)
Every perfect homemade fruit tart is a beautiful trinity. First, we have the Pâte Sablée , which translates roughly to "sandy dough." This is a sweet, tender shortcrust that relies heavily on butter and powdered sugar for that melt-in-your mouth crumbly texture.
Next is the smooth, rich Crème Pâtissière , a classic custard filling stabilized with cornflour so it holds its shape when sliced. Finally, we finish it with the fresh fruit, bound together with a clear, shiny glaze.
Required Tools for Tart Success (Equipment Checklist)
You don't need a professional convection oven for this, but a good 9 inch tart pan with a removable bottom is non-negotiable. Seriously, trying to unmold a tart from a solid bottomed dish is a recipe for heartbreak and shattered edges.
A stand mixer helps tremendously with the Pâte Sablée , but hands and a pastry blender work just fine. You will also need a fine mesh sieve, both for sifting the powdered sugar and for straining the finished pastry cream.
Achieving the Ideal Snap: Secrets to Crisp Pâte Sablée
The secret to this "sandy" pastry is using cold, hard butter and mixing it just until it looks like coarse sand. Don't overwork the dough! Overworking develops gluten, which leads to tough, chewy crusts that shrink dramatically in the oven. The dough needs to be barely held together.
Preventing Soggy Bottoms: The Egg Wash Shield
This is a step I learned the hard way after many weeping tarts. After blind baking the crust and removing the weights, brush the slightly cooled shell (while it’s still in the pan) with a little whisked egg white or thin egg wash. Bake for another minute.
This flash cooks the egg wash, creating a thin, impermeable layer that seals the crust against the wet custard filling. Trust me, this simple trick is magic.
The Silky Smoothness of Proper Crème Pâtissière
If your pastry cream is lumpy, you either didn't temper the eggs properly, or you stopped cooking too soon. We need to whisk the cornflour sugar-yolk mixture until it's very pale, and then slowly introduce the hot milk (the tempering step).
When you cook the final mixture, you must let it bubble aggressively for at least 60 seconds; this ensures the starch fully thickens and the cream won’t taste powdery or starchy later.
Gathering Your Arsenal: Detailed Ingredients and Essential Substitutions
This tart is built on high-quality basics. Don't cheap out on the butter or the vanilla.
Butter Selection: European Style vs. Standard (For Pâte Sablée)
European style butter, which has a higher fat content (around 82%), yields a flakier, richer Pâte Sablée . I highly recommend using it if you can find it. If you are stuck with standard American butter (80% fat), just make sure it is ice cold and be very precise with the chilling times.
| Ingredient | My Top Choice | Viable Substitute |
|---|---|---|
| Butter | High fat (European style) | Standard unsalted butter + a pinch less water in the dough. |
| Flour | All-purpose or Pastry Flour | 1:1 gluten-free Blend (ensure it contains xanthan gum). |
| Powdered Sugar | Standard Icing Sugar | Granulated sugar, but only if pulsed briefly in a food processor first. |
| Cornflour (Starch) | Standard Cornflour/Cornstarch | Tapioca starch or 1:1 dedicated GF all-purpose baking mix. |
| Whole Milk | Full fat Dairy Milk | High fat oat milk or evaporated milk diluted slightly. |
| Glaze | Apricot Jam (strained) | Apple jelly or light corn syrup mixed with lemon juice. |
Cream Consistency: Whole Milk or Heavy Cream for the Crème Pâtissière?
You absolutely need whole milk for the Crème Pâtissière. The filling relies on the fat and protein content of full fat dairy to achieve that rich, luxurious mouthfeel. Using heavy cream can make the cream too heavy and greasy, while skim milk will result in a thin, watery custard.
Choosing and Preparing Seasonal Fruit Toppings
The beauty of a homemade fruit tart is adapting it to the season. In summer, go heavy on strawberries, raspberries, and blueberries. Fall and winter are great for sliced kiwi, mandarins, or firm grapes. Always select fruits that are slightly underripe or firm.
Overripe fruit is too juicy and will make your pastry cream weep.
Glaze Alternatives: Apricot Jam vs. Commercial Glaze
Apricot jam is the gold standard for French fruit tarts, providing a lovely peachy hue and neutral flavour. If you don't like apricot, a neutral glaze (sometimes called commercial piping glaze) works beautifully, or you could opt for strained, warmed apple jelly .
If you happen to be making my make-ahead Thanksgiving Desserts: The Salted Caramel Apple Crumble Tart , a bit of the strained caramel sauce could even work for a non-traditional drizzle!
Phase 1: Building the Foundation (Mastering the Pâte Sablée)
Mixing and Resting the Dough (Crucial Chilling Time)
Use the reverse creaming method here: blend the dry ingredients (flour, sugar, salt) first, then cut in the cold butter until coarse crumbs form. Finally, add the single egg yolk. Mix only until the dough just comes together. It should look shaggy, not smooth.
Crucially, the initial chill must be at least an hour. This prevents major shrinkage later.
Blind Baking Precision: Weighting and Timing the Shell
Preheat your oven properly. Line the chilled, docked shell with parchment paper, leaving generous overhang, and fill it completely with weights. I use ceramic weights, but dried beans work perfectly well. This is the Blind Bake Precision stage, where the structure is set.
Bake for the first 15 minutes weighted, remove the weights, reduce the oven temperature slightly, and finish baking until it's perfectly golden brown, dry, and smells divine.
Repairing Cracks and Imperfections Before Final Bake
Inevitably, small cracks might appear, especially where the sides meet the bottom. Don't panic! Simply use a small amount of the leftover dough scraps, mix them with a tiny drop of water to make a paste, and gently smear this paste into the cracks. Bake as normal; the paste seals the hole instantly.
Phase 2: Whipping Up the Flawless Crème Pâtissière
Tempering Eggs Like a Professional
Whisk the yolks, sugar, and cornflour in a separate bowl until the mixture is pale yellow (blanchir). Meanwhile, the milk should be just steaming, not boiling rapidly. Slowly, very slowly , ladle about a third of the hot milk into the egg mixture while whisking like your life depends on it.
This raises the temperature of the yolks gently. Pour everything back into the pot with the remaining milk.
Cooking the Cream to the Perfect Nappé Consistency
Place the saucepan back over medium heat and whisk constantly. You will feel it suddenly thicken dramatically. Once it reaches that thick consistency, you must continue whisking and let it boil for a full minute to cook out the cornflour.
The finished cream should coat the back of a spoon thick enough so that a line drawn through it holds its shape (the nappé consistency).
Rapid Cooling Techniques for Safety and Texture
Lumps are the enemy of smooth pastry cream. Immediately after cooking, strain the cream through a fine mesh sieve into a shallow dish (a baking dish works well). Press plastic wrap directly onto the surface of the cream. This prevents that horrid skin from forming and allows it to cool quickly.
Rapid chilling (at least one hour) ensures a thick, sliceable filling.
Phase 3: Assembly, Glazing, and Finishing Your Homemade Fruit Tart
- Prep the Components: Gently whisk your fully chilled Crème Pâtissière to break up its texture and smooth it out; don't over whisk, or it might deflate. Make sure your tart shell is completely cooled.
- Fill and Smooth: Spoon the cream into the shell, spreading it evenly with an offset spatula.
- Arrange: Get creative! Start with the largest fruit (like kiwi slices) around the outside, then layer smaller berries, often working in concentric circles. Think visually appealing colour blocks.
- Glaze Prep: Warm the apricot jam gently with a splash of water or lemon juice. Crucial Tip: Strain the melted jam to remove any solid fruit bits, ensuring a completely clear glaze.
- Brush and Chill: Using a clean pastry brush, lightly paint the glaze over all the exposed fruit. Chill for 30 minutes to set the glaze and the filling fully.
Troubleshooting Your Tart: Chef's Tips and Avoiding Common Mistakes
Preventing the Tart Shell from Slumping During Baking
This almost always happens because the butter in the dough was too warm or the dough wasn't chilled long enough after lining the pan. Fix: If your crust starts to slump, immediately drop the oven temperature by 25 degrees and quickly press the soft dough back up the sides using the back of a metal spoon.
More chilling is always the answer!
Why Your Pastry Cream Tastes Like Starch (And How to Fix It)
If your finished custard tastes powdery or chalky, it means the cornflour wasn't fully cooked. Fix: Pour the mixture back into the saucepan and continue cooking and whisking vigorously over medium heat until it comes to a rolling boil again. Cook for a full minute.
I promise, the extra heat is necessary to properly activate the starch, leaving behind only smooth vanilla goodness.
Handling High Moisture Fruits (e.g., Berries)
Berries, especially raspberries, are notorious for releasing moisture. If you are using very wet fruits, you can lightly dust the surface of the pastry cream (before laying the fruit down) with a tiny bit of powdered sugar or finely ground almond flour.
This acts as a barrier, soaking up excess liquid before it reaches the custard.
Keeping Your Creation Fresh: Storage and Freezing the Homemade Fruit Tart
Short Term Storage for Fully Assembled Tarts
Once assembled, the tart will keep beautifully in the refrigerator for up to 2 days. Keep it loosely covered with plastic wrap, or in a cake dome, to prevent the crust from softening too much. The fruit will look freshest on the first day, but the structure holds up well.
Freezing Components: Crust and Pastry Cream (Unassembled)
This is where the magic happens for make-ahead dessert planning!
- Crust: You can blind bake the crust entirely and freeze the cooled shell, wrapped tightly in foil, for up to 3 months. Thaw it completely at room temperature before filling.
- Pastry Cream: The Crème Pâtissière freezes surprisingly well. Place the cooled cream in an airtight container, leaving some headspace. Freeze for up to 2 months. To use, thaw overnight in the fridge and give it a vigorous whisking (or use a hand mixer) to bring back its smooth, creamy texture.
Reactivating the Glaze After Refrigeration
If your assembled tart has been chilling and the fruit glaze looks dull or cloudy, you can gently brush on a second, very thin layer of freshly warmed and strained apricot jam right before serving. This will bring back that professional high gloss shine instantly.
Perfect Pairings: Elegant Serving Suggestions
Preventing the Tart Shell from Slumping During Baking
This heading is redundant in this section, so let's focus on the serving component!
A slice of this gorgeous Classic Apple Pie: Grandmas Homemade Flaky Crust Recipe is great, but a light, crisp fruit tart requires something equally sophisticated. Serve it alongside a strong espresso or a small glass of Moscato D'Asti. The slight fizz and low alcohol content of the wine complements the sweetness of the fruit perfectly.
Why Your Pastry Cream Tastes Like Starch (And How to Fix It)
Again, serving only! Ditch the ice cream (it's too heavy) and instead offer a spoonful of slightly tart Crème Fraîche or simply whipped cream, sweetened minimally. The tanginess cuts through the richness of the pastry cream beautifully.
Handling High Moisture Fruits (e.g., Berries)
If you are serving the tart outdoors in the summer, consider chilling the serving plates beforehand. A cold plate keeps the Crème Pâtissière stable and firm, ensuring that beautiful, clean slice. Dust the entire plate with a light snowfall of powdered sugar for the ultimate photo finish.
 : PIN FOR LATER")
Recipe FAQs
Why did my Pâte Sablée crust shrink significantly during baking?
Crust shrinkage is usually caused by overworking the dough, which develops gluten, or by not chilling the dough sufficiently before baking. Ensure your ingredients are very cold, and always allow the shaped dough to rest in the fridge for at least 30 minutes before blind baking to relax the gluten strands.
Additionally, make sure to use pie weights or dried beans during the initial blind baking phase.
My Crème Pâtissière turned out lumpy or too thin. How can I salvage the cream?
If the cream is lumpy, immediately push the warm mixture through a fine mesh sieve or quickly hit it with an immersion blender to achieve smoothness. If it is too thin, return it to low heat and whisk aggressively until it begins to boil and thickens enough to coat the back of a spoon thickly, indicating the starches have fully activated.
How do I prevent the tart shell from getting a soggy bottom once the cream is added?
Ensure the crust is fully blind baked until it is evenly golden brown, not just set. For professional results, you can brush the cooled, baked crust with a thin layer of melted white chocolate or tempered cocoa butter, which acts as a moisture proof barrier against the Crème Pâtissière.
This simple step keeps the shortcrust crisp for several days.
How long can I store the assembled fruit tart, and should it be refrigerated?
The tart is best consumed within 24 hours of assembly, but it can be stored loosely covered in the refrigerator for up to 2 days. Because of the dairy in the Crème Pâtissière and the fresh fruit, refrigeration is essential; however, chilling may slightly dull the shine of the glaze.
Can I use a different filling if I don't want to make the traditional Crème Pâtissière?
Yes, many sturdy fillings work well, such as lemon curd, stabilized mascarpone cream, or pastry cream lightened with whipped cream (Diplomat Cream). Ensure your alternative filling is thick enough to hold the weight of the fruit and is properly chilled before adding the toppings.
Is it possible to freeze components of the tart for later use?
You can successfully freeze the fully baked, unfilled Pâte Sablée shell wrapped tightly in plastic wrap and foil for up to three months. However, never freeze the fully assembled tart; the moisture content of the Crème Pâtissière and fresh fruit will cause the filling to weep and the fruit to turn mushy upon thawing.
What is the easiest substitute if I don't have ingredients for a mirror glaze?
The simplest and most classic substitute is apricot jam: warm 1/4 cup of good quality apricot jam and strain it through a fine mesh sieve to remove any chunks. Brush this warm liquid glaze lightly over the arranged fruit just before serving to achieve a similar glossy finish and to protect the fruit from drying out.
Homemade Fruit Tart Patisserie Recipe

Ingredients:
Instructions:
Nutrition Facts:
| Calories | 657 kcal |
|---|---|
| Protein | 18.0 g |
| Fat | 20.5 g |
| Carbs | 100.2 g |
