Heavenly Roasted Garlic: a Flavorful Transformation

- Heavenly Roasted Garlic: A Flavorful Transformation
- Recipe Overview of Roasted Garlic
- Key Benefits of Roasting Garlic
- Your Essential Ingredients Guide: Level Up Your Cooking
- Professional Cooking Method: Elevate Your Culinary Game
- Additional Recipe Information
- Frequently Asked Questions
- 📝 Recipe Card
Heavenly Roasted Garlic: A Flavorful Transformation
Have you ever had one of those moments in the kitchen where you just know you stumbled onto something magical? picture this: a chilly evening, the aroma of something warm wafting through the air, and just like that, you open your oven to a head of golden, heavenly roasted garlic .
Honestly, that's the moment i realized roasting garlic is a game changer. i still remember the first time i tried it.
I was just playing around, thinking, "what if i roasted a clove of garlic?" little did i know, it would soon become my kitchen secret weapon.
Roasting garlic transforms it from that strong, almost overpowering bite into something sweet and buttery. you can use it in a ton of peeled garlic recipes , or even just spread it on toast and call it a night.
No joke, it’s become my go-to ingredient for everything, from pasta sauces to gourmet spreads. and let’s be real, who doesn’t want to elevate their dishes with something as simple as roasting garlic?
Recipe Overview of Roasted Garlic
Before i dive too deep into how to roast garlic cloves, let’s take a quick trip down memory lane. roasting garlic isn’t a modern invention; it has roots in mediterranean cuisine where it’s loved for adding warmth to food without overpowering flavors.
Nowadays, it's one of those roasted garlic recipes that everyone from busy moms to gourmet chefs can't get enough of.
The best part? it’s super easy to make! you only need about 45 minutes total , with just 10 minutes of prep .
Honestly, if you can slice garlic, you can totally nail this. the cost? a head of garlic costs next to nothing, and it yields enough roasted cloves to jazz up at least four meals or snacks.
Trust me, it’s a budget friendly winner.
Key Benefits of Roasting Garlic
Of course, one of the notable reasons to roast garlic is the health benefits. garlic is packed with essential nutrients like vitamin c and b6.
Plus, it’s known for its anti inflammatory and immune boosting properties. that sweet roasted goodness isn’t just tasty; it's pretty good for you too!
But let’s get to the fun part: versatility. what to do with roasted garlic? the options are endless! you can smear it on bread, toss it in mashed potatoes, or mix it into sauces.
It’s especially perfect for special occasions like date nights or holiday dinners when you want to impress your guests but don’t want to stress out.
And the aroma? pure bliss! it’s like a warm hug for your kitchen.
Lastly, if you consider it against raw garlic, roasted garlic wins hands down. the flavor is milder and sweeter, making it a great addition even for those who might typically shy away from garlic.
So, are you ready to dive in and discover the magic of roasted garlic? You won't regret it! Let’s check out what you need to get started, shall we?
Ingredient List
- 1 whole head of garlic
- 1-2 tablespoons of olive oil (extra virgin is best)
- Salt (about ½ teaspoon, but adjust to taste)
- Black pepper (freshly cracked, if you’re feeling fancy)
Grab those and let's roast! you won’t just be cooking; you will be transforming this bulb of garlic into something mouthwateringly good.
Happy roasting, and get ready for a flavor explosion that will take your meals from zero to hero!
Your Essential Ingredients Guide: Level Up Your Cooking
When it comes to cooking, knowing your essentials can really make or break your meals. seriously, the right ingredients can turn a blah dish into something heavenly kind of like roasting a clove of garlic !
Trust me, once you get that sweet, buttery goodness, you'll be finding all sorts of uses for roasted garlic .
So grab your apron, and let’s dive into this guide!
Premium Core Components
First off, let’s chat about quality ingredients . you don’t need to break the bank, but choosing the good stuff really pays off in flavor.
When you’re on the hunt for garlic, look for firm bulbs with tight skins; the papery outer layer should be intact, signaling freshness .
When it comes to storage , keep your garlic in a cool, dark place for maximum shelf life about three to six months .
Just don't throw it in the fridge; that’s too much moisture for it!
Speaking of which, for the ultimate in flavor, roasting garlic takes raw cloves on a culinary journey from sharp to sweet delight .
And if you think it’s just little cloves going to the oven, wait until you squeeze that golden goodness onto crusty bread!
Signature Seasoning Blend
Let’s move on to that magical thing we call seasoning. a good spice blend can lift dishes to new heights.
Think about classic combos like italian herbs basil and oregano are a no-brainer! but don’t sleep on companions like fennel seeds and cumin, too.
They add layers of flavor that are like a warm hug in your mouth.
For those times you might want a touch more pizzazz, sprinkle in some smoked paprika or cayenne pepper for a kick that’ll have your taste buds dancing.
And when you’re cooking, take note of regional variations. you might use creole seasoning for that cajun flair or garam masala for an indian twist on your classic roast.
Smart Substitutions
Uh-oh, out of an ingredient? no worries! that’s when the art of smart substitutions kicks in. in a pinch, if you don’t have garlic, try using garlic powder or even shallots.
While it’s not the same, it can save your dish from being too bland.
For dietary restrictions, coconut oil can replace butter in most recipes. if a friend is gluten-free, you can use almond flour in place of regular flour.
Just remember that a little bit of experimentation goes a long way this is your chance to get creative!
Kitchen Equipment Essentials
Now let’s talk about the tools of the trade . you don’t need a fancy kitchen to whip up delicious meals.
For roasting a head of garlic, just a baking dish or aluminum foil will do the trick. and while the classic roasting method is foolproof, you could also opt for a dutch oven or air fryer for quicker results.
There are always alternatives!
But let’s not forget prep equipment: a sharp knife and a good cutting board go a long way. they’ll make your chopping sessions feel less like a chore and more like a cooking party.
Flipping the Script
At the end of the day, all these tips and tricks can transform your cooking. imagine making a meal where each ingredient is ensoiastic about its role a star studded ensemble, if you will.
You might even impress yourself along the way!
As we gear up to dive into some delicious roasted garlic recipes that will spice up your dinners, remember that cooking is all about love, creativity, and maybe a splash of wine.
So pour yourself a glass, roll up those sleeves, and let’s create something beautiful together!
When you’re ready, grab your ingredients, and we’ll get roasting!
Professional Cooking Method: Elevate Your Culinary Game
Okay, let’s talk about something that’s super essential in the kitchen roasting a clove of garlic. seriously, if you haven’t tried it yet, you’re missing out!
It’s such a simple technique, and it can transform your dishes from “meh” to “omg, what’s that amazing flavor?” roasting garlic brings its pungent and sharp flavor to a whole new level of sweet and buttery goodness.
So let’s dive into the process, shall we?
Essential Preparation Steps
Before we even think about throwing that garlic in the oven, we’ve got to get our ducks in a row. Here are some essential steps to get you organized:
Mise en place details: this fancy french term just means “everything in its place.” gather all your ingredients one whole head of garlic, olive oil, and seasonings before starting.
It makes everything smoother!
Time management tips: roasting takes time, so plan for about 40- 50 minutes total. keep an eye on that clock while you prep other ingredients, like cooking some pasta or whipping up a creamy spread.
Organization Strategies: Have your baking dish or foil ready. You don’t want to be scrambling for tools while that garlic is waiting in limbo.
Safety Considerations: Always be careful with sharp knives and hot ovens. Don’t rush; it’s not a race!
Step-by-step Process
Now let’s break it down with clear, numbered instructions, because who doesn’t love that?
Preheat the Oven: Set it to 400° F ( 200° C) . This is your starting line!
Prepare the Garlic: Slice the top off the garlic bulb it’s about a ¼ inch off. This exposes those sweet cloves.
Drizzle with Olive Oil: Give it a good coat! About 1-2 tablespoons will do. It’s like giving your garlic a spa day.
Season: Sprinkle some salt and maybe a dash of black pepper if you’re feeling fancy.
Wrap or Place in a Dish: You can wrap it in aluminum foil or place it in a baking dish covered with foil. Both work wonders.
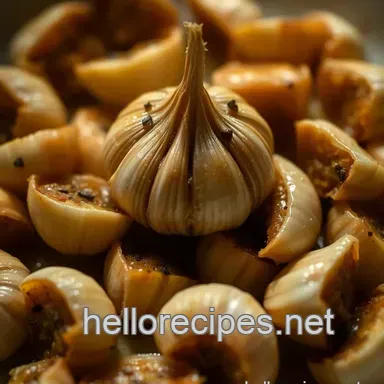
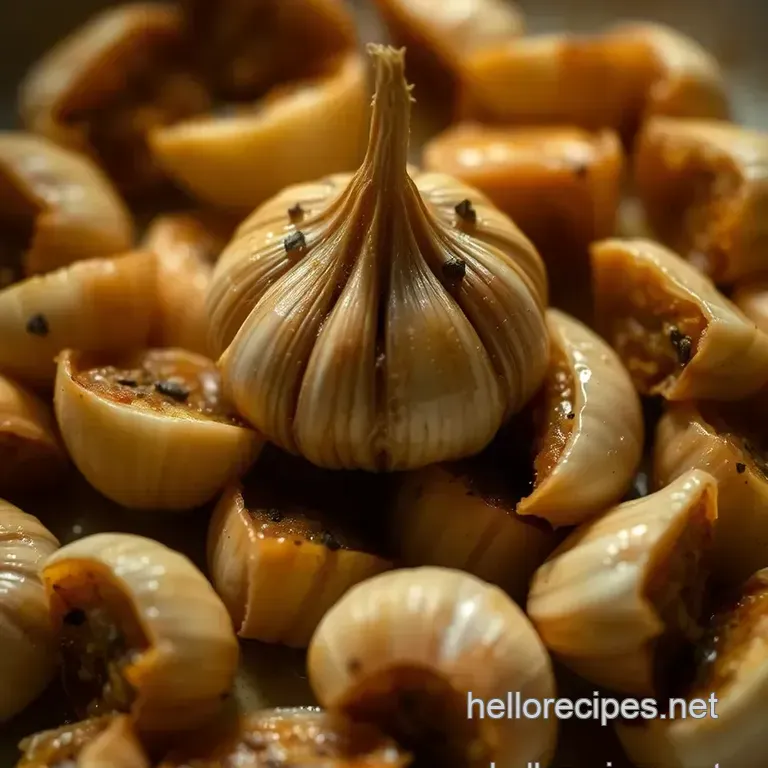
Roast the Garlic: Pop it in the oven for 30- 40 minutes until the cloves are soft and golden brown. Trust me, your kitchen will smell heavenly!
Cool and Extract: After roasting, let it cool a bit. Then gently squeeze those beautiful roasted cloves out.
Use or Store: Enjoy fresh in a dish, or store it for later in an airtight container.
Expert Techniques
Want to take your garlic game to the next level? Here’s how:
Perfect Temperature Control: Roasting at 400° F ( 200° C) allows for that lovely brownness without burning. Keep checking after the 30-minute mark.
Timing Precision: If you’re not sure when it’s done, take a peek! You want the cloves to be squishy and caramelized.
Visual Cues: You’ll know it’s done when it’s golden brown and smells nutty. It should almost feel like a soft pillow!
Troubleshooting Tips: If your garlic doesn’t seem to be cooking right, don’t panic! Just give it a little more time. Patience is key.
Success Strategies
No one wants to waste time in the kitchen making mistakes. Avoid these common pitfalls:
Undercooked Garlic: Make sure it’s roasted enough to bring out that rich, sweet flavor.
Over seasoning: A pinch of salt works wonders, but too much can ruin it. Just a little will complement, not overwhelm.
Storage Issues: If you refrigerate it, drizzle some extra olive oil to keep it moist. Nobody loves dry garlic!
make-ahead Options: You can roast garlic ahead of time and store it! It keeps well in the fridge for up to a week, plus it’s super handy for quick meals.
So there you have it! roasted garlic is such a versatile ingredient that you can toss in mashed potatoes, thicken pasta sauces, or spread on crusty bread like a total champ.
Honestly, once you start exploring all the ways to use roasted garlic, there’s no stopping you!
In conclusion, this humble clove can turn into a star ingredient in roasted garlic recipes for dinners . Now, let’s move into some additional information that will make your garlic game even more solid!
Additional Recipe Information
Alright, my friends, let’s dive deeper into this heavenly roasted garlic experience. ever found yourself wondering what to do with roasted garlic? you’re not alone! trust me, i’ve been there, and i’m here to share some of my hard won wisdom.
Pro Tips & Secrets
First up, pro tips ! honestly, the key to roasting a clove of garlic perfectly lies in getting it nice and soft.
I’ve made the mistake of pulling it out too early, thinking it would still taste awesome. spoiler: it didn’t. when you’re cooking, make sure you’re roasting at 400° f ( 200° c) for about 30- 40 minutes until those cloves are golden brown.
Also, don’t skimp on the olive oil! seriously, it’s your best buddy here. so drizzle away, and don’t forget to sprinkle some salt and maybe a pinch of pepper.
Oh, and if you’re feeling adventurous, try adding some herbs like thyme or rosemary. they’ll take those roasted peeled garlic cloves to a whole new level.
Perfect Presentation
Now let’s talk presentation . plating is everything, am i right? it’s like putting on the final touches to your outfit before stepping out.
After you’ve squeezed the roasted garlic out of its skin, spread the creamy goodness onto some crispy bruschetta . a sprinkle of fresh parsley or chives on top will really make it pop!
When it comes to colors, think about how are you serving it. if you’re pairing it with pasta or mashed potatoes, a hint of green on top will make the dish more visually appealing.
No one wants to dig into a bland looking plate, right?
Storage & make-ahead
Here’s a quick tip for those of you who like to meal prep: you can totally make a batch of roasted garlic in advance ! once it cools, store it in an airtight container in the fridge for up to a week.
I like to drizzle a little extra olive oil on top to keep it nice and moist.
And if you’re wondering about reheating, just pop it in the oven at 350° f ( 175° c) for about 10 minutes .
This way, you’re bringing that delicious aroma back to life without turning it into a rubbery mess.
Creative Variations
If you’re the kind of cook who loves to experiment (me, me, me!), there are so many creative variations you can try.
For a spicy kick, toss in some chili flakes before roasting. want a zesty pop? add some lemon slices alongside your garlic.
The world’s your oyster!
And if you're watching your diet, no worries. Just use fewer cloves when you're deciding on how to use roasted garlic — you can still pack that flavor punch without overdoing it.
Complete Nutrition Guide
Time for a little nutrition rundown! each head of roasted garlic has about 35 calories and only 1g of protein .
But don’t let that fool ya! these roasted garlic cloves recipes can have fantastic health benefits. they are known to be great boosters for your immune system and have heart health benefits too.
Just remember, moderation is key. stick to reasonable portions about 1-2 cloves per serving will do.
Wrapping It Up
So, there you have it! a whole treasure trove of insider tips and ideas around roasting garlic. trust me when i say, once you master how to roast garlic cloves , it’s going to level up your cooking game.
From the basic techniques to the creative uses for roasted garlic, you’re set to impress anyone at the dinner table.
So grab that head of garlic and let it do its magic. You'll be spreading that sweet, buttery goodness on everything soon enough! Happy roasting, and may your kitchen be filled with that irresistible aroma of roasting peeled garlic in the oven ! Enjoy!
Frequently Asked Questions
What is the best way to prepare for roasting a clove of garlic?
To prep for roasting, simply slice off the top of the garlic bulb to expose the cloves, drizzle with olive oil, and sprinkle with salt and pepper. Wrap it in foil or place it in a baking dish to keep the moisture in. It's really that simple!
How long does roasting a clove of garlic take?
Roasting garlic typically takes about 30-40 minutes at 400°F (200°C). You'll know it's done when the cloves feel soft and look golden brown much like the color of a perfectly toasted marshmallow!
Can I roast minced garlic instead of a whole bulb?
While roasting a whole clove yields the best flavor, you can roast minced garlic on a baking sheet, but you'll need to keep an eye on it. It cooks much faster, around 10-15 minutes, so they don’t burn! Just be sure to spread it out evenly to prevent clumping.
How should I store roasted garlic?
You can store your roasted garlic in an airtight container in the fridge for up to a week. Drizzle a bit of olive oil over it before sealing to keep it moist. Just remember to use it within that week don't let it sit around like a forgotten biscuit at a tea party!
What can I do with leftover roasted garlic?
Leftover roasted garlic is a culinary treasure! You can mash it into butter for a flavourful spread, mix it into mashed potatoes, or stir it into sauces for a rich depth of flavour. It's like the cheeky addition to your roast dinner that everyone secretly loves!
Are there any health benefits to roasting garlic?
Yes, roasting garlic can make it more digestible than raw garlic, while still providing health benefits like boosting the immune system and reducing inflammation. Plus, it makes your dishes taste absolutely divine a win-win in anyone's book!
Heavenly Roasted Garlic A Flavorful Transformati