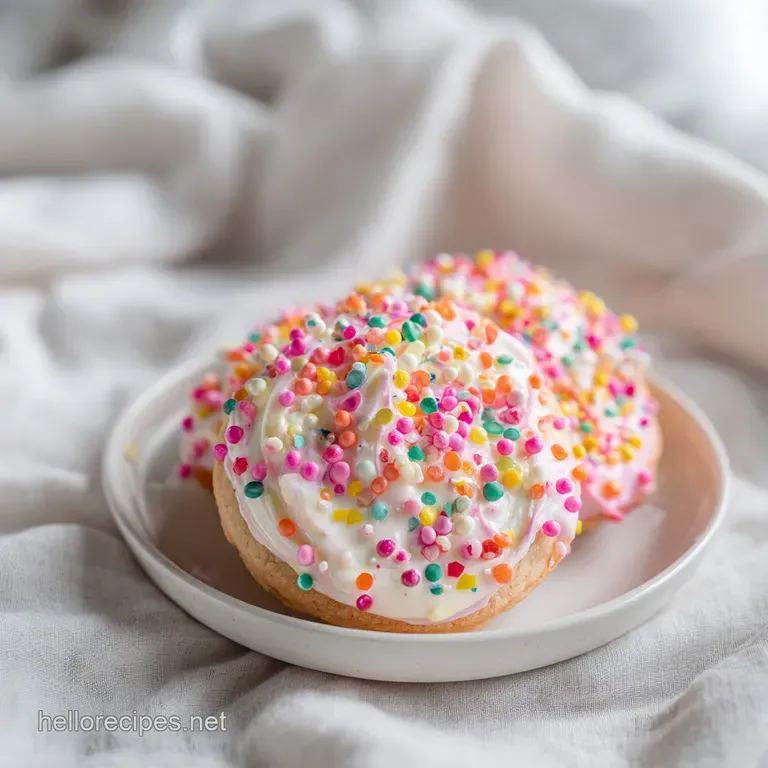
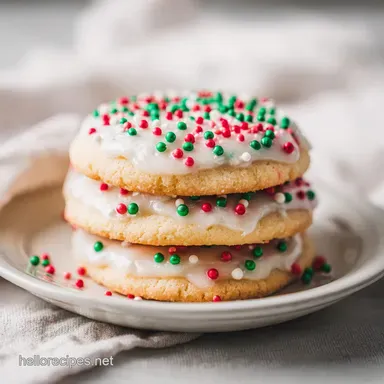
Sugar Cookie Icing: Silky and Glossy
- Time: Active 10 minutes, Passive 0 minutes, Total 10 minutes
- Flavor/Texture Hook: High gloss, shatter thin exterior with a silky, melt away center.
- Perfect for: Holiday gift boxes, bake sales, or rainy day decorating with kids.
- Achieve the Most Vibrant Sugar Cookie Icing
- Why This Glossy Glaze Works
- Precision Timing and Texture Checkpoints
- Component Analysis and Selection
- Hand Picked Ingredients for Visual Impact
- Essential Tools for Pristine Results
- Steps for a Silky Smooth Finish
- Pro Fixes for Common Decorating Hurdles
- Adjusting for Large Batch Gatherings
- Debunking Traditional Decorating Misconceptions
- Keeping Your Colors Fresh and Vibrant
- Finishing Touches for a Stunning Spread
- Recipe FAQs
- 📝 Recipe Card
Achieve the Most Vibrant Sugar Cookie Icing
Have you ever looked at a beautifully decorated cookie and wondered why the surface looks like polished glass while yours usually looks a bit matte or grainy? I remember standing in a small artisan bakery in Mexico City, staring at these incredible hand painted "calaveras" cookies.
The colors were so vibrant, and the surface had this incredible, mirror like sheen that caught the sunlight. I asked the baker how they got that shine, and she just winked and said, "It is all about the tension and the syrup."
Before I learned this specific method, my icing was always either too runny, turning my cookies into a puddle, or so thick it felt like I was spreading spackle on a wall. It was frustrating because the cookie itself was great, but the topping just didn't do it justice. We have all been there, right?
You spend hours baking the perfect base, only for the decoration to look like a Pinterest fail.
This Sugar Cookie Icing is the answer to all those decorating headaches. It uses a specific combination of ingredients that creates a "crust" on the outside while remaining tender underneath. Whether you want to flood a whole cookie or pipe intricate, colorful patterns, this is the reliable base you need.
It is vibrant, it is stable, and honestly, it tastes way better than the chalky, store-bought tubes. Let's get into what makes this particular version so special.
Why This Glossy Glaze Works
The magic of this Sugar Cookie Icing lies in how the ingredients interact to create surface tension. It is not just about mixing sugar and water, it is about creating a stable suspension that holds its shape.
- Surface Tension Mastery: The corn syrup acts as a glucose boost that interferes with sugar crystallization, resulting in a smooth, glass like finish that reflects light.
- Evaporation Control: As the water in the milk evaporates, the sugar molecules bond tightly at the surface, creating a thin, protective "shatter" layer that allows for stacking.
- Liquid to Solid Ratio: By using exactly 6 tablespoons of milk to 4 cups of sugar, we reach a saturation point where the icing is fluid enough to flow but viscous enough to stay on the cookie.
- Fat Stabilization: The tiny amount of fat in the whole milk helps the icing feel velvety on the tongue rather than just being a hit of pure, sharp sweetness.
Precision Timing and Texture Checkpoints
| Consistency | Visual Cue | Best For | Setting Time |
|---|---|---|---|
| 10 Second Flow | Drizzle disappears in 10 seconds | Flooding large surfaces | 4 to 6 hours |
| 15 Second Flow | Drizzle holds shape briefly | Outlining and lettering | 2 to 3 hours |
| 20 Second Flow | Drizzle stays on top | Intricate details/beading | 1 hour |
When you are aiming for that professional look, knowing which consistency to use is half the battle. If you are new to this, start with the 10 second flow for a smooth, flat surface. It is much more forgiving and allows the icing to self level, which means fewer visible mistakes for us to worry about!
Component Analysis and Selection
| Ingredient | Science Role | Pro Secret |
|---|---|---|
| Powdered Sugar | Structural Base | Always sift it twice to prevent "volcano" clogs in your piping tips. |
| Light Corn Syrup | Gloss Agent | This is the key to the mirror shine; never skip it if you want that professional "glow." |
| Whole Milk | Solvent/Softener | Provides a creamier mouthfeel and more opaque white base than using plain water. |
| Pure Vanilla | Flavor Depth | Use clear vanilla if you want a stark, snowy white icing, otherwise, the real stuff is best. |
Hand Picked Ingredients for Visual Impact
To get the best results, we need to be specific about what goes into the bowl. This isn't just about utility, it's about building layers of flavor and ensuring the texture is exactly where we need it to be.
- 4 cups powdered sugar (approx. 480g), sifted: Why this? Provides the body and sweetness while ensuring a completely smooth, lump free texture. (Substitute: Sifted organic powdered sugar, though it may be slightly less white).
- 6 tablespoons whole milk: Why this? The fat content ensures the icing doesn't become brittle or unpleasantly hard. (Substitute: For a plant based twist, use full fat oat milk for similar creaminess).
- 1/4 cup light corn syrup: Why this? Creates the characteristic shine and prevents the sugar from becoming grainy. (Substitute: Brown rice syrup, though it adds a slight amber tint).
- 1 teaspoon pure vanilla extract: Why this? Adds that classic, nostalgic aroma that balances the sugar's sweetness. (Substitute: Almond extract for a bright, fruity "wedding cake" flavor).
- 1 pinch salt: Why this? Essential for cutting through the sugar and making the flavors pop. (Substitute: Fine sea salt).
- 2 drops gel food coloring (optional): Why this? Gel provides vibrant color without thinning out our carefully balanced consistency. (Substitute: Natural beet or turmeric powders for earthy, muted tones).
For another fun project, you might want to try making Edible Cookie Dough which uses similar pantry staples but gives a totally different texture. It's a great way to use up extra vanilla or sugar you have lying around.
Essential Tools for Pristine Results

You don't need a professional kitchen, but a few specific items make this Sugar Cookie Icing much easier to handle. Trust me, trying to do this with just a spoon is a recipe for a mess.
First, a fine mesh sieve is non negotiable. If you have even one tiny clump of sugar, it will get stuck in the piping tip right when you are doing something delicate. It's the worst! You'll also want a sturdy whisk.
A silicone one works great because it doesn't incorporate too much air, which helps prevent those annoying little bubbles.
Speaking of bubbles, keep some toothpicks or a scribe tool nearby. These are your best friends for popping air pockets and moving the icing into tight corners. For the actual decorating, I highly recommend using small squeeze bottles or disposable piping bags.
If you use bags, you can just snip a tiny hole at the end, which gives you incredible control over the flow.
Steps for a Silky Smooth Finish
- Sift the powdered sugar into a large mixing bowl to ensure a smooth, lump free finish.
- Add the whole milk, light corn syrup, vanilla extract, and salt to the bowl.
- Whisk the ingredients together until completely smooth and glossy. Note: Stir slowly to avoid creating excess air bubbles.
- Test for consistency: lift the whisk and let the icing drizzle back. It should disappear into the surface in exactly 10 seconds (10 second consistency).
- Adjust as needed: add more milk by the teaspoon for a thinner flow, or more sifted sugar for a thicker piping consistency. Continue until the ribbon of icing melts back into the bowl seamlessly.
- Divide the icing into smaller bowls if you plan on using multiple colors.
- Add 1-2 drops of gel food coloring to each bowl and stir gently until the color is uniform and vibrant.
- Transfer icing to piping bags or squeeze bottles and apply to cooled cookies. Use a toothpick to pop any small air bubbles.
- Allow the cookies to sit undisturbed for at least 4 to 6 hours until the surface is firm and dry to the touch.
Pro Fixes for Common Decorating Hurdles
Why Your Sugar Cookie Icing Is Dull
If your icing looks matte or "chalky" once it dries, it's usually because it dried too slowly in a humid environment. The corn syrup helps with shine, but air circulation is just as important.
I once made a batch on a rainy day, and they never quite got that "pop." Now, I always run a small fan near my drying cookies to speed up the process.
Why Your Colors are Bleeding
This is the ultimate heartbreak. You pipe a beautiful red heart on a white background, and the next morning it's pink and blurry. This happens when the first layer isn't dry enough before adding the second, or if the icing is too thin.
| Problem | Root Cause | Solution |
|---|---|---|
| Icing is too runny | Excess milk added | Add sifted powdered sugar 1 tablespoon at a time until thick. |
| Bubbles on surface | Excessive whisking | Tap the bowl on the counter and let it sit for 5 mins before bagging. |
| Icing won't dry | High humidity | Use a small desk fan to circulate air around the drying cookies. |
Common Mistakes Checklist
- ✓ Never ice a warm cookie; the residual heat will melt the icing and make it run off the edges.
- ✓ Always sift the sugar, even if it looks fine in the bag clumps are the enemy of precision.
- ✓ Keep a damp cloth over your bowls of icing while working to prevent a crust from forming.
- ✓ Use gel colors instead of liquid drops to maintain the thick, velvety consistency.
- ✓ Let the icing "rest" in the piping bag for a few minutes to let air bubbles rise to the top.
Adjusting for Large Batch Gatherings
Scaling this Sugar Cookie Icing is pretty straightforward, but you have to be careful with the liquids. If you are doubling the recipe to 8 cups of sugar, don't just dump in double the milk immediately.
For a half batch (12 servings), use 2 cups of sugar, 3 tablespoons of milk, and 2 tablespoons of corn syrup. When doubling or tripling, I recommend adding the milk one tablespoon at a time once you hit the 3/4 mark. It is much easier to thin out a thick icing than it is to thicken a soup like mess.
If you find yourself with way too much icing, you can actually use the excess as a dip for fruit or crackers waste not, want not!
If you are making a massive batch for a party, you might want to check out my sugar cookie recipe to make sure you have enough bases to cover with all that glorious glaze.
Debunking Traditional Decorating Misconceptions
One big myth is that you need "Royal Icing" (which uses egg whites or meringue powder) to get a hard finish. That's simply not true! This corn syrup version gets plenty firm for stacking and shipping, but it doesn't have that "break your tooth" hardness that some royal icings do.
Another misconception is that you have to use clear vanilla. While clear vanilla keeps the icing a pure, snowy white, the flavor is often a bit artificial. I prefer using high-quality pure vanilla and just adding a tiny drop of violet food coloring if the icing looks too yellow.
The violet neutralizes the yellow tones and makes it look bright white. It's a total artist's trick that works perfectly in the kitchen.
Keeping Your Colors Fresh and Vibrant
Storage is key because sugar is a magnet for moisture. If you have leftover icing, place it in an airtight container with a piece of plastic wrap pressed directly against the surface of the icing. This prevents a crust from forming.
- Fridge: Store in an airtight container for up to 1 week. You'll need to give it a good stir when you take it out, as it might separate slightly.
- Freezer: Not recommended for the icing alone, as the texture can become grainy once thawed. However, iced cookies freeze beautifully! Just wait until they are completely dry, layer them with parchment paper, and freeze for up to 3 months.
- Zero Waste: If you have leftover colorful icing, don't toss it! I like to pipe small "dots" or stars onto parchment paper and let them dry. These become homemade "sprinkles" or "royal icing transfers" that you can use on future cakes or cupcakes.
Finishing Touches for a Stunning Spread
Mastering the Marble Effect
If you want a look that is truly vibrant and multicultural, try the marbling technique. Dip a toothpick into a contrasting gel color and swirl it through the white icing once it's on the cookie. It looks like high end marble or traditional tile work.
This works best while the icing is still very wet (the "wet on-wet" technique).
Maximizing the Shine
To really make that "shatter" layer glow, let your cookies dry in a cool, dry place. If you're in a rush, a dehydrator on the lowest possible setting (around 95°F or 35°C) for about 30 minutes can set the surface and give it an incredible sheen.
Just be careful not to melt the butter in the cookies themselves!
Natural Flavor Twists
Since I love fusion flavors, I often swap the vanilla for other extracts. A drop of rosewater or orange blossom water creates a floral, sophisticated icing that pairs beautifully with a buttery cookie.
Or, try adding a pinch of ground cardamom directly into the icing for a warm, spiced scent that feels incredibly cozy during the winter months.
Decorating should be fun, not stressful. Once you get the hang of the "10 second rule" for consistency, you'll be able to create cookies that look like they came straight from a high end bakery. Just remember to breathe, keep your toothpicks handy, and don't worry about making every single one look identical.
The "imperfections" are what let people know they were made with love in your own kitchen. Let's get to decorating!

Recipe FAQs
What is the best icing to make for sugar cookies?
A royal style icing made with powdered sugar and light corn syrup is the gold standard. It provides the perfect balance of a smooth, professional finish that sets firmly enough to stack your cookies without smudging.
How to make icing sugar for sugar cookies?
Sift four cups of powdered sugar into a large mixing bowl to remove all lumps. This initial sifting is the secret to achieving a silky, high end texture rather than a grainy one.
How do you make icing for a cookie?
Whisk your sifted sugar with whole milk, light corn syrup, vanilla, and salt until glossy. If you enjoyed mastering this smooth emulsion, you can apply similar whisking techniques to ensure a perfect texture in our Basic Cookie Dough recipe.
What is the icing that hardens on cookies?
This is a corn syrup based sugar icing that forms a hard, shiny shell as it dries. It relies on the correct ratio of sugar to milk; if your icing feels too soft, simply whisk in more sifted sugar to increase the density.
Is it true I can use liquid food coloring instead of gel?
No, this is a common misconception. Liquid drops contain extra water that can ruin your 10-second consistency, whereas gel colors maintain the thick, velvety body of the icing.
How to fix icing that is too thin?
Add more sifted powdered sugar one tablespoon at a time until you reach the desired thickness. Test your progress by lifting your whisk; the icing should drip back and vanish into the surface in exactly 10 seconds.
Can I decorate the cookies while they are still warm?
No, you must wait for the cookies to cool completely. Residual heat will immediately melt your icing, causing it to run off the edges and lose that clean, defined look.
Glossy Sugar Cookie Icing
Ingredients:
Instructions:
Nutrition Facts:
| Calories | 90 kcal |
|---|---|
| Protein | 0.1 g |
| Fat | 0.1 g |
| Carbs | 22.7 g |
| Fiber | 0 g |
| Sugar | 21.8 g |
| Sodium | 6 mg |
