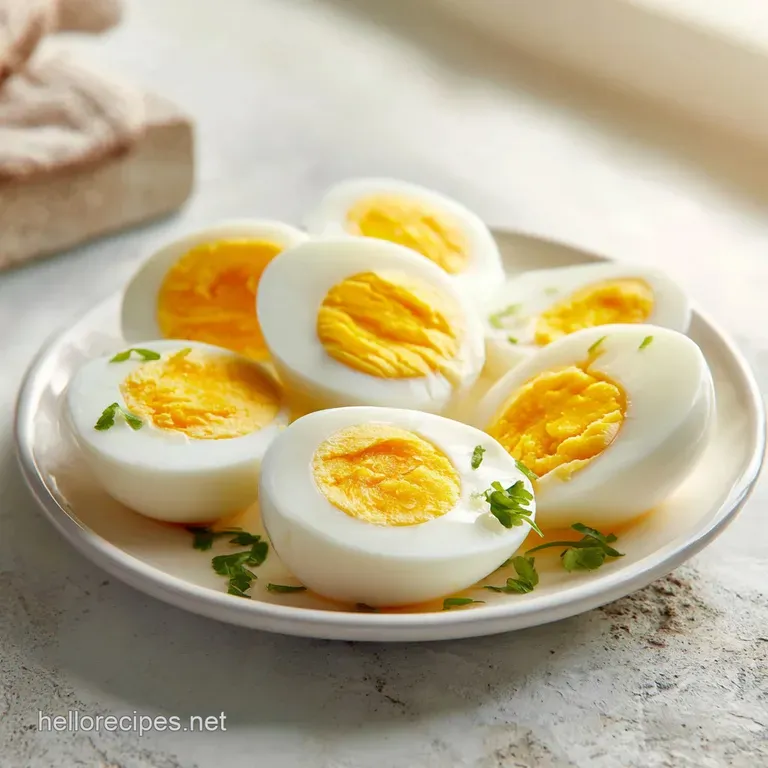
Hard Boiled Eggs: Easy Peel, No Green Ring
- Time: Active 5 mins, Passive 20 mins, Total 25 mins
- Flavor/Texture Hook: Velvety, creamy yolks with no green ring and a clean peel.
- Perfect for: Meal prepping, quick snacks, salads, or busy weeknight meals.
- The Secret to Perfect Hard Boiled Eggs
- Essential Hard Boiled Eggs Ingredients
- Gear for Speedy Egg Prep
- Cooking Hard Boiled Eggs Step-by-Step
- Fixing Common Egg Mishaps Quickly
- Level Up Your Hard Boiled Eggs
- Myths About Hard Boiled Eggs
- Keeping Hard Boiled Eggs Fresh
- Quick Ways to Enjoy Eggs
- Hard Boiled Eggs FAQs
- 📝 Recipe Card
The Secret to Perfect Hard Boiled Eggs
Ever wonder why sometimes your "Hard Boiled Eggs" peel like a dream, and other times they fight you every step of the way, taking half the egg white with the shell? Or why the yolk sometimes has that sad, greenish gray ring?
It's a common kitchen frustration, but what if I told you there's one simple, game changing step that fixes almost all of these issues? It's not about magic, it's about method.
I used to dread making them, especially when I needed a big batch for meal prep. I'd stand over the stove, trying to time it perfectly, only to end up with a mix of undercooked, overcooked, and stubbornly unpeelable eggs.
Then, after trying what felt like a hundred different tricks, I finally landed on a system that works every single time for perfect Hard Boiled Eggs. It's quick, healthy, and frankly, makes you feel like a kitchen wizard.
This isn't some complex culinary journey; it’s an efficient plan for getting those wonderfully firm, vibrant yolks and super easy peel shells without a fuss. We're talking minimal active time, maximum delicious results.
Get ready to ditch the frustration and embrace the ease of a truly reliable Hard Boiled Eggs Recipe.
Why This Method Works Its Magic
- Gentle Start
- Placing eggs in cold water before heating prevents thermal shock, which can cause shells to crack and whites to burst. It's a calmer beginning for a better outcome.
- Residual Heat Cooking
- Removing the pan from the heat as soon as it boils stops aggressive bubbling, which can damage whites. The trapped residual heat gently cooks the egg through, resulting in a tender, even texture.
- The Ice Bath Advantage
- Immediately transferring the cooked eggs to an ice bath halts the cooking process, preventing the yolk from overcooking and forming that unappealing green gray ring. This rapid temperature drop also causes the egg white to contract, separating it cleanly from the shell membrane, making for super Hard Boiled Eggs Easy Peel.
| Doneness Goal | Stand Time in Hot Water | Yolk Consistency |
|---|---|---|
| Jammy Eggs | 6-7 minutes | Soft, runny center |
| Creamy Eggs | 8-9 minutes | Custardy, moist center |
| Firm Eggs | 10-12 minutes | Fully set, classic hard yolk |
Ingredient Deep Dive
Even with something as simple as eggs, understanding the role of each component helps you get the best outcome.
| Ingredient | Science Role | Pro Secret |
|---|---|---|
| Large Eggs | Protein source; structure changes with heat. | Older eggs (about a week or two past purchase) tend to peel much easier than very fresh ones due to changes in pH and the weakening of the inner membrane. |
| Cold Water | Conductor of heat; prevents shock. | Starting with cold water allows the egg to warm up gradually with the water, minimizing cracks. It's essential for uniform cooking from the outside in. |
| Ice | Rapid cooling agent; stops cooking. | The immediate ice bath is crucial. It stops sulfur in the egg white from reacting with iron in the yolk, preventing the green ring, and helps the membrane separate for a perfectly smooth peel. |
Essential Hard Boiled Eggs Ingredients
You only need three things to master the Perfect Hard Boiled Eggs. Keep it simple, keep it speedy.
- 6 large eggs Why this? Standard size for consistent cooking results.
- Water Why this? Essential for boiling and cooking eggs.
- Ice Why this? Critical for stopping the cooking process and easy peeling.
Gear for Speedy Egg Prep
To streamline your Hard Boiled Eggs Stove Top method, you only need a few basic kitchen tools. Efficiency is key!
- Medium Saucepan with Lid: Big enough to hold your eggs in a single layer, crucial for even cooking.
- Slotted Spoon or Spider: For gently placing and removing eggs without cracking.
- Large Bowl: For preparing the essential ice bath.
Cooking Hard Boiled Eggs step-by-step
This method for How To Cook Perfect Hard Boiled Eggs focuses on precision for a flawless result every time.
Prep Flow: Getting Ready (5 minutes)
- Gently place the 6 large eggs in a single layer at the bottom of a medium saucepan.
- Fill the saucepan with cold water, ensuring the water covers the eggs by at least 1 inch (2.5 cm). This ensures all eggs cook evenly.
- Prepare a large bowl with plenty of ice and cold water; this will be your ice bath, ready for action.
Cooking Flow: The Heat Phase (12 minutes)
- Place the saucepan on high heat and bring the water to a rolling boil. Until vigorous bubbles break the surface.
- As soon as the water reaches a full rolling boil, immediately remove the pan from the heat. This is a critical step to prevent overcooking.
- Cover the pan tightly with the lid. Let the eggs stand in the hot water for 10-12 minutes for a fully firm, classic hard boiled yolk. Note: Adjust time for desired doneness: 6-7 minutes for jammy, 8-9 minutes for creamy.
Finish Flow: Cooling & Peeling (8-10 minutes)
- Immediately transfer the cooked eggs to the large bowl filled with ice water (your ice bath) to stop the cooking process. Use your slotted spoon to avoid splashing.
- Let them cool completely for at least 5-10 minutes before peeling. This rapid temperature change helps prevent the green gray ring and ensures Hard Boiled Eggs Easy Peel.
- For effortless peeling, gently crack the egg all over, then roll it between your hands to loosen the shell. Start peeling under cool running water.
The Critical Ice Bath
Seriously, don't skip the ice bath. It’s the secret weapon for getting those beautifully vibrant yolks without the dreaded green ring and making peeling a breeze. The instant shock locks in the perfect texture and color.
Peeling Your Perfect Hard Boiled Eggs
Once the eggs have chilled in the ice bath for at least 5 minutes, give one a gentle tap on a hard surface. Roll it around to create small cracks all over the shell, then start peeling from the wider end. The membrane should come away cleanly, especially if you've used older eggs.
Fixing Common Egg Mishaps Quickly

Even with the best instructions, things can go a little sideways. Don't worry, these quick fixes will get you back on track for Perfect Hard Boiled Eggs.
My Eggs Won't Peel!
This is one of the most common and frustrating problems with making Hard Boiled Eggs. It usually means you're losing precious egg white along with the shell, making for a messy and unappetizing result.
| Problem | Root Cause | Solution |
|---|---|---|
| Shells stick and tear whites | Very fresh eggs, inadequate ice bath, or peeling too soon. | Use eggs that are at least 1 week old. Ensure a full ice bath for at least 5 minutes. Crack and roll the egg gently before peeling. Peeling under running water helps too. |
| Green gray ring around yolk | Overcooking, which causes sulfur and iron compounds to react. | Stop cooking immediately once the water boils. Follow the exact standing times. Transfer eggs to an ice bath without delay to halt the cooking process. |
| Cracked shells while boiling | Eggs too cold when put in hot water, or water boiling too aggressively. | Start eggs in cold water. Don't let water boil vigorously once covered; the residual heat does the work. Avoid overcrowding the pot. |
Common Mistakes Checklist:
- ✓ Start with eggs in cold water (prevents cracking).
- ✓ Remove from heat immediately once boiling (stops overcooking).
- ✓ Don't skip the ice bath (crucial for peel and yolk color).
- ✓ Use eggs that aren't super fresh (older eggs peel easier).
Level Up Your Hard Boiled Eggs
Once you've mastered the basic Hard Boiled Eggs Recipe, you can easily tweak it for different flavors or dietary needs. These are quick changes for maximum impact.
For Spiced & Marinated Eggs
After peeling, place your Hard Boiled Eggs in a jar with a simple marinade: soy sauce, rice vinegar, a pinch of sugar, and a few slices of ginger or a dried chili. Let them sit in the fridge for a few hours or overnight. These are fantastic for bento boxes or an umami packed snack.
For Deviled Egg Innovations
While the classic deviled egg is a hit, try adding a tiny dollop of pesto, a pinch of curry powder, or finely chopped smoked salmon to the yolk mixture. These little touches elevate your appetizer.
For dairy-free Considerations
Good news - Hard Boiled Eggs are naturally dairy-free! Enjoy them as is for a healthy, protein rich snack. For variations, ensure any additions like mayonnaise are also dairy-free.
Myths About Hard Boiled Eggs
There are a few old wives' tales floating around the kitchen about making Hard Boiled Eggs. Let's bust a couple of them for efficient cooking.
- Myth: Adding vinegar or salt to the water helps with peeling. Truth: While it might help prevent a cracked egg from leaking too much white, it doesn't significantly aid in peeling the shell from an intact egg. The ice bath and egg age are far more impactful.
- Myth: Boiling eggs for a long time makes them "harder boiled." Truth: Over boiling actually makes the whites rubbery and gives the yolk that unappetizing greenish gray ring. Longer isn't better; precise timing and a rapid cool down are key for a tender white and creamy yolk.
Keeping Hard Boiled Eggs Fresh
These Hard Boiled Eggs are fantastic for meal prepping because they last well, making your week's healthy snacks or quick additions to meals incredibly convenient.
- Storage
- Store peeled or unpeeled Hard Boiled Eggs in an airtight container in the refrigerator for up to 7 days. If storing unpeeled, you can place them directly into a bowl in the fridge. For peeled eggs, a damp paper towel in the container can help keep them moist.
- Freezing
- While you can technically freeze hard boiled egg yolks, the whites become rubbery and watery upon thawing, losing their texture. For this reason, freezing whole Hard Boiled Eggs is generally not recommended. It's much better to enjoy them fresh within that week.
- Zero Waste
- Don't toss those eggshells! They're excellent for composting, adding calcium to your garden soil. If you crush them finely, you can even add them to your coffee grounds before brewing for a smoother taste and mineral boost.
Quick Ways to Enjoy Eggs
Hard Boiled Eggs aren't just for eating plain; they're a versatile protein powerhouse ready for anything from a fast breakfast to a speedy dinner side. For another fast, high protein meal, you might also enjoy my Perfectly Boiled Eggs recipe.
For a Protein Packed Salad
Chop your Hard Boiled Eggs and add them to any green salad. They're particularly great with a classic Cobb, a simple vinaigrette, or mixed into a tuna salad for extra heft. It’s a fast, nutritious lunch.
For Wholesome Avocado Toast
Mash ripe avocado onto your favorite toast, then slice or dice Hard Boiled Eggs on top. A sprinkle of everything bagel seasoning or red pepper flakes adds a quick burst of flavor. This makes a healthy, satisfying breakfast or snack in minutes.

Hard Boiled Eggs FAQs
How long do you boil a hard egg for?
Boil for 0 minutes; steep for 10-12 minutes. Bring the water to a full rolling boil, then immediately remove the pan from the heat, cover it tightly, and let the eggs stand undisturbed for 10 to 12 minutes for a fully firm yolk.
What is the best method for hard boiled eggs?
The hot water steep method is best. Place eggs in a saucepan, cover with cold water, bring to a rapid boil, then remove from heat and cover to let them stand for the final cooking time. This technique prevents overcooking and results in easy peeling.
What is the 10 5 10 rule for boiling eggs?
There is no established 10-5-10 rule for this method. Our reliable timing for a completely firm yolk involves bringing the water to a boil (the first 10 minutes are heat-up time), removing from heat, and then allowing the eggs to steep for 10 to 12 minutes.
Do you put eggs in boiling water or cold water?
Start the eggs in cold water. Gently place the eggs in a saucepan, then cover them with cold water ensuring at least one inch covers the eggs before placing the pan on high heat. Starting cold allows the eggs to heat gradually, reducing cracking.
Why do my hard boiled eggs have a green ring around the yolk?
This ring is caused by overcooking. The sulfur in the white reacts with the iron in the yolk when exposed to excessive heat for too long, creating the harmless but unappealing ferrous sulfide ring. Immediately plunge the eggs into an ice bath to stop this reaction.
How can I ensure my hard boiled eggs peel easily?
Use a rapid ice bath immediately after cooking. After the 10-12 minute steep time, transfer the eggs directly into ice water for at least 5-10 minutes; the swift temperature drop shocks the membrane away from the egg white. If you master temperature control here, you can also achieve perfect results when making delicate sauces, similar to how we balance heat in our Homemade Eggs Benedict Recipe.
Can I peel hard boiled eggs days ahead of time?
No, peeling ahead reduces freshness and increases drying. Peeled eggs dry out quickly; they are best peeled the day of serving or within 1-2 days if stored submerged in water in the refrigerator. For a longer lasting pickled version, try our Classic Pickled Eggs Recipe.
Foolproof Hard Boiled Eggs

Ingredients:
Instructions:
Nutrition Facts:
| Calories | 77 kcal |
|---|---|
| Protein | 6.3 g |
| Fat | 5.3 g |
| Carbs | 0.6 g |
| Sodium | 62 mg |
