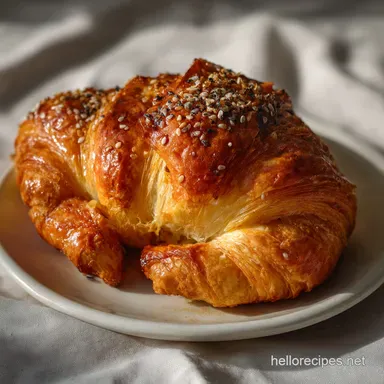
Flaky Gluten Free Croissant Recipe

- Time: Active 1 hour 40 mins, Passive 11 hours 30 mins, Total 13 hours 10 mins
- Flavor/Texture Hook: Shatter crisp golden crust with a velvety, honeycomb crumb
- Perfect for: Sophisticated weekend brunches or holiday breakfast celebrations
- Gluten Free Croissant Recipe for a Flaky Breakfast Treat
- The Science of Flaky Architecture
- Ingredient Analysis and Molecular Role
- Procuring High Quality Elements
- Essential High Performance Tools
- Executing the Lamination Process
- Correcting Common Technical Failures
- Innovative Recipe Variations
- Conservation and Waste Reduction
- Creating Sophisticated Flavor Pairings
- Challenging Common Culinary Assumptions
- Recipe FAQs
- 📝 Recipe Card
Have you ever stood in a bakery, watching the light catch the gold leaf layers of a pastry, and felt a pang of exclusion? I spent years trying to crack the code of the "gluten-free brick" before realizing that we don't need to fight chemistry, we need to lean into it.
Discover how to make a delightful, flaky gluten-free croissant for a special breakfast.
This isn't just a recipe; it's a piece of culinary technology designed to solve the structural failures of gluten-free baking. We’re moving away from the gritty, dense results of the past and toward a future where "gluten-free" is no longer a compromise.
Trust me, once you hear that first crackle as you pull a warm pastry apart, you'll see why the patience pays off.
Right then, let's get into the mechanics of this breakfast treat. We aren't just mixing flour and water; we're building a structural cage for steam. By the time we’re done, you’ll have a tray of pastries so light they practically hover off the cooling rack.
Ready to transform your kitchen into a center for sustainable gastronomy?
gluten-free Croissant Recipe for a Flaky Breakfast Treat
The Science of Why it Works The psyllium husk powder creates a hydrocolloid network that mimics gluten's elasticity, allowing the dough to stretch without tearing.
Meanwhile, the high fat European butter undergoes a phase change during baking, where its water content evaporates into steam, forcing the thin layers of dough to puff and separate.
Chef's TipsFreeze your rolling pin: Place your metal or marble rolling pin in the freezer for 15 minutes before lamination to prevent the butter from melting.
The "Windowpane" Hack: Even without gluten, your dough should be smooth; if it’s shaggy, let it rest for 10 minutes to allow the starches to fully hydrate.
The Science of Flaky Architecture
The Psyllium Starch Structural Matrix
In traditional baking, gluten provides the "rubber band" effect. In this version, we use 15g Psyllium Husk Powder to create a biological scaffold. When combined with 300ml Filtered Water at 100°F, it forms a viscous gel.
This gel coats the 400g high-quality GF All Purpose Blend, giving it the tensile strength needed to hold layers of fat.
Cold Phase Butter Plasticity
The 250g High Fat European Style Butter must stay in a "plastic" state pliable but not greasy. If the butter reaches its melting point (around 90°F), it absorbs into the dough, and you lose the separation.
We aim for a temperature of 55°F to 60°F during the folding process to maintain distinct layers.
over High heat Steam Injection
When the dough hits a 400°F oven, the moisture in the butter and the dough flashes into steam. Because we have layered the fat so precisely, this steam has nowhere to go but up, pushing the dough layers apart. This creates the "honeycomb" cross section that defines a high-quality pastry.
Ingredient Analysis and Molecular Role
| Ingredient | Science Role | Pro Secret |
|---|---|---|
| Psyllium Husk Powder | Structural Scaffold | Use powder, not whole husks, for a smoother dough. |
| European Style Butter | Steam Generation | Higher fat content (82%) means less water and crisper layers. |
| Sorghum Flour | Flavor Complexity | Adds a subtle nutty note that masks the "starchiness" of GF blends. |
| Rapid Rise Yeast | Leavening | Provides the initial lift before the steam takes over in the oven. |
Procuring high-quality Elements
To achieve a bakery quality result, every gram matters. I recommend using [King Arthur Measure for Measure] or [Cup4Cup] for your 400g high-quality GF All Purpose Blend. These blends are specifically engineered with the right ratio of rice flour and starches to ensure a velvety crumb.
- 400g high-quality GF All Purpose Blend: The base of our structure. Why this? Provides the starch balance needed for a tender, non gritty bite.
- Sub: Authentic Foods Multi Blend (Similar starch to protein ratio).
- 50g Sorghum or Oat Flour: Adds protein and color. Why this? Sorghum provides a deeper, toasted flavor profile.
- Sub: Millet flour (yields a slightly sweeter, yellow toned crumb).
- 15g Psyllium Husk Powder: Our gluten substitute. Why this? Essential for elasticity and preventing the dough from crumbling during folds.
- Sub: Flax meal (Note: will result in a darker, denser texture).
- 250g High Fat European Style Butter: The lamination engine. Why this? Lower water content prevents the dough from becoming soggy.
- Sub: Vegan Miyoko’s Cultured Butter (Remains solid at room temp longer than oil based tubs).
- 40g Organic Cane Sugar: Feeds the yeast and aids browning. Why this? Provides a clean sweetness without the molasses heavy notes of brown sugar.
- Sub: Coconut sugar (Note: will darken the interior dough significantly).
- 10g Rapid Rise Yeast: For a quick, reliable lift.
- 8g Fine Sea Salt: To balance the richness.
- 300ml Filtered Water: Use lukewarm (100°F) for activation.
- 40g Unsalted Grass Fed Butter: Melted and cooled for the dough.
- 1 Large Egg: For the final wash.
- 1 tsp Honey: Enhances the golden sheen of the crust.
Essential High Performance Tools
- Digital Scale: This is non negotiable. Measuring flour by volume is the primary cause of pastry failure. I use an [Oxo Good Grips] scale for precision down to the gram.
- Lodge Cast Iron Baking Stone: While a sheet pan works, a preheated stone provides the thermal mass needed to "pop" the layers instantly.
- KitchenAid Stand Mixer: Using the paddle attachment helps integrate the psyllium gel without overworking your hands.
- French Rolling Pin: The tapered ends allow for better control over dough thickness than a handled pin.
Executing the Lamination Process

1. Integrating the Dry Matrix
Whisk together 400g GF All Purpose Blend, 50g Sorghum flour, 40g sugar, 8g salt, and 10g yeast in your [KitchenAid] bowl. Ensure the yeast doesn't touch the salt directly to prevent cell damage.
2. Hydrating the Dough Foundation
Whisk 15g psyllium powder into 300ml lukewarm water until a thick gel forms (about 1 minute). Add this gel and 40g melted butter to the dry ingredients. Mix on medium speed for 5 minutes until the dough is supple and pulls away from the sides.
3. Initial Fermentation and Chill
Place the dough in a lightly oiled bowl, cover with beeswax wrap, and let it rise in a warm spot for 1 hour. It won't double in size, but it should look puffy. Degas it gently, then wrap tightly and refrigerate for at least 4 hours (or overnight).
4. Constructing the Butter Block
Place 250g cold European butter between two sheets of parchment paper. Sprinkle with 10g GF flour. Beat it with your rolling pin until it becomes a pliable 7 inch square. This "plastic" state is the secret to a flaky breakfast treat.
5. Encasing the Fat Layer
Roll your chilled dough into a 10 inch square. Place the butter block diagonally in the center. Fold the corners of the dough over the butter like an envelope, sealing the edges tightly.
6. Executing the Letter Folds
Roll the dough into a 18x8 inch rectangle. Fold the bottom third up and the top third down, like a letter. Rotate 90 degrees and repeat. This is one "turn." Wrap and chill for 30 minutes. Perform 3 turns total.
7. Precision Shaping and Cutting
Roll the laminated dough to 1/4 inch thickness. Cut into long, skinny triangles (about 4 inches wide at the base). Stretch the tip slightly, then roll tightly from the base to the point.
8. Controlled Proofing Environment
Place croissants on a parchment lined tray. Brush with a mixture of 1 egg and 1 tsp honey. Let rise in a cool, draft free area for 2 hours until they look like puffed marshmallows and wobble slightly.
9. Thermal Application and Finish
Preheat your oven to 400°F. Bake for 10 minutes, then rotate the tray and reduce heat to 375°F. Bake for another 15 minutes until deep mahogany brown and the bottom sounds hollow when tapped.
Correcting Common Technical Failures
| Problem | Root Cause | Solution |
|---|---|---|
| Butter Leaking | Dough was too warm | Chill dough for 20 mins before continuing folds. |
| Dense/Gummy Center | Underproofed or underbaked | Ensure dough "wobbles" before baking; use an instant read thermometer (aim for 205°F). |
| Layers Shaking Loose | Butter was too cold/brittle | Let butter block sit at room temp for 5 mins before locking in. |
Why Your Croissants Shatter
If your pastry falls apart into dry crumbs, the hydration was too low. The psyllium needs every drop of that 300ml water to stay flexible. Next time, try increasing the water by 10ml or ensuring your flour blend isn't too heavy on cornstarch.
Avoiding the Butter Pool
I once made the mistake of proofing my croissants in a "warm" oven. The butter melted out before the dough could rise, leaving me with greasy biscuits. Keep the proofing temperature below 75°F. If your kitchen is hot, proof them in the fridge overnight for a slower, more controlled rise.
Innovative Recipe Variations
- The Savory Twist: Before rolling the triangles, brush with a thin layer of my 5Minute Liquid Gold recipe and sprinkle with Everything Bagel seasoning. The turmeric and garlic notes create a stunning contrast with the butter.
- Pain au Chocolat: Place two sticks of high-quality dark chocolate (70% cocoa) at the base of the triangle before rolling. The bitterness of the chocolate cuts through the richness of the pastry perfectly.
- Almond Cream Fill: Pipe a mixture of almond flour, sugar, and egg into the center of a baked, sliced croissant for a "twice baked" cafe style.
Conservation and Waste Reduction
Storage Management Keep fresh croissants in a paper bag at room temperature for up to 24 hours. For longer storage, wrap them individually in foil and freeze for up to 2 months.
To reheat, bake at 350°F for 8 minutes never use a microwave, or you'll lose that beautiful shatter.
Zero Waste Pastry Solutions Don't throw away the dough scraps from your triangle cuts! Roll them in cinnamon sugar and bake them alongside the croissants to make "pastry fries." Alternatively, stale croissants make the most incredible bread pudding.
Simply cube them, soak in a custard of eggs and milk, and bake until golden.
Creating Sophisticated Flavor Pairings
A croissant is a canvas for flavor. While a simple cup of espresso is classic, I love serving these as part of a larger, innovative brunch spread. The rich, buttery layers are the perfect foil for something salty and savory.
For a complete meal, consider serving these alongside my Cheesy Scalloped Potatoes recipe. The velvety cream sauce and tender potatoes provide a grounding weight to the airy pastry. Add a side of fresh berries or a sharp arugula salad to provide acidity and cut through the fat.
- If you want maximum shatter
- Freeze the shaped croissants for 20 minutes before baking to firm up the butter.
- If you want a softer crumb
- Increase the sugar by 10g to retain more moisture.
- If you want a deeper color
- Use 2g of instant espresso powder in the egg wash.
Challenging Common Culinary Assumptions
Searing Heat vs. Gentle Warmth
Many believe croissants should be proofed in a warm environment to "speed things up." Truthfully, a cool proof (around 68°F) is superior. It prevents the butter from softening too much, ensuring that when the heat finally hits, the layers stay distinct rather than merging into a single mass.
The Myth of "gluten-free Flour"
Not all blends are created equal. Many people assume a "1 to-1" blend will work for any recipe. In reality, lamination requires a specific balance of protein and starch. If your blend is too high in rice flour, it will be gritty; if it’s too high in potato starch, it will be gummy.
Adding that extra 50g of Sorghum flour is the "innovator's secret" to achieving the right structural integrity.
Fresh vs Shortcut Comparison
| Feature | This Fresh Recipe | store-bought GF Frozen |
|---|---|---|
| Texture | Multi layered, crisp | Bread like, dense |
| Ingredient Quality | Grass fed butter, no preservatives | Palm oil, stabilizers |
| Cost | Lower per unit | High premium price |
- 1. Water Temp
- Exactly 100°F. Too hot kills yeast; too cold stalls it.
- 2. Butter Block Thickness
- Exactly 1/2 inch. Any thinner and it will melt into the dough.
- 3. Oven Calibration
- Use an oven thermometer. If your oven is off by even 10 degrees, the steam won't trigger the "pop" required for those flaky layers.
Building this recipe is a masterclass in patience and technology. By understanding the science of the psyllium starch matrix, you're not just baking you're engineering a better breakfast. Trust the process, watch your temperatures, and enjoy the most rewarding flaky breakfast treat you've ever had.
Happy baking!

Recipe FAQs
What is the essential ingredient that replaces gluten's elasticity in this recipe?
Psyllium husk powder. This ingredient forms a hydrocolloid gel when mixed with water, creating a structural scaffold that mimics the tensile strength normally provided by wheat gluten.
Why must the European butter be kept cold (around 55°F to 60°F) during lamination?
Yes, temperature control is critical for flakiness. If the butter gets too warm, it melts and absorbs into the dough layers instead of staying distinct, which prevents the steam from puffing the pastry layers apart during baking.
Can I substitute the psyllium husk powder with ground flaxseed?
No, this substitution is strongly discouraged for texture. While flax can absorb liquid, it results in a much denser, darker crumb, fundamentally changing the desired airy texture of a croissant.
How long must the dough rest in the refrigerator before the lamination process begins?
A minimum of 4 hours is required, but overnight is better. Chilling allows the starches to fully hydrate within the psyllium matrix, making the dough easier to handle and preventing tearing when rolling out the butter.
What is the ideal final internal temperature I should aim for when checking for doneness?
Aim for 205°F internally. This temperature ensures the starches are fully cooked through and that the maximum amount of steam has been generated to create separation between the layers.
What can I serve with these rich croissants to balance the flavor profile?
Something acidic or slightly tart works best to cut the richness. These pair wonderfully as part of a larger spread; for example, you could serve them alongside something savory like my Black Eyed Peas Recipe: Classic Southern Hoppin John for an unexpected brunch fusion.
I am struggling with shaping my croissants; can this dough technique be used elsewhere?
Yes, the lamination technique is highly transferable. If you enjoyed mastering the precise folding and chilling required here, see how that same skill of temperature control is vital when achieving high rise results in our Yorkshire Pudding Recipe: Classic High Rise Puddings.
Flaky gluten-free Croissant Recipe
Ingredients:
Instructions:
Nutrition Facts:
| Calories | 394 kcal |
|---|---|
| Protein | 3.2 g |
| Fat | 24.2 g |
| Carbs | 41.6 g |
| Fiber | 3.5 g |
| Sugar | 4.8 g |
| Sodium | 315 mg |
