Crispy Summer Grilled Pizza in 20 Minutes
- Time: 10 min active + 10 min cook
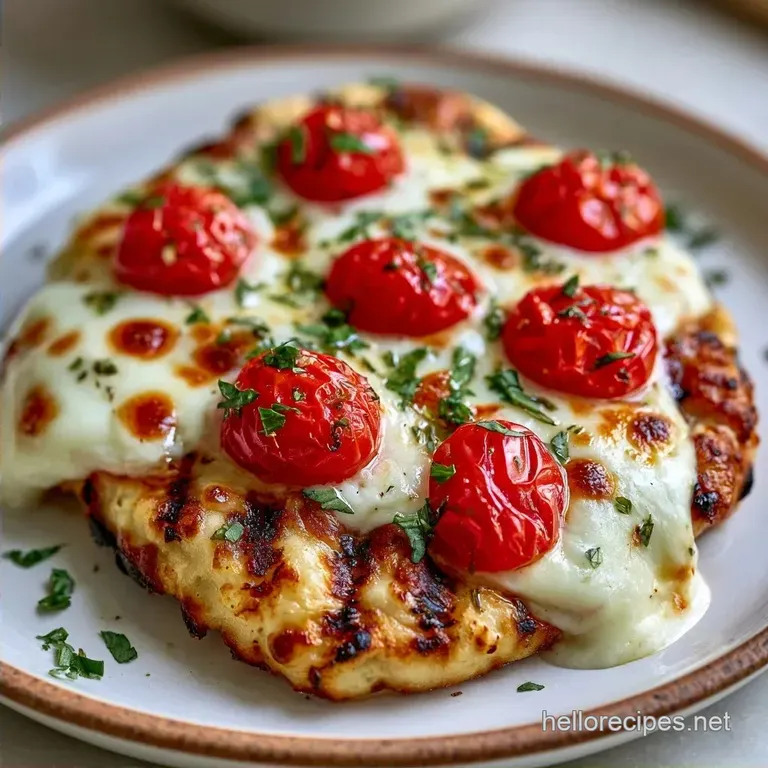
- Flavor/Texture Hook: Mahogany charred crust with melted mozzarella
- Ideal for: Backyard parties and lazy Sunday dinners
I can still smell the charred flour and bubbling cheese from the first time I tried this on my old charcoal grill. It was a humid July afternoon, the kind where the air feels heavy, and we wanted something that didn't involve heating up the entire kitchen.
We threw some dough on the grates, and the smell was instant that toasted, smoky aroma that only comes from direct fire.
You don't need a fancy pizza oven to get those professional bubbles in the crust. This method relies on raw heat and a bit of oil to create a barrier between the dough and the metal. You'll get a crust that snaps when you bite into it, topped with fresh, vibrant summer produce.
Expect a fast process once the grill is hot. The Crispy Summer Grilled Pizza moves quickly from the counter to the fire, so have your toppings ready to go. It's about timing and temperature, not complicated techniques.
Crispy Summer Grilled Pizza Guide
The trick to this texture is treating the dough like a steak. You sear one side first to lock in the structure before adding the weight of the sauce and cheese. This prevents the pizza from becoming a floppy mess.
Looking at Serious Eats, you'll see that high heat is the only way to get that authentic "leap" in the dough. By hitting it with 500°F immediately, the water in the dough turns to steam and pushes the crust upward.
The Heat Logic
- High Heat: Fast cooking prevents the dough from drying out and becoming a cracker.
- Pre Searing: Cooking the bottom first creates a sturdy base that supports the toppings.
- Oil Barrier: Brushing the grates stops the dough from gripping the metal.
Since I love a good comparison, here is how I decide between making the dough from scratch or grabbing a store-bought ball.
| Item | Fresh Approach | Shortcut Approach | Result |
|---|---|---|---|
| Effort | High (Kneading/Rising) | Low (Pre made) | Same if store-bought is fresh |
| Texture | More airy bubbles | Denser, more consistent | Fresh is slightly lighter |
| Time | 4-24 hours | 10 minutes | Shortcut is better for cravings |
Ingredient Deep Dive
I prefer using white sauce here to let the fresh tomatoes pop. If you use a heavy red sauce, it can sometimes make the grilled crust too damp.
| Ingredient | What It Does | Best Swap |
|---|---|---|
| Pizza Dough | Forms the structure | gluten-free blend (may need more oil) |
| Fresh Mozzarella | Provides a creamy pull | Provolone or low moisture mozzarella |
| White Pizza Sauce | Adds creaminess and salt | Ricotta mixed with lemon and garlic |
| Cherry Tomatoes | Adds bursts of acidity | Sliced zucchini or bell peppers |
For the dough, let it sit at room temperature for an hour before you start. Cold dough snaps back when you try to stretch it, which leads to uneven thickness and burnt spots.
The Essential Gear
You don't need a professional kitchen for this. A standard outdoor grill does the job.
- Outdoor grill (gas or charcoal)
- Grill brush for cleaning
- Pastry brush for oiling
- Long handled spatula
- Baking sheet (optional, for assembly)
How to Grill It
Get your toppings prepped before you even light the fire. Once the grill is hot, things move fast.
- Preheat the outdoor grill to high (450°F to 500°F) and scrub the grates clean. Note: Clean grates prevent old food bits from sticking to your crust.
- Brush the grill grates with olive oil immediately before adding the dough.
- Stretch the pizza dough into a thin circle. Brush both sides lightly with olive oil and sprinkle with a pinch of sea salt.
- Lay the dough directly onto the hot grates. Close the lid for 2-3 minutes until the dough bubbles and the bottom is mahogany colored.
- Flip the dough using a spatula so the cooked side is facing up.
- Spread the white pizza sauce over the crust, then add the sliced mozzarella and quartered cherry tomatoes.
- Close the grill lid for 3-5 minutes until the cheese is bubbled and melted.
- Remove from grill. Top with torn fresh basil and drizzle with remaining olive oil.
Chef's Note: If the dough is too sticky to move, dust your hands with cornmeal instead of flour. Flour burns quickly on a grill and can taste bitter.
Solving Common Issues

Grilling pizza is a bit of a dance with the flame. Sometimes the fire wins, but these fixes help.
Sticking to Grates
This usually happens because the grill wasn't hot enough or the oil barrier failed. The dough should practically sizzle when it hits the metal. If it sticks, don't panic, just lift the edges and slide a spatula underneath.
Uneven Melting
If your crust is charred but the cheese is still raw, your grill has a "cold spot." Move the pizza to the center or close the lid more tightly to trap the heat.
Soggy Middle
Too many toppings are the enemy of a Crispy Summer Grilled Pizza. Keep your sauce thin and your tomatoes quartered rather than sliced thin, which releases too much water.
| Problem | Root Cause | Solution |
|---|---|---|
| Burnt Bottom | Grill too hot/too long | Reduce first sear to 2 mins |
| Raw Dough | Grill too cold | Wait for grates to smoke slightly |
| Cheese Slides | Too much sauce | Use 1/2 cup sauce max |
Adjusting Your Batch Size
If you're feeding a crowd, don't try to make one giant pizza. It will be impossible to flip and the middle will be raw.
Scaling Down (1-2 people) Use a 1/2 lb ball of dough. Everything else halves naturally. Keep the heat high, but watch the cook time smaller pizzas can burn in seconds.
Scaling Up (6-8 people) Work in batches of two. If you double the toppings, keep the salt and spices at 1.5x to avoid over seasoning. I find that making individual 10 inch pizzas works better than one large one.
If you have extra time, you can try a different vibe by pairing this with Homemade BBQ Baked Beans for a full summer feast.
Busting Grill Pizza Myths
Searing the dough first doesn't "seal" the pizza. It simply cooks the bottom fast enough so that the sauce doesn't soak into the raw flour and make it gummy.
You don't actually need a pizza stone for a great crust. While stones hold heat, the direct contact of the grill grates gives you those charred "leopard spots" that a stone can't replicate.
Keeping Leftovers Fresh
Store any remaining slices in an airtight container in the fridge for up to 3 days. Avoid the microwave, as it turns the crust rubbery.
For the best results, reheat slices in a dry skillet over medium heat for 3 minutes. This crisps the bottom back up without overcooking the cheese. You can also use a toaster oven at 350°F for about 5 minutes.
To avoid waste, take any leftover basil stems and blend them into a pesto or chop them finely into a salad.
Best Serving Ideas
This pizza is light and fresh, so it needs sides that match the energy. I love serving it with a crisp green salad tossed in Homemade Caesar Dressing. The salty punch of the dressing balances the sweetness of the cherry tomatoes.
Another great option is a side of grilled asparagus or a chilled watermelon salad with feta. If you're feeling extra, serve the pizza on a wooden board with a bowl of chili oil for dipping the crusts.
This Crispy Summer Grilled Pizza is all about embracing the heat of the season. Once you get the hang of the flip, you'll probably stop using your oven for pizza entirely. Just keep the heat high, the toppings light, and the drinks cold.
Recipe FAQs
Can I grill pizza on a charcoal grill?
Yes, charcoal grills work perfectly. The direct fire provides that classic smoky aroma and the intense heat required for a mahogany crust.
What kind of pizza dough works best on a grill?
Use room temperature pizza dough. This ensures the dough stretches easily and bubbles up the moment it hits the heat. If you enjoyed handling the dough here, see how that same technique applies to our homemade pita bread.
How to cook pizza on a barbecue?
Preheat the grill to 450°F-500°F. Sear the oiled dough for 2-3 minutes, flip it, then add white pizza sauce, mozzarella, and cherry tomatoes for another 3-5 minutes.
Is it true you need a pizza stone for a crispy grill crust?
No, this is a common misconception. Direct contact with oiled grates actually creates a better char and a crisper snap than using a pizza stone.
What are the best toppings for a summer grilled pizza?
Fresh mozzarella, quartered cherry tomatoes, and torn basil. These vibrant, fresh ingredients cut through the smokiness of the charred crust.
Why do I need to oil both the grates and the dough?
Oil creates a necessary non-stick barrier. Brushing both the grates and the dough prevents tearing and ensures the crust browns evenly.
How to prevent the pizza dough from sticking to the grill?
Brush the grill grates with olive oil immediately before adding the dough. This creates a slick surface that stops the dough from bonding to the hot metal.
Crispy Summer Grilled Pizza

