The Golden Sceptre Ultracrispy Pankocrusted Chicken Parmesan

- Beyond the Basic Bake: Unlocking True Italian Flavor
- Why This Chicken Parmesan Recipe Dominates Dinner
- The Hall of Fame: Sourcing Superior Components for Your Dish
- Preparing the Panko Powerhouse Coating
- Phase One: Tenderizing and Taming the Protein
- The Triple-Dip Technique: Engineering Maximum Crispiness
- The Grand Assembly: Building Your Masterpiece Layer by Layer
- Elevating Your Side Game: Pairing Suggestions for the Meal
- Storage Solutions and Reviving Leftover Glory
- Recipe FAQs
- 📝 Recipe Card
Beyond the Basic Bake: Unlocking True Italian Flavor
There are few dishes that hold the universally cherished status of Chicken Parmesan . It’s the definition of culinary comfort a marriage of protein, bright tomato acidity, and decadent, melted cheese.
However, too often, this classic falls short, resulting in a dish where the coating is either timidly soft or the chicken dry. Our goal today is to redefine what you expect from this Italian American staple.
We are seeking the shatteringly crisp texture that contrasts perfectly with the tender meat underneath, leading to an Authentic Chicken Parmesan Recipe experience that honours its roots while delivering maximum flavour impact. Forget the mediocre; we are aiming for the gold standard.
Why This Chicken Parmesan Recipe Dominates Dinner
This particular approach transforms the process from simple assembly to an engineered culinary event. We are focusing heavily on technique to guarantee results every single time. This isn't just about throwing ingredients together; it's about understanding the science behind achieving that perfect crunch and melt.
The resulting flavour profile is robust, perfectly balanced between the savory crust and the sweet, slow simmered sauce.
The Quest for the Unbeatable Crunch Factor
The secret weapon here is Panko breadcrumbs. Unlike traditional fine breadcrumbs which absorb moisture quickly, Panko flakes are larger, lighter, and create little pockets of air when fried. This results in a coating that is demonstrably lighter and dramatically crispier.
When combined with finely grated Parmesan cheese inside the coating mixture, we create a Parmesan crusted Chicken Recipe that locks in flavour and moisture while offering an unparalleled textural experience.
This technique is essential for creating a truly Crispy Chicken Parmesan Recipe .
A Nod to Tradition: Pollo alla Parmigiana Refined
While the concept might have been refined on American shores, the foundation lies in Southern Italian traditions. This refined version leans into high-quality ingredients especially the sauce and the cheese to pay respect to that heritage.
We ensure the chicken is pounded thin, promoting even cooking and maximizing the surface area for that glorious crust. This attention to detail elevates the dish whether you plan to serve it traditionally over pasta or perhaps transform it into a phenomenal Chicken Parmesan Sandwich later in the week.
Setting the Stage: Tools for Perfect Execution
Success starts with preparation. You’ll need four main components for this build: the thinly pounded cutlets, a dedicated three stage dredging system, a high sided skillet for shallow frying, and finally, a baking sheet prepared for the oven finish.
If you are aiming for a lighter approach, the Chicken Parmesan Air Fryer method is viable, but we will prioritize the shallow fry here for the deepest flavour infusion. Having a good instant read thermometer is highly recommended to ensure your oil temperature remains precise.
The Hall of Fame: Sourcing Superior Components for Your Dish
For a dish this iconic, ingredient quality cannot be compromised. We are using four pounds of chicken, yielding eight thin cutlets, which ensures generous portions for four hungry diners.
The sauce should be rich and vibrant whether you dedicate an hour to simmering your own bright marinara or opt for an excellent store-bought version, it needs body. The real stars, however, are the coatings and the cheese layers that define this Crispy Parmesan Mozzarella Crusted Chicken .
Preparing the Panko Powerhouse Coating
The coating is what truly distinguishes this recipe. We aren't just dipping; we are constructing a shield designed for maximum crunch retention.
Selecting the Star: Choosing Chicken Breasts Wisely
Begin by taking your four boneless, skinless chicken breasts and carefully slicing them horizontally to create eight thinner cutlets. This thinness is crucial; it allows the chicken to cook through quickly during the frying stage without burning the crust.
Once sliced, place them between sheets of plastic wrap and gently pound them to a uniform thickness of about a quarter of an inch using a meat mallet. Season these tenderized pieces generously on both sides with kosher salt and freshly cracked black pepper.
Sauce Secrets: The Slow Simmered Marinara Foundation
While the chicken rests, focus on your sauce. You will need about two cups of high-quality marinara. If making your own, ensure it is thick enough to cling to the chicken without immediately soaking the breading. Warm the sauce slightly before assembly; cold sauce hitting hot, fried chicken is the enemy of crispiness.
This sauce will form the fragrant base when serving with Chicken Parmesan Pasta .
Cheese Selection: Mozzarella, Parmesan, and the Meltdown Magic
For the cheese topping, you need two players. We use about half a cup of finely grated, high-quality Parmesan mixed directly into the Panko for seasoning and structure. For the topping, use 8 ounces of fresh mozzarella, sliced thinly, or a full fat, low-moisture shredded variety.
The key is quality the cheese needs to melt beautifully without releasing excessive water.
Related Recipes Worth Trying
- Right Then Lets Cook Speedy Lemon Herb Chicken Veggie Bake — Right then lets cook up a storm that wont keep the family waiting This OnePan Chicken Bake is the ultimate in Fast Dinner Ideasflavourful easy and minimal...
- Ultimate Cheesy Chicken Leek Bake Easy Family Dinner Casseroles — Need easy family dinner casseroles This creamy flavourful chicken and leek bake elevates comfort food with a savoury crunchy crumb topping Find out the...
- The Best Crispy Garlic Parmesan Oven Carrots Recipe — Transform humble carrots into an irresistible side dish These oven-roasted carrots are packed with Parmesan and garlic Easy enough for weeknights
Phase One: Tenderizing and Taming the Protein
Once seasoned, the cutlets are ready for their transformation. Ensure they are completely dry after seasoning, as moisture is the bane of a crispy crust. We are preparing a standard three stage dredging system, laid out in shallow dishes for easy access.
The Triple Dip Technique: Engineering Maximum Crispiness
This methodical application of flour, egg, and breadcrumbs is non-negotiable for achieving the perfect texture. It builds layers that fry up light and golden.
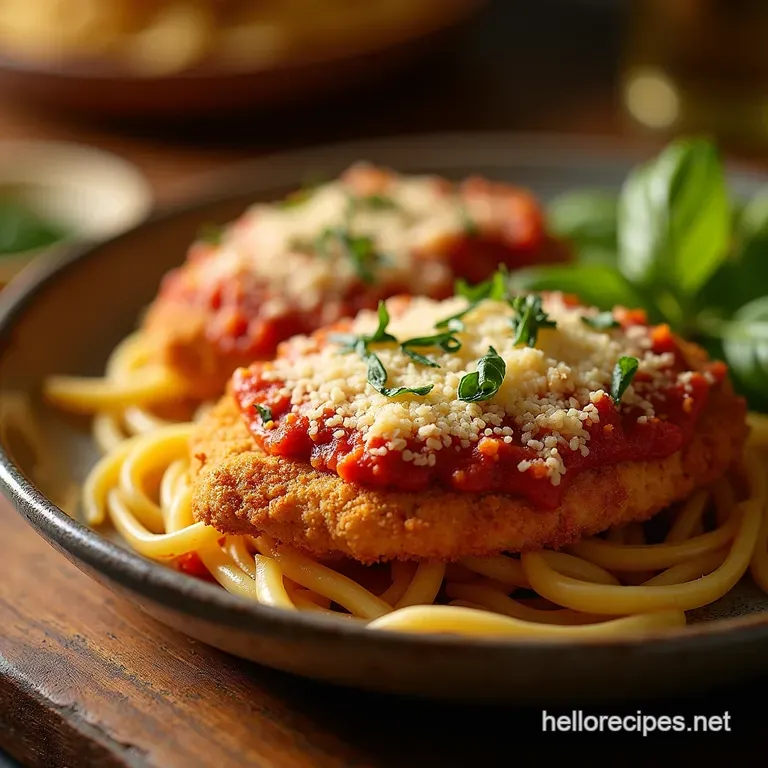
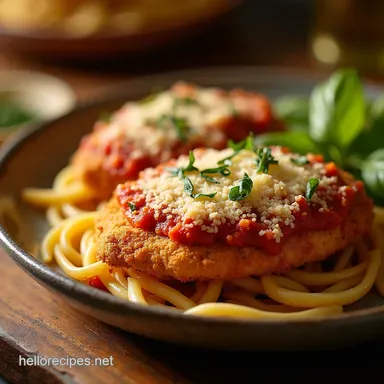
The Grand Assembly: Building Your Masterpiece Layer by Layer
With your cutlets prepped and your dredging stations ready, the assembly process moves quickly. Remember, we are aiming for a deep, golden exterior that can withstand the subsequent baking phase.
Achieving Uniform Thickness Without Brute Force
Pounding the chicken ensures that every bite yields tender meat juxtaposed against the rigid crust. Uneven thickness leads to some parts being overcooked while others remain raw, defeating the purpose of this swift cooking method.
Mastering the Dredge: Flour, Egg Wash, and Panko Adhesion
First, coat the cutlet thoroughly in the all-purpose flour, shaking off any excess. This allows the egg to adhere properly. Next, pass it through the lightly whisked eggs. Finally, transfer to the Panko mixture here’s where you must press firmly.
Use your palms to gently but firmly press the Panko mixture onto both sides of the cutlet, ensuring every nook and cranny is covered. This intensive pressing guarantees superior adherence for our Crispy Parmesan Mozzarella Crusted Chicken .
Frying to Flawless: The Shallow Oil Searing Method
Pour about an inch of vegetable or canola oil into a heavy bottomed skillet and heat it over medium high heat until it shimmers, ideally reaching 350° F ( 175° C). Working in small batches, gently lay the cutlets into the hot oil.
Fry for approximately 2– 3 minutes per side until they achieve a deep, beautiful golden brown colour. Immediately transfer the fried cutlets to a wire rack set over a baking sheet; this crucial step allows air circulation, preventing the bottoms from steaming and losing their crunch.
The Final Bake: Achieving the Perfect Cheese Melt Over Chicken Parmesan
Preheat your oven to 400° F ( 200° C). On a prepared baking sheet (parchment paper is recommended), spread a very thin layer of marinara sauce. Arrange the golden cutlets on top.
Spoon a moderate amount of sauce only over the centre of each piece, leaving the edges of the crust exposed to maintain that coveted crispness. Top with your mozzarella slices. Bake for 8 to 12 minutes, until the cheese is bubbly, perfectly melted, and the internal temperature of the chicken registers 165° F ( 74° C).
Elevating Your Side Game: Pairing Suggestions for the Meal
The richness of this main course demands thoughtful accompaniments. While a classic bed of spaghetti tossed in leftover marinara is tempting, consider something brighter to cut through the fat and cheese. A simple, lightly dressed arugula salad with shaved Parmesan and a sharp lemon vinaigrette works wonders.
Alternatively, some garlicky, slightly bitter sautéed rapini offers a fantastic counterpoint. If you opt for the Chicken Parmesan Pasta route, ensure the pasta itself is perfectly al dente to hold up against the heavy topping.
Storage Solutions and Reviving Leftover Glory
Leftovers, if you are lucky enough to have any, store well in an airtight container in the refrigerator for up to three days. However, the primary challenge with leftover Chicken Parmesan is moisture migration into the crust.
Troubleshooting: Preventing a Soggy Bottom Crust
To revive that crispness, avoid the microwave at all costs. The best method involves a brief, intense reheat in a 425° F ( 220° C) oven or toaster oven. Place the cutlets directly on a wire rack set over a baking sheet, exposing the crust to dry heat.
If possible, reheat the chicken without the sauce and cheese first until the crust crisps, then add the toppings and return to the oven for a minute or two just to melt the cheese.
Nutritional Snapshot: Adjusting for Lighter Fare
This preparation is rich due to the shallow frying, making it a satisfying indulgence. For a lighter meal, you can move towards the Chicken Parmesan Air Fryer technique, significantly reducing the absorbed oil.
Alternatively, use lower fat mozzarella, though be aware this may slightly alter the melt quality.
Parmesan Variations: Herbaceous Twists and Spice Infusions
Don't be afraid to customize your Panko blend. For a brighter flavour profile, incorporate finely minced fresh parsley or dried basil into the breading mixture. If you prefer a touch of heat especially if you are making the Chicken Parmesan Sandwich version later a generous pinch of red pepper flakes in the Panko adds a beautiful underlying warmth that complements the sharp Parmesan beautifully.

Recipe FAQs
My breading always goes soggy! What’s the secret to a truly crispy Chicken Parmesan?
The crunch is everything! The trick lies in two main areas: using Panko breadcrumbs, which are flakier than standard crumbs, and making sure your frying oil is hot enough (around 350°F). Also, drain the fried cutlets on a wire rack, not paper towels, to stop the bottoms from steaming.
Can I make this Chicken Parmesan ahead of time? I’m hosting a crowd.
You can certainly prep ahead! It’s best to complete steps 1 through 6 (breading and frying) a few hours in advance and keep the cutlets loosely covered in the fridge. When your guests arrive, just assemble them in the baking dish with the sauce and cheese and pop them straight into the oven.
Do I need to bake the chicken after frying, or is frying enough?
Baking is essential for two reasons: it melts that beautiful layer of mozzarella until it’s gooey perfection, and it ensures the chicken is cooked all the way through to a safe temperature (165°F). Since the chicken is already browned, the baking time is kept short so the crust doesn't burn.
What’s the best way to stop the edges of the chicken from getting soggy when I add the sauce?
This is a brilliant question soggy edges are a dead giveaway of a rushed job! When topping the cutlets for the oven, only spoon the marinara over the centre section, leaving a clear, crispy border around the edges exposed. This way, the crust stays delightfully crisp while the centre soaks up the flavour.
Can I skip the frying step and just bake or air-fry this whole dish?
You absolutely can for a lighter take, but be aware it won't taste quite like the classic pub favourite. If you opt for the oven or air fryer, lightly spray the breaded chicken with oil first.
Frying provides a depth of flavour and superior texture that is hard to replicate, but baking is a perfectly acceptable lighter alternative!
Crispy Panko Chicken Parm
Ingredients:
Instructions:
Nutrition Facts:
| Calories | 2455 kcal |
|---|---|
| Protein | 36.2 g |
| Fat | 44.3 g |
| Carbs | 103.5 g |
| Fiber | 20.8 g |
| Sodium | 851 mg |
