The Mediterranean Dream Creamy Lemon and Herb White Bean Dip

- Elevating the Pantry: Why This White Bean Dip Reigns Supreme
- Crafting the Perfect Creamy Lemon and Herb White Bean Dip
- Essential Elements for Maximum Mediterranean Flavor
- Minimizing Mess: The Only Equipment You'll Need
- The Step-by-Step Guide to Silky Smooth Dip Consistency
- Finalizing Your Lemon and Herb White Bean Dip: Plating and Garnish
- Beyond the Cracker: Creative Ways to Use This Lemon Herb Dip
- Storing Your Homemade Lemon and Herb White Bean Dip Safely
- Recipe FAQs
- 📝 Recipe Card
Elevating the Pantry: Why This White Bean Dip Reigns Supreme
We all need an ace up our sleeve when it comes to entertaining, and this Lemon and Herb White Bean Dip is exactly that a true culinary secret weapon. It’s the ultimate expression of simplicity meeting sophistication.
While chickpeas are often the star of the dip world, we are leaning into the smoother, silkier texture provided by the noble cannellini bean. This isn't just another spread; it’s an incredibly quick, yet deeply flavourful, effortless appetizer .
Ready in under an hour (including crucial chilling time), this preparation transforms humble pantry staples into a bright, herbaceous, and utterly satisfying centerpiece. It’s a guaranteed crowd pleaser that fits naturally into any modern Mediterranean menu, satisfying those looking for a truly delicious and healthy dip alternative.
Crafting the Perfect Creamy Lemon and Herb White Bean Dip
The goal of this Lemon Herb White Bean Dip Recipe is to achieve a texture that is light, airy, and whipped, rather than dense and heavy. This requires careful attention to the ingredients we select and the order in which we blend them.
The final flavour profile is dominated by fragrant lemon zest, pungent fresh garlic, and vibrant herbs, perfectly balanced by the creamy richness of high-quality extra virgin olive oil.
The Secret to Ultra Smooth Texture
Achieving that luxurious, velvety texture in a homemade dip requires a technique borrowed from chefs: emulsification using cold liquid. After initially processing the oil, garlic, and beans, we slowly stream in a small amount of ice water while the food processor is running.
This tiny addition of cold liquid allows the olive oil and bean starches to fully emulsify, resulting in a Lemony White Bean Dip that feels light and whipped on the palate a true testament to the power of controlled blending.
Hummus vs. Cannellini: Understanding the Difference
While similar in concept to traditional hummus, this recipe intentionally steps away from using chickpeas. Chickpeas contain a slightly tougher outer skin and generally require more tahini and liquid to break down, resulting in a denser final product.
Cannellini beans, or other creamy varieties like Great Northern beans, are naturally softer and starchier, leading to an incredibly smooth base without needing excessive oil or tahini. This makes our White Bean Dip a lighter, fresher vehicle for carrying the bright notes of the citrus and herbs.
Serving Inspiration for Effortless Entertaining
Because this dip takes minimal active time about ten minutes of hands-on work it is the ideal candidate for effortless entertaining . Serve it alongside a rustic baguette, robust vegetable crudités, or use it as a striking addition to a colourful Mediterranean antipasto platter.
Essential Elements for Maximum Mediterranean Flavor
The success of this creamy spread rests squarely on the quality of its supporting cast. Beyond the beans, the flavor is built upon a powerhouse trio of aromatics and fresh additions.
We begin by microplaning the freshest lemon zest available; this holds the essential oils that deliver the fragrance necessary for a truly vibrant dip. That fragrance is paired with the sharpness of freshly squeezed lemon juice, which provides the necessary acidity to lift the otherwise heavy bean base.
For the crucial punch, we utilize fresh garlic, blended early in the process to mellow its heat slightly. This foundation creates the essential White Bean Garlic Lemon Dip profile.
Finally, we incorporate a generous blend of fresh flat leaf parsley and aromatic basil, pulsing them in quickly at the end to ensure the White Bean Herb Dip retains vibrant green flecks and a clean, fresh finish.
Minimizing Mess: The Only Equipment You'll Need

This is truly a no-cook recipe, which drastically cuts down on post meal cleanup. The only significant piece of equipment required is a robust blending tool, making the preparation exceptionally straightforward.
Optimizing Bean Choice: Canned vs. Home Cooked White Beans
While cooking beans from scratch provides a marginally richer flavour, the entire appeal of this swift Lemon and Herb White Bean Dip is its reliance on pantry efficiency.
Canned beans are perfectly suitable, provided you follow a crucial rule: they must be thoroughly drained and rinsed under cold running water. This step removes the starchy, salty canning liquid, ensuring a cleaner flavour base for the delicate herbs and citrus.
The Brightening Trio: Zest, Juice, and high-quality Oil
To prevent this dip from tasting flat, we must treat the citrus carefully. Ensure you zest the entire lemon before juicing it, as the zest holds 90% of the perfume. We incorporate the zest directly into the base mixture.
As for the oil, while a decent quality extra virgin olive oil is blended into the dip for body, reserve your absolute best, most robust, and fruity EVOO for the final garnish swirl. Its unprocessed flavour will shine brightly.
Sourcing the Freshest Herbs for Optimal Aroma
Do not be tempted to substitute dried herbs here; the character of a true White Bean Herb Dip is dependent entirely upon fresh, verdant flavour. Flat leaf parsley and basil are specified for their bright, slightly peppery notes, but ensure they are added right at the end of the blending process to prevent them from becoming bruised and turning the mixture an unappetizing muddy green.
Must Have Kitchen Tools for Silky Blending
The key to achieving the desired silky consistency lies in using either a strong, standard sized food processor (8-cup minimum) or a high speed blender. A blender can often achieve a smoother texture more quickly, but a food processor offers more control, allowing for precise pulsing when adding the delicate herbs.
Related Recipes Worth Trying
- Flaky Salmon Cakes Recipe Crispy Easy and Ready in a Midweek Jiffy — Forget stodgy patties This easy Salmon Cakes recipe uses canned salmon or leftovers for a flaky interior and ultracrisp Panko crust Perfect for a speedy...
- Foolproof 30Minute Shrimp Scampi Pasta Silky LemonGarlic Sauce — This isnt just Scampi Pasta its a 30minute weeknight masterpiece Learn the chefs secret to a glossy emulsified Shrimp Scampi Pasta Sauce bursting with fresh...
- Proper Shepherds Pie Recipe Rich Lamb Filling and Crisp Potato Mash — The best traditional Shepherd Pie Casserole Our classic recipe uses succulent lamb mince in a deeply savoury red wine gravy topped with buttery golden mash...
The step-by-step Guide to Silky Smooth Dip Consistency
We approach the blending process in deliberate stages to build structure and flavour progressively. The first crucial step is to create an aromatic paste. Into the food processor bowl, place the peeled garlic cloves, lemon zest, lemon juice, salt, pepper, and the primary portion of the olive oil (1/4 cup).
Process this mix for about 30 seconds until the garlic is finely minced. This action helps "tame" the raw sharpness of the garlic before the beans are introduced. Next, add the thoroughly rinsed and drained cannellini beans.
Process continuously, using a rubber spatula to scrape down the sides, until the mixture is thick and homogenous, roughly 1 to 2 minutes.
Preparing the Beans for the Food Processor
While canned beans are convenient, their preparation is vital. After rinsing off the canning liquid, pat the beans lightly dry to ensure you are not adding excess water before the processing begins.
This slight dryness helps the beans combine properly with the olive oil in the initial stage, setting up a better emulsion.
The Critical Blending Sequence: Oil and Liquid Ratios
To move from a thick paste to a velvety dip, we introduce the secret ingredient: cold water. With the food processor running, slowly drizzle in the cold water, one tablespoon at a time, until the mixture reaches the desired whipped consistency. We use between two and four tablespoons total.
This controlled addition ensures the dip lightens considerably without becoming watery. Finally, toss in the measured fresh parsley and basil. Pulse only 5 to 8 times just enough to distribute the herbs and leave visible flecks of green, guaranteeing a beautiful Lemon Herb White Bean Dip .
Adjusting Seasoning and Thickness
Transfer the freshly blended dip to a bowl before tasting. At this point, the raw garlic and lemon may seem slightly aggressive. Adjust the flavour by adding more salt if the overall taste seems dull or flat, or a small squeeze more lemon juice if it lacks brightness.
If the dip is too thick, incorporate another teaspoon of ice water. If it’s slightly too runny, a quick chill will often firm it up beautifully.
Finalizing Your Lemon and Herb White Bean Dip: Plating and Garnish
The final presentation is what transforms a simple bean dip into an impressive effortless appetizer . The most critical step post blending is chilling. Never skip this!
Refrigerating the dip for at least 30 minutes allows the volatile oils in the garlic, herbs, and lemon zest to meld with the bean base, resulting in a far deeper and more complex flavour profile.
Mastering the Perfect Olive Oil Swirl Finish
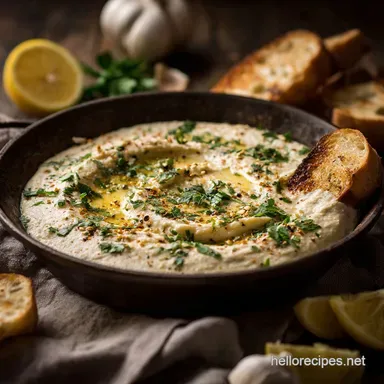
When ready to serve, transfer the chilled dip to your preferred shallow serving bowl. Use the back of a spoon to create a shallow well or crater in the centre. This depression is the perfect vessel for the finishing touches.
Drizzle that reserved tablespoon of high-quality Extra Virgin Olive Oil generously over the top, allowing it to pool slightly. This enhances the mouthfeel and provides a striking visual sheen.
What to Do If Your Dip Is Too Thick or Too Runny
If, after chilling, your dip is too stiff, gently whisk in a teaspoon of cold water or a tiny splash of lemon juice until it relaxes. If it remains too runny, place the dip back into the food processor and pulse in a few additional whole, rinsed cannellini beans to absorb some of the excess moisture, then chill again.
Flavor Variations: Spice, Roasting, and Added Vegetables
For those who prefer a deeper, less raw flavour, try using roasted garlic instead of fresh, blending four slow roasted cloves into the initial mixture. This yields a sweeter, earthier White Bean Garlic Lemon Dip .
Alternatively, you can introduce subtle heat by adding a teaspoon of harissa paste, or add a beautiful orange hue and rich umami flavour by processing 1/4 cup of oil-packed, drained sun-dried tomatoes alongside the beans.
Maximizing Shelf Life and Freezing Guidelines
This homemade Lemon and Herb White Bean Dip stores beautifully when covered tightly and refrigerated. It will maintain peak freshness for 4 to 5 days. Since the dip contains fresh herbs and a high water content, freezing is not generally recommended as it can compromise the velvety smooth texture, often resulting in a slightly grainy consistency upon thawing.
Nutritional Breakdown and Dietary Swaps (Vegan/gluten-free)
This recipe is naturally accommodating, serving as an outstanding vegan dip and being entirely gluten-free. White beans provide an excellent source of plant protein and fiber, making this one of the truly healthy dips on the market.
For individuals monitoring sodium, ensure you choose low-sodium canned beans and rinse them rigorously. If you want a different herb flavor, fresh dill or tarragon make beautiful, though slightly more pungent, substitutions for the basil.
Beyond the Cracker: Creative Ways to Use This Lemon Herb Dip
While fantastic served traditionally with pita or crudités, this Lemony White Bean Dip is far too versatile to be limited to the appetizer table. Think of it as a creamy, bright condiment ready to replace heavier, less nutritious spreads.
Use it as a flavourful sandwich or wrap spread instead of mayonnaise or cream cheese. It pairs exceptionally well when smeared thickly onto toasted baguette slices and topped with fresh roasted bell peppers or grilled zucchini for an instant bruschetta style lunch.
On top of that,, thin it slightly with a touch more lemon juice or olive oil and use it as a creamy, light dressing for cold pasta salads or drizzled over a simple platter of roasted chicken or salmon. The clean, bright acidity ensures it lifts, rather than overwhelms, the main components of a dish.
Storing Your Homemade Lemon and Herb White Bean Dip Safely
Proper storage is key to preserving the fresh, vibrant flavours of this delightful spread. Due to the high content of fresh herbs and garlic, keeping the dip refrigerated in an airtight container is essential to slow flavour deterioration and maintain food safety.
Always ensure the surface is covered tightly to prevent the dip from oxidizing, which can cause the lovely green colour to dull. The ideal storage time is within four days of preparation.
When serving leftovers, allow the dip to sit at room temperature for about 15 minutes before plating for optimal flavour release.

Recipe FAQs
This Lemon and Herb White Bean Dip tastes lovely, but how long will it actually keep in the fridge?
Treat this versatile spread just like you would a good homemade hummus or pesto. Provided it's stored promptly in an airtight container, it’s usually perfectly good for 4 to 5 days, making it ideal for meal prep.
For the best flavour and texture, let it sit out of the fridge for about 15 minutes before serving like a decent red wine, it needs to breathe a bit to fully release its aromatics!
My dip came out a bit grainy, not the ‘velvety’ texture you promised! What did I muck up?
Don’t panic! Achieving that truly velvety, luxurious texture is all down to processing time and hydration. Make sure your beans are thoroughly rinsed first. If it’s still grainy, run the food processor for another minute, scraping down the sides thoroughly, while slowly drizzling in an extra tablespoon of ice water.
That cold liquid is your secret weapon for a genuinely whipped finish, emulsifying beautifully with the olive oil.
I’m fresh out of cannellini beans, can I use different beans for the Lemon and Herb White Bean Dip?
Absolutely! The beauty of this recipe is its adaptability. Stick to Great Northern or Navy beans (haricot beans) if possible; they are excellent straight swaps and will still deliver that signature creamy texture.
While chickpeas work, they tend to give you a slightly thicker, heavier texture, leaning closer to traditional hummus rather than this airy Mediterranean delight.
I love garlic, but sometimes raw garlic tastes too strong. Any tips to soften the punch?
Raw garlic can be a bit much, bless its heart. If you're sensitive, you have a couple of excellent options: either use just one small clove, or try pre-roasting the garlic until it’s soft and golden this introduces a lovely, mellow sweetness that truly elevates the dish.
Additionally, the essential 30-minute chilling time naturally allows the raw garlic heat to mellow and integrate into the oil and lemon.
Apart from just dipping pitta bread, how else can I use this gorgeous spread?
It’s incredibly versatile! Think of it as a posh replacement for mayonnaise or cream cheese. Try spreading it generously onto crusty baguette slices under grilled courgettes and red peppers, or use it as a creamy base for wraps and sandwiches.
You can also thin it slightly with a touch more olive oil and lemon juice to create a sophisticated, zesty dressing for roasted vegetables or a vibrant pasta salad.
Creamy Lemon Herb White Bean Dip
Ingredients:
Instructions:
Nutrition Facts:
| Calories | 750 kcal |
|---|---|
| Protein | 5.2 g |
| Fat | 15.6 g |
| Carbs | 28.9 g |
| Fiber | 8.8 g |
| Sodium | 1805 mg |
