The Only White Bread Recipe Youll Ever Need the Classic Cloudlike Loaf
- The Only White Bread Recipe You’ll Ever Need: Crafting the Perfect Cloud-Like Loaf
- Assembling Your Foundation: Precision Ingredients for Ultimate Rise
- Step-by-Step Alchemy: Transforming Simple Ingredients into Dough
- The Patience Principle: Proofing Stages Explained for Maximum Volume
- Elevating Your Loaf: Pro Tips and Flavor Enhancements
- Recipe FAQs
- 📝 Recipe Card
The Only White Bread Recipe You’ll Ever Need: Crafting the Perfect Cloud Like Loaf
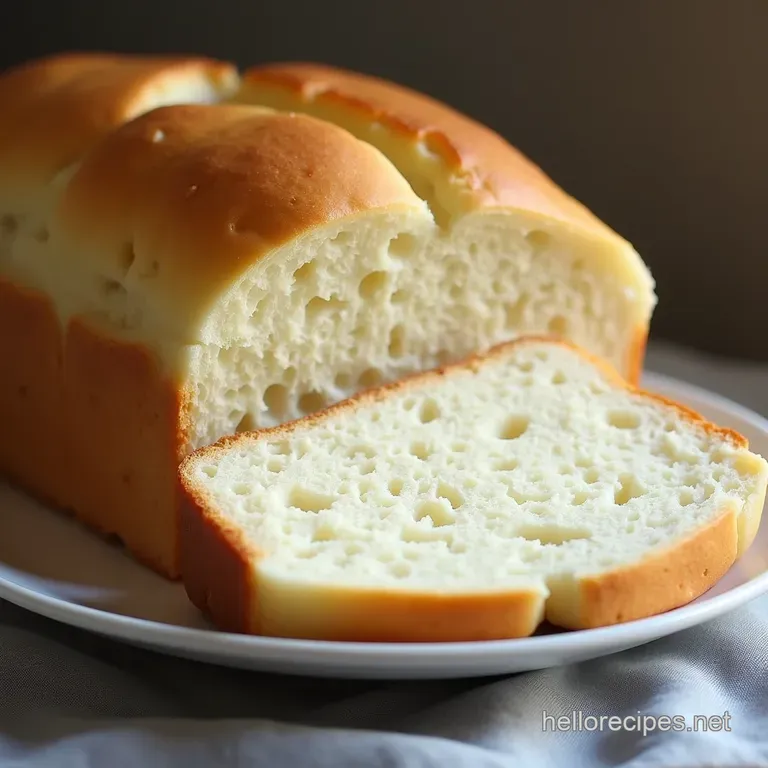
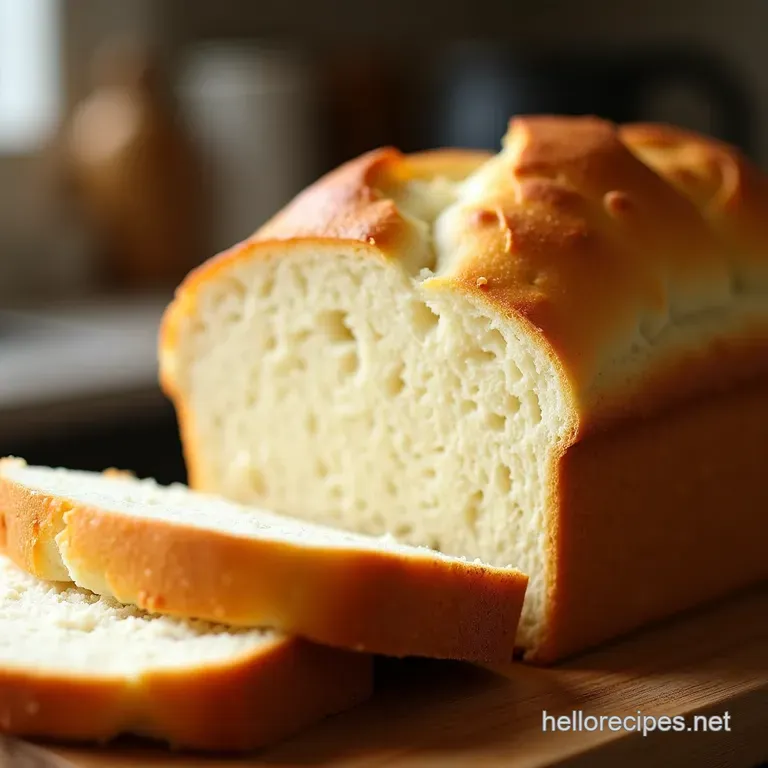
This recipe is the cornerstone of bread baking: a timeless, soft, and slightly sweet sandwich loaf. Inspired by the hearty reliability of classic American style white bread, this loaf boasts a tender crumb and a golden crust, perfect for everything from a classic Ploughman’s lunch sandwich to perfect French toast.
It's simplicity perfected, proving that sometimes, the most basic ingredients yield the most extraordinary results. This comprehensive guide ensures you master the Homemade White Bread Recipe on your very first attempt.
Why This Classic White Bread Recipe Triumphs Over store-bought Bricks
There is an undeniable satisfaction that comes from pulling a freshly baked loaf from your own oven. store-bought bread, while convenient, often contains additives and preservatives necessary for shelf stability, resulting in a texture that lacks genuine character.
This Classic White Bread Recipe , however, relies purely on the magic of fermentation and properly handled flour. We are aiming for that perfect, slightly yielding softness that only comes from quality ingredients nurtured correctly through the baking process.
Setting the Stage: The Nostalgia of Authentic Home Baking
The aroma itself is reward enough. Imagine stepping into your kitchen and being enveloped by the warm, yeasty scent that signals true comfort. Baking White Bread from scratch connects you to a tradition that stretches back centuries.
It’s less about speed and more about the meditative process the feeling of the dough transforming under your hands is truly therapeutic. For those seeking a reliable guide, this White Bread Recipe Easy approach demystifies the entire venture.
Your Blueprint for Achieving Fluffy, Square Perfection
Our goal isn't just a loaf; it's the loaf tall, evenly structured, and capable of slicing into perfect, uniform squares ideal for sandwich assembly. To achieve this height and squareness, attention must be paid to the shaping technique later on, ensuring the final rise is directed upward into the loaf pan, rather than spreading outward.
This detailed plan transforms what many consider intimidating into an Easy White Bread Recipe .
Beyond Basic: Understanding the Structure of Superior Bread
The quality of your final White Bread hinges on gluten development. Gluten, formed when water interacts with the proteins in flour, creates an elastic network that traps the carbon dioxide produced by the yeast. This trapped gas is what provides the lift and the airy structure we crave.
Understanding this mechanism is the difference between a dense brick and a cloud like crumb.
Assembling Your Foundation: Precision Ingredients for Ultimate Rise
Success in bread making begins long before the mixing starts; it starts with selecting and preparing the right components. Achieving that hallmark springiness requires attention to the specific roles each of the Basic Bread Making Ingredients plays.
Mastering the Flour-to-Liquid Ratio for Your White Bread
For a standard sandwich loaf, consistency in measurement is paramount. We call for 4 cups of all-purpose flour, which should be measured by lightly spooning it into the measuring cup and leveling off, rather than scooping directly from the bag, which compacts the flour and leads to a drier, heavier final product.
The liquid content, including the eggs, is precisely calculated to yield a manageable, slightly tacky dough the perfect consistency for this Homemade White Bread Recipe .
Activating the Yeast: Water Temperature Secrets Revealed
Yeast is a living organism, and temperature dictates its happiness. We need the water to be warm enough ( 105° F– 115° F) to wake it up without cooking it.
If the mixture of 1 ½ cups of water, ¼ cup of sugar, and 2 ¼ teaspoons of active dry yeast doesn't foam into a creamy cap within 10 minutes, the yeast is likely dormant, and the entire batch needs restarting.
This simple blooming step confirms viability before committing to the full mixing process, making this a wonderfully reliable Quick Homemade Bread Recipe .
The Essential Pantry Check: What You Must Have On Hand
Beyond the yeast, flour, and water, two key ingredients ensure richness and tenderness: salt and fat. Salt is vital not only for flavour but also for controlling the yeast activity and strengthening the gluten structure.
The ¼ cup of softened, unsalted butter adds richness and inhibits gluten development slightly, contributing to that characteristic soft bite. The two lightly beaten eggs contribute protein, colour, and binding power, making this a richer, more satisfying Classic White Bread Recipe .
Choosing the Right Pan: Loaf Sizing Matters
For this recipe yielding one standard loaf, a 9x5-inch loaf pan is the ideal vessel. This specific dimension supports the dough during its final rise and baking, encouraging it to bake up tall and straight rather than slumping over the sides. Using a pan that is too wide will result in a shorter, flatter loaf.
Related Recipes Worth Trying
- The Best Homemade Roti Recipe Soft Puffy Flatbread — Master how to make roti at home with this easy stepbystep guide Achieve the softest perfectly puffed roti bread every timebetter than storebought
- Hearty Corn Bread Stuffing with Bacon and Sage The Best Side Dish — Make the ultimate homemade cornbread stuffing with bacon and sage This moist flavourful recipe elevates all your Thanksgiving dinner recipes Get the...
- The Best Sugarfree Banana Bread Naturally Sweet Moist — Bake the best sugar-free banana bread This recipe uses only ripe bananas for sweetnessno dry texture here Perfect for your afternoon cuppa
step-by-step Alchemy: Transforming Simple Ingredients into Dough
The alchemy begins when the activated yeast mixture is combined with the dry components. Into the large bowl go the 4 cups of flour and 1 ½ teaspoons of salt, whisked together first to ensure even distribution.
Next, the wet ingredients the yeast mixture, the two beaten eggs, and the softened butter cut into small cubes are added. This initial mixing creates what bakers call a "shaggy mass." It will look messy, but resist the urge to immediately add more flour; the next stage addresses this texture.
The Patience Principle: Proofing Stages Explained for Maximum Volume
Bread making is often described as a Homemade Bread step-by-step process where time, not just effort, is an ingredient. The rising, or proofing, stages are non-negotiable for developing the deep flavour profile of this White Bread .
Mixing and Kneading: Developing the Gluten Network Effortlessly
Whether using the paddle attachment of a stand mixer or your own two hands, the goal of kneading is to align and strengthen the gluten strands. If using a mixer, 6– 8 minutes on medium speed is usually sufficient after the initial 2 minutes of slow mixing.
By hand, expect a vigorous 10– 12 minutes. The dough is ready when it is smooth, springs back slowly when gently poked, and passes the windowpane test meaning you can stretch a small piece thin enough to see light through it without tearing.
This focused kneading ensures you can have a Fast Bread Recipe result without sacrificing quality.
The First Rise: Creating the Ideal Warm Environment
Once kneaded, the dough must rest. Place the dough ball into a lightly oiled bowl, turning it once to coat the surface, which prevents a dry skin from forming. Cover it securely and place it in a draft free, warm area ideally between 75° F and 85° F ( 24° C and 29° C).
Allow this bulk fermentation to continue until the dough has doubled in volume, typically 60 to 90 minutes. This stage builds flavour foundations.
Shaping Techniques for a Tight, Uniform Loaf Structure
Gently deflate the risen dough to release large gas bubbles. Turn it out onto a very lightly floured surface. For that signature square loaf shape, flatten the dough into a rough rectangle slightly narrower than the length of your loaf pan.
Fold the top third down to the middle, then fold the bottom third up over the top, like folding a business letter. Finally, roll the resulting log tightly from one short end to the other, pinching the final seam shut firmly. This rolling action creates internal tension vital for the high rise.
Place this shaped log, seam side down, into your prepared 9x5-inch pan.
Baking Times and Temperatures: Securing That Golden Crust
Preheat your oven to 375° F ( 190° C) as the dough nears the end of its second rise. The second rise, or final proofing, usually takes 45– 60 minutes; the dough should crest about an inch above the pan rim.
Before sliding it in, a quick brush of milk or melted butter gives the crust a lovely sheen. Bake for 30 to 35 minutes. The internal temperature is your true guide here; aim for 200° F– 205° F ( 93° C– 96° C).
Elevating Your Loaf: Pro Tips and Flavor Enhancements
While this recipe is fundamentally simple, a few professional touches can elevate it from great to sublime. Mastering these small details ensures every bake is a success, positioning you well beyond basic bread making.
Troubleshooting Common Setbacks: Why Didn't My Dough Double?
If your dough barely budges during the first rise, the primary suspects are cold water temperature killing the yeast, or the use of old/inactive yeast. Another cause can be too much flour, which suffocates the yeast.
If the dough rose but fell dramatically during shaping, it was likely over proofed the first time; learn to watch the dough, not just the clock. These insights are crucial for perfecting your Homemade White Bread Recipe .
Variations on the Theme: Incorporating Subtle Honey or Milk Notes
To add a slight, natural sweetness without altering the texture too much, substitute 2 tablespoons of the granulated sugar with high-quality honey. For an even softer crumb, known in classic baking as an "enriched dough," replace the 1 ½ cups of water with 1 ½ cups of whole milk, ensuring the milk is warmed to that crucial 105° F– 115° F range.
This small swap moves the result closer to a classic diner style roll texture, making it a fantastic Quick Homemade Bread Recipe upgrade.
Maximizing Freshness: Storing Your Homemade Bread for Days
The biggest challenge with White Bread is keeping it fresh once it’s made! Allow the loaf to cool completely on a wire rack for at least two hours this stops the interior structure from turning gummy.
Once fully cool, wrap the loaf tightly in plastic wrap, and then slide that into a sealed, airtight bag. Stored at cool room temperature, it should remain wonderfully soft for 3 to 4 days. Avoid the refrigerator, as this rapidly dries out bread.
Perfect Pairings: Serving Suggestions Beyond Simple Slices
This versatile loaf deserves more than just jam. Its soft yet sturdy nature makes it magnificent toasted for Eggs Benedict, where it stands up beautifully to hollandaise sauce. For lunch, use two slices for the ultimate, structurally sound grilled cheese sandwich, allowing that rich, soft interior to melt perfectly against the crisp exterior.

Recipe FAQs
My yeast isn't getting foamy when I bloom it; what's gone wrong with my White Bread?
If your yeast isn't blooming, it usually means the water temperature was too high and killed the little critters off, or the yeast itself is past its prime. Aim for that sweet spot of 105°F 115°F think pleasantly warm bath water, not piping hot!
Give it another go with fresh yeast and properly tempered water.
How can I make sure my finished loaf of White Bread isn't dense or gummy in the middle?
The biggest culprit for a gummy crumb is slicing it too soon! You must let the loaf cool completely on a wire rack for at least an hour, preferably longer, before cutting into it. This allows the internal steam to escape properly. Also, ensure you've kneaded the dough long enough so that it passes the windowpane test.
Can I make this recipe ahead of time, or do I have to bake it all in one go?
Absolutely, you can slow things down! After the initial kneading (Step 4), you can place the dough in an oiled, covered bowl in the fridge for up to 24 hours; this is a cold ferment, which develops deeper flavour. Just remember to let it warm up slightly before shaping and allow for a longer second rise.
What's the best way to store homemade white bread to keep it fresh for a few days?
Unlike shop bought loaves wrapped in plastic, homemade bread doesn't like being sealed airtight straight away, as it traps moisture and makes the crust soggy. Store it cut-side down on a wooden board, or loosely wrapped in a clean tea towel for the first day or two.
For longer storage, slice it first and freeze what you won't eat within three days.
My kitchen is a bit chilly; where is the best warm spot for the dough to rise properly?
Ah, the age-old battle against draughts! The best trick is to use your oven as a proofing box, but remember to turn it OFF first. Place the covered dough inside, perhaps with a cup of hot (not boiling) water next to it for humidity, and close the door.
This creates a lovely, consistent warm environment for the dough to get puffy.
Classic White Bread Recipe

Ingredients:
Instructions:
Nutrition Facts:
| Calories | 2959 kcal |
|---|---|
| Protein | 71.6 g |
| Fat | 136.6 g |
| Carbs | 307.4 g |
| Fiber | 30.5 g |
| Sodium | 40858 mg |
