The Cantgowrong Classic Butter Cookie Dough Base
- The 'Can't-Go-Wrong' Classic Butter Cookie Dough Base
- Why This Basic Cookie Dough is Your Kitchen MVP
- The Essential Pantry Lineup for Superior Dough Results
- Precise Measurements: Your Blueprint for Success
- Step-by-Step Mastery: Crafting the Ultimate Basic Cookie Dough
- The Crucial Resting Period: Why Chilling Makes or Breaks Your Bake
- Elevating Your Creation: Flavor Twists and Troubleshooting
- Calculating Nutritional Estimates for Your Homemade Cookie Dough
- Recipe FAQs
- 📝 Recipe Card
The 'Can't-Go-Wrong' Classic Butter Cookie Dough Base
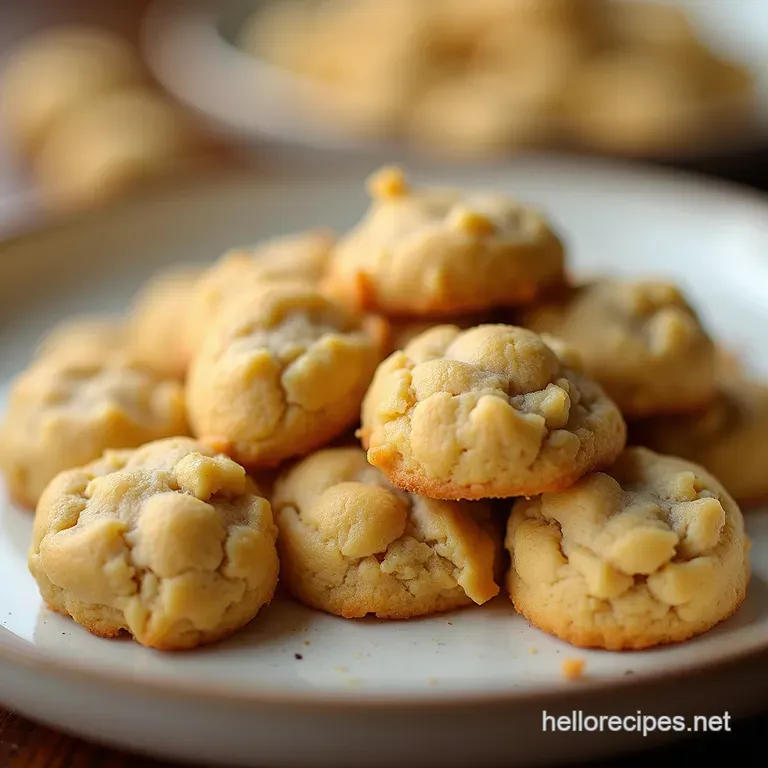
This recipe is the absolute bedrock of classic home baking that perfect, buttery dough that tastes exactly like childhood memories. It’s delightfully straightforward, balances sweetness and richness beautifully, and serves as the perfect canvas for chocolate chips, nuts, dried fruit, or a dusting of sea salt.
Think of it as the dough equivalent of a proper Sunday roast reliable, comforting, and universally loved. We are charting the course for your definitive Basic Cookie Dough , a simple yet profound recipe that yields approximately 24 standard sized drop cookies, ready to transform into whatever your heart desires.
The estimated active prep time is a mere 20 minutes, though we must dedicate a crucial 30– 60 minutes afterward to chilling. This recipe is classified as Easy; it relies primarily on the tried and-true creaming method, ensuring success even for those new to the mixing bowl.
Why This Basic Cookie Dough is Your Kitchen MVP
Every great baker needs an anchor recipe, and this buttery foundation is it. It’s the starting point for so many beloved variations, from the classic Chip Cookie Recipe to ornate shortbreads.
Mastering this Basic Cookie Dough Base means you’ve mastered the fundamental relationship between fat, sugar, and flour the trinity of cookie science.
This approach avoids complex folding techniques, focusing instead on temperature and timing to deliver consistent, chewy, yet perfectly structured results every time.
Unlocking the Secret to Uniformly Perfect Cookies Every Time
Consistency in baking comes down to controlling variables. For this Basic Cookie Dough , the secret to uniformity lies in temperature control and precise scooping.
We use a combination of granulated and brown sugar a crucial part of the Basic Cookie Dough Ratio —to balance crisp edges with a wonderfully moist, chewy interior.
Once the dough is mixed, chilling is non-negotiable; it allows the flour to fully hydrate and solidifies the butter, dramatically reducing unwanted spread during baking.
The Foundation: Understanding the Core Components of Quality Dough
To build superb cookies, we must respect the role of each component. We start with 1 cup (227g) of unsalted butter, softened but not melted, which provides richness and aids in aeration when creamed.
The sugars ¾ cup (150g) of granulated and ¾ cup (165g) of packed light brown sugar do more than sweeten; the brown sugar introduces molasses, which retains moisture and contributes to that desirable chewiness.
We bind it all with two large eggs and a generous tablespoon of pure vanilla extract. This mixture forms the wet foundation for any great Basic Cookie Dough for Add-Ins .
Childhood Nostalgia Baked In: Why We Start Simple
There’s a magic in simplicity. While complicated recipes have their place, nothing beats the straightforward goodness of a vanilla forward, buttery cookie. This foundational recipe is ideal for those looking for a Basic Cookie Dough Recipe Small Batch , though it scales easily.
On top of that,, for those needing egg-free options, this base can often be adapted though we'll discuss that in the variations making it versatile. For now, we focus on the perfect texture achievable with the standard ingredients listed.
The Essential Pantry Lineup for Superior Dough Results
Gathering your mise en place before you begin mixing is the hallmark of an organized kitchen. For this recipe, you’ll need 2 ¼ cups (280g) of all-purpose flour, which must be carefully measured.
Leavening is handled by 1 teaspoon (5g) of baking soda, which interacts perfectly with the sugars to provide just the right lift. Don’t forget the ½ teaspoon (3g) of fine grain salt; it’s vital for balancing the sweetness and bringing out the deep butter notes.
A critical piece of equipment is your mixer a stand mixer or a sturdy electric hand mixer makes the creaming process effortless, though strong arms can certainly manage with a good wooden spoon.
Heavy duty baking sheets lined with parchment paper or silicone mats are essential for preventing sticking and ensuring even heat distribution.
Precise Measurements: Your Blueprint for Success
Accuracy is paramount in baking. When developing this Basic Cookie Dough Ratio , we aim for a structure that holds its shape but remains tender. Using a digital scale for your flour (280g) and sugars (315g total) offers the best results, but if you rely on volume measurements, ensure you spoon the flour into your cup and level it off rather than scooping directly.
Selecting Fats and Sugars: Texture is Everything
As mentioned, we use a 1:1 ratio of granulated to brown sugar by volume (though the brown sugar is slightly denser by weight). The contrast between the crystalline structure provided by the white sugar and the hygroscopic, moist nature of the brown sugar is what prevents a flat, crispy cookie and instead yields the perfect tender crumb.
Always use butter; margarine or oils simply cannot replicate the flavour or texture achieved by high-quality unsalted butter softened to room temperature.
Dry Component Integrity: Flour Choices and Leavening Agents
Using standard all-purpose flour works perfectly here. Do not substitute with cake or bread flour unless you are intentionally trying to alter the outcome significantly. The 1 teaspoon of baking soda is necessary because we are using a relatively high amount of acidic brown sugar; the soda reacts to create the rise.
Ensure your baking soda is fresh, as old leavening agents are a primary cause of dense, flat cookies.
The Tools of the Trade: Essential Equipment Checklist
Beyond the mixer, a rubber spatula is your best friend for scraping down the sides of the bowl this ensures every ingredient is fully incorporated. A cookie scoop (medium size, about 1.5 tablespoons) is highly recommended, especially if you plan on adding heavy inclusions later, as it guarantees every cookie bakes at the same rate.
Related Recipes Worth Trying
- The Ultimate MeltAway Grandmas Butter Cookies — Looking for the perfect Grandmas Butter Cookies This classic recipe delivers meltinyourmouth nostalgic biscuits with just a hint of vanilla Get baking
- Safe Brown Butter Chocolate Chip Edible Cookie Dough Recipe — The easiest edible cookie dough recipe featuring heattreated flour and browned butter for incredible depth Guaranteed safe to eat by the spoonful
- NoBake Chocolate Chip Edible Cookie Dough EggFree — Craving chocolate chip cookie dough This easy recipe for edible cookie dough skips the raw eggs and oven time So safe so simpleget scooping
step-by-step Mastery: Crafting the Ultimate Basic Cookie Dough
The process begins by whisking your dry components flour, baking soda, and salt in a separate bowl. This simple action distributes the leavening evenly, preventing pockets of soda in your finished cookie.
Next, turn your attention to the mixer bowl. Here, you will cream the softened butter with both sugars on medium speed. This step is critical; you must beat them until the mixture is visibly lighter in color and fluffy in texture, incorporating tiny air bubbles that will support the cookie structure.
Once airy, beat in the two room temperature eggs, one at a time, ensuring full incorporation before adding the next, followed by the vanilla. Finally, reduce your mixer speed to low and gradually add the flour mixture, mixing only until the streaks of dry flour disappear. Stop immediately.
Overmixing at this stage develops gluten, leading to tough cookies.
The Crucial Resting Period: Why Chilling Makes or Breaks Your Bake
Once combined, flatten the Basic Cookie Dough into a disc, wrap it tightly in plastic wrap, and refrigerate it. This chilling phase is perhaps the most frequently skipped, yet it’s vital for creating a superior product.
Creaming Perfection: Achieving the Ideal Butter Sugar Emulsion
The initial creaming stage is where you introduce air. When butter and sugar are beaten together correctly, the sugar crystals cut into the fat, creating microscopic pockets of air. These pockets expand in the oven, providing lift and tenderness. If you rush this step, your cookies will be denser.
Integrating Wet and Dry Elements Without Overmixing
When adding the flour mixture, keep the mixer speed low. As soon as the last dry streaks vanish, switch off the machine and finish any remaining small incorporation by hand with a spatula.
This minimal handling ensures that the gluten strands in the flour remain short, resulting in a tender bite, which is essential for a fantastic Basic Cookie Dough Base .
Shaping Techniques: From Log to Scoop Preparation
If you plan to make a standard drop cookie, use your scoop to portion the dough onto parchment lined sheets, spacing them about two inches apart to allow for spread. If you are using this as a Basic Cookie Dough for Mix Ins that are particularly heavy (like large chunks of toffee), chilling the dough first will make scooping much easier.
Elevating Your Creation: Flavor Twists and Troubleshooting
This dough is incredibly adaptable. You can easily shift its profile by incorporating extras during the final mixing stage, turning your standard batch into an entirely new experience.
Flavor Injections: Simple Add-Ins to Transform the Base Recipe
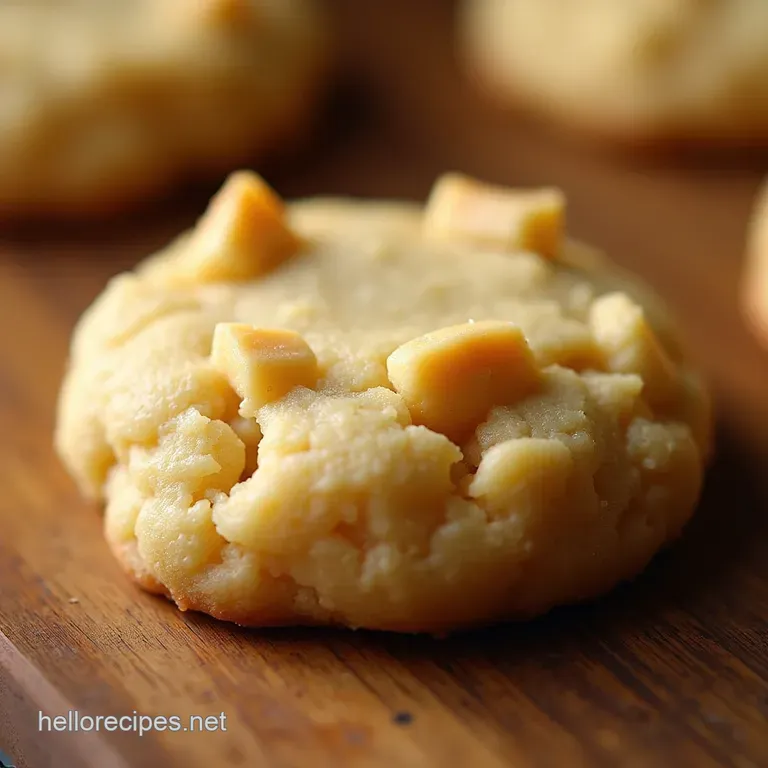
This template is perfect for creating a Chip Cookie Recipe variation. Once the dough is mixed, fold in 1 ½ cups of your preferred chips (milk, dark, or white).
You can also introduce nuts, finely chopped dried fruits, or a sprinkle of flaky sea salt on top before baking for textural contrast. For a richer flavour, you can even substitute the vanilla with almond extract or use browned butter instead of freshly softened butter (ensure the browned butter is cooled before creaming).
This adaptability is why mastering this Basic Cookie Dough for Add-Ins is so valuable.
Troubleshooting Common Dough Dilemmas (Too Sticky? Too Crumbly?)
If your dough feels excessively sticky after chilling (often due to high humidity), add an extra tablespoon or two of flour. If, conversely, it seems too crumbly and won’t hold together when scooped, it might be too cold or slightly under mixed.
Let it sit at room temperature for 5– 10 minutes, or slightly increase the vanilla extract if you suspect the wet-to-dry ratio is off. Remember, if you are attempting a Basic Cookie Dough Recipe No Egg variant, you may need a liquid binder like milk or applesauce to compensate for the missing moisture and structure from the yolks.
Freezing the Dough: Best Practices for Future Baking Sessions
Unbaked dough freezes beautifully. Scoop your dough portions onto a tray, freeze them solid for about two hours, and then transfer the frozen balls to an airtight freezer bag. They will keep well for up to three months.
When you’re ready to bake, simply place the frozen dough balls directly onto your lined baking sheet no need to thaw but you may need to add 1 2 extra minutes to the baking time.
Calculating Nutritional Estimates for Your Homemade Cookie Dough
For the pure, unadulterated dough made from the listed measurements (yielding roughly 24 cookies), a single serving comes in around 130 145 calories, largely driven by the butter content. This estimate will change significantly once you introduce additions like chocolate or nuts.
Storage Solutions: Keeping Your Unbaked Dough Freshest for Longer
Refrigerated, this Basic Cookie Dough Base will keep well, tightly wrapped, for up to five days. The flavour often deepens slightly overnight, which is a nice side effect of the resting period. Always ensure it’s wrapped securely to prevent it from absorbing any refrigerator odours.
Calculating Nutritional Estimates for Your Homemade Cookie Dough
For the pure, unadulterated dough made from the listed measurements (yielding roughly 24 cookies), a single serving comes in around 130 145 calories, largely driven by the butter content. This estimate will change significantly once you introduce additions like chocolate or nuts.
When you follow this blueprint, you are securing a reliable, delicious foundation for all your baking endeavours. Enjoy the process, trust the chilling time, and get ready for that perfect, nostalgic chew!

Recipe FAQs
Why does my Basic Cookie Dough spread out so much in the oven that they look like pancakes?
This is almost always down to the butter temperature or skipping the chill time. If your butter is too melted, the fat melts too quickly in the oven, causing rapid spreading. Make sure you chill the dough for at least 30 minutes; this firms up the butter so the cookies hold their shape better while baking.
I'm new to baking; do I really need to chill this cookie dough? What happens if I skip it?
Absolutely, chilling is non-negotiable for the best results! Skipping it results in flatter, greasy tasting cookies because the flour hasn't had time to fully hydrate. Chilling allows the dough to relax and the fats to solidify, giving you that desirable thick, chewy centre think of it as letting the dough have a nice cuppa before it gets to work.
How long can I keep this basic cookie dough in the fridge, and can I freeze it for later?
This dough will keep happily in an airtight container in the fridge for up to three days perfect for baking fresh cookies whenever the mood strikes! For longer storage, roll the dough into logs or balls, wrap tightly in plastic wrap, and freeze for up to three months.
Just thaw in the fridge overnight before baking.
Can I substitute the brown sugar in this recipe, or change the type of fat used?
If you swap all the brown sugar for granulated sugar, the cookies will lose moisture and become crisper rather than chewy a texture more like a classic shortbread. For the fat, while you can substitute butter with shortening, you'll lose that wonderful rich flavour that makes these cookies so divine; butter is definitely recommended here.
My cookies seem a bit dry after baking. Did I measure the flour incorrectly, or overbake them?
Dry cookies usually point to either too much flour or baking them for too long. Remember the golden rule: spoon the flour into the measuring cup, don't pack it! Also, always pull cookies when the edges are set but the centres still look slightly soft; they finish cooking beautifully on the hot tray outside the oven.
Classic Cookie Dough Base
Instructions:
Nutrition Facts:
| Calories | 140kcal |
|---|---|
| Fat | 8g |
| Fiber | 0.5g |
