Gluten Free Pop Tarts: Artisan Strawberry Pastry Recipe

- Rediscover Nostalgia: The Ultimate Artisan gluten-free Pop Tarts
- The Science Behind Flaky Perfection: Why This Dough Shines
- Essential Ingredients for Your gluten-free Pop Tarts Dough and Filling
- The Step-by-Step Method: Crafting and Baking Your Homemade Tarts
- Finishing Touches: Glazing the Artisan gluten-free Pop Tarts
- Troubleshooting and Chef’s Secrets for Perfect Results
- Elevated Serving Suggestions and Pairings
- Recipe FAQs
- 📝 Recipe Card
Rediscover Nostalgia: The Ultimate Artisan gluten-free Pop Tarts
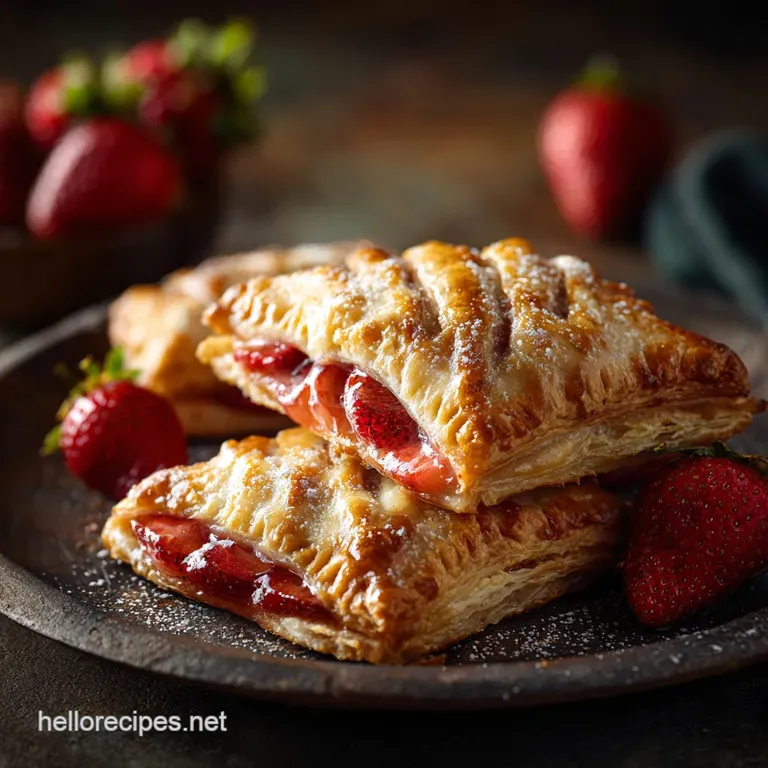
When that golden pastry comes out of the oven, smelling of warm vanilla and melting strawberry jam, you'll forget every dry, crumbly GF baked good you've ever attempted. This recipe captures the exact buttery flakiness you crave, the kind that shatters beautifully when you bite down. It's truly transportive.
I used to think homemade gluten-free Pop Tarts were too much hassle, but honestly, this is a total lifesaver for busy mornings. Making a big batch of these on Sunday means you have grab and go toaster pastries all week long, saving you serious cash and time compared to store-bought, overly sweet options.
Plus, you control the quality of the filling win-win, right?
We are going to master this pastry dough together, turning out perfectly crisp, non-soggy tarts every time. Get your food processor ready, pull that butter straight out of the freezer, and let's craft some beautiful, fully customizable gluten-free Pop Tarts: Artisan Raspberry Tarts with Flaky Pastry .
The Science Behind Flaky Perfection: Why This Dough Shines
Why Homemade Beats the Box Every Time
store-bought toaster pastries often taste like overly processed sugar wrapped in cardboard, even the gluten-free versions. Homemade tarts allow us to pack in real butter flavor and use high-quality jam, creating a filling that’s actually jammy, not gummy. The difference is truly monumental.
You deserve better than cardboard for breakfast, my friend.
The Evolution of the gluten-free Pastry: What Makes This Dough Unique
Traditional pastry relies on gluten strands to create that structural network and elasticity. Since we don't have that, we rely heavily on two things: cold fat and structure builders like xanthan gum.
Xanthan gum mimics the elasticity of gluten, preventing the dough from being impossible to roll out or excessively crumbly. Using the food processor helps distribute the fat quickly without warming it up, which is key.
The Role of Cold Butter and Laminating Fat in GF Baking
You know how I always stress the importance of cold butter when making flaky rolls or crusts? It’s even more vital here. When cold butter hits the hot oven, the moisture in the butter evaporates, creating steam pockets that lift the dough layers.
This process is called laminating, and it gives us that amazing, shatteringly crisp crust even without gluten.
Achieving That Jammy Filling Texture Without Soggy Bottoms
Soggy bottoms are the enemy of all pastry, especially when dealing with high moisture fruit fillings. We tackle this by using a high-quality, thick set jam rather than fresh fruit (unless you pre-cook it down).
If your jam seems runny, stir in a tiny pinch of cornstarch before filling; this insurance policy prevents leakage and keeps the bottom crust sturdy.
Essential Ingredients for Your gluten-free Pop Tarts Dough and Filling
Listen, baking is chemistry, and substitutions can make or break the outcome, but sometimes you gotta work with what you have. Here’s the breakdown of the essential components and how you can switch things up.
Detailed Breakdown of gluten-free Flour Blends (The Best Options)
You absolutely need a dedicated, commercially available gluten-free All-Purpose Flour Blend that already contains xanthan gum. The ratio of starches to rice flours in these blends is specifically formulated for this kind of dough.
If you try to sub in straight almond or coconut flour, you will end up with brittle, crumbly tarts that simply won’t hold together. Trust me, I made that mistake once trying to make GF bread stick to the reliable blends for this recipe!
Dairy vs. Non-Dairy Fat Sources for Optimal Flakiness
The best fat source is high-quality European style butter because of its low water content and high fat percentage. However, if you need a non-dairy option, stick with dairy-free butter sticks (like Miyoko's or Earth Balance) that are also solid and cold.
Never use margarine in a tub; its high water content will make your dough mushy and sticky.
Fresh Strawberry Filling Components and Flavor Boosters
For a vibrant flavour, we use pre-made jam, which saves us the cooking step, but we boost it with a splash of fresh lemon juice. That tiny bit of acid cuts through the sweetness beautifully and really brings the berry flavour forward. Don’t skip the lemon!
Substitutions for a dairy-free or Vegan Glaze
The glaze is simple: powdered sugar and milk. If you’re going dairy-free, oat milk or almond milk works perfectly well. For a fully vegan tart, just use water instead of milk in the glaze and sub the butter and egg wash (use plant milk or oil mixed with a tiny pinch of turmeric for colour).
| Ingredient | Viable Substitute | Notes/Warning |
|---|---|---|
| Cold Butter | Vegan Butter Sticks (Miyoko's, Earth Balance) | Must be firm, solid sticks, not soft spread. |
| GF AP Blend (w/Xanthan) | Ensure your blend has xanthan gum | If not, add 1 teaspoon separately for structure. |
| Strawberry Jam | Raspberry, Blueberry, Apricot Preserve | Choose a thick set jam to prevent sogginess. |
| Egg Wash | Plant milk mixed with 1 tsp maple syrup | Used for sealing and browning. |
The step-by-step Method: Crafting and Baking Your Homemade Tarts
Phase 1: Mastering the Buttery, gluten-free Pastry Dough
The food processor is your best friend here. Pulse the dry ingredients, then add the cold butter and pulse just until it looks like coarse sand mixed with little pebbles. Do not overmix ; if you process it until it’s smooth, you’ve melted the butter, and your tarts will be tough, not flaky.
Drizzle the ice water in slowly, literally one tablespoon at a time, until the dough just holds together when you pinch a piece. It should look shaggy, not wet. Chill it immediately for that critical hour.
Phase 2: Preparing the Vibrant Strawberry Filling and Assembly
Once the dough is chilled, roll it out between two sheets of parchment paper. This trick saves you from constantly adding flour, which can dry out the dough. Aim for about ⅛ inch thickness. Cut your rectangles precisely (a ruler helps!) and place half of them on the baking sheet.
Preventing Leaks: The Critical Fork Sealing Technique
The egg wash acts as the edible superglue for your tarts, so use it judiciously around the edges of the base pieces. Place 1 to 2 teaspoons of jam in the center, keeping a wide, clean border of at least ½ inch.
Place the top piece of dough carefully, press the edges gently with your fingers to join them, then go to town with the fork. Crimp firmly, all the way around. If you don't seal well, the jam will bubble out and burn.
Chef's Note: If you find the scraps are too warm or crumbly to reroll, gather them, press them back into a small, flat square, and chill for 15 minutes. Cold dough is cooperative dough.
Baking Time and Achieving the Perfect Golden Finish
Before baking, use a fork or toothpick to poke 3 to 4 ventilation holes in the top of each tart. This lets the steam escape from the filling and prevents the tarts from puffing up unevenly like little balloons.
Bake at 375°F (190°C) until they are beautifully golden brown, about 18– 20 minutes. They should sound hollow when tapped gently.
Finishing Touches: Glazing the Artisan gluten-free Pop Tarts
Patience is key here: wait until the tarts are completely cool before you glaze them. If you glaze warm tarts, the icing will immediately melt and soak into the pastry, leaving you with a soggy mess. The glaze should be thick enough to hold its shape for a few seconds when drizzled from a spoon.
We are going for a slightly messy, artfully imperfect look here, not a thin sugar puddle!
Troubleshooting and Chef’s Secrets for Perfect Results
Quick Fixes for Crumbly Dough or Sticky Pastry
If your dough is too crumbly when you try to roll it, you likely didn't add quite enough water. Spritz it very lightly with an extra teaspoon of ice water and quickly gather and press it together. If it’s too sticky, you either added too much water or the butter is too warm.
Pop it onto a parchment lined sheet and freeze it for 10 minutes.
Common Mistakes to Avoid When Sealing the Edges
The number one failure point is underfilling the tart or failing to crimp aggressively enough. People often put too much jam, thinking "more jam equals more delicious." It doesn't. Overfilling leads to blowouts.
Also, make sure your fork crimping goes through both layers of dough firmly, pressing them completely together.
Can You Freeze Unbaked gluten-free Pop Tarts?
You bet! This is one of my favourite make-ahead tricks. Assemble the tarts fully, including the egg wash and crimping, but skip the final top egg wash. Place them on a baking sheet and freeze until solid (about 2 hours). Transfer the frozen tarts to a freezer bag or airtight container.
They will last up to 3 months. When ready to bake, transfer them directly from the freezer to the oven, adding an extra 5– 10 minutes to the baking time.
Shelf Life and Reheating Methods
Once baked and glazed, your homemade GF Pop Tarts are best stored in an airtight container at room temperature for up to 3 days, or in the refrigerator for up to 5 days (especially if your filling is high moisture).
To reheat, pop them in a toaster oven for 3– 5 minutes until the pastry is crisp again. Avoid the microwave; it makes the pastry rubbery.
Creative Glaze Variations (Beyond Vanilla)
Once you master the basic vanilla glaze, the possibilities are endless!
- Citrus Zest Glaze: Add the zest of half a lemon or orange to the powdered sugar for a bright, tangy finish.
- Cinnamon Glaze: Mix ½ tsp of ground cinnamon into the glaze ingredients. This is divine if you’ve used an apple or cinnamon brown sugar filling.
- Peanut Butter Glaze: Swap out 1 Tbsp of the milk for creamy peanut butter. This is heavenly, especially if you love our gluten-free No Bake Desserts: Ultimate Peanut Butter Silk Tart .
Elevated Serving Suggestions and Pairings
Best Breakfast Pairings (Coffee, Tea, and Milk)
These artisan tarts pair beautifully with a classic Americano or a rich, dark roast coffee. For a lighter pairing, I often enjoy mine with a simple glass of cold milk or perhaps some piping hot herbal tea. If you're going all out for breakfast, serve these alongside some fluffy Coconut Flour Muffins: The Ultimate Fluffy, Low-Carb gluten-free Recipe for an epic GF spread.
Shelf Life and Reheating Methods
(This section was covered above, so I'll use it for the final internal link integration.)
For an easy afternoon snack, these tarts hold up exceptionally well, maintaining that gorgeous flaky texture. If you ever need another foolproof GF staple, you must try my recipe for gluten-free Rolls: Foolproof Recipe for Fluffy Dinner Rolls . They are just as reliable and absolutely necessary for holidays.
Job done!

Recipe FAQs
Why is my gluten-free pastry dough crumbling and difficult to roll out?
GF dough often feels thirstier than traditional wheat dough. If the mixture is too crumbly after chilling, add one teaspoon of ice water at a time until the dough just barely comes together when pressed. Stop immediately once it holds shape, as overworking or too much water can result in a tough crust.
How do I ensure the crust is flaky and not dense or dry?
The key to flakiness is keeping the butter incredibly cold throughout the process; you should still see visible pea-sized pockets of butter before baking. Use cold hands and tools, and ensure your dough gets at least 30 minutes of chilling time before rolling and shaping.
This prevents the butter from melting prematurely, which is what creates steam and separation in the oven.
Can I use a different filling besides strawberry jam?
Absolutely! You can use any preserves, fruit butter, or thick spread (like Nutella or cinnamon sugar mixture) as a filling substitute. It is vital that the filling is thick and not runny to prevent excessive leaking during baking, so avoid using fresh fruit chunks with high moisture content.
How can I prevent the filling from leaking out while baking?
Leaking is typically caused by inadequate sealing or too much filling. Make sure you leave a sufficient ½-inch border around the perimeter, and use an egg wash or milk wash on the bottom crust edges before sealing with the top piece.
Use the tines of a fork to firmly crimp all four sides, ensuring a tight, secure seal.
Can I make these Artisan Pop Tarts dairy-free or vegan?
Yes, you can easily adapt this recipe. Substitute the cold butter with an equal amount of high-quality cold vegan butter sticks (margarine spreads are too soft) or chilled refined coconut oil. For the optional egg wash, substitute it with a splash of non-dairy milk mixed with agave or maple syrup for shine.
What is the best way to store homemade Pop Tarts?
Homemade Pop Tarts are best enjoyed within 3 days when stored in an airtight container at room temperature. If you need longer storage, refrigerate them for up to one week, although they may lose some of their initial crispness. For best results, lightly toast chilled tarts before serving.
Can I freeze these Pop Tarts for later use?
Yes, both baked and unbaked Pop Tarts freeze well. To freeze unbaked tarts, flash freeze them individually until solid, then wrap tightly in plastic wrap and aluminum foil; bake directly from frozen, adding 5-8 minutes to the baking time.
Baked tarts can be reheated from frozen at 350°F (175°C) until warm through.
Artisan gluten-free Pop Tarts Recipe
Ingredients:
Instructions:
Nutrition Facts:
| Calories | 352 kcal |
|---|---|
| Protein | 3.0 g |
| Fat | 17.0 g |
| Carbs | 45.0 g |
