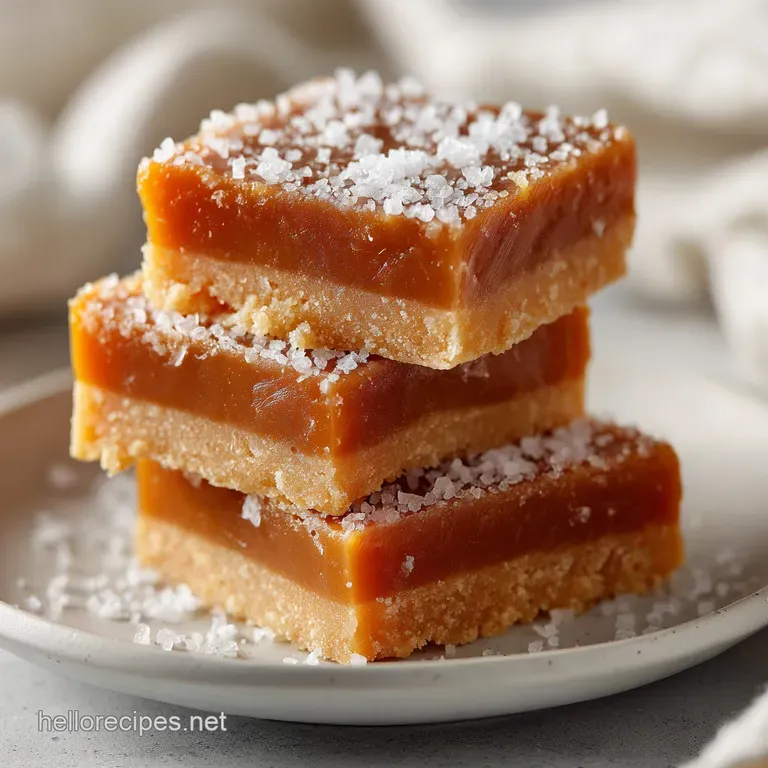
Salted Caramel Butter Bars: Crispy and Buttery
- Time:15 minutes prep + 45 minutes cook + 3 hours chilling = 4 hours total
- Flavor/Texture Hook: Shatteringly crisp shortbread meets molten, buttery caramel
- Perfect for: High impact holiday gifting or a decadent weekend baking project
- Mastering the Ultimate Salted Caramel Butter Bars Recipe
- Key Techniques for Layered Flavor Success
- Ingredient Deep Dive for Peak Texture
- Selecting Quality Components for Vibrant Flavor Layers
- Tooling Up for Effortless Caramel Success
- A Sensory Guide to Baking Golden Layers
- Refining Your Technique and Avoiding Sogginess
- Creative Twists to Customize Your Butter Bars
- Guidelines for Scaling and Adjusting
- Preserving the Shatteringly Crisp Shortbread Crust
- Enhancing the Experience with Thoughtful Pairings
- Debunking Common Butter Bar Myths
- Recipe FAQs
- 📝 Recipe Card
Mastering the Ultimate Salted Caramel Butter Bars Recipe
I remember the first time I pulled a tray of these out of the oven on a rainy Tuesday. The kitchen didn't just smell like baking; it smelled like a professional candy shop. There is something almost hypnotic about the scent of butter browning against brown sugar it’s deep, nutty, and incredibly comforting.
When I finally cut into them after the agonizing three hour wait, the sound of the shortbread base giving way was a distinct, satisfying snap.
You’ve probably had "caramel bars" before that were either too hard to bite through or so soft they turned into a sticky puddle on the plate. We’ve all been there. But this version is different because it treats the caramel filling like a true emulsion.
It’s rich, stable, and has that perfect "pull" without sticking to your teeth. It’s the kind of treat that makes people stop talking the moment they take a bite, focusing entirely on that hit of flaked sea salt against the sweet, velvety filling.
This recipe is essentially a love letter to high-quality butter. Since we’re using a full pound for the base and another cup for the filling, you really taste every bit of that dairy goodness. If you've been looking for that one dessert that secures your spot as the favorite person at the potluck, this is it.
It’s bold, it’s decadent, and honestly, it’s surprisingly straightforward once you understand how the layers interact.
Key Techniques for Layered Flavor Success
The magic here isn't just in the ingredients, but in the specific way we manipulate the temperatures and textures. Most people rush the caramel or overwork the dough, but a few small adjustments in your technique will yield professional results every single time.
- Structural Pre Baking: Baking the shortbread base halfway creates a "crust seal" that prevents the liquid caramel from soaking in and making the bottom soggy.
- Emulsion Stability: Using light corn syrup acts as an "interfering agent," which prevents sugar crystals from bonding together and making the caramel grainy.
- Controlled Hydration: Powdered sugar in the base provides a finer crumb than granulated sugar alone, as the cornstarch often found in powdered sugar helps regulate moisture.
- Carryover Setting: The caramel continues to cook and firm up as it cools, which is why that three hour refrigeration period is non negotiable for structural integrity.
| Finish Type | Chilling Time | Texture Profile | Best For |
|---|---|---|---|
| Room Temp | 1 hour | Gooey, molten, messy | Warm dessert bowls with ice cream |
| Refrigerated | 3 hours | Firm, chewy, clean cut | Party platters and gift boxes |
| Overnight | 8+ hours | Dense, fudge like, snappy | Mail order shipping or hot climates |
The distinction between a "good" bar and a "legendary" bar often comes down to the temperature of your ingredients when you start. For the base, we want the butter soft enough to cream with sugar, but for the filling, we start with cubed butter in the pan to ensure it melts at the same rate as the brown sugar and condensed milk.
This prevents the fat from separating and pooling on top of your bars.
Ingredient Deep Dive for Peak Texture
| Component | Science Role | Pro Secret |
|---|---|---|
| Powdered Sugar | Creates a "short" crumb | Sift it first to avoid tiny white flour pockets in the crust. |
| Condensed Milk | Provides protein for browning | Use full fat versions for the most velvety mouthfeel and stability. |
| Corn Syrup | Prevents sugar crystallization | It keeps the caramel smooth for days, even when stored in the fridge. |
| Flaked Sea Salt | Contrast and flavor masking | Apply only after the second bake to keep the crystals from dissolving. |
The interaction between the sugars and the fats here is what creates that "vibrant" flavor profile. While the granulated sugar in the base provides sweetness, the brown sugar in the caramel provides depth via molasses. If you are looking to master other butter heavy foundations, you might find my Honey Butter Dinner Rolls helpful for understanding how fats affect dough elasticity.
Selecting Quality Components for Vibrant Flavor Layers
- 1 lb unsalted butter, softened: Why this? The foundation of the shortbread’s flavor and delicate, flaky texture. (Sub: Salted butter, but omit extra salt in the dough).
- 1 cup granulated white sugar: Why this? Provides sweetness and helps the edges of the crust crisp up. (Sub: Caster sugar for an even finer texture).
- 1.5 cups powdered sugar: Why this? Ensures the shortbread is tender rather than crunchy. (Sub: Extra granulated sugar, though the texture will be grainier).
- 2 tbsp pure vanilla extract: Why this? Rounds out the buttery notes and adds a floral aroma. (Sub: Vanilla bean paste for visible specks).
- 4 cups all purpose flour, leveled: Why this? Provides the bulk of the structure for both base and crumble. (Sub: A 1:1 gluten-free baking blend).
- 1 cup salted butter, cubed: Why this? The salt in this butter balances the intense sweetness of the filling. (Sub: Unsalted butter plus 1/4 tsp extra salt).
- 1 cup light brown sugar, packed: Why this? Adds the necessary molasses notes for a classic caramel profile. (Sub: Dark brown sugar for a deeper, toffee like flavor).
- 28 oz sweetened condensed milk (two 14 oz cans): Why this? The thickener that creates a fudge like caramel layer. (Sub: There is no direct substitute for this specific texture).
- 2 tbsp light corn syrup: Why this? Prevents the caramel from becoming grainy or "sugary." (Sub: Honey or golden syrup, though flavors will change).
- 1 tsp fine sea salt: Why this? Seasons the filling from within. (Sub: Table salt, use slightly less).
- 1 tbsp flaked sea salt: Why this? Provides a tactile crunch and a sharp flavor contrast. (Sub: Coarse kosher salt).
Tooling Up for Effortless Caramel Success
You don't need a professional pastry kitchen to make Salted Caramel Butter Bars, but a few specific tools will make your life much easier. First and foremost, a heavy bottomed saucepan is your best friend.
Thin pans have "hot spots" that can scorch the milk proteins in the condensed milk before the butter is even fully melted.
A stand mixer, like a KitchenAid, is also a massive help for the base. Creaming a full pound of butter with two types of sugar takes some muscle if you're doing it by hand, and you want that mixture to be truly pale and fluffy. Finally, don't skip the parchment paper.
Because the caramel is so sticky, trying to pry these out of a greased pan without a parchment "sling" is a recipe for broken bars and a very frustrated cook.
A Sensory Guide to Baking Golden Layers

- Preheat your oven to 325°F (165°C). Line a 9x13 inch baking pan with parchment paper, leaving an overhang on the sides for easy removal. Note: This overhang allows you to lift the entire block out for easy slicing.
- In a large mixing bowl or stand mixer, cream the 1 lb of softened unsalted butter with the granulated sugar and powdered sugar until light and pale. Stir in the vanilla extract.
- Gradually add the all purpose flour on low speed until a soft dough forms. Do not overmix, or the crust will become tough instead of flaky.
- Measure out and set aside 2 cups of the dough to be used for the crumble topping. Press the remaining dough firmly and evenly into the bottom of the prepared 9x13 pan.
- Bake the crust for 18–20 minutes until the edges are just barely starting to turn a light mahogany color. Remove from the oven and let cool slightly while preparing the filling.
- In a medium heavy bottomed saucepan, combine the 1 cup cubed salted butter, light brown sugar, sweetened condensed milk, and light corn syrup. Whisk over medium low heat until the butter is melted and the mixture is fully emulsified.
- Stir the fine sea salt into the caramel mixture. Pour the hot caramel evenly over the pre baked shortbread base.
- Crumble the reserved 2 cups of dough over the top of the caramel layer. Sprinkle the flaked sea salt over the top.
- Return the pan to the oven and bake for an additional 25–30 minutes until the filling is bubbly and the crumble topping is golden brown.
- Remove from the oven and allow to cool completely at room temperature. Refrigerate for at least 3 hours until the center feels firm to the touch before cutting into 24 squares.
Refining Your Technique and Avoiding Sogginess
The biggest hurdle with any caramel based bar is the transition between the layers. If the caramel is too thin, it will seep into the crust; if it's too thick, it won't spread. I once made the mistake of pouring the caramel while it was still boiling aggressively, and it actually melted the top of my pre baked crust, creating a weird, swirled mess.
It still tasted good, but the texture was all wrong.
Why Your Caramel Layer Separated
If you see a layer of oil sitting on top of your caramel after baking, it usually means the emulsion broke during the stovetop phase. This happens if the heat is too high or if you didn't whisk constantly.
| Problem | Root Cause | Solution |
|---|---|---|
| Runny Caramel | Underbaked or not chilled | Chill for the full 3 hours; the caramel needs time to set its structure. |
| Tough Crust | Overworked dough | Mix flour only until no white streaks remain; do not beat it. |
| Grainy Filling | Sugar didn't dissolve | Whisk over medium low heat until completely smooth before pouring. |
Common Mistakes Checklist
- ✓ Always use "packed" brown sugar to ensure you have the correct moisture content for the caramel.
- ✓ Level your flour with the back of a knife; too much flour makes the base dry and crumbly.
- ✓ Don't skip the corn syrup; it's the insurance policy against a grainy, sandy texture.
- ✓ Wait for the "barely mahogany" edge on the crust before adding the filling.
- ✓ Let the bars reach full room temperature before putting them in the fridge to prevent condensation.
Creative Twists to Customize Your Butter Bars
Once you've mastered the classic version, there are so many ways to play with the flavor profile. If you're a fan of deeper, more complex fats, you could try incorporating a Brown Butter Sauce technique by browning the butter for the filling first. This adds a toasted, nutty aroma that pairs beautifully with the salt.
2 Flavor Twists
- The Nutty Crunch: Add 1 cup of toasted, chopped pecans or walnuts to the crumble topping before the final bake. The tannins in the nuts cut through the richness of the butter.
- The Mocha Infusion: Stir 1 tablespoon of instant espresso powder into the caramel filling. It doesn't make it taste like coffee, but it deepens the "toffee" notes of the brown sugar.
2 Diet Swaps
- gluten-free: Use a high-quality 1:1 gluten-free flour blend. Since there is no eggs for structure, the xanthan gum in the blend is essential.
- dairy-free: Use a plant based butter stick (not tub margarine) and a coconut based sweetened condensed milk. Note: The caramel will be softer and have a slight tropical hint.
Guidelines for Scaling and Adjusting
If you're baking for a smaller household, you can easily halve this recipe and bake it in an 8x8 inch square pan. The bake times will remain roughly the same, though you should start checking the crust at the 15 minute mark.
When halving, it’s best to measure the condensed milk by weight (14 oz) rather than trying to eyeball half a can.
When scaling up for a huge crowd (like a wedding or a big bake sale), I recommend making two separate batches in two 9x13 pans rather than trying to double the recipe into one giant sheet pan. The caramel cooks more evenly in the standard size, and you won't risk the edges burning while the center remains raw.
| Premium Choice | Budget Alternative | Flavor Impact | Savings |
|---|---|---|---|
| European Butter | Store Brand Butter | Less "grassy" depth | $4.00 - $6.00 |
| Vanilla Bean Paste | Imitation Vanilla | Loss of floral complexity | $3.00 - $5.00 |
| Flaked Maldon Salt | Coarse Kosher Salt | Less "shatter" in the crunch | $2.00 - $3.00 |
Preserving the Shatteringly Crisp Shortbread Crust
These bars are surprisingly hardy thanks to the high sugar and fat content, which act as natural preservatives. At room temperature, they’ll stay fresh in an airtight container for about 3 to 4 days.
If you keep them in the fridge, they’ll last up to a week, though the crust will lose a bit of its "shatter" and become more of a dense cookie texture.
To freeze them, I recommend slicing them into bars first. Place them on a baking sheet in the freezer for an hour to "flash freeze" the caramel, then wrap each bar individually in plastic wrap before tossing them into a freezer bag. They’ll stay perfect for up to 3 months.
To reheat, just let them sit on the counter for 20 minutes; you don't actually want to microwave them, as the caramel will turn into a liquid mess before the base is even warm.
If you find yourself with leftover scraps or broken bars, don't throw them away! Chop them up into small chunks and fold them into softened vanilla bean ice cream. The salty sweet crunch against cold cream is a life changing experience.
Enhancing the Experience with Thoughtful Pairings
While these Salted Caramel Butter Bars are a powerhouse on their own, the way you serve them can really change the vibe. If it's a casual afternoon, a sharp, acidic cup of black coffee or a strong Earl Grey tea provides the perfect counterpoint to the richness.
The tannins in the tea literally "clean" the butter from your palate, making every bite feel like the first one.
For a more "posh" presentation, serve a single square slightly chilled with a dollop of unsweetened whipped cream or a side of tart raspberries. The acidity of the fruit cuts right through the heavy caramel, balancing the sugars.
If you're feeling adventurous, a small glass of tawny port or a nutty sherry alongside these bars makes for an incredible grown up dessert course. Just remember: because they are so rich, a small square goes a long way.
Debunking Common Butter Bar Myths
One major misconception is that you need a candy thermometer to make the caramel filling. While thermometers are great for hard candies, this filling is stabilized by the proteins in the condensed milk.
You aren't looking for a specific "stage" of sugar (like soft ball or hard crack); you're simply looking for the mixture to emulsify and thicken slightly. If it's smooth and coats the back of a spoon, you're good to go.
Another myth is that you must use unsalted butter for everything. While I use unsalted for the base to control the salt levels, using salted butter in the filling actually adds a layer of seasoning that you can't get by just adding salt at the end.
It integrates into the fat more effectively, creating a more cohesive flavor. Finally,, don't believe the idea that "more salt is always better." There is a fine line between "salted caramel" and "salty caramel" stick to the measurements, especially with the flaked salt on top!

Recipe FAQs
How to ensure the bars slice cleanly?
Refrigerate the bars for at least 3 hours before cutting. This chilling time is essential for the caramel layer to set, which prevents the squares from becoming messy or sticky when you slice them.
Is it true I can bake these bars a day ahead?
Yes, this is an excellent make-ahead strategy. You can bake the full tray up to 2 days in advance, though it is best to leave the bars uncut until just before serving to maintain the cleanest possible edges.
How to achieve the perfect shortbread texture?
Do not overmix the dough once the flour is added. If you enjoyed mastering this specific fat-to-sugar ratio, you can apply the same structural logic to our edible cookie dough for consistent results.
How to tell when the crust is ready for the filling?
Remove the crust from the oven once the edges turn a light mahogany color. The 18 20 minute bake time creates a structural moisture barrier that keeps the base crisp despite the heavy caramel layer on top.
Is it necessary to use a heavy bottomed saucepan for the caramel?
Yes, it is highly recommended. A heavy bottomed pan provides even heat distribution, which is crucial for emulsifying the butter, brown sugar, and sweetened condensed milk without scorching the bottom.
How to keep the caramel layer from splitting?
Whisk the mixture continuously over medium low heat until fully smooth. This constant movement ensures the butter and condensed milk stay emulsified, resulting in a velvety texture that won't separate or become oily.
Why is my crumble topping not golden brown?
Check that you are baking for the full 25 30 minutes in the second stage. The filling needs that time to bubble, which simultaneously toasts the reserved dough crumbles into a golden, buttery topping.
Salted Caramel Butter Bars
Ingredients:
Instructions:
Nutrition Facts:
| Calories | 483 kcal |
|---|---|
| Protein | 5g |
| Fat | 26g |
| Carbs | 59g |
| Fiber | 1g |
| Sugar | 43g |
| Sodium | 412mg |
