Vegan Peanut Butter Nobake Cookies the Proper Chocolate Fix
- Ditching the Oven: Why This Proper Vegan Peanut Butter NoBake Cookie Recipe Is Essential
- The Proper British Teatime Treat, Reimagined: Decadent & Dairy and Free
- Mastering the Key Components: Essential Ingredients for the Perfect Batch
- Beyond the Basics: The Specific Tools Required for No and Bake Success
- The Quick 10 Minute Method: Step and by-Step Assembly of Your Vegan Peanut Butter NoBake Cookies
- Getting the Set Right: Critical Tips for Perfectly Formed Cookie Discs
- Storage Secrets and Extending Shelf Life: Keeping Your Treats Fresh
- Customizing the Classic: Easy Variations to Spice Up Your Vegan Peanut Butter NoBake Cookies
- Recipe FAQs
- 📝 Recipe Card
Ditching the Oven: Why This Proper Vegan Peanut Butter NoBake Cookie Recipe Is Essential
Look, sometimes I just cannot be bothered with the oven. Who has time to wait for preheating, manage multiple trays, and worry about whether the bottoms are going to burn before the middle is set? Not me, especially when I need a serious chocolate and peanut butter fix right now .
This recipe for Vegan Peanut Butter NoBake Cookies is my ultimate emergency dessert. It’s the kind of thing you whip up when your friend texts to say they’re dropping by in 45 minutes, or when you’ve had a terrible day and need guaranteed comfort food that doesn’t require complex chemistry.
It uses the simplest kitchen science (sugar crystallization) to deliver perfectly chewy, intensely flavored biscuits without ever touching the hob dial past ‘medium’.
I’ve had my share of no and bake disasters, trust me. I’ve made batches that slid off the parchment paper and ones that crumbled into powdery dust the second you looked at them. These tips, however, fix all of that. We’re aiming for dense, glossy, and perfectly set perfection. It’s brilliant.
The Proper British Teatime Treat, Reimagined: Decadent & Dairy and Free
In the UK, we love a good, sturdy biscuit with our tea, and this is the vegan answer to that. These aren’t delicate little things. They are robust, chewy hockey pucks of bliss. The combination of salt, sugar, rich cocoa, and natural peanut oil just hits every single satisfying note. The best part?
No eggs, no dairy, and they are inherently gluten and free (as long as you use certified oats, of course). It’s maximum flavour payoff for minimum effort.
Sweet, Salty, and Satisfying: Achieving the Perfect Texture (Chewy vs. Crumbly)
Texture is everything here. We are aiming for chewy, firm, and fudgy. If they come out crumbly, it’s usually because you boiled the sugar mixture too long. Boiling the sugar too much concentrates it to the point where it becomes brittle upon cooling. If they come out too gooey, you didn't boil it long enough.
The 60 second rule (which we will hammer home later) is the difference between a beautiful, chewy Vegan No Bake Cookie With Oats and a sad, sticky mess.
The Ultimate Rushed Dessert: Ready Before the Kettle Whistles
Seriously. Once you get the hang of the method, the active cooking time is about five minutes. Five minutes! You stir, you boil, you mix, you scoop. By the time your kettle has boiled, you’ve poured your tea, and you’ve scrolled through Instagram for a few minutes, these babies are ready for the fridge.
They only need 30 minutes to set firm in the refrigerator. That’s faster than ordering delivery, isn’t it?
How These No and Bake Marvels Beat Traditional Baked Biscuits
For one, consistency. When you bake, you worry about hot spots in the oven, ambient temperature, and whether your flour ratios are spot on. With these Peanut Butter No Bake cookies, the setting process is entirely based on precise heat application on the hob, which is much easier to control.
Plus, you avoid the heavy, dense texture that often comes with vegan baking when you replace eggs. These are light, somehow, despite being so rich.
Answering the Big Question: Are These No and Bake Cookies Truly Healthy?
Let’s be real. These are still a sweet treat. They contain sugar and fat. But they are a thousand times better than the ultra and processed rubbish you find in a store wrapper.
They’re made with wholesome ingredients (oats and peanut butter are genuinely good things) and you control exactly what goes into the pot. Compared to a standard baked cookie that might use refined white flour, these Vegan Peanut Butter Oatmeal No Bake Cookies offer fiber and protein from the oats and peanuts.
It’s a guilt and free indulgence, definitely.
Mastering the Key Components: Essential Ingredients for the Perfect Batch
The real secret to making these work is understanding the role of each ingredient. The sugar is the structure. The fat and milk carry the flavor. The peanut butter and oats are the binders that turn the liquid into a solid mass. You can’t skimp or swap carelessly here, or the whole thing fails.
Beyond the Basics: The Specific Tools Required for No and Bake Success

You really don’t need much, which is another reason I love this. A standard 3 quart saucepan (make sure it has a heavy bottom, otherwise things burn quickly), a good rubber spatula, and two baking sheets lined with parchment.
CRUCIAL NOTE: Do yourself a huge favour and use a standard cookie scoop. Trying to eyeball the size with a spoon leads to messy, weirdly shaped Vegan No Bake Chocolate Peanut Butter Bars that don’t set uniformly. A scoop makes the whole process tidy and quick.
Selecting the Right Peanut Butter (Crucial for Setting Consistency)
This is a make and or-break moment. You want creamy peanut butter, absolutely. If you use natural peanut butter (the kind that separates oil at the top), you must stir it thoroughly first. If you use the separated oil, your cookies will be greasy and will struggle to set properly.
I often recommend using a stabilized, no and stir brand here, simply because it’s consistent and reliable. Avoid crunchy. We want smooth texture.
Which Oats Work Best? The Certified Gluten and Free Requirement
The oats provide the bulk and chew. You have two main choices:
- Quick and Cooking Oats: My preferred option. They absorb the liquid quickly and yield a smoother, slightly more compact cookie.
- Old and Fashioned Rolled Oats: These give you a much chewier, heartier bite. If you like rustic texture, use these, but they might need an extra five minutes of chilling time to feel truly firm.
Sweetener Showdown: Granulated Sugar vs. Maple Syrup Alternatives
I wish I could tell you that you can use maple syrup entirely. You cannot. The setting ability of these cookies comes from the granulated sugar dissolving and then boiling, causing the water to evaporate and the sugar to reach a specific concentration that crystallizes when cooled.
Maple syrup, while lovely, does not crystallize reliably in this way, leading to a perpetually gooey mess. Use the white granulated sugar; it's essential for structure.
Coconut Oil vs. Vegan Butter: Choosing Your Binding Agent
I usually opt for refined coconut oil because it’s neutral in flavor and firms up beautifully, which aids the setting process. However, if you want a richer, more familiar, buttery taste (like the classic bake and sale cookies), use good quality vegan butter sticks (the kind that are solid at room temp).
Both work, but the coconut oil gives a cleaner flavour that lets the peanut butter and chocolate shine.
Troubleshooting Ingredient Swaps: Ensuring Flavor and Structure
If you mess with the ratio of sugar to liquid (milk and fat), the setting fails. If you try to swap out the peanut butter for low and fat spread, you won’t have enough fat to hold the oats together. The ingredients listed are a carefully balanced chemical equation.
If you want to try a substitute (like sunbutter for peanuts), keep the measurements exact.
Related Recipes Worth Trying
- NoBake Pumpkin Marshmallow Pie Easy Autumn Dessert Recipe — This NoBake Pumpkin Marshmallow Pie is the ultimate effortless autumn dessert Achieve a light velvety Cool Whip Pumpkin Pie texture without turning on the...
- Chickpea Tikka Masala The Effortless Creamy Vegan Curry — Master this Effortless Chickpea Tikka Masala recipe Get a creamy restaurantquality Homemade Indian Chickpea Curry in just 50 minutes Vegan option included
- Pita Tostadas with Butternut Squash Black Beans Av Crisp Healthy Ready in 55 Min — Pita Tostadas with Butternut Squash Black Beans Av delivers ultimate flavor fusion This healthy vegetarian dish swaps corn for crispy pita featuring spiced...
The Quick 10 Minute Method: Step and by-Step Assembly of Your Vegan Peanut Butter NoBake Cookies
Right then, let's crack on. Remember, speed is key here, especially after the boil. Have your oats measured and your parchment paper lined up.
- The Base: Combine the granulated sugar, plant milk, vegan fat, cocoa powder, and salt in your saucepan. Turn the heat to medium. Stir this mixture constantly until the fat is melted and the whole thing looks shiny and uniform.
- The Boil: Bring it to a full, rolling boil. I mean serious bubble action that doesn't disappear when you try to stir it.
- The Clock: Once that full, rolling boil is established, time it for exactly 60 seconds. Do not touch the spatula. Walk away if you have to.
- Flavour Drop: Immediately yank the pot off the heat. Stir in the vanilla extract and the creamy peanut butter. Stir like your life depends on it until the peanut butter is completely melted and the mixture is glossy, smooth, and deeply colored. This is the stage where the heat is binding the fats and sugars together.
- The Fold: Dump in the rolled oats. Fold them in quickly but gently with your spatula. You want every oat coated, but you don't want to overmix or dilly and dally, because the temperature is dropping, and it’s going to start seizing up fast.
- Scoop and Set: Use your cookie scoop to drop the mixture onto the prepared sheets. Try to work fast. Get them into the fridge, or just leave them on the counter if your kitchen is cool, and walk away for 30 minutes.
Getting the Set Right: Critical Tips for Perfectly Formed Cookie Discs
Getting the sugar mixture right is the most common sticking point. If you master the boil, you master the cookie.
Phase One: Achieving the Perfect Rolling Boil (The Setting Catalyst)
The reason we need a rolling boil is twofold: it kills any potential bacteria, sure, but more importantly, it ensures the mixture hits the required temperature (about 230°F or 110°C) needed to evaporate enough liquid. If you only see a shimmer or soft bubbles, you’re not there yet.
Wait for aggressive, furious bubbling before starting that 60 second timer.
The Quick and Mix Technique: Incorporating Oats Without Overworking the Mixture
Once the peanut butter is mixed in, the clock starts ticking. The whole mass is cooling down and will turn from fudgy liquid to sticky solid very quickly. If you add the oats and keep stirring for ages, you risk losing the sheen and ending up with dry and looking clumps.
Mix until just combined about 10 to 15 quick folds and stop.
Scooping & Shaping: Achieving Uniform Size and Thickness
Using a scoop ensures that every single cookie has the same volume and, critically, the same mass. This means they will all set at the same rate. If you have big chunky cookies next to thin flat ones, the thin ones will likely be hard and brittle by the time the big ones are set.
How Long Must They Chill? Accelerating the Setting Time
You can absolutely leave these out on the counter if your kitchen is cool (say, 68°F/20°C or below). They need about 45 minutes that way. However, if it’s summer or you live somewhere humid, the fridge is your friend.
30 minutes in the fridge is usually all it takes to get them perfectly firm.
| Environment | Optimal Setting Location | Time Estimate | Notes |
|---|---|---|---|
| Cool/Dry Kitchen | Countertop | 45 min 1 hour | Best texture, less cold/hard. |
| Warm/Humid Kitchen | Refrigerator | 30 minutes | Mandatory for preventing stickiness. |
Storage Secrets and Extending Shelf Life: Keeping Your Treats Fresh
These treats store beautifully. Once they are fully set and hardened, transfer them to an airtight container. At room temperature (provided your room isn't sweltering), they will stay fresh and chewy for 4 to 5 days.
If you keep them in the refrigerator, they'll last closer to 7 to 10 days, although they will be firmer and chewier straight from the cold. I recommend letting them sit at room temp for 10 minutes before eating if they came from the fridge.
Customizing the Classic: Easy Variations to Spice Up Your Vegan Peanut Butter NoBake Cookies
The basic recipe is brilliant, but sometimes you need a little pizzazz.
Freezing Instructions: Making a Double Batch for Later
Yes! These freeze incredibly well. Once they are fully set, lay them in a single layer on a sheet tray and pop them in the freezer for about an hour. Once solid, transfer them to a sturdy freezer bag or airtight container, layering them between sheets of parchment paper. They are good for up to three months.
To thaw, just set them on the counter for 20 minutes.
Flavor Boosters: Adding Coffee, Vanilla, or Spices
If you want to add an extra layer of complexity, try adding 1 teaspoon of instant coffee powder (not grounds, the powder!) to the boiling liquid stage. It deepens the chocolate flavor unbelievably. You could also try:
- 1/2 teaspoon ground cinnamon for warmth.
- A pinch of cayenne pepper for a subtle Mexican hot chocolate vibe (trust me).
- Switching 1/4 of the oats for crisped rice cereal for extra crunch.
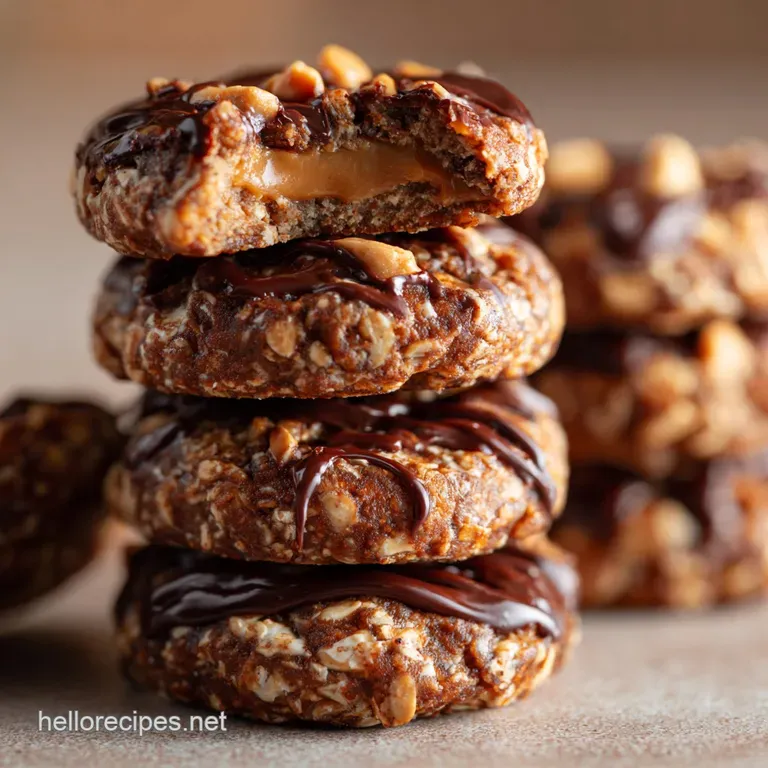
Chocolate Drizzle and Topping Ideas for Extra Decadence
If you want to take these Vegan Chocolate Peanut Butter No Bake Cookies to the next level, melt a few ounces of vegan chocolate chips (with a tiny bit of coconut oil) and drizzle it over the set cookies. A light dusting of flaky sea salt on top of the fresh drizzle looks amazing and adds a sophisticated pop of flavor.
Troubleshooting Common Mistakes (Too Gooey or Too Crumbly)
- Problem: Too Gooey/Won't Set. You didn't boil long enough (less than 60 seconds), or you added too much liquid (check your milk measurement). Put the mixture back in the pot, bring it to a rolling boil again, and time it strictly for 60 seconds. Add a tiny splash of extra oats if needed, but be careful not to make them too dry.
- Problem: Too Crumbly/Dry. You boiled too long (over 70 seconds). The mixture got too hot and evaporated too much moisture. The fix here is slightly messier: place the crumbled mixture back in the pot with 1 or 2 tablespoons of extra plant milk, warm gently just until glossy, then scoop immediately. They might not be as perfect, but they’ll be salvaged.

Recipe FAQs
Help! My "Vegan Peanut Butter NoBake Cookies" are still mushy. What went wrong?
The critical 60-second boil wasn't timed precisely, preventing the necessary sugar crystallization needed to bind the oats. Ensure your rolling boil is vigorous and timed exactly to guarantee a firm set; otherwise, you'll have a sticky mess a proper kitchen disaster!
My mixture turned out crumbly and dry did I definitely boil it for too long?
Yes, absolutely! Boiling for longer than the specified minute evaporates too much liquid, which causes the final product to be dry and difficult to scoop. If you catch it early, try stirring in 1 tablespoon of warmed plant milk to try and rescue the stiff mixture before it’s too late.
How should I store these delicious little biscuits, and how long do they keep?
Keep them in an airtight tin at room temperature for 3 4 days, or pop them in the fridge for up to a week if you prefer a firmer chew, especially during the warmer summer months. They also freeze brilliantly for up to three months, perfect for having a stash ready for unexpected guests or a proper cuppa.
I need to make these nut-free for the school bake sale; what’s the best alternative to peanut butter?
Sunflower seed butter (Sunbutter) is the champion substitution here; it maintains the creamy texture and rich flavour profile without compromising safety. Be aware, however, that it can react with the sugar and turn the cookies slightly green after a few hours, which is just harmless chemistry playing silly beggars.
Can I use natural peanut butter, or do I need the processed stuff?
You can use natural peanut butter, but you must ensure it is exceptionally well stirred before measuring to incorporate all the oil back into the solids. If there is too much free oil, the fat ratios will be off, resulting in greasy cookies that don't set 'bang on' firmly.
Proper Vegan Peanut Butter Nobake Cookies

Ingredients:
Instructions:
Nutrition Facts:
| Calories | 275 calories |
|---|---|
| Fat | 15 grams |
| Fiber | 3 grams |
