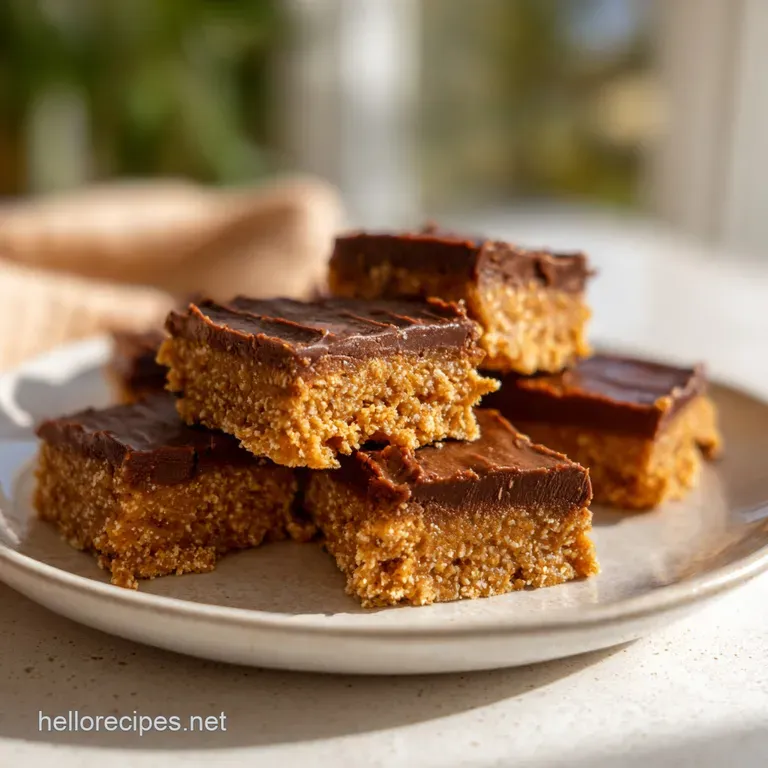
No Bake Peanut Butter Bars: Silky and Crisp
- Time: Active 15 minutes, Passive 60 minutes, Total 75 minutes
- Flavor/Texture Hook: Silky peanut butter base with a crisp chocolate snap
- Perfect for: Last minute potlucks or keeping the kitchen cool in summer
- Optimizing Your Preparation Time
- Selecting The Best Pantry Staples
- Minimal Tools For Maximum Flavor
- Crafting Your No Bake Treat
- Solving Common Texture Issues
- Making This Recipe For Everyone
- Keeping Your Desserts Fresh
- Creative Ways To Serve Bars
- Debunking Common Kitchen Myths
- Final Thoughts on Efficiency
- Recipe FAQs
- 📝 Recipe Card
Optimizing Your Preparation Time
The success of this treat depends entirely on how the fats interact with the dry components. When we mix melted butter with peanut butter, we are creating a lipid rich environment that prevents the powdered sugar from feeling grainy.
The sugar dissolves just enough into the fats to create a smooth mouthfeel, while the graham cracker crumbs provide the skeletal structure that keeps everything from turning into a puddle at room temperature.
Structural Reinforcement: The graham cracker crumbs act as a sponge, absorbing excess oils from the peanut butter to ensure the bars stay firm.
Crystalline Stability: Sifted powdered sugar provides a fine grain sweetness that integrates seamlessly, avoiding the gritty texture found in lower quality versions.
Thermal Setting: Using melted butter allows for easy mixing, but as it cools in the fridge, it returns to a solid state, effectively "locking" the crumbs in place.
| Prep Method | Active Time | Setting Time | Texture Result |
|---|---|---|---|
| Room Temp | 15 minutes | 4 hours | Soft and fudge like |
| Refrigerator | 15 minutes | 60 minutes | Firm and sliceable |
| Freezer | 15 minutes | 20 minutes | Extra dense and cold |
When you are in a rush, the freezer is your best friend, but for the absolute best texture, the slow chill of the refrigerator is the way to go. It allows the flavors of the peanut butter and chocolate to meld without becoming too hard to bite through.
I usually aim for that 60 minutes mark because it hits the sweet spot between efficiency and quality.
Selecting The Best Pantry Staples
I have learned the hard way that not all peanut butters are created equal when it comes to no bake treats. You want to avoid the "natural" versions where the oil separates at the top for this specific recipe.
The stabilized, creamy commercial brands provide the consistent emulsification needed to keep the bars from becoming greasy or crumbly.
| Ingredient | Science Role | Pro Secret |
|---|---|---|
| Creamy Peanut Butter | Primary Binder | Use room temperature for easier mixing |
| Powdered Sugar | Structural Sweetener | Always sift to prevent "sugar pockets" |
| Graham Cracker Crumbs | Bulking Agent | Grind them extra fine for a smoother base |
Getting the crumb size right is a small detail that makes a massive difference. If your crumbs are too large, the bars will fall apart the moment you try to lift them out of the pan. I like to pulse mine in a food blender until they look like fine sand.
It might seem like an extra step, but it ensures that every bite is consistent.
Minimal Tools For Maximum Flavor
You really don't need a pantry full of specialized gadgets to make this work. A simple 8x8-inch square baking pan is the gold standard here. If you use a larger pan, your layers will be too thin and lose that satisfying ratio of chocolate to peanut butter.
If you use a smaller one, they might be too thick to eat comfortably.
I always suggest using parchment paper with a bit of an overhang. It’s like having "handles" for your dessert. It prevents that awkward moment where you're trying to pry the first square out with a knife and end up ruining the edges.
A flat bottomed measuring cup is also a secret weapon for pressing the base down; it gives you a level of evenness that your hands just can't match.
For melting the chocolate, a microwave safe bowl is usually the fastest route, but you have to be careful. Chocolate is temperamental. If you hit it with too much heat for too long, it will seize up and turn into a grainy mess.
The 30 second interval rule isn't just a suggestion; it is the difference between a glossy finish and a ruined batch.
Crafting Your No Bake Treat
- Line an 8x8-inch square baking pan with parchment paper, leaving an overhang on two sides for easy removal. Note: This ensures you can lift the entire block out later for clean cuts.
- In a large mixing bowl, combine the melted 0.5 cup (115g) unsalted butter, 1.5 cups (150g) graham cracker crumbs, and 2 cups (240g) sifted powdered sugar.
- Stir in the 1.5 cups (260g) of creamy peanut butter until the mixture reaches the consistency of damp sand.
- Transfer the mixture to the prepared pan and press down firmly and evenly using the bottom of a flat measuring cup. Note: Packing it tightly is the key to structural integrity.
- In a microwave safe bowl, combine the 1.5 cups (250g) semi sweet chocolate chips and the remaining 2 tablespoons (32g) of peanut butter.
- Heat in 30 second intervals, stirring until the chocolate is completely smooth and glossy.
- Pour the melted chocolate mixture over the peanut butter base and spread evenly with an offset spatula.
- Refrigerate for at least 1 hour until the chocolate top is firm and matte.
- Lift the parchment paper handles to remove the slab from the pan.
- Slice into 16 squares using a warm knife for the cleanest edges.
Chef's Tip: If the chocolate layer seems too hard to slice without cracking, let the pan sit at room temperature for 5 minutes before cutting. This softens the top just enough to let the knife glide through.
Many people skip the step of adding peanut butter to the chocolate topping, but it's a mistake I once made that I'll never repeat. Without that extra bit of fat from the peanut butter, the chocolate sets into a very hard shell. When you go to take a bite, the whole top layer can shatter or peel off the base.
The peanut butter keeps the chocolate slightly "soft set," which means it stays together when you bite in.
If you find yourself enjoying this process, you might want to look at other no bake options. For example, my safe edible cookie dough uses a similar philosophy of heat treating flour (or avoiding it) to make a dessert that's ready in minutes.
Solving Common Texture Issues

The most common frustration I hear is about the bars being too crumbly. This almost always comes down to the measurement of the graham cracker crumbs. If you pack your measuring cup too tightly with crumbs, you'll end up with a dry base. Use a spoon to fill the cup and level it off.
Crumbly Base Problems
If your bars are falling apart, the ratio of dry to wet ingredients is off. This often happens if the peanut butter used was too dry or if the butter wasn't fully melted.
Oily Surface Issues
Sometimes you'll see beads of oil on top of the peanut butter layer. This is usually caused by using "natural" peanut butter or mixing the base while the butter is piping hot. Let the butter cool for a minute after melting before you add it to the sugar and crumbs.
Chocolate Blooming
If your chocolate top turns white or cloudy, it’s called "bloom." This happens when the chocolate is heated too quickly or cooled too fast. It's still perfectly safe to eat, but it doesn't look as pretty. Keeping the microwave intervals short helps prevent this.
| Problem | Root Cause | Solution |
|---|---|---|
| Bars Fall Apart | Too many crumbs | Increase peanut butter by 1 tablespoon |
| Greasy Texture | Separated peanut butter | Use stabilized commercial creamy brands |
| Cracked Top | Chocolate too cold | Add 1 tsp of coconut oil to the melt |
Once you understand these basic mechanics, you can troubleshoot any batch. But honestly, even a "failed" batch that is a bit crumbly still tastes like a dream when stirred into a bowl of vanilla ice cream.
Common Mistakes Checklist
- ✓ Did you sift the powdered sugar? (Prevents tiny white lumps)
- ✓ Is the parchment paper long enough? (Avoids digging the bars out)
- ✓ Did you use creamy, not crunchy peanut butter? (Crunchy changes the binding)
- ✓ Was the chocolate stirred between every interval? (Prevents burning the bottom)
- ✓ Did you wait the full 60 minutes? (Crucial for the fat to solidify)
Making This Recipe For Everyone
One of the reasons I love this easy no bake peanut butter dessert is how adaptable it is for different kitchens and budgets. If you are shopping on a tight budget, you can easily swap the name brand chocolate chips for a store brand bar that you chop up yourself.
In fact, some store brands actually melt smoother because they have fewer stabilizers.
| Original Ingredient | Substitute | Why It Works |
|---|---|---|
| Graham Crackers | Digestive Biscuits | Similar honey/wheat flavor and dry texture |
| Unsalted Butter | Salted Butter | Adds a nice savory kick; just skip any extra salt |
| Semi Sweet Chips | Milk Chocolate | Sweeter profile; Note: Sets softer than dark chocolate |
If you are looking for a different profile, you could even try using buttery shortbread crumbs if you have leftovers from a different baking project. The high fat content in shortbread makes for an incredibly decadent base that almost melts on the tongue.
Keeping Your Desserts Fresh
Since this is a fat based dessert, temperature is your biggest indicator of quality. If you leave these out on a warm counter during a party, they will soften. While they won't melt into a puddle immediately, they lose that distinct "snap" that makes them so professional.
For storage, keep them in an airtight container in the fridge for up to 2 weeks. I actually think they taste better on day three because the graham cracker crumbs have had more time to soften slightly into the peanut butter, creating a texture that's almost like a truffle.
If you want to keep them longer, they freeze beautifully. Wrap individual squares in plastic wrap and then place them in a freezer bag. They will stay fresh for up to 3 months. When you're ready to eat one, just let it sit on the counter for 10 minutes.
It's like having a homemade candy bar stash ready at any moment.
Creative Ways To Serve Bars
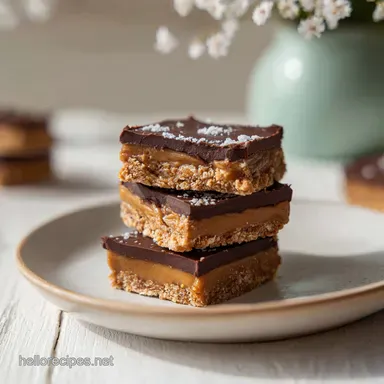
While these are incredible on their own, there are ways to make them feel a bit more "gourmet." A tiny pinch of flaky sea salt on top of the chocolate before it sets completely can transform the flavor profile.
The salt cuts through the richness of the peanut butter and makes the chocolate taste deeper and more intense.
If you are serving these at a party, try cutting them into tiny 1 inch "bites" rather than large squares. Because they are so rich, a smaller portion is often more than enough. You can also drizzle a little extra melted peanut butter over the top in a zig zag pattern to give them a professional, bakery style look.
Don't forget that these can be a base for other things too. You can crumble them over a bowl of chocolate mousse or use them as the "crust" for a no bake cheesecake. The possibilities are endless once you have the foundation of this recipe down.
I've found that people often ask about the "health" aspect of no bake treats. While these are definitely an indulgence, you can feel a bit better knowing exactly what went into them. No high fructose corn syrup or strange preservatives just simple pantry staples that you probably already have in your kitchen.
If you're ever in the mood for something with a bit more fruit, you might enjoy a classic apple pie, though that does require the oven! But for those days when you want maximum reward for minimum effort, this peanut butter treat is the undisputed champion.
Debunking Common Kitchen Myths
There is a common belief that no bake desserts are "cheating" or somehow less impressive than baked goods. This couldn't be further from the truth. Professional chocolatiers spend years mastering the art of the "cold set," and this recipe uses those same principles.
Another myth is that you must use coconut oil to get a glossy chocolate top. While coconut oil does add shine, the 2 tablespoons of peanut butter we add to our chocolate chips achieve the same result while keeping the flavor consistent with the base. It also prevents the chocolate from becoming too brittle.
Finally,, some think you can't over mix a no bake base. Actually, if you over work the mixture while the butter is warm, you can force the oils out of the peanut butter, leading to a greasy finish. Stir just until combined and then stop.
Respecting the ingredients is just as important here as it is with a delicate souffle.
Final Thoughts on Efficiency
The beauty of this easy no bake dessert with few ingredients and peanut butter is that it fits into a busy life. You can whip it up while waiting for your coffee to brew in the morning, and by lunchtime, you have a perfect treat ready to go.
It proves that you don't need a massive grocery bill or a professional kitchen to make something that people will talk about for weeks.
The next time you're standing in front of your pantry, wondering what to make for that last minute gathering, remember the 15 minute prep time and the simple joy of peanut butter and chocolate. It’s a classic for a reason, and now you have all the tricks to make it better than the store-bought version.
Enjoy the process, and more importantly, enjoy that first, perfect, chilled bite.

Recipe FAQs
Is it true I must use crunchy peanut butter for better texture?
No, this is a common misconception. You must use creamy peanut butter because the oils and particle size are optimized to bind with the graham cracker crumbs and sugar, creating a smooth, dense base that crunchy peanut butter cannot achieve.
How to get the perfect smooth finish on the chocolate layer?
Spread the melted mixture immediately using an offset spatula. Working quickly while the chocolate is warm ensures a level surface, which is a technique that also helps you achieve a professional finish when frosting our moist banana cake.
How to prevent lumps in the peanut butter base?
Sift the powdered sugar before combining it with the butter and crumbs. This simple step removes compacted clumps that would otherwise stay visible and gritty in your finished dessert.
How to ensure the bars release easily from the pan?
Line the 8x8-inch pan with parchment paper, leaving an overhang on two sides. These handles allow you to lift the set block out of the pan cleanly after the required 60 minutes in the refrigerator.
Can I speed up the chilling process by putting them in the freezer?
No, stick with the 1-hour refrigerator recommendation. Rapid freezing can cause the fats in the butter and peanut butter to seize unevenly, potentially leading to a grainy texture rather than the desired fudgy consistency.
How to melt the chocolate without burning it?
Heat the chocolate chips and peanut butter in 30-second intervals in the microwave. Stir thoroughly between each interval to distribute the heat evenly, which prevents the bottom layer from scorching.
How to get clean slices without the chocolate cracking?
Run a sharp knife under hot water and wipe it dry before cutting. The warmth of the blade gently softens the chocolate, allowing you to slice through the 16 portions without fracturing the top layer.
No Bake Peanut Butter Bars
Ingredients:
Instructions:
Nutrition Facts:
| Calories | 333 kcal |
|---|---|
| Protein | 5.9 g |
| Fat | 20.4 g |
| Carbs | 35.5 g |
| Fiber | 1.9 g |
| Sugar | 28.8 g |
| Sodium | 142 mg |
