Easy Pie Crust: Flaky and Homemade
- Time: Active 10 minutes, Passive 60 minutes, Total 70 minutes
- Flavor/Texture Hook: Shatteringly flaky and buttery with a tender, melt in-the mouth finish.
- Perfect for: Holiday baking, busy weeknight chicken pot pies, and beginner bakers.
- Bringing Everyone Together With a Flaky Golden Crust
- Achieving a Golden Shatter in Every Single Bite
- The Logic Behind the Perfect Flake
- Component Analysis
- The Essential Pantry List
- Basic Kitchen Tools for the Minimalist Baker
- The Straightforward Preparation Steps
- Managing Common Hurdles for the Perfect Finish
- Adjusting Quantities for Every Occasion
- Debunking Old School Pastry Rules
- Keeping Your Pastry Fresh and Minimizing Waste
- Creative Ways to Flavor Your Golden Crust
- The Best Pairings for Your Homemade Bake
- Recipe FAQs
- 📝 Recipe Card
Bringing Everyone Together With a Flaky Golden Crust
There is a specific sound that happens when a sharp knife meets a properly chilled, well baked pie. It is a distinct, high pitched crackle followed by the sight of a thousand tiny, buttery layers shattering across the cutting board. I remember the first time I actually achieved that sound.
I was in my cramped first apartment, trying to impress my family during a chaotic Sunday lunch. The kitchen was sweltering, my hands were warm, and my previous attempts at pastry had always ended up either like tough cardboard or a greasy puddle.
But then, I tried the frozen butter trick. As I pulled that first successful Easy Pie Crust out of the oven, the aroma of toasted flour and high-quality butter filled the room, instantly calming the pre dinner nerves. It wasn't just a side dish; it was the star of the show.
That golden, wavy edge looked like something out of a professional bakery, and for the first time, I wasn't hiding the crust under a mountain of whipped cream.
We have all been there, hovering over a bowl of flour, terrified that one extra stir will ruin everything. This method removes that fear. It is built for the home cook who has a million things going on and just wants a reliable, fast solution that doesn't require fancy equipment or years of French culinary training.
Whether it is for a cozy autumn gathering or a quick Tuesday night meal, this is the one recipe you will keep taped to the inside of your cupboard.
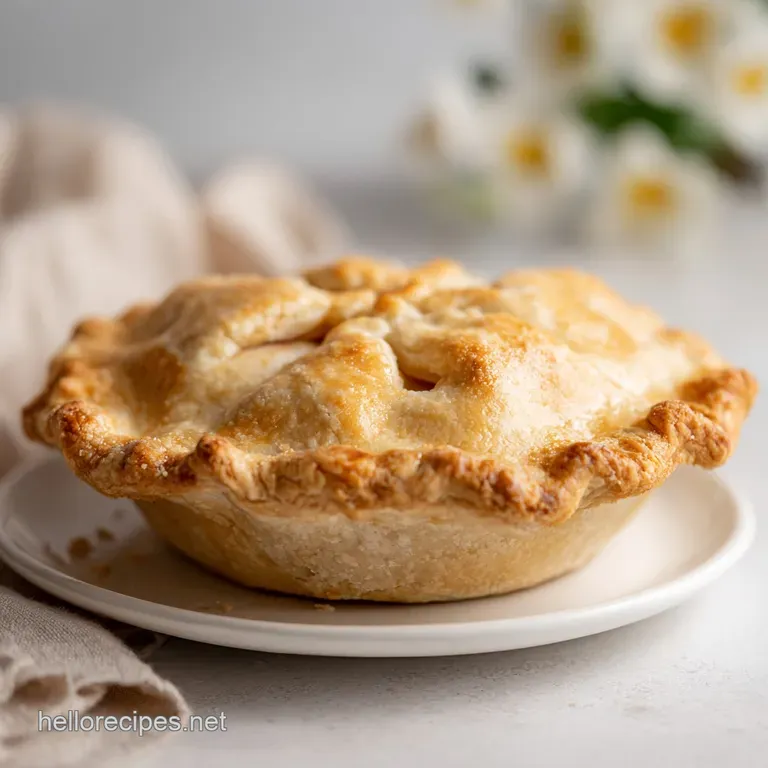
Achieving a Golden Shatter in Every Single Bite
When we talk about an Easy Pie Crust, we are looking for a very specific set of characteristics. It needs to be sturdy enough to hold a heavy fruit filling or a creamy custard, yet delicate enough that it yields the moment your fork touches it. This particular version leans into the "shatter" factor.
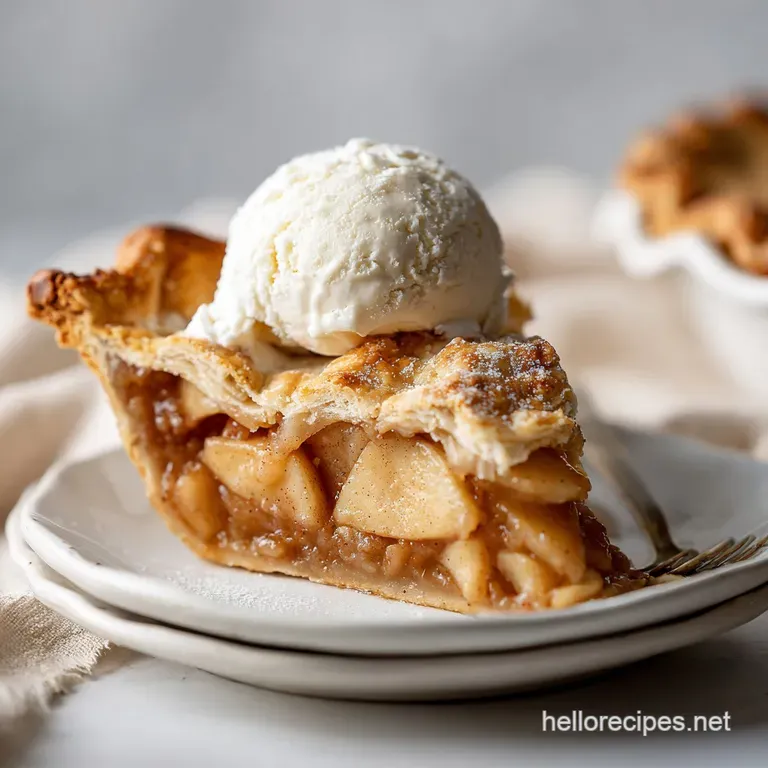
Because we use frozen butter and a box grater, the fat stays in distinct, tiny shards throughout the dough. When that cold fat hits a hot oven, it creates little steam explosions that lift the flour, creating those coveted layers.
The finish is matte golden with visible flecks of butter still trapped in the crumb. It is not overly sweet, which is why it is so versatile. I have used this for everything from a deep dish apple pie to a rustic tomato galette.
The salt content is balanced just enough to sharpen the flavors of whatever you put inside it. It’s the kind of crust that people actually finish eating, rather than leaving the edges behind on the plate like lonely little discarded handle bars.
What I love most is the texture of the dough itself while you are working it. It feels shaggy and almost messy at first, but as it rests, the flour hydrates and it becomes a velvety, pliable dream. It doesn't fight back when you roll it out.
There is no elastic "snap back" that makes you want to throw your rolling pin across the room. It stays where you put it, behaves beautifully in the pie tin, and bakes up into a crisp, structural masterpiece every single time.
The Logic Behind the Perfect Flake
Understanding the "why" helps us relax in the kitchen. Pastry is often treated like a high stakes chemistry experiment, but it is actually just about managing temperature and moisture. Here is the logic behind why this specific method works so well for a busy cook.
- Thermal Barrier: Grating frozen butter ensures the fat remains solid until the very second it hits the oven heat, which is the secret to those distinct, flaky layers.
- Gluten Interruption: The inclusion of apple cider vinegar slightly increases the acidity, which inhibits gluten development and ensures the crust stays tender rather than chewy.
- Hydration Control: Adding water one tablespoon at a time prevents over saturation, keeping the dough light and airy instead of dense and gummy.
- Steam Pockets: The tiny butter shavings create thousands of microscopic air gaps that expand rapidly during the bake, resulting in a shatter crisp texture.
Before we get into the nitty gritty of the ingredients, it is helpful to see how this simplified method compares to the traditional "rubbing in" technique that many of us grew up watching our grandparents do.
| Method | Time Investment | Skill Level | Texture Result |
|---|---|---|---|
| Box Grater (This Recipe) | 10 mins active | Beginner | Uniformly flaky and light |
| Traditional hand cut | 20 mins active | Intermediate | Irregular, rustic flakes |
| Food Processor | 5 mins active | Intermediate | Short, crumbly, and "biscuity" |
This table shows why the grater is the "sweet spot" for most home cooks. It gives you the professional results of hand cutting without the thumb cramps and the risk of melting the butter with your body heat.
Component Analysis
Choosing the right elements is half the battle. You don't need expensive specialty items, but you do need to understand how these basic pantry staples work together to create magic.
| Ingredient | Science Role | Pro Secret |
|---|---|---|
| All Purpose Flour | Provides the structural protein (gluten) needed to hold the shape. | Sift or whisk before measuring to avoid "packing" the flour too tightly. |
| Unsalted Butter | Creates the fat barriers that lead to flakiness and provides the main flavor. | Use high fat European style butter if you want an even more velvety finish. |
| Apple Cider Vinegar | Breaks down gluten bonds for a more "short" and tender crumb. | Keep the vinegar in the fridge so it doesn't warm up your ice water. |
The Essential Pantry List
To make this Easy Pie Crust, you only need six basic ingredients that are likely already in your kitchen. Stick to these measurements for a consistent result every time. This recipe yields enough for two standard crusts (top and bottom) or two separate open faced pies.
- 2.5 cups all purpose flour (315g):Why this? It has the right protein balance for both structure and tenderness.
- 1 tablespoon granulated sugar (12g):Why this? Assists in browning and balances the saltiness of the dough.
- 1 teaspoon fine sea salt (6g):Why this? Enhances the buttery flavor and strengthens the gluten slightly.
- 1 cup unsalted butter, frozen (226g):Why this? Frozen is non negotiable for the grating technique to work.
- 7 tablespoons ice water (105ml):Why this? Binds the dough without melting the fat particles.
- 1 teaspoon apple cider vinegar (5ml):Why this? Makes the dough more forgiving and easier to roll out.
For the butter, I always recommend unsalted. Salt levels in branded butter vary wildly, and using unsalted allows you to control the seasoning perfectly. If you only have salted butter, just cut the added sea salt in half.
Basic Kitchen Tools for the Minimalist Baker
One of the reasons I love this recipe is that it doesn't require a bulky food processor or a fancy pastry blender. We are keeping it simple and efficient.
- Box Grater: The hero of the recipe. Use the large holes (the ones you’d use for cheddar cheese).
- Large Mixing Bowl: Glass or metal is best as they stay colder than plastic.
- Silicone Spatula or Fork: For tossing the ingredients without using your warm hands.
- Plastic Wrap: Essential for the chilling phase to prevent the dough from drying out.
- Rolling Pin: A simple tapered French pin or a heavy marble one works best.
Chef's Tip: Put your mixing bowl and your box grater in the freezer for 10 minutes before you start. A cold environment is the best friend of a flaky crust.
The Straightforward Preparation Steps
Now, let's get into the actual making. Follow these steps closely, and pay attention to the sensory cues. The dough will look "wrong" before it looks "right," so trust the process.
- Grate the butter. Take your 1 cup (226g) of frozen butter and grate it against the large holes of the box grater. Note: Work quickly so the butter doesn't soften from the heat of your hands.
- Flash freeze. Place the grated butter shavings back in the freezer for 5 minutes. Until they are rock hard again.
- Mix dry ingredients. In your chilled large bowl, whisk together the 2.5 cups flour, 1 tablespoon sugar, and 1 teaspoon salt.
- Coat the butter. Toss the frozen butter shavings into the flour. Use a fork to lift and stir until every single shard of butter is white and coated in flour. It should look like a bowl of cold pebbles.
- Prep the liquid. Stir the 1 teaspoon apple cider vinegar into your 7 tablespoons of ice water.
- Hydrate the dough. Drizzle the water mixture over the flour one tablespoon at a time. Toss with your spatula after each addition until the dough starts to look like shaggy, damp clumps.
- Form the discs. Turn the mixture out onto a clean surface. Gently press the clumps together don't knead! and divide into two even piles.
- Wrap and flatten. Place each pile on plastic wrap, pull the edges tight to form a disc, and flatten slightly with the palm of your hand.
- Chill thoroughly. Place the discs in the refrigerator for at least 1 hour. Wait until the dough feels firm and cold to the touch before you even think about rolling it.
Managing Common Hurdles for the Perfect Finish
Even with a simple recipe, pastry can be temperamental. If things seem to be going sideways, don't panic. Most "failures" in pie crust are easily fixed if you catch them early.
Why Your Pastry is Crumbly and Dry
If your dough is falling apart as you try to roll it out, it usually means it didn't get enough water or it wasn't chilled long enough for the flour to fully hydrate. You’ll see cracks forming at the edges that look like a dry desert floor.
This is a common issue when using high protein flours that drink up more liquid.
Preventing Shrinking Edges
Nothing is more frustrating than a beautiful crust that shrinks down the sides of the tin during baking. This usually happens because the gluten was overworked or the dough didn't "relax" enough in the fridge. When gluten is tight, it acts like a rubber band, pulling back as soon as it hits the heat.
| Problem | Root Cause | Solution |
|---|---|---|
| Tough/Chewy Crust | Over handling or too much water. | Use the "toss and fold" method; don't knead the dough. |
| Greasy/Flat Crust | Butter melted before baking. | Ensure butter is frozen and dough is chilled 1 hour. |
| Soggy Bottom | Filling was too wet or oven was too cool. | Bake on the lowest rack and use a preheated baking sheet. |
Common Mistakes Checklist:
- ✓ Never skip the "flash freeze" for the butter shavings; they need to be independent of each other.
- ✓ Use actual ice in your water to keep the temperature as close to freezing as possible.
- ✓ Stop adding water as soon as the dough holds together when squeezed in your fist.
- ✓ Let the dough sit at room temperature for 5-10 minutes after chilling if it’s too hard to roll.
- ✓ Always roll from the center outward to keep the thickness even.
Adjusting Quantities for Every Occasion
This recipe is very easy to scale up if you are batch prepping for a big holiday like Thanksgiving. However, baking math isn't always linear, so follow these guidelines to keep the texture consistent.
Scaling Up (2x or 3x): When doubling the recipe to make four crusts, I recommend making them in two separate batches rather than one massive bowl. It is much easier to keep the butter cold in smaller quantities.
If you must do it all at once, reduce the total liquid by about 10% initially and only add the final splashes if absolutely necessary. Spices like salt and sugar should be scaled exactly, but be careful not to over work the larger mass of dough.
Scaling Down (1/2 batch): If you only need one single bottom crust for a quiche, you can easily halve the ingredients. Use a smaller bowl to ensure the butter stays distributed. For the apple cider vinegar, use a scant half teaspoon. The chilling time remains the same don't cut corners there!
If you’re looking for a great way to use a single crust, it pairs beautifully with the rich, custardy filling of a silky smooth pumpkin pie recipe.
Debunking Old School Pastry Rules
We've been told a lot of things about pie crust over the years that aren't strictly true. Let's clear some things up so you can bake with confidence.
- Myth: You must use a pastry blender. Truth: A box grater is actually superior for beginners because it creates uniform fat sizes without the risk of over mixing.
- Myth: Vodka is better than water. Truth: While vodka inhibits gluten, apple cider vinegar does the same job with a better flavor profile and lower cost.
- Myth: You shouldn't see chunks of butter. Truth: Large "marbled" streaks of butter are exactly what you want. Those streaks are what turn into flakes in the oven.
Keeping Your Pastry Fresh and Minimizing Waste
Proper storage is the secret to being a relaxed home cook. You can make this dough when you have a free 10 minutes and save it for when the "baking urge" strikes.
Fridge Storage: Wrap the discs twice in plastic wrap. They will stay perfectly fresh for up to 3 days. If the dough starts to turn a slightly greyish hue, that is just oxidation; it is still safe to eat, though it’s best used within 48 hours for the best flavor.
Freezer Storage: This Easy Pie Crust freezes like a dream. Wrap in plastic, then place in a heavy duty freezer bag. It will last for 3 months. To use, thaw it overnight in the refrigerator. Never thaw it on the counter, or the butter will melt!
Zero Waste Tips: Don't throw away those jagged edge trimmings! I call these "Baker's Scraps." Gather them up, sprinkle with cinnamon and sugar, and bake them on a tray for 10-12 minutes at 180°C.
They make the best little snacks while you wait for your main pie to finish. You can also use small scraps to "patch" any holes that form in your crust while you are fitting it into the tin just use a drop of water as glue.
Creative Ways to Flavor Your Golden Crust
While the classic version is perfect for almost anything, sometimes you want to give the pastry its own personality. It’s a great way to match the crust to the specific filling you are using.
- Herbaceous Savory: Add 1 tablespoon of dried thyme or rosemary to the flour for a chicken pot pie or a tomato tart.
- Spiced Sweet: Whisk 1/2 teaspoon of cinnamon or ginger into the dry ingredients for an extra layer of warmth in fruit pies.
- Cheese Infusion: Toss 1/4 cup of finely grated sharp parmesan in with the butter shavings for a savory quiche base.
- Citrus Brightness: Add the zest of one lemon or orange to the flour to cut through the richness of a heavy chocolate or nut filling.
For another decadent treat that benefits from a sturdy, flavored crust, try using this base for a Southern pecan pie. The saltiness of the dough perfectly offsets the gooey sweetness of the pecans.
The Best Pairings for Your Homemade Bake
Once you have mastered this crust, the world of pies is your oyster. Because this recipe is so reliable, you can focus your energy on the fillings.
If you are going the savory route, this is the ultimate lid for a creamy chicken and vegetable stew. It holds up to the steam and stays crisp on top. For a weekend brunch, try blind baking the crust (baking it empty with weights) and filling it with a mixture of caramelized onions, gruyère cheese, and fresh eggs.
On the sweet side, this crust is a champion for "wet" pies like berry crumbles or custard tarts. The vinegar tenderized dough creates a barrier that resists sogginess better than most recipes. Serve your finished pie warm with a scoop of cold vanilla bean ice cream or a dollop of unsweetened whipped cream.
The contrast between the hot, flaky crust and the cold cream is one of life’s simplest and best pleasures. Trust me, once you see how fast and easy this is, you will never walk down the frozen aisle for a pre made crust again. Happy baking!

Recipe FAQs
How to make quick pie pastry?
Grate your frozen butter sticks using the large holes of a box grater to ensure even fat distribution without overworking the dough. Keep the flour mixture cold and use a light hand when drizzling the apple cider vinegar and ice water to maintain a shaggy, flaky texture.
What is the trick to making good pie crust?
Keep everything ice-cold until it hits the oven. If you enjoyed mastering the temperature control in this flaky crust, you can apply the same principle to our brown butter maple pumpkin pie for consistent results.
Is pie crust better with butter or crisco?
Butter is superior for flavor and texture. Using 226g of frozen unsalted butter provides the necessary moisture and distinct layers that create a high-quality, shatteringly crisp crust that lard or shortening simply cannot replicate.
What are the three main ingredients used to make pie dough?
The foundation consists of all-purpose flour, unsalted butter, and ice water. While sugar, salt, and apple cider vinegar are included for flavor and structural balance, the flour, fat, and hydration are the three primary components that define the final pastry structure.
Is it true I must knead the dough until smooth?
No, this is a common misconception. You should only mix the ingredients until the dough forms a shaggy mass; over kneading develops too much gluten, which results in a tough, chewy crust instead of a delicate, flaky one.
How to keep the crust from shrinking in the oven?
Chill the formed dough discs in the refrigerator for at least 1 hour before rolling them out. This step relaxes the gluten strands and firms up the butter shavings, preventing the pastry from pulling away from the edges of your pie dish during baking.
How long can I store the raw dough?
Keep the wrapped dough discs in the refrigerator for up to 3 days. Ensure they are wrapped tightly in plastic wrap to prevent the dough from drying out or absorbing other flavors while it sits in the cold.
Easy Pie Crust Recipe

Ingredients:
Instructions:
Nutrition Facts:
| Calories | 176 kcal |
|---|---|
| Protein | 2.2 g |
| Fat | 11.7 g |
| Carbs | 15.8 g |
| Fiber | 0.5 g |
| Sugar | 0.8 g |
| Sodium | 146 mg |
