Homemade Taco Shells the Crispy Crunch That Stops Store Buying

- The Untapped Potential of Proper Homemade Taco Shells
- Deep and Frying vs. Baking: Achieving the Optimal Crunch
- Shopping List: What You Need for Superior Shells
- The Right Gear: Tools for Structuring Perfect Homemade Taco Shells
- Prep Phase: Perfecting the Tortilla Softening Process
- The Frying Technique: Turning Flexible Discs into Rigid Vessels
- Troubleshooting Common Taco Shell Issues and Pro Tips
- Beyond the Fryer: Alternative Methods and Storage Solutions
- Recipe FAQs
- 📝 Recipe Card
The Untapped Potential of Proper Homemade Taco Shells
Okay, confession time. For years, I thought tacos meant those brittle, cardboard and tasting shells you buy in the yellow boxes. They’d break the moment you looked at them sideways. They had that weird, dusty flavor.
Then one day, I was chatting with a chef friend who casually dropped the bombshell: "You just fry the tortillas yourself, dummy." The simplicity floored me, but the results were life and changing. We’re not aiming for a sad, dry crunch here.
We are aiming for a crispy, fresh and corn snap that still has a hint of chewiness at the bottom. The whole point of making homemade taco shells is controlling the flavor from start to finish.
If you’re putting the effort into slow and cooking carnitas or making fresh salsa, why cheap out on the vehicle? Right?
Deep and Frying vs. Baking: Achieving the Optimal Crunch
This is where the rubber meets the road. If you want a truly phenomenal, restaurant and quality hard shell, you absolutely must fry them. I know, I know. It sounds messy. It sounds decadent. But the science is sound.
| Method | Texture Result | Flavor Profile | Time Commitment |
|---|---|---|---|
| Deep and Frying | Shatteringly crisp, holds shape perfectly. | Richer, deep corn flavor. | Quick (30 40 seconds per shell). |
| Baking | Dry, medium crunch, can crack easily. | Light, drier corn flavor. | Slower (7- 12 minutes per batch). |
Baking certainly works and we will cover that as a backup but frying is the method for ultimate crunch and structure. It’s quick, hot, and decisive.
The Flavour Upgrade: Fresh Corn vs. Boxed Dust
Those pre and packaged shells? They’re often made with cornmeal or finely ground flour and preservatives. When we make homemade hard taco shells , we are using high and quality, pre and made corn tortillas.
They are already cooked, steamed, and packed with that glorious, earthy corn flavor you associate with authentic Mexican food. When these hit the hot oil, they bloom. That fresh, slightly sweet corn flavor comes out beautifully and becomes the perfect counterpoint to any savory filling.
Honestly, don't even bother with low-fat cheese here. It's just not the same.
Understanding the Tortilla's Transformation Journey
The key is moisture. A dry, cold tortilla is brittle. Think about taking a dried sheet of pasta and trying to fold it. Snap! We need to temporarily reintroduce moisture (steaming is the best way) to make the starches pliable again. Once they are soft and warm, they go into the 350°F (175°C) oil.
The water in the tortilla instantly vaporizes, puffing up the corn structure while the heat rapidly cooks the exterior, setting that perfect U-shape permanently. This is why skipping the softening step is the number one cause of cracked shells. Been there. Done that.
Had a big pile of broken chips instead of tacos that night.
Safety First: Essential Deep and Frying Setup
Seriously, if you are deep and frying, invest the $15 in a proper thermometer. Don't guess. Oil that is too cold leads to greasy shells (they soak up the fat). Oil that is too hot burns them instantly. Keep a close eye on your Dutch oven or heavy skillet.
Never add water to hot oil, and keep kids and pets far away during the frying phase. This is an adult activity, requiring focus!
Shopping List: What You Need for Superior Shells
You need three things, maximum. Simple, right?
- High and Quality Corn Tortillas (6 inch standard size)
- Neutral Frying Oil (Canola, vegetable, or peanut work best)
- Fine Sea Salt (Must be fine so it sticks well)
The Right Gear: Tools for Structuring Perfect Homemade Taco Shells
The most important "tool" for this job is patience, but a second most important tool exists. It's the thermometer. Then, grab two sets of long and handled kitchen tongs. Trust me on the two tongs it makes the shaping much, much easier.
Selecting the Ideal Corn Tortilla Base
You absolutely need corn tortillas. If you grab the thick, chewy flour ones, they will soak up the oil and be heavy and greasy. Look for thin, flexible corn tortillas. I usually find the best ones in the refrigerated section of the grocery store, often near the specialty cheeses or deli.
The thinner they are, the lighter and crisper the final homemade taco shells will be.
Oil Deep Dive: Choosing the Best Fat for Frying
We need a high smoke point and a neutral flavor profile. Vegetable oil (or rapeseed oil, as my UK friends call it) is my standard go and to. Canola and peanut oil are also excellent choices. Avoid extra virgin olive oil (too low smoke point) and coconut oil (unless you use refined, flavorless coconut oil).
The oil should be about an inch deep in your pan.
A Note on Seasoning Your Shells Post and Fry
The seasoning needs to happen the instant the shell comes out of the oil. It’s hot, slightly moist, and the salt will stick beautifully. I use plain, fine sea salt because I want the corn flavor to shine. But if you want to dial it up?
- Mix 1/2 tsp of salt with 1/4 tsp of garlic powder and a pinch of cayenne.
- Try salt mixed with smoked paprika for a smoky vibe.
Related Recipes Worth Trying
- Spicy Guacamole The Best Homemade Fiery Lime Recipe — Spicy Guacamole is easy to make and features a proper fiery lime kick Learn the secret to this best homemade recipe using jalapeño and serrano Ready in 45...
- Proper Homemade Pozole Rojo The Rich Hearty Pork Hominy Stew — The ultimate hearty winter Pozole dish featuring forktender pork and a deeply smoky silken red chile broth Our secret straining step guarantees the...
- The Ultimate Crock Pot Candy Recipe Easy Homemade Peanut Clusters — Make Crock Pot Candy the foolproof way This slow cooker peanut clusters recipe uses Almond Bark for a perfect snap The ultimate quick and easy Christmas treat
Prep Phase: Perfecting the Tortilla Softening Process
If your tortillas are dry and cold, you fail. Period. The softening phase is non and negotiable if you want to avoid sadness and broken shells.
Warming Methods: Steaming for Pliability
Steaming is far superior to microwaving, though microwaving works in a pinch. Place a steamer basket over a pot of gently simmering water. Pop 4 to 6 tortillas in the basket, cover it, and steam them for about four minutes. They should be floppy, warm, and highly pliable.
Keep the rest covered in a clean, damp towel while you work, so they don't dry out.
The Frying Technique: Turning Flexible Discs into Rigid Vessels
Set up your station before you start: Oil heating, tortillas soft and ready, tongs ready, and the draining rack waiting.
Monitoring Oil Temperature for Consistent Results
Heat your oil slowly to 350°F (175°C). Seriously, if it starts climbing toward 375°F, pull the pan off the heat for a minute or two. Consistency is key to making how to make taco shells homemade turn out perfectly.
The Three and Second Hold: Shaping the U-Bend
Carefully slide one tortilla into the hot oil using one set of tongs. Fry it flat for about 10 seconds per side until it puffs up slightly. This makes the texture start to set. Now, this is the tricky bit:
- Gently fold the tortilla in half using your two sets of tongs. Don't press the edges shut! The oil needs to flow freely inside the U shape.
- Hold it firmly for 15 to 30 seconds. You’ll feel the shell stiffen.
- Once it holds its shape, release the tongs and let the shell finish frying freely for another 30 to 60 seconds until golden brown.
Proper Drainage and Post and Frying Care
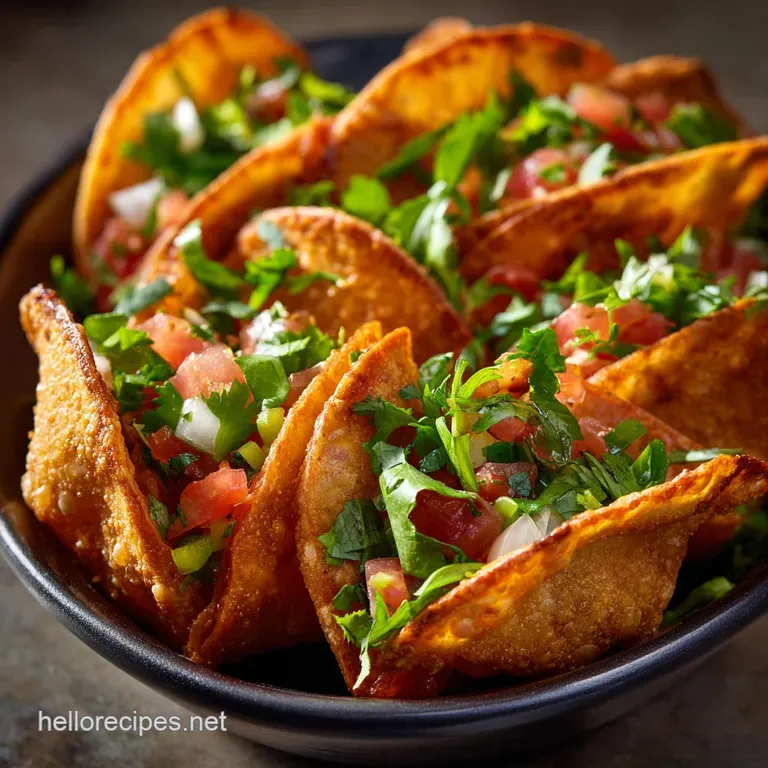
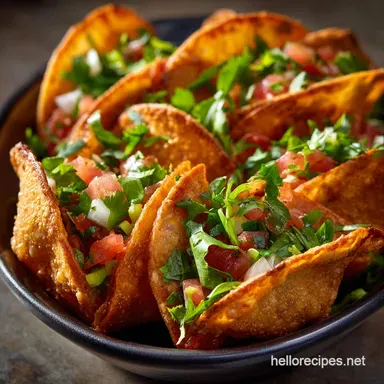
This is my secret weapon for anti and grease: Do not lay the shells flat on paper towels. They will steam and get soggy. Pull the shell out, give it a quick vertical shake over the pan, and immediately place it vertically (standing on its edge) on the cooling rack.
Resting them this way allows gravity to do the work and lets all that extra oil drain off. Salt them immediately!
Troubleshooting Common Taco Shell Issues and Pro Tips
WARNING: Never overcrowd the pot! If you put more than two tortillas in at once, the temperature of the oil will drop too fast, and they will become soggy and absorb too much fat. Slow and steady wins the crispness race.
Here are a few things I learned the hard way when mastering homemade taco shells from scratch :
- Issue: Cracking: Did you skip the steaming step? Yes, you did. Go back and soften them up.
- Issue: Greasy Shells: Your oil was too cold (under 325°F). Raise the temperature before frying the next batch.
- Pro Tip: If you only have one set of tongs, use a thin metal spatula to help gently hold the fold while the shell sets in the oil. It takes practice!
Beyond the Fryer: Alternative Methods and Storage Solutions
Okay, I hear you, frying is sometimes just too much effort. Thankfully, you can still achieve a decent homemade taco shells in the oven result.
The Oven Method: Baking Your Own Homemade Taco Shells
Preheat your oven to 375°F (190°C). Soften the tortillas (still necessary!), then lightly spray them on both sides with cooking spray. Now, drape them over the metal bars of your oven rack. They should hang naturally in the U-shape. Bake them for 7 to 12 minutes.
Watch them closely; they go from perfect to burnt charcoal very quickly. They won't be as rich or uniformly crisp as fried ones, but they get the job done! This is definitely the way to go if you want low and fat homemade taco shells .
Preventing Shells from Cracking or Burning
The biggest mistake people make in the oven is not softening the tortilla first. If you place a dry tortilla straight on the rack and heat it, it will immediately stress and crack right along the fold.
If they are burning, your oven might be running hot, or you didn't spray enough oil on them the oil helps them crisp up evenly without drying out too fast.
Optimal Storage Life for Freshly Prepared Homemade Taco Shells
These are best eaten within 24 hours. Honestly. They lose their maximum crunch pretty fast. If you absolutely must store them, let them cool completely, then place them in an airtight container lined with a paper towel at the bottom.
Keep them on the countertop, never in the fridge (humidity is the enemy of crunch). You can gently re and crisp them in a 300°F oven for about five minutes if they get a little sad the next day.
Nutritional Snapshot and Serving Suggestions
Yes, the fried method adds fat, obviously, but the flavor payoff is immense, and you are skipping all those preservatives. Filling the shells is where you need to be careful always drain your beef or beans well. Nothing ruins a fresh shell faster than a tablespoon of simmering liquid.
Try stuffing your perfect, crispy shells with slow and cooked shredded chicken (drained!) topped with a crunchy cilantro and lime slaw. It’s heaven. Forget the store and bought stuff; you just cracked the code to making the best taco night ever.

Recipe FAQs
My tortillas keep snapping when I try to fold them. What's the secret to shaping perfect Homemade Taco Shells?
Ah, that's a common pickle, and it all comes down to the crucial softening step. The secret to making beautiful, pliable Homemade Taco Shells without splitting is to steam them briefly or microwave them in a damp cloth beforehand; cold, dry tortillas are far too brittle for the folding stage.
Crikey, my shells turned out greasy! What did I do wrong with the frying oil?
The temperature is the likely culprit, old bean. If the oil drops below the required 350°F (175°C), the shells will absorb the fat like a sponge instead of crisping up quickly, so stick religiously to the specified temperature and only fry 1 2 shells at a time to keep the heat stable.
Can I make a huge batch of these ahead of time for a party, and how do I keep them fresh?
Absolutely, they’re excellent for prepping ahead! Once completely cooled, store the shells in a rigid, airtight container at room temperature for up to three days; if they’ve gone a little soft, a few minutes in a 300°F (150°C) oven before serving will restore that proper crunch.
Is the baked method just as crispy as the deep fried version, or is it a bit of a compromise?
The baked method is a magnificent choice if you're watching the waistline or avoiding the faff of deep fat frying, but the oil method undeniably delivers the supreme, heavy duty shatteringly crisp texture; think of the baked shells as a lighter, equally tasty alternative.
I only have flour tortillas on hand. Will they work instead of corn?
They will work, but you'll end up with a slightly different creature altogether. Flour tortillas make a softer, chewier shell, absorb more oil, and require a quicker fry time, meaning you won’t get that robust, classic crack of a corn shell still tasty, mind you!
Crispy Homemade Taco Shells Recipe
Ingredients:
Instructions:
Nutrition Facts:
| Calories | 1701 kcal |
|---|---|
| Protein | 4.1 g |
| Fat | 0.1 g |
| Carbs | 432.4 g |
