Mimosa Torta: the Golden Dawn Italian Recipe
- The Golden Flower: Unveiling the Classic Italian Torta Mimosa
- Why This Recipe Delivers the Perfect Textural Balance
- Essential Ingredients, Preparation, and Smart Swaps
- Step-by-Step Guide: Assembling Your Celebration Cake
- Troubleshooting and Expert Cake Decorating Techniques
- Storing Your Dessert: Shelf Life and Freezing the Cake
- Perfect Presentation and Recommended Pairings
- Recipe FAQs
- 📝 Recipe Card
The Golden Flower: Unveiling the Classic Italian Torta Mimosa
When you slice into this glorious yellow dessert, the scent of fresh vanilla, bright citrus, and subtle liqueur hits you right away. It’s light, impossibly fluffy, and truly tastes like eating sunshine.
This isn't just a cake; it’s a celebration, and frankly, the only thing that should be called a Mimosa on a special occasion, besides perhaps a fantastic brunch cocktail.
Look, I love baking, but I hate unnecessary effort. The beauty of the Mimosa cake, or Torta Mimosa as the Italians call it, is that while it looks utterly magnificent and complicated, it relies on two basic, time tested building blocks: an airy sponge ( Pan di Spagna ) and a silky pastry cream ( Crema Pasticcera ).
It’s cheap to make, adaptable, and a massive crowd pleaser.
So, ditch the dry, crumbly recipes you’ve seen online. After years of perfecting this beautiful dessert, I’m finally sharing the version that gets it right every single time. This is the Mimosa recipe you need, designed for success and maximum textural enjoyment.
Let’s get this Italian masterpiece baked.
Why This Recipe Delivers the Perfect Textural Balance
The real magic of the best Mimosa cake is the contrast. You need the sponge to be so dry initially that it eagerly accepts the syrup, and you need the pastry cream to be rich but light enough that it doesn't compress the sponge layers.
What is a Torta Mimosa? The Essential Components
A true Torta Mimosa relies on three perfectly balanced elements. First, the Pan di Spagna: this high volume sponge uses no chemical leavening, getting all its height and lightness from whipped eggs, making it the ideal base for soaking up flavor.
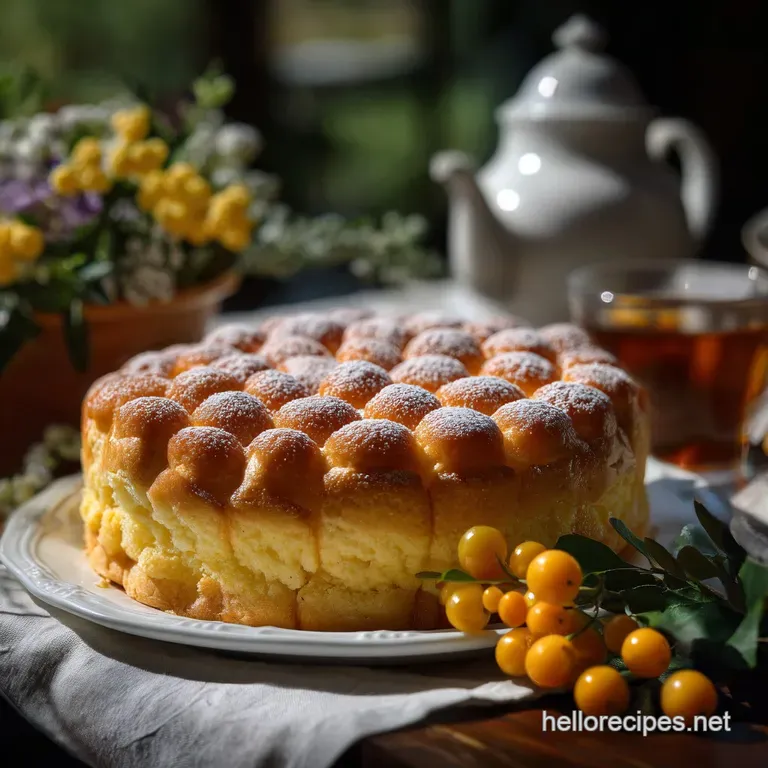
Second, the Crema Pasticcera, a thick, vanilla and citrus custard that acts as the rich filling. And finally, the iconic appearance small, feathery sponge cubes dusted all over the cake to mimic the yellow Mimosa flowers blooming in spring.
A Symbol of Spring: The History Behind the Cake
The Mimosa cake holds special significance in Italy, particularly on March 8th for Festa della Donna (International Women’s Day). The beautiful, tiny yellow flower, which blooms around that time, is given as a gesture of appreciation, and naturally, someone brilliant decided to turn it into an edible form.
It's not just a beautiful dessert; it carries a lovely cultural message of warmth and softness.
Torta Mimosa vs. The Cocktail: Culinary Confusion Cleared Up
Yes, I know what you’re thinking: isn't a Mimosa something you drink at brunch? It is! But trust me, the Italian Mimosa cake is the superior namesake. While the drink is bubbly and citrusy, the cake takes that bright, floral yellow color and transforms it into a dessert that tastes like a sunny day. If you want the drink version, I do have a brilliant Sunrise Strawberry Mimosa Recipe The Best Brunch Sparkler over here, but today, we focus on the dessert.
The Secret to Lightness: Mastering the Pan di Spagna Sponge
We are aiming for a sponge that feels like a cloud. The trick here is patience with the eggs. You must whip the room temperature eggs and sugar on high speed until they reach the "ribbon stage," which takes a full 10 to 12 minutes.
The mixture should fall off the whisk in a thick ribbon that holds its shape for a moment before dissolving. If your eggs don't reach this stage, your sponge will be flat, dense, and tragic.
Achieving the Velvety Custard Cream Filling (Crema Pasticcera)
My recipe includes heavy cream alongside the milk in the pastry cream, which adds incredible richness and stability. This prevents the filling from weeping or flattening under the weight of the sponge layers later on.
The pastry cream must be thoroughly chilled at least three hours before you use it, or your Mimosa will slide right off the plate.
The Role of Citrus Zest in Elevating the Flavor Profile
The sponge uses lemon zest, and the pastry cream uses orange zest. This slight variation ensures the cake isn't one-note; the lemon provides a high, bright note in the cake itself, while the orange zest deepens the richness of the creamy filling.
You need those micro particles of oil to give the Mimosa that fresh, non-stale flavor that commercial bakeries often miss.
Essential Ingredients, Preparation, and Smart Swaps
Getting the right ingredients makes assembling this Mimosa much easier, so read this section before you start!
Detailed List: Components for the Sponge, Syrup, and Pastry Cream
| Component | Key Ingredient | Why It Matters | Smart Swap |
|---|---|---|---|
| Sponge | Room Temperature Eggs | Essential for volume and lightness. | If cold, place eggs in warm water for 5 minutes. |
| Cream | Egg Yolks | Provide richness and thickening power. | No yolks? Use 4 Tbsp extra cornstarch for thickening, but flavor suffers. |
| Syrup | Limoncello (Optional) | Adds complexity and moisture. | Extra orange juice or a splash of vanilla extract for alcohol free version. |
| Dry | Cake Flour (Preferred) | Creates a lighter crumb structure. | Substitute 1:1 with standard all-purpose flour, but ensure it is heavily sifted. |
Choosing the Right Dairy: Heavy Cream vs. Mascarpone for Filling Stability
While traditional crema pasticcera is just milk, sugar, and eggs, I highly recommend folding stabilized whipped cream or a bit of mascarpone into the chilled custard before assembly.
This creates crema diplomatica , which is lighter and holds up better, especially if your Mimosa needs to sit out for a while. If you choose mascarpone, use it cold, whisking gently until just combined with the cream.
gluten-free Sponge and dairy-free Cream Modifications
If you need a gluten-free Mimosa cake recipe, fear not! You can absolutely swap out the standard flour for a high-quality 1:1 gluten-free blend. Ensure the blend contains xanthan gum, which mimics the structure lost without gluten.
For the cream, swap out all dairy for full fat canned coconut milk, using only the thick cream layer. The coconut flavor is mild and actually pairs beautifully with the citrus in this Mimosa dessert.
Prepping Your Components: Room Temperature and Zest Requirements
The biggest mistake people make is using cold ingredients. Everything the eggs, the milk for the custard (when heating), and even the syrup when soaking should be considered. Ensure the zest is grated finely using a microplane; you want flavor, not big white pieces of bitter pith.
Chef's Note: Remember, once the Pan di Spagna is baked, the syrup MUST be cold before you apply it. Applying cold syrup to warm cake, or warm syrup to cold cake, results in a soggy, broken texture. Both should be cool or room temp.
step-by-step Guide: Assembling Your Celebration Cake

This sounds like a lot, but we break it down into four manageable phases. Trust me, the result is the best Mimosa cake you'll ever taste.
Phase I: Baking and Cooling the Pan di Spagna Layers
First, preheat your oven to 340°F (170°C). Prepare two 8 inch round cake tins, lining the bottom with parchment paper and leaving the sides bare this helps the sponge climb. Now, whip those room temp eggs and sugar for the full 10 minutes until you get that glorious ribbon.
Fold in your sifted flour and lemon zest gently , using a large spatula to cut down the middle and bring the batter up and over. Divide the batter and bake for about 30 minutes, or until golden and springy to the touch.
Phase II: Preparing the Simple Syrup and Luxurious Pastry Cream
While the cakes cool, make the syrup by heating water and sugar until dissolved, then stirring in the orange juice and Limoncello. Set this aside to cool completely. For the pastry cream, whisk your egg yolks, sugar, and cornstarch until pale and thick.
Gently heat the milk and cream until simmering, then slowly pour about a third of the hot milk into the egg mixture while whisking constantly this is tempering, and it prevents scrambled eggs!
Return the entire mix to the saucepan and cook, stirring vigorously, until it thickens enough to coat the back of a spoon and bubbles slowly for 60 seconds. Chill immediately, covering the surface with plastic wrap to prevent skinning.
Phase III: The Key to Fluffy Crumb: Cutting the Sponge for Decoration
This is where your Mimosa gets its distinctive look. Take one entire cooled sponge and a sharp serrated knife. Carefully slice off the browned top and sides we want that bright yellow interior only. Now, cut the clean sponge into tiny, uniform 1/2 inch cubes.
These are your "mimosa petals," and uniformity is critical for that signature fluffy look. Next, take the second sponge cake and carefully slice it horizontally into two even layers. You now have three layers ready for filling and a pile of beautiful crumb.
Phase IV: Layering, Soaking, and Final Assembly of the Torta
Place the bottom layer of sliced sponge onto your serving platter. Brush it generously with the cold citrus syrup; you want it moist, but not dripping. Spread half of your chilled pastry cream evenly. Top with the second sliced layer, soak again, and spread the remaining cream.
Finally, place the last whole layer on top. Apply a thin layer of cream (or softly whipped heavy cream) to the entire top and sides of the cake this is the glue. Gently press the tiny sponge cubes onto the entire surface.
Press them lightly until the whole cake is covered in that glorious, fluffy yellow texture. Chill the finished Mimosa for at least two hours before slicing.
Troubleshooting and Expert Cake Decorating Techniques
It’s easy to stress over a showstopper like the Italian Mimosa cake, but most problems come down to two steps: the sponge volume or the cream consistency.
Preventing the Sponge from Drying Out (Syrup Application Tips)
The Pan di Spagna is famously dry, which is why the citrus syrup is non-negotiable for this Mimosa cake recipe. If you worry about over soaking, simply use a brush and give each layer a slow, even coat. Focus on the edges and the top, as the centre often stays slightly moister.
Remember, the syrup should taste delicious on its own it adds flavor, not just moisture.
Achieving the Signature "Mimosa" Crumb Texture (Dicing Technique)
The iconic texture is why we love the Mimosa . If your crumbs look shaggy or huge, the overall effect is lost. Use a very sharp serrated knife, and try to make your cuts as clean and small as possible, aiming for uniform, tiny squares. Only use the soft, yellow interior; discard all crusts.
Why Your Pastry Cream Broke: Common Mistakes to Avoid
Pastry cream breaks for two reasons: You heated it too fast or you didn't whisk vigorously enough when tempering. If it separates or looks curdled, try blitzing it with an immersion blender while it's still warm. This can sometimes save it, forcing the emulsion back together.
If you failed to whisk continuously while cooking, you probably scorched the bottom, in which case, you’ll have to start over.
Storing Your Dessert: Shelf Life and Freezing the Cake
Does this stunning Mimosa last? Only if you can resist eating it! Here is what you need to know about keeping this spring celebration cake fresh.
How Long Does Torta Mimosa Last in the Refrigerator?
Because this Mimosa dessert relies on a dairy and egg custard filling, it must be refrigerated. Covered tightly with plastic wrap or stored in an airtight container, it will last beautifully for 3 to 4 days. The flavors actually deepen overnight, making it a fantastic make-ahead option.
Can I Freeze the Baked Sponge Cake Layers?
Yes! And this is a huge time saver. Bake your Pan di Spagna layers, let them cool completely, wrap them tightly in plastic wrap (then foil), and freeze for up to two months. Defrost them overnight in the fridge before you make your syrup and cream.
Do not, however, try to freeze the assembled, cream filled Mimosa cake. The custard will separate and become watery upon thawing.
Tips for Transporting a Cream Filled Cake Safely
If you’re taking your glorious Italian Mimosa to a party, ensure it stays level and cold. Transport it in a large cooler packed with ice packs. The chilling process is what keeps the structure of the crema pasticcera firm, so cold is your best friend when moving this delicate beauty.
Perfect Presentation and Recommended Pairings
This cake is already a showstopper, but a few simple touches can really make your Mimosa sparkle. A light dusting of powdered sugar over the top helps the sponge crumbs look even more like fuzzy Mimosa flowers.
I also love adding a tiny scattering of blueberries or raspberries around the base for a contrasting color pop.
The citrus notes in this Mimosa dessert pair beautifully with sharp flavors. Try serving it with a strong espresso, or perhaps a small, cold glass of Vin Santo. Alternatively, if you're a fan of combining flavors, consider following up with a tart and creamy bite of something like my MimosaInspired Lemon Orange Curd Tart Recipe . Enjoy baking this glorious, classic Mimosa !

Recipe FAQs
Why did my Pan di Spagna (sponge cake) turn out dense instead of airy?
This is usually caused by overmixing the batter after adding the flour, which deflates the volume built into the eggs. Ensure you fold the flour in gently using a spatula, stopping as soon as the last streaks of dry ingredients disappear.
What is the traditional filling, and can I use a different cream for the Torta Mimosa?
The traditional filling is Diplomat Cream (Crème Diplomate), which is Pastry Cream folded with whipped cream for a light, stabilized texture. While traditional, you can substitute it with stabilized Mascarpone Cream or a light Lemon Curd mixed with whipped cream for variations in flavor.
My finished cake tastes a bit dry. What should I do next time?
The dryness results from insufficient simple syrup applied to the sponge layers. Use a generous amount of cool simple syrup (or liqueur infused syrup) to thoroughly moisten both sponge layers before adding the cream filling, allowing the cake to absorb it fully.
How do I ensure the cake crumbs look like the fluffy Mimosa flowers?
The secret is using the cake trimmings from the top and sides, ensuring they are slightly dry before crumbling them. For the best result, pulse them very briefly in a food processor or rub them through a fine sieve to achieve an even, airy texture for coating.
How far in advance can I assemble the Torta Mimosa, and how should I store it?
Because of the fresh cream filling, the Torta Mimosa is best assembled no more than 24 hours in advance. Store the finished cake covered in the refrigerator and let it sit at room temperature for about 20 30 minutes before serving to ensure the cream is palatable.
Can I add liqueur to the simple syrup used for soaking the cake?
Yes, adding liqueur is a popular way to enhance the flavor. Traditional choices include Limoncello, Grand Marnier, or Maraschino. Start with about 1 tablespoon of liqueur per half cup of simple syrup to ensure the flavor is complementary but not overpowering.
Is it possible to make this cake gluten-free?
The Torta Mimosa can be successfully adapted to be gluten-free by adjusting the Pan di Spagna recipe. Substitute the standard flour with an equal weight of finely ground almond flour blended with a neutral starch like cornstarch or potato starch to maintain the essential light structure.
Classic Italian Torta Mimosa

Ingredients:
Instructions:
Nutrition Facts:
| Calories | 1108 kcal |
|---|---|
| Protein | 28.4 g |
| Fat | 43.0 g |
| Carbs | 122.6 g |
